
In this printer drivers installation and troubleshooting guide, I cover various unattended installation methods and common errors (including solutions). This article is not only relevant to Citrix Virtual Apps and Desktops but applies to regular client installations as well.
Printing is a very complicated and encompassing topic. One article cannot deal with all aspects of printing. This article only deals with the installation and troubleshooting of printer drivers and does not cover topics such as printing pathways, the Citrix Universal Print Driver and Server, printing isolation, or printing formats such as EMF and XPS. For these topics, I recommend you to read Bas van Kaam’s excellent publication: The ultimate Citrix printing internals cheat sheet (version 2.0).
The installation of printer drivers, especially unattended, can be a daunting task. First of all, there are various installation methods to choose from. Secondly, all sorts of problems may arise, the solution of which is not always straightforward.
I hope that this article may be of some help to you. In the sections below, you find a list of the main unattended installation methods as well as a detailed description of some of the common problems and their solution.
The installation methods apply to both model-specific and universal printer drivers. The universal printer driver is “one driver to rule them all” and supports most or at least many of the vendor’s various printer models. The advantage of a universal printer driver is that you only need to install one driver to support all vendor-specific printer models.
However, in some cases, you may require a model-specific drive if, for example, the universal printer driver does not support a specific feature.
Printer drivers source files
Printer driver source files consist of a variety of files, such as:
- BMP (e.g. for images used in the Devices and Printers GUI)
- DLL (containing the core code and functions)
- CHM (help files)
- INI (configuration settings)
- DAT (data files)
- CAT (security catalog)
- INF (the setup information file)
Each time a driver is installed, Windows looks in the INF file for the line Catalogfile=filename.cat, then finds the specified CAT file and verifies the digital signature. It then verifies each file against the cryptographic checksum value that is recorded in the signed catalog file. If a signature is not trusted or a file’s cryptographic checksum is not the same as the original, the installation will end with a warning or error.
Reference: http://download.microsoft.com/download/a/f/c/afcf8195-0eda-4190-a46d-aa60b45e0740/driver2.ppt (link no longer valid)
The INF file
The INF file is the setup information file. This file is responsible for “guiding” and organizing the installation of the printer driver.
The most important sections of the INF file are these:
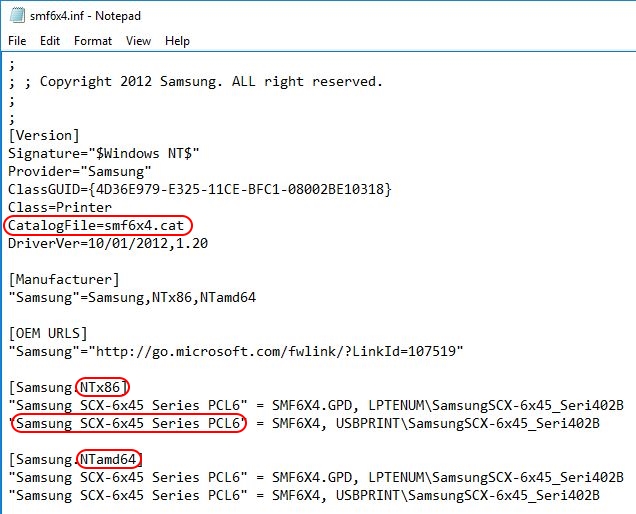
- The location of the catalog file
- The exact name of the printer driver(s)
- The supported system architectures (one driver can include multiple types):
- 32-bit (NTx86 in the INF file)
- 64-bit (NTamd64 in the INF file)
- Itanium (NTia64 in the INF file)
- The list of source files to be copied to the local system during installation (see also the following paragraph The CAT file)
The printer driver source files may contain more than one INF file.
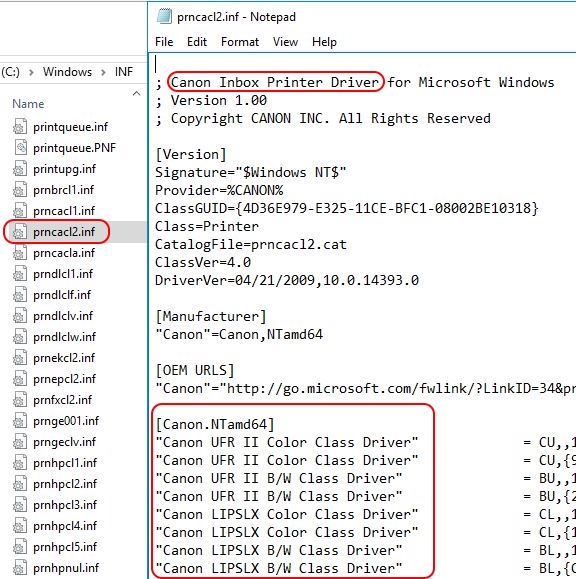
The CAT file
| Disclaimer: in this section, I present some examples of potential printer driver installation errors. I used a Samsung driver to simulate these errors. Please understand that this is for demonstration purposes only! I purposely manipulated these drivers to be able to demonstrate installation errors and warning messages. Do not interpret my examples as bad advertising regarding Samsung printers and printer drivers. This is NOT my intention. Thank you for your understanding! |
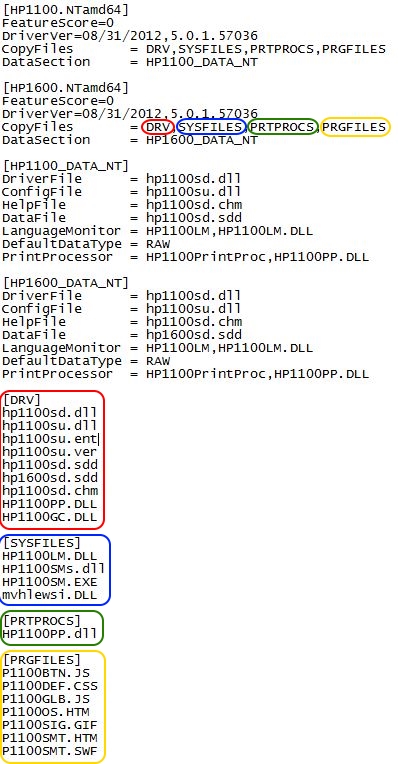
The CAT file is the security catalog file. As per Microsoft, “the catalog (.cat) file contains the digital signature for all the files which are part of the driver package”.
The catalog file contains a collection of cryptographic hashes, or thumbprints, for each of the files that are included in the CopyFiles section of the INF file. For example:
In case the cryptographic checksum of one of the files does not match, the installation will end in an error. The error message will contain the word tampered or tampering.
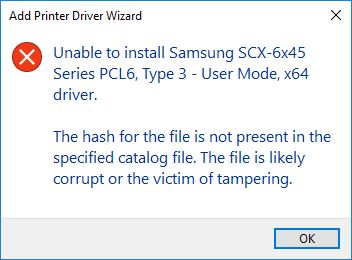
In this case, you either have to obtain a new version of the printer driver, or create a new catalog file. If you need to create a new catalog file yourself, please see the section INF hash is not present in the catalog. Driver package appears to be tampered in this article for a detailed explanation.
The catalog file itself has to be signed with a certificate and the publisher (the issuer) of the certificate has to be trusted. If the catalog file has not been signed or the publisher is not trusted, the installation will halt.
The Add Printer Driver Wizard shows whether a driver is digitally signed or not. In the screenshot below the driver is digitally signed.

The following screenshot shows the notification This driver is not digitally signed!. This means that either the driver is not signed or that the driver is signed, but the certificate is not trusted.
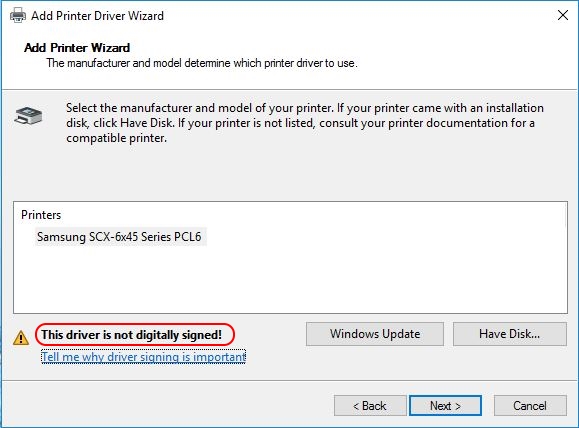
When a file is digitally signed, the tab Digital Signatures is present in the properties of the catalog file. A file that is not digitally signed does not have this tab. If you have an unsigned printer driver, please see the section Unsigned printer drivers in this article.
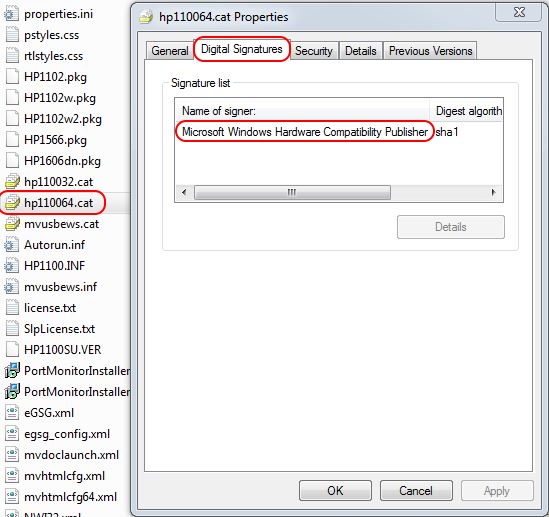
The publisher of the certificate has to be trusted. This is a requirement for a successful installation. When the certificate descends from a main Microsoft certificate, the driver goes through the regular WHQL process and is therefore trusted. One example is the certificate Microsoft Windows Hardware Compatibility Publisher in the screenshot above.
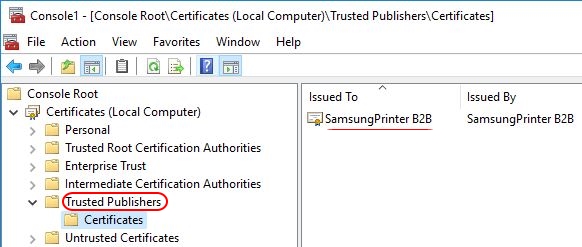
If the certificate is from a third party, it may not be trusted. You need to make sure that the publisher certificate is present in the Trusted Publishers certificate store (local computer) on your local server.
To avoid installation issues, make sure that the publisher is trusted before triggering the (unattended) installation. For more information see the section Untrusted printer drivers in this article.
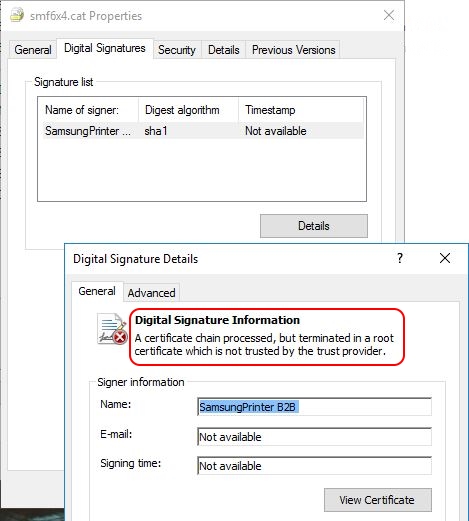
I want to share an interesting fact with you. When the publisher certificate has been added to the Trusted Publishers store, the driver will be trusted for installation. However, when opening the certificate to view its contents, the certificate is still marked as untrusted. Let me explain.
When installing a printer driver, the publisher is checked against certificates present in the Trusted Publishers store. When opening a certificate file to see its contents, the certificate store Trusted Root Certification Authorities (and, if applicable, the store Intermediate Certification Authorities) is checked.
In the screenshot below you see that the certificate is not trusted when opened (Properties \ Digital Signatures \ Details), even though it was trusted during the installation.
If you want the publisher to be trusted under all circumstances, add the certificate to both the Trusted Publishers and Trusted Root Certification Authorities store.
Default printer drivers included in Windows
As you probably know, the Windows operating system ships with a whole bunch of printer drivers. What this means is that the source files of these drivers are included in Windows, but that does not mean that these drivers are installed.
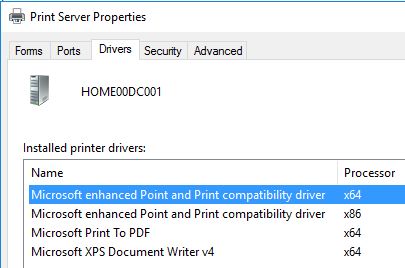
To see which printer drivers are currently installed, open the Control Panel and go to Devices and Printers. Click on an existing printer to make the button Printer server properties appear in the top menu. Open the Printer server properties and go to the Drivers tab. Here you will find the currently installed printer drivers.
In the following chapter, Unattended printer driver installation, I describe various methods for the unattended installation of printer drivers. Although the installation methods may be different, each method requires source files (including the INF file) and the exact name of the printer as written in the INF file. See the section Printer driver source files in this article for more information.
When you want to install a printer driver from external source files, obtaining the name and path of the INF file as well as the printer name is easy. You simply open the INF file and look for the name (as shown in the paragraph The INF file).
But what if you want to perform an unattended installation of a printer driver whose source files are already included in Windows? How will you retrieve the name and the location of the INF file as well as the exact printer name? Well, I may be able to help out here.
First of all, the printers known to Windows are listed in multiple INF files. These files are located in the directory %WinDir%\inf, which by default is C:\Windows\inf. Printer driver INF files always start with the same first three letters: prn. The extension is .inf.
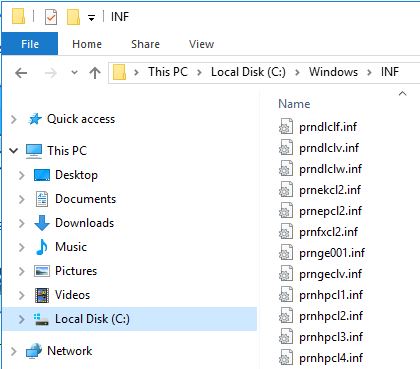
Open an INF file with your favorite text editor (e.g. Notepad) to see the list of printers for which it provides a driver.
Windows Server 2016 build 1607 ships with a total of 39 printer driver INF files. These 39 INF files include a total of 1253 printers. How do I know this? Well, I manually counted all printers listed in all INF files. No, just kidding, I had my colleague count them for me. 🙂 OK, OK, I will get serious now. I wrote a small PowerShell script that reads the printer names from all available INF files.
|
1 2 3 4 5 6 7 8 9 10 11 12 13 14 15 16 17 18 19 20 21 22 23 24 25 26 27 28 29 30 31 32 33 34 35 36 37 38 39 40 41 42 43 44 45 46 47 48 49 50 51 52 53 54 55 56 57 |
#========================================================================== # # LIST ALL PRINTER DRIVERS INCLUDED IN THE LOCAL OPERATING SYSTEM # # AUTHOR: Dennis Span (https://dennisspan.com) # DATE : 19.08.2017 # # This script has been designed for and tested on the following operating systems: # -Windows Server 2008 R2 SP1 # -Windows Server 2012 R2 # -Windows Server 2016 build 1607 # -Windows 7 Enterprise SP1 # -Windows 10 build 1703 # # This script works on 32-bit and 64-bit operating systems (probably not on Itanium) #========================================================================== $INFFiles = Get-ChildItem -Path (Join-Path $env:SystemRoot "inf\*") -Include "prn*.inf" | sort-object $x = 0 foreach ($File in $INFFiles) { #write-host "$($File.Name) , $File" $INFFileText = Get-Content $File # Set the correct keyword required to search the INI file. The keyword depends on the operating system's architecture switch ((Get-WmiObject Win32_OperatingSystem).OSArchitecture) { "32-bit" { $Keyword = ".NTx86]" } "64-bit" { $Keyword = ".NTamd64]" } default { $Keyword = "Unknown" } } if ( $Keyword -eq "Unknown" ) { Write-Host "Error: the operating system's architecture could not be determined. This script will now quit." Exit 1 } else { # Read each line of the INF file and locate the line containing the text stored in the variable $Keyword. Extract the part before the dot (.). This is the name of the vendor. foreach ($Line in $INFFileText ) { # Read each line of the INF file if ( $Line.Contains(".NTamd64]" )) { # Locate the line containing the text stored in the variable $Keyword $Vendor = (($Line.Split("."))[0]).Substring(1) # Split the line on the dot (.) and read the part before the dot. This is the name of the vendor. } } # Now that we have the name of the vendor, loop through the contents of the INF file once again to retrieve the list of printers. foreach ($Line in $INFFileText ) { # Read each line of the INF file (again) if ( $Line.StartsWith("""$Vendor ") ) { # Find the line that starts with the following text: "%VendorName%%Space% -> e.g. "Canon + space $x++ # Increase the variable $x by 1. This variable serves as a counter and counts the total number of available printers. $PrinterName = ($Line.Split(""""))[1] # Split the line on the " character and retrieve the name of the printer Write-Host "$PrinterName; $File" # Write the name of the printer on the screen including the path and name of the INF file } } } } Write-host "" write-host "Total number of INF files found: $($INFFiles.count)" write-host "Total number of available printers found: $x" |
The output of the script is a list of all available printer drivers (their exact names as written in the INF file) including the path to the INF file. And exactly these two variables are required for an unattended installation.
This script has been created for and tested on:
- Windows Server 2008 R2 SP1
- Windows Server 2012 R2
- Windows Server 2016 build 1607
- Windows 7 Enterprise SP1
- Windows 10 build 1703
The script automatically detects the operating system’s architecture. It supports 32-bit and 64-bit processors (not Itanium).
Execute the script as follows, for example:
powershell.exe -file “C:\List all printer drivers included in OS.ps1”
In case you get a security warning, set the execution policy to allow the script to run:
powershell.exe -executionpolicy unrestricted -file “C:\List all printer drivers included in OS.ps1”
Would you like to know how many printers are included by default in other Windows operating systems? Simply run the aforementioned script. Since I was curious myself, I checked several Windows versions and this was the result:
- Windows 7: 1785 printers in a total of 103 INF files
- Windows Server 2008 R2 SP1: 1785 printers in a total of 103 INF files
- Windows Server 2012 R2: 1242 printers in a total of 37 INF files
- Windows Server 2016 build 1607: 1253 printers in a total of 39 INF files
- Windows 10 build 1703: 1257 printers in a total of 41 INF files
When you are preparing the unattended installation of a printer driver, you will know the name of the vendor of the printer (e.g. HP, Canon, whatever). With a small modification of the above script, we can search for all available printer drivers for that particular vendor. This significantly reduces the output. In the script below, I search for all available printer drivers for Canon printers. You can change the name of the vendor in the variable $VendorName in line 18.
|
1 2 3 4 5 6 7 8 9 10 11 12 13 14 15 16 17 18 19 20 21 22 23 24 25 26 27 28 29 30 31 32 33 34 35 36 37 38 39 40 41 42 43 44 45 46 47 48 49 50 51 52 53 54 55 56 57 58 59 60 61 |
#========================================================================== # # LIST ALL PRINTER DRIVERS (FOR ONE PARTICULAR VENDOR) INCLUDED IN THE LOCAL OPERATING SYSTEM # # AUTHOR: Dennis Span (https://dennisspan.com) # DATE : 19.08.2017 # # This script has been designed for and tested on the following operating systems: # -Windows Server 2008 R2 SP1 # -Windows Server 2012 R2 # -Windows Server 2016 build 1607 # -Windows 7 Enterprise SP1 # -Windows 10 build 1703 # # This script works on 32-bit and 64-bit operating systems (probably not on Itanium) #========================================================================== $VendorName = "Canon" $INFFiles = Get-ChildItem -Path (Join-Path $env:SystemRoot "inf\*") -Include "prn*.inf" | sort-object $x = 0 foreach ($File in $INFFiles) { #write-host "$($File.Name) , $File" $INFFileText = Get-Content $File # Set the correct keyword required to search the INI file. The keyword depends on the operating system's architecture switch ((Get-WmiObject Win32_OperatingSystem).OSArchitecture) { "32-bit" { $Keyword = ".NTx86]" } "64-bit" { $Keyword = ".NTamd64]" } default { $Keyword = "Unknown" } } if ( $Keyword -eq "Unknown" ) { Write-Host "Error: the operating system's architecture could not be determined. This script will now quit." Exit 1 } else { # Read each line of the INF file and locate the line containing the text stored in the variable $Keyword. Extract the part before the dot (.). This is the name of the vendor. foreach ($Line in $INFFileText ) { # Read each line of the INF file if ( $Line.Contains($Keyword)) { # Locate the line containing the text stored in the variable $Keyword $Vendor = (($Line.Split("."))[0]).Substring(1) # Split the line on the dot (.) and read the part before the dot. This is the name of the vendor. } } # Now that we have the name of the vendor, loop through the contents of the INF file once again to retrieve the list of printers. foreach ($Line in $INFFileText ) { # Read each line of the INF file (again) if ( $Line.StartsWith("""$Vendor ") ) { # Find the line that starts with the following text: "%VendorName%%Space% -> e.g. "Canon + space if ( $VendorName -eq $Vendor ) { # Only list printers for the vendor specified in the variable $VendorName in the beginning of this script $x++ # Increase the variable $x by 1. This variable serves as a counter and counts the total number of available printers. $PrinterName = ($Line.Split(""""))[1] # Split the line on the " character and retrieve the name of the printer Write-Host "$PrinterName; $File" # Write the name of the printer on the screen including the path and name of the INF file } } } } } Write-host "" write-host "Total number of INF files found: $($INFFiles.count)" write-host "Total number of available printers found: $x" |
Adding printer drivers to the Windows driver store
It is possible to add printer drivers to the Windows driver store (pre staging). Adding a driver to the Windows driver store does not install the printer driver. It merely adds the printer driver source files to the operating systems for future use. Future use in this case means one of the following:
- The driver is installed at a later time using methods 1 to 4 in the section Unattended printer driver installation.
- The driver is installed automatically during a Plug and Play operation, for example when a printer that requires this particular driver is connected.
The tool to add drivers to the driver store is PnPUtil.exe. This executable file is included by default in every version of Windows, starting with Windows Vista. This is what the command looks like:
pnputil.exe /a C:\Temp\MyPrinterDriver\MyINFFile.INF
The following command adds the drivers to the driver store and installs the driver:
pnputil.exe /a /i C:\Temp\MyPrinterDriver\MyINFFile.INF
You can execute these commands directly from the command line. For unattended installations, you can add these commands to a script or directly to an SCCM or MDT task sequence.
In case you ever want to remove the driver from the store, please read the following statement by Microsoft; “When you add a driver package to the driver store by using the /a switch, Windows uses a different name (published name) for the driver package’s INF file. You must use the published name of the INF file for the PublishedInfFileName parameter of the /d switch”.
For more information, please see the Microsoft article https://learn.microsoft.com/en-us/windows-hardware/drivers/devtest/pnputil. The command syntax is described here: https://docs.microsoft.com/en-us/windows-hardware/drivers/devtest/pnputil-command-syntax.
Source file location of installed printer drivers
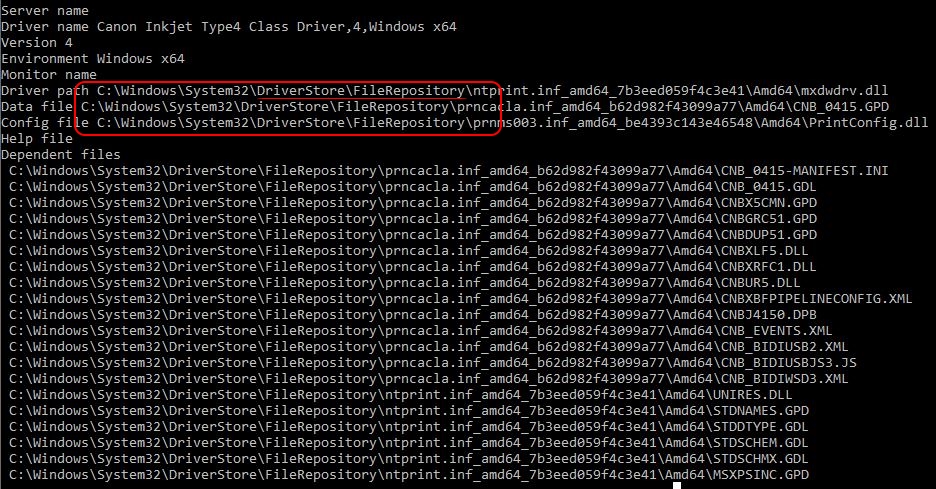
To see detailed information concerning installed printer drivers, execute the following command:
cscript “C:\windows\system32\Printing_Admin_Scripts\en-US\prndrvr.vbs” -l
The image below shows you the details of a driver for an HP LaserJet P1102 printer, such as printer name, version, architecture, and the location of the main source files after installation. During installation, the source files are copied to the directory C:\Windows\system32\spool\DRIVERS\x64.
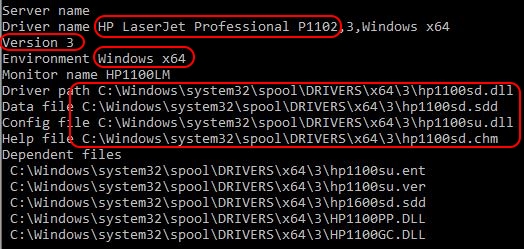
Please note the different source file locations for drivers that are included in the Windows driver store (C:\Windows\System32\DriverStore\FileRepository).
Unattended printer driver installation
In this section, I present five methods for the unattended installation of printer drivers. Even though the installation methods may be different, each method requires the path to the printer driver source files especially the INF file, as well as the exact name of the printer as written in the INF file.
If you are installing an external printer driver not included in the Windows driver store, read the paragraph The INF file to learn how to retrieve the exact name of the printer driver.
If you want to install a printer driver already included in the Windows store, please see the chapter Default printer drivers included in Windows. In this chapter, I explain how to retrieve the path and name of the INF file as well as the exact name of the printer driver.
Method 1: using PRNDRVR.vbs
Operating systems: all
One of the oldest methods to install a printer driver unattended is to use the default Microsoft VBScript prnddrvr.vbs. This file has been around forever. Its location changed over time though. Initially, the file was located in the directory C:\Windows\System32. In newer operating systems, the file is located in the directory C:\windows\System32\Printing_Admin_Scripts\en-US.
For the sake of completeness, this directory also contains other scripts for managing printer objects, ports, and jobs:
- prncnfg.vbs -> get and set printer configuration
- prnjobs.vbs -> manage print jobs (pause, resume, cancel, and list jobs)
- prnmngr.vbs -> manage printer objects (add, delete, and list printers)
- prnport.vbs -> manage printer ports (add, delete, and list ports)
- prnqctl.vbs -> control printers (pause, resume, and purge printers)
- pubprn.vbs -> publish printers (old, applies to Windows 2000)
Here is an example of how to install a printer driver from the Windows driver store using the VBScript prnddrvr.vbs:
cscript “C:\Windows\System32\Printing_Admin_Scripts\en-US\prndrvr.vbs” -a -m “Canon Inkjet Type4 Class Driver” -v 3 -e “Windows x64” -i “C:\Windows\inf\prncacla.inf“
Here is an example of how to install a printer driver not present in the Windows store using the VBScript prnddrvr.vbs:
cscript “C:\Windows\System32\Printing_Admin_Scripts\en-US\prndrvr.vbs” -a -m “HP LaserJet Professional P1102” -v 3 -e “Windows x64” -i “C:\Temp\HP_1100\HP1100.INF“
These commands also work on the latest editions of Windows Server 2016 and Windows 10 (I have tested them).
Let’s take a closer look at the structure of the command line:
cscript(.exe)*
This executable file is the command-line version of the Windows Script Host required to execute VBscripts.
prndrvr(.vbs)*
The VBScript file is used to install the printer driver.
-a
This parameter tells the VBScript to install the driver (as opposed to the parameter -d which deletes the driver).
-m “HP Universal Printing PCL 6 (v5.5.0)”
The name of the driver you want to install. Use the exact name as specified in the driver’s INF file (if not you will get the error Win32 error code 87). The INF file is included in the driver’s source files. Please be aware that there may be more than one INF file.
-v 3
The version of the driver. Nowadays, printer drivers are either version 3 or 4. You may be able to check the version in the INF file (but not always).
If you cannot find the version number, use 3. During my tests, I was able to install a version 4 driver without problems even if I used version 3 in the command line.
If you want to be sure, install the printer driver manually on a test server and check the version in the GUI. Open the Control Panel and go to Devices and Printers. Click on an existing printer to make the button Printer server properties appear in the top menu. Open the Printer server properties and go to the Drivers tab. Here you will find the currently installed printer drivers including their versions (type).

-e “Windows x64”
The environment (= the architecture of the operating system) in which the driver is to be installed. Possible values are Windows NT x86, Windows x64, and Windows IA64.
-i “C:\Temp\PrinterDrivers\HP\UP_PCL6\hpcu130u.inf”
The complete path and file name of the INF file of the driver. The INF file contains all relevant driver-specific data.
*The file cscript.exe does not require the full path, because the parent directory C:\Windows\System32 is listed by default in the environment variable path.
You can use this command directly in software deployment tools such as Microsoft MDT and Microsoft SCCM. I do not use command lines such as these, because I prefer my own centralized logging and customized error handling. Instead, I have created a PowerShell script to install printer drivers in my master images (see below).
For more detailed information concerning the prndrvr.vbs, please see the following Microsoft article: https://learn.microsoft.com/en-us/previous-versions/windows/it-pro/windows-server-2012-R2-and-2012/cc754632(v=ws.11)?redirectedfrom=MSDN
Method 2: using RUNDLL32.exe
Operating systems: all
Another old way to install printer drivers is to use the rundll32.exe and call the printui.dll. The rundll32.exe, as explained by Microsoft, “loads and runs 32-bit dynamic-link libraries (DLLs)”. One of the many DLLs that can be loaded is the printui.dll.
Here is an example of how to install a printer driver from the Windows driver store using the RUNDLL32.exe:
RUNDLL32 PRINTUI.DLL,PrintUIEntry /ia /f “C:\Windows\inf\prncacla.inf” /m “Canon Inkjet Type4 Class Driver“
Here is an example of how to install a printer driver not present in the Windows store using the RUNDLL32.exe:
RUNDLL32 PRINTUI.DLL,PrintUIEntry /ia /f “C:\Temp\PrinterDrivers\HP\UP_PCL6\hpcu130u.inf” /m “HP Universal Printing PCL 6 (v5.5.0)“
These commands also work on the latest editions of Windows Server 2016 and Windows 10 (I have tested them).
Let us analyze this command line:
RUNDLL32(.exe)*
This executable file loads and runs the printer DLL.
PRINTUI.DLL
This DLL file contains all the functions required to install the printer driver.
PrintUIEntry
The PrintUIEntry keyword, required by the printui.dll, is case sensitive and you must enter the syntax for this command with the exact capitalization shown.
/ia
This parameter lets the printui.dll know that a printer driver, using a INF file (*.inf), needs to be installed.
/f “C:\Temp\PrinterDrivers\HP\UP_PCL6\hpcu130u.inf”
The complete path and file name of the INF file of the driver. The INF file contains all relevant driver-specific data.
/m “HP Universal Printing PCL 6 (v5.5.0)”
The name of the driver you want to install. Use the exact name as specified in the driver’s INF file. The INF file is included in the driver’s source files. Please be aware that there may be more than one INF file.
*The file rundll32.exe does not require the full path, because its parent directory C:\Windows\System32 is listed by default in the environment variable path.
You can execute this command directly on the command line or within a script (e.g. VBScript or PowerShell).
The command RUNDLL32 PRINTUI.DLL,PrintUIEntry can be used for more than installing a printer driver. For a complete list of all possible functions and the corresponding parameters, please see the Microsoft article Rundll32 printui.dll,PrintUIEntry. I do not use command lines such as these (except for the unattended uninstallation), because I prefer my own centralized logging and customized error handling. Instead, I have created a PowerShell script to install printer drivers in my master images (see below).
For more information concerning the above command, please see the Microsoft article Deploying Printers and Print Drivers Remotely.
Method 3: Using PowerShell and WMI
Operating systems: all
Nowadays, a lot of automation in a Windows infrastructure is done with PowerShell. Installing printer drivers is no exception. In this paragraph, I provide you with a working example complete with error handling and detailed logging.
For operating systems from Windows 8 / Windows Server 2012 and higher, you may also want to check the next paragraph Method 4: Using PowerShell and cmdlet.
The script works for all operating systems from Windows Server 2008 R2 / Windows 7 and higher. Please always make sure to install the latest PowerShell version.
Based on my installation template, this is what the complete script, including logging and error handling, looks like.
|
1 2 3 4 5 6 7 8 9 10 11 12 13 14 15 16 17 18 19 20 21 22 23 24 25 26 27 28 29 30 31 32 33 34 35 36 37 38 39 40 41 42 43 44 45 46 47 48 49 50 51 52 53 54 55 56 57 58 59 60 61 62 63 64 65 66 67 68 69 70 71 72 73 74 75 76 77 78 79 80 81 82 83 84 85 86 87 88 89 90 91 92 93 94 95 96 97 98 99 100 101 102 103 104 105 106 107 108 109 110 111 112 113 114 115 116 117 118 119 120 121 122 123 124 125 126 127 128 129 130 131 132 133 134 135 136 137 138 139 140 141 142 143 144 145 146 147 148 149 150 151 152 153 154 155 156 157 158 159 160 161 162 163 164 165 166 167 168 169 170 171 172 173 174 175 176 177 178 179 180 181 182 183 184 185 186 187 188 189 190 191 192 193 194 195 196 197 198 199 200 201 202 203 204 205 206 207 208 209 210 211 212 213 214 215 |
#========================================================================== # # INSTALL AND UNINSTALL PRINTER DRIVERS # # AUTHOR: Dennis Span (https://dennisspan.com) # DATE : 17.08.2017 # # COMMENT: This script installs and uninstalls printer drivers on a Windows operating system # # This script has been designed for the following operating systems: # -Windows Server 2008 R2 SP1 # -Windows Server 2012 R2 # -Windows Server 2016 build 1607 # -Windows 7 Enterprise SP1 # -Windows 10 build 1703 # # This script has been tested on the following operating systems: # -Windows Server 2008 R2 SP1 # -Windows Server 2016 build 1607 # # This script works on 32-bit and 64-bit operating systems #========================================================================== # define Error handling # note: do not change these values $global:ErrorActionPreference = "Stop" if($verbose){ $global:VerbosePreference = "Continue" } # FUNCTION DS_WriteLog #========================================================================== Function DS_WriteLog { <# .SYNOPSIS Write text to this script's log file .DESCRIPTION Write text to this script's log file .PARAMETER InformationType This parameter contains the information type prefix. Possible prefixes and information types are: I = Information S = Success W = Warning E = Error - = No status .PARAMETER Text This parameter contains the text (the line) you want to write to the log file. If text in the parameter is omitted, an empty line is written. .PARAMETER LogFile This parameter contains the full path, the file name and file extension to the log file (e.g. C:\Logs\MyApps\MylogFile.log) .EXAMPLE DS_WriteLog -InformationType "I" -Text "Copy files to C:\Temp" -LogFile "C:\Logs\MylogFile.log" Writes a line containing information to the log file .Example DS_WriteLog -InformationType "E" -Text "An error occurred trying to copy files to C:\Temp (error: $($Error[0]))" -LogFile "C:\Logs\MylogFile.log" Writes a line containing error information to the log file .Example DS_WriteLog -InformationType "-" -Text "" -LogFile "C:\Logs\MylogFile.log" Writes an empty line to the log file #> [CmdletBinding()] Param( [Parameter(Mandatory=$true, Position = 0)][ValidateSet("I","S","W","E","-",IgnoreCase = $True)][String]$InformationType, [Parameter(Mandatory=$true, Position = 1)][AllowEmptyString()][String]$Text, [Parameter(Mandatory=$true, Position = 2)][AllowEmptyString()][String]$LogFile ) $DateTime = (Get-Date -format dd-MM-yyyy) + " " + (Get-Date -format HH:mm:ss) if ( $Text -eq "" ) { Add-Content $LogFile -value ("") # Write an empty line } Else { Add-Content $LogFile -value ($DateTime + " " + $InformationType.ToUpper() + " - " + $Text) } } #========================================================================== # Function DS_InstallPrinterDriver #========================================================================== Function DS_InstallPrinterDriver { <# .SYNOPSIS Install a Windows printer driver .DESCRIPTION Install a Windows printer driver .PARAMETER Name This parameter contains the name of the printer driver as found in the accompanying INF file, for example "HP Universal Printing PCL 6 (v5.5.0)" .PARAMETER Path This parameter contains the path to the printer driver, for example "C:\Temp\PrinterDrivers\HP\UP_PCL6". Do not specify the INF file! Path only! .PARAMETER INF_Name This parameter contains the name of the INF file located within the directory defined in the variable 'Path', for example "hpcu130u.INF". Specify INF file name only! No path! .EXAMPLE DS_InstallPrinterDriver -Name "HP Universal Printing PCL 6 (v5.5.0)" -Path "C:\Temp\PrinterDrivers\HP\UP_PCL6" -INF_Name "hpcu130u.INF" Installs the printer driver 'HP Universal Printing PCL 6 (v5.5.0)' using the source files in the directory 'C:\Temp\PrinterDrivers\HP\UP_PCL6' and the INF file 'hpcu130u.INF' #> [CmdletBinding()] param ( [parameter(mandatory=$True,Position=1)] [string] $Name, [parameter(mandatory=$True,Position=2)] [ValidateNotNullorEmpty()] [string] $Path, [parameter(mandatory=$True,Position=3)] [string] $INF_Name ) # Create and initiate log file $LogFileName = ("Install_PrinterDriver_$($Name).log").Replace(" ","_") $LogFile = Join-Path $LogDir $LogFileName New-Item $LogFile -ItemType "file" -force | Out-Null DS_WriteLog "I" "START SCRIPT - Install printer driver '$Name'" $LogFile DS_WriteLog "-" "" $LogFile DS_WriteLog "I" "-Name: $Name" $LogFile DS_WriteLog "I" "-Source path: $Path" $LogFile DS_WriteLog "I" "-INF file name: $INF_Name" $LogFile # Install the printer driver try { $DriverClass = [WMIClass]"Win32_PrinterDriver" $DriverClass.Scope.Options.EnablePrivileges = $true $DriverObj = $DriverClass.createinstance() $DriverObj.Name = $Name $DriverObj.DriverPath= $Path $DriverObj.Infname = Join-Path $Path $INF_Name $ReturnValue = $DriverClass.AddPrinterDriver($DriverObj) $Null = $DriverClass.Put() if ( $ReturnValue.ReturnValue -eq 0 ) { DS_WriteLog "S" "Successfully installed printer driver $Name" $LogFile DS_WriteLog "-" "" $LogFile DS_WriteLog "I" "End of script" $LogFile } else { DS_WriteLog "E" "An error occurred trying to install printer driver $Name (error: $($ReturnValue.ReturnValue))" $LogFile Exit 1 } } catch { DS_WriteLog "E" "An error occurred trying to install printer driver $Name (error: $($Error[0]))" $LogFile Exit 1 } } #========================================================================== # Function DS_UninstallPrinterDriver #========================================================================== Function DS_UninstallPrinterDriver { <# .SYNOPSIS Uninstall a Windows printer driver .DESCRIPTION Uninstall a Windows printer driver .PARAMETER Name This parameter contains the name of the printer driver as found in the accompanying INF file that needs to be uninstalled, for example "HP Universal Printing PCL 6 (v5.5.0)" .EXAMPLE DS_UninstallPrinterDriver -Name "HP Universal Printing PCL 6 (v5.5.0)" Uninstalls the printer driver 'HP Universal Printing PCL 6 (v5.5.0)' #> [CmdletBinding()] param ( [parameter(mandatory=$True,Position=1)] [string] $Name ) # Create and initiate log file $LogFileName = ("Uninstall_PrinterDriver_$($Name).log").Replace(" ","_") $LogFile = Join-Path $LogDir $LogFileName New-Item $LogFile -ItemType "file" -force | Out-Null DS_WriteLog "I" "START SCRIPT - Uninstall printer driver '$Name'" $LogFile DS_WriteLog "-" "" $LogFile DS_WriteLog "I" "-Name: $Name" $LogFile # Uninstall the printer driver (if installed) if ( Get-WMIObject -class Win32_PrinterDriver -Filter "Name LIKE '%$Name%'" -ErrorAction SilentlyContinue) { try { RUNDLL32 PRINTUI.DLL,PrintUIEntry /dd /m $Name # I have to use the RUNDLL32.exe to delete the printer driver, because the WMI class Win32_PrinterDriver does not have a delete method DS_WriteLog "S" "Successfully uninstalled printer driver $Name" $LogFile DS_WriteLog "-" "" $LogFile DS_WriteLog "I" "End of script" $LogFile } catch { DS_WriteLog "E" "An error occurred trying to uninstall printer driver $Name (error: $($Error[0]))" $LogFile } } else { DS_WriteLog "I" "The printer driver $Name is not installed on the local system. Nothing to do." $LogFile } } #========================================================================== ################ # Main section # ################ # Custom variables [edit] $BaseLogDir = "C:\Logs" # [edit] add the location of your log directory here $PackageName = "PrinterDriver" # [edit] enter the display name of the software (e.g. 'Arcobat Reader' or 'Microsoft Office') # Global variables $StartDir = $PSScriptRoot # the directory path of the script currently being executed $LogDir = (Join-Path $BaseLogDir $PackageName).Replace(" ","_") # Create the log directory if it does not exist if (!(Test-Path $LogDir)) { New-Item -Path $LogDir -ItemType directory | Out-Null } ########################################## # Install or uninstall printer driver(s) # ########################################## # Install the printer driver 'Canon Inkjet MP630 series' DS_InstallPrinterDriver -Name "Canon Inkjet Type4 Class Driver" -Path "C:\Windows\inf" -INF_Name "prncacla.inf" # Install the printer driver 'HP Universal Printing PCL 6 (v5.5.0)' DS_InstallPrinterDriver -Name "HP Universal Printing PCL 6 (v5.5.0)" -Path "C:\Temp\PrinterDrivers\HP\UP_PCL6" -INF_Name "hpcu130u.INF" # Install the printer driver '<name of the inf file only (without path)>' DS_InstallPrinterDriver -Name "<the exact name of the driver as specified in the INF file>" -Path "<the path and name of the INF file>" -INF_Name "<the name of the INF file only (without path)>" # Install the printer driver '<name of the inf file only (without path)>' DS_InstallPrinterDriver -Name "<the exact name of the driver as specified in the INF file>" -Path "<the path and name of the INF file>" -INF_Name "<the name of the INF file only (without path)>" # UnInstall the printer driver '<the exact name of the driver as specified in INF file>' DS_UninstallPrinterDriver -Name "Canon Inkjet Type4 Class Driver" |
The above script can be used for the installation and uninstallation of one or more printer drivers. In the script, I call the function DS_InstallPrinterDriver for installing printer drivers and the function DS_UnInstallPrinterDriver for uninstalling printer drivers. You can call these functions as many times as you like. This means that the script offers you a lot of flexibility. You can choose to have one consolidated script to manage all of your printer driver (un)installations or to use a separate copy of the script for each driver. Whatever suits your needs.
Make sure to call the function correctly. For example:
DS_InstallPrinterDriver -Name “Canon Inkjet Type4 Class Driver” -Path “C:\Windows\inf” -INF_Name “prncacla.inf“
- Name: has to be the EXACT name as specified in the INF file, otherwise the error 87 is thrown.
- Path: specify the path WITHOUT adding the name of the INF file. Path only!
- INF_Name: specify the name of the INF file only. No path!
To install the printer driver, I used Windows Management Instrumentation (WMI); the Win32_PrinterDriver class to be exact. Now, it is important to realize that WMI is not restricted to PowerShell. I could have easily used a different scripting language, such as VBScript, to communicate with WMI.
Before you can use the above script, you first need to prepare the printer driver source files. I recommend to follow these steps:
- Create an installation directory on the local computer or a file share (UNC path). For example C:\Temp\PrinterDrivers.
- Create a subdirectory for each vendor, for example: C:\Temp\PrinterDrivers\HP and C:\Temp\PrinterDrivers\Canon.
- Create a subdirectory for each printer driver per vendor, for example, C:\Temp\PrinterDrivers\HP\HP Universal Printing PCL 6 (v5.5.0).
- In the printer driver directory, create a subdirectory called Files, for example, C:\Temp\PrinterDrivers\HP\HP Universal Printing PCL 6 (v5.5.0)\Files.
- Copy the printer driver files (for the specific printer) to the directory Files.
- Copy the above script to a new PS1 file, for example, PrinterDrivers.ps1, and add this file to the root of your installation directory. You can choose on which level you want to add this script, for example:
- C:\Temp\PrinterDrivers\PrinterDrivers.ps1 -> Use one script to install all printer drivers.
- C:\Temp\PrinterDrivers\HP\PrinterDrivers.ps1 -> Use one script to install all vendor-specific printer drivers.
- C:\Temp\PrinterDrivers\HP\HP Universal Printing PCL 6 (v5.5.0)\PrinterDrivers.ps1 -> use one script for each printer driver.
- Execute the PowerShell script, for example:
powershell.exe -file C:\Temp\PrinterDrivers\PrinterDrivers.ps1 - In case you get a security warning, set the execution policy to allow the script to run: powershell.exe -executionpolicy unrestricted -file C:\Temp\PrinterDrivers\PrinterDrivers.ps1
Log files are created in the directory C:\Logs\PrinterDriver, but you can change this to any directory you want (see lines 188 and 189).
Method 4: Using PowerShell and cmdlet
Operating systems: Windows 8.1 / Windows Server 2012 R2 and higher
From Windows 8.1 / Windows Server 2012 R2 and higher, the cmdlets Add-PrinterDriver and Remove-PrinterDriver can be used.
| Note: the following commands only work with drivers already present in the Windows drivers store! You cannot install a printer using external source files. |
The only parameter both commands require is the exact name of the printer driver (as specified in the INF file). See the section Default printer drivers included in Windows on how to retrieve the exact name of the printer driver.
|
1 |
Add-PrinterDriver -Name "Canon Inkjet Type4 Class Driver" |
|
1 |
Remove-PrinterDriver –Name "Canon Inkjet Type4 Class Driver" |
Unfortunately, these commands do not allow an administrator to install drivers not present in the driver store.
Method 5: using the vendor’s installer
Operating systems: all
In some cases, it is better to use the vendor’s installer instead of any of the previous methods, for example when installing a more complicated driver.
Take the HP Universal Printer Driver for example. The source files contain multiple INF files, the driver can be installed in traditional mode or dynamic mode and the driver comes in two flavors; a version-specific or a non-version-specific installation.
| Note: dynamic mode is not supported on multi-user environments such as Microsoft RDS and Citrix Virtual Apps and Desktops. Only traditional mode is supported. |
In this more complicated case, the installer may be the better choice. Also, and this is not unimportant, the only other supported method for unattended installation according to the HP documentation is Method 2: using RUNDLL32.exe.
And one other important and positive information; the installer install.exe can be called with the parameters /q /h to enable an unattended installation. I cannot guarantee that all vendor installers can handle unattended installation, but I think that most can.
The conclusion at the end of this long section is that you will have to make a decision which installation method to use for each printer driver you want to install.
Unattended printer driver uninstallation
The unattended installation of a printer driver should be something simple, but it turned out that was not the case. The main reason for this is that the WMI class Win32_PrinterDriver does not seem to have a delete method.
The way I got it to work was with the executable file RUNDLL32.exe:
RUNDLL32 PRINTUI.DLL,PrintUIEntry /dd /m “HP Universal Printing PCL 6 (v5.5.0)“
I have successfully tested this uninstall command on Windows Server 2008 R2 and Windows Server 2016.
The PowerShell script in the section Method 3: using PowerShell and WMI contains both an installation and uninstallation function. The installation function is based on WMI; the uninstallation function executes the executable file RUNDLL32.exe.
Common installation problems and solutions
| Note: before reading this chapter, I recommend reading the entire article from the top for a better understanding of the behavior and handling of printer drivers. |
In general, installation problems of printer drivers fall into one of the following categories:
- The driver (= catalog / .cat file) has not been digitally signed. See the section Unsigned printer drivers for the solution.
- The catalog file has been signed, but the certificate is not trusted. See the section Untrusted printer drivers for the solution..
- The hash value of one of the source files has changed, invalidating the catalog file (which stores the original hash values or thumbprints). See the section INF hash is not present in the catalog. Driver package appears to be tampered for the solution.
Regarding the type of error, one of the most important sources of information is the log file C:\Windows\INF\setupapi.dev.log. Open this log file and scroll to the end to see the reason for the installation failure.
Unsigned printer drivers
As explained in the section The CAT file, printer drivers need to be digitally signed. To be more specific, the catalog file (.cat) needs to be digitally signed.
As a best practice, I strongly recommend that you try to get the original printer driver from the vendor. Nowadays, these should be WHQL signed. If this is not possible, the following workarounds are available to you:
- Disable integrity checks (bcdedit.exe)
- Sign the catalog file (selfcert.exe, signtool.exe)
Disable integrity checks (bcdedit.exe)
One workaround for installing unsigned drivers is to play around with the boot configuration data settings (BCD), but this method goes against various security guidelines from Microsoft and becomes more and more difficult with newer operating systems. The goal of this method is to disable integrity checks and enable the test-signing mode using the bcdedit.exe.
- Disable integrity checks by executing the following command:
bcdedit.exe /set loadoptions DISABLE_INTEGRITY_CHECKS - Enable test-signing by executing the following command:
bcdedit.exe /set testsigning ON
Please be aware that when Secure Boot is enabled, the above two commands have no effect. Also, I have not tested these commands on the latest operating system (Windows Server 2016 and Windows 10). I cannot guarantee the commands still work on these newer operating systems.
To undo the above settings, execute the following commands:
- bcdedit.exe /deletevalue loadoptions
- bcdedit.exe /set testsigning OFF
Sign the catalog file (SelfCert.exe, SignTool.exe)
My preferred method to solve this unsigned driver issue is to simply sign the catalog file myself.
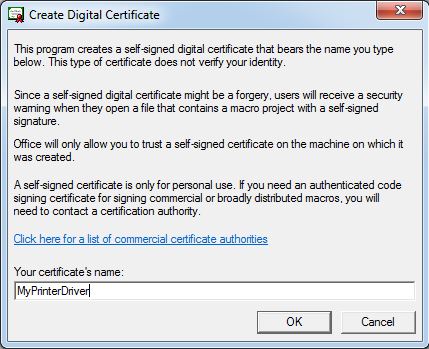
To digitally sign a file you will need a certificate. You can use your enterprise certificate authority (CA) for this. In case you do not have a certificate authority, you can use the selfcert.exe included in Microsoft Office.
Run the file SELFCERT.EXE located in the directory C:\Program Files (x86)\Microsoft Office\Office15.
Enter an appropriate name for the certificate and click OK. In this example, I use the name MyPrinterDriver.
The following message should appear:
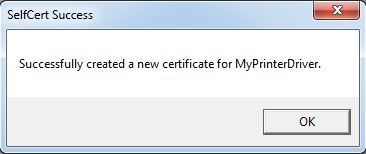
The certificate is now created and added to your Personal certificate store. To see the certificate, open a Microsoft Management Console (mmc.exe) and add the snap-in Certificates (Current User).
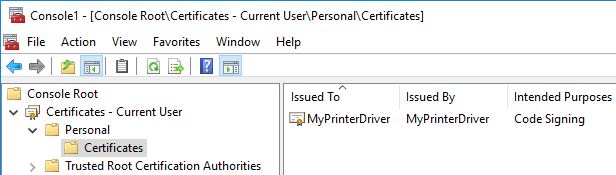
At this point, it may be wise to export the certificate. You will need this in one of the following steps. While in the Personal certificate store, select the corresponding certificate with a right-mouse click and go to All Tasks \ Export. Simply follow the wizard. At the end of the wizard, you will have a .CER file (without the private key which is not exportable).
To sign the catalog file with the newly created certificate, the Microsoft signtool.exe can be used. This tool ships in the Microsoft Windows Driver Kit (WDK) and can be downloaded here. To sign the catalog file, execute the following command:
“C:\Program Files (x86)\Windows Kits\10\Tools\bin\i386\signtool.exe” sign /i MyPrinterDriver “C:\Temp\MyPrinterDriver\MyCatalogFile.cat”
In the above example, I assume that the signtool.exe is located in the default installation directory of the Windows Driver Kit. Adjust the path to your requirements.
It is enough to specify only the name of the certificate because it is automatically retrieved in the Personal certificate store.
The above steps take care of the signing of the catalog file, but, the certificate is not yet trusted. Please use one of the methods described in the section Untrusted printer drivers to make the certificate trusted (you will need the exported certificate for this).
References:
Windows 8 x64 driver installation error – signature test fails(blog no longer exists)- How to install unsigned drivers
Untrusted printer drivers
To prevent error messages relating to untrusted drivers, the publisher certificate has to be added to the Trusted Publishers certificate store.
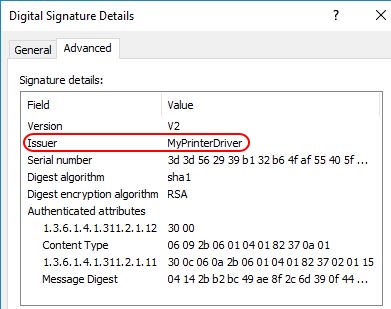
The first step is to identify which certificate is the publisher certificate. Open the file properties of the catalog file, go to the tab Digital Signatures, and click the button Details (you may have to wait a bit before something happens). A new window opens displaying the certificate details. Go to the tab Advanced. Here you find the name of the publisher (= issuer).
You may have to retrieve the publisher certificate from the Internet. If you cannot find it I suggest you contact the vendor and have the certificate sent to you.
In some cases, the publisher certificate is the same as the one on the catalog file. This is the case when using a self-signed certificate as explained in the section Unsigned printer drivers. In this case, you can simply save (export) the certificate to a .CER file.
Now that you have the publisher certificate you need to add it to the Trusted Publishers store (I also recommend adding it to the Trusted Root Certification Authorities store right away as explained in the section The CAT file). There are various ways to achieve this goal:
- Update certificate store using Group Policy
- Update certificate store using PowerShell and .Net
- Update certificate store using PowerShell and cmdlet
- Update certificate store using certmgr.exe
Update certificate store using Group Policy
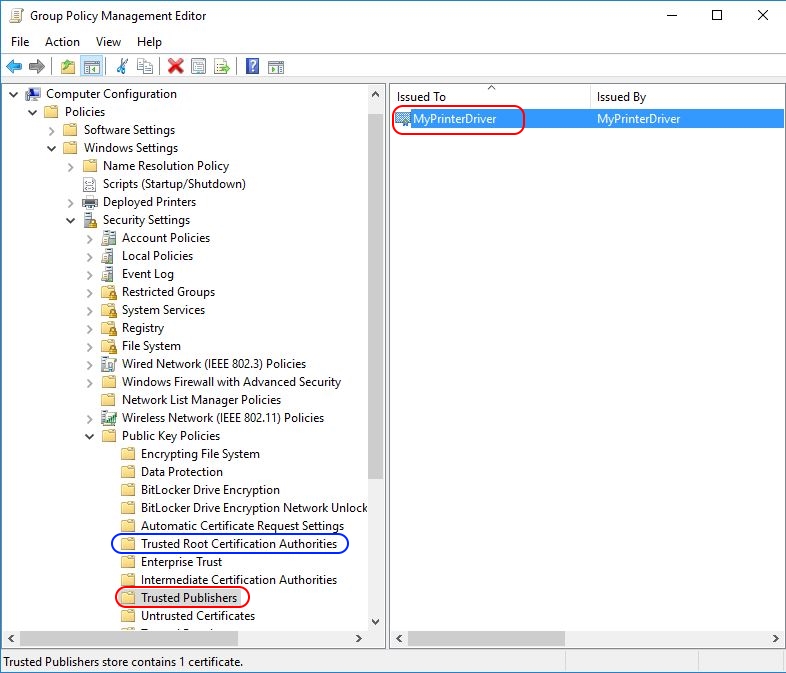
The easiest method is to use a Group Policy. Open the group policy editor (GPMC.msc) and create a new group policy object or modify an existing one. Go to Computer Configuration \ Policies \ Windows Settings \ Security Settings \ Public Key Policies and add the exported certificate to the Trusted Publishers store (and the Trusted Root Certification Authorities store).
Update certificate store using PowerShell and .Net
Operating systems: all
In case you would like to install the certificate on the local server (or in your master image) without using Group Policies, I recommend using PowerShell.
The following PowerShell script adds the example certificate PrinterDriver.cer to both the Trusted Publishers store and the Trusted Root Certification Authorities store.
|
1 2 3 4 5 6 7 8 9 10 11 12 13 14 15 16 17 18 19 20 21 22 23 24 25 26 27 28 29 30 31 32 33 34 35 36 37 38 39 40 41 42 43 44 45 46 47 48 49 50 51 52 53 54 55 56 57 58 59 60 61 62 63 64 |
#========================================================================== # # IMPORT A CERTIFICATE TO ONE OR MORE CERTIFICATE STORES # # AUTHOR: Dennis Span (https://dennisspan.com) # DATE : 25.08.2017 # # This scrript has been designed for and tested on the following operating systems: # -Windows Server 2008 R2 SP1 # -Windows Server 2012 R2 # -Windows Server 2016 build 1607 # -Windows 7 Enterprise SP1 # -Windows 10 build 1703 # # This script works on 32-bit and 64-bit operating systems # # The following main certificate stores exist: # -"CA" = Intermediate Certificates Authorities # -"My" = Personal # -"Root" = Trusted Root Certificates Authorities # -"TrustedPublisher" = Trusted Publishers # # Note: to find the names of all existing certificate stores, use the following PowerShell command: Get-Childitem cert:\localmachine #========================================================================== $StoreScope = "LocalMachine" # Possible values: CurrentUser or LocalMachine $StoreName = "TrustedPublisher" # Possible values: CA, My, Root, TrustedPublisher $CertFile = "C:\MyPrinterDriver.cer" # Enter the path and name of the certificate file (e.g. C:\MyPrinterDriver.cer) $CertPassword = "" # In case the exported certificate is password protected, add the password here # Note: to secure passwords in a PowerShell script, see my article https://dennisspan.com/encrypting-passwords-in-a-powershell-script/ Write-Host "Import the certificate $CertFile in the $StoreScope store $StoreName" if (Test-Path "cert:\$StoreScope\$StoreName") { $Cert = New-Object System.Security.Cryptography.X509Certificates.X509Certificate2 $CertFile,$CertPassword $Store = New-Object System.Security.Cryptography.X509Certificates.X509Store $StoreName, $StoreScope $Store.Open([System.Security.Cryptography.X509Certificates.OpenFlags]::ReadWrite) $Store.Add($Cert) $Store.Close() Write-Host "The certificate $CertFile was imported successfully in the $StoreScope store $StoreName" } else { Write-Host "Error: the store does not exist. This script will now quit" } $StoreName = "Root" # Possible values: CA, My, Root, TrustedPublisher Write-Host "" Write-Host "Import the certificate $CertFile in the $StoreScope store $StoreName" if (Test-Path "cert:\$StoreScope\$StoreName") { $Cert = New-Object System.Security.Cryptography.X509Certificates.X509Certificate2 $CertFile,$CertPassword $Store = New-Object System.Security.Cryptography.X509Certificates.X509Store $StoreName, $StoreScope $Store.Open([System.Security.Cryptography.X509Certificates.OpenFlags]::ReadWrite) $Store.Add($Cert) $Store.Close() Write-Host "The certificate $CertFile was imported successfully in the $StoreScope store $StoreName" } else { Write-Host "Error: the store does not exist. This script will now quit" } Write-Host "" Write-Host "End of script" |
In the script, I use the .Net framework class instead of the cmdlet Import-Certificate. The simple reason for this is that the .Net class works on all operating systems (at least from Windows 2008 R2 and later), whereas the Import-Certificate cmdlet only works from Windows Server 2012 R2 / Windows 8.1 and above (see the following paragraph).
Execute the script as follows, for example:
powershell.exe -file “C:\Import certificate.ps1”
In case you get a security warning, set the execution policy to allow the script to run:
powershell.exe -executionpolicy unrestricted -file “C:\Import certificate.ps1”
Update certificate store using PowerShell and cmdlet
Operating systems: Windows 8.1 / Windows Server 2012 R2 and higher
From Windows 8.1 / Windows Server 2012 R2 and higher, the cmdlet Import-Certificate can be used. Two parameters are required:
- Filepath: the path to the certificate file which has to be imported.
- CertStoreLocation: this parameter requires two inputs.
- The store path can have one of two values:
- LocalMachine
- CurrentUser
- The store name. The most used stores are:
- CA (= Intermediate Certificates Authorities)
- My (= Personal)
- Root (= Trusted Root Certificates Authorities)
- TrustedPublisher (= Trusted Publishers)
- The store path can have one of two values:
To see all available stores, open a PowerShell command window and type the following command:
|
1 |
Get-Childitem cert:\localmachine |
Here is an example of how to import a certificate using the cmdlet:
|
1 2 |
Import-Certificate -Filepath "C:\MyPrinterDriver.cer" -CertStoreLocation cert:\LocalMachine\Trus tedPublisher |
Update certificate store using CertMgr.exe
Operating systems: all
Another possible method for adding certificates to the local certificate store is the certmgr.exe tool from Microsoft. For more information, please see the following article: https://learn.microsoft.com/en-us/dotnet/framework/tools/certmgr-exe-certificate-manager-tool.
INF hash is not present in the catalog. Driver package appears to be tampered
As explained in the section The CAT file, the catalog file contains a collection of cryptographic hashes, or thumbprints, for each of the files that are included in the CopyFiles section of the INF file.
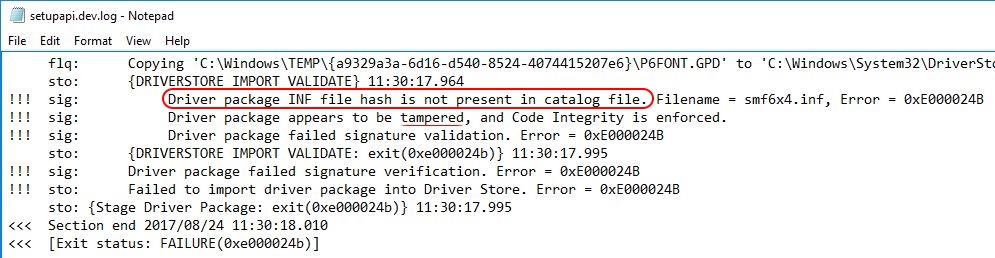
If one or more source files have changed, the hash values stored in the catalog file no longer match the actual hash values. In this case, the installation ends in an error such as Driver package INF file hash is not present in catalog file and Driver package appears to be tampered. These errors are also clearly identifiable in the log file C:\Windows\INF\setupapi.dev.log.
To solve this problem, I strongly recommend trying to get the original printer driver from the vendor. If this is not possible for some reason, you will have to recreate the catalog file yourself. These are the steps involved.
First, you need the tool Inf2Cat.exe, which is included in the Windows Driver Kit (WDK). If you do not have the WDK installed on your machine, you can download it here. Install it on your machine.
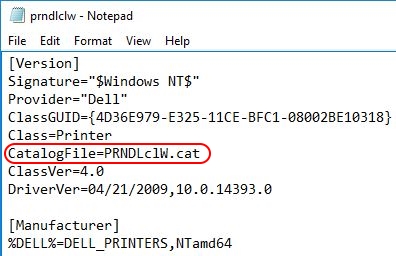
Open the INF file of the driver you are trying to repair. Make sure that the line CatalogFile=MyCatalogFile.cat is specified in the beginning of the file. If not, add it to the [Version] section.
To create a driver compatible with the operating systems Windows Server 2012 R2 and Windows Server 2016, open a command window and execute the following command line:
C:\Program Files (x86)\Windows Kits\10\bin\x86\Inf2Cat.exe /driver:”C:\Temp\MyPrinterDriver” /os:Server6_3_X64,Server10_X64
For more information about the various command line options, either check the help function of Inf2Cat (Inf2Cat.exe /?) or check the Microsoft article Inf2Cat. Here you also find the list of operating systems and their abbreviations, although the abbreviation for Windows 10 and Windows Server 2016 I only found in the help function of the Inf2Cat file.
The catalog file has now been restored, but you are not done yet; the catalog file still has to be digitally signed and the publisher certificate needs to be trusted by the local system. Please follow the steps in the section Unsigned printer drivers to sign the catalog file. Afterward, make sure that the publisher certificate is trusted by using one of the methods described in the section Untrusted printer drivers.
References:
- Using Inf2Cat to Create a Catalog File
https://learn.microsoft.com/en-us/windows-hardware/drivers/install/using-inf2cat-to-create-a-catalog-file - Inf2Cat
https://learn.microsoft.com/en-us/windows-hardware/drivers/devtest/inf2cat - Windows 8 x64 driver installation error – signature test fails
http://tivadj-tech.blogspot.co.at/2012/09/certificate-check-error-when-installing.html(blog no longer exists)
Dennis Span works as a Lead Account Technology Strategist at Cloud Software Group in Vienna, Austria. He holds multiple Citrix certifications (CCE-V). Dennis has been a Citrix Technology Advocate (CTA) since 2017 (+ one year as Citrix Technology Professional, CTP). Besides his interest in virtualization technologies and blogging, he loves spending time with his family as well as snowboarding, playing basketball and rowing. He is fluent in Dutch, English, German and Slovak and speaks some Spanish.

Great indepth article on printer drivers. I’m missing a section on how to remove printer drivers properly though.
What do you think of a method I developed?: http://blog.misjageuskens.nl/2013/05/26/how-to-keep-your-printerdrivers-in-sync-at-your-xenapp-6-x-farm/
Hi Misja,
Thanks for your input. Concerning the removal of printer drivers, this is covered in the article, here to be precise: https://dennisspan.com/printer-drivers-installation-and-troubleshooting-guide/#UnattendedDriverUnInstall
I checked your article and it is a really interesting approach. I never used the Printbrm.exe before, but I can definitely see some use-cases for it. I always like to find new approaches such as yours. Keep up the good work!
Bye,
Dennis
Pingback: EUC Weekly Digest – September 2, 2017 – Carl Stalhood
Dennis, I was wondering if you would be able to tell me if this is even possible. We just moved from WinXP to Win10. We have shop flyers for about 10,000 parts are constantly adding new ones. We build wood store fixtures. We were using a driver called HPLJ.GPD in WinXP. It’s actually a Microsoft driver. We use it in our CAD system to print to file (we print to AutoCAD’s .plt file that is used in our ERP system). This driver (and it’s associated .dll, .inf, .cat files etc) are not part of Win10. I’ve tried installing them, but Win10 keeps me from modifying things. How would I go about getting these drivers to work in Win10? Remember, we’re not printing to a physical printer. We’re only using this driver to create a plot file in AutoCAD.
Hi Mick, did you actually manage to install the HPLJ.gpd driver in Windows 10? What do you mean when you say that “W10 keeps me from modifying things”? Are you installing and modifying in admin mode without User Account Control (UAC)? I found the following article where a number of workarounds are described such as using a generic HPGL/2 driver. Could this work for you? This is the article I am referring to: https://knowledge.autodesk.com/support/autocad/troubleshooting/caas/sfdcarticles/sfdcarticles/HP-printers-do-not-work-with-AutoCAD-2015-on-Windows-8.html
Thanks. I did not try lowering (or turning off) UAC. I can try that. We actually need to be able to use the old driver. The HPLJ.GPD creates a plot file that is compatible with our ERP software. Any of the newer PCL formats (PCL3, 4, 5 or 6) messes up the print jobs. It seems all the newer printer options print PCL formats. I’d like to be able to re-create an .inf file on Win10 using this older driver, since we aren’t printing to a hardware device. Do you know of an article like “creating .inf files in Win10 for dummies” ? BTW, great article. Back in the early 90’s I wrote an article for Laserjet Journal on how we used HP Macro language to create our Work Order system. Back then it was pretty trick printing the database information, barcodes and a CAD drawing all on the same sheet. Got a free HP mug out of the deal.
Hi Mick, perhaps you can send me an e-mail with a more detailed clarification of the issue at hand. Perhaps you can add some screenshots and if you want to you can add a ZIP file with the driver. I can take a look at it if you want to. I cannot guarantee I can get it running though. My holiday starts tomorrow so I will be out of touch for two weeks. But I will get back to you after my holiday. Oh yeah, creating INF files is covered in my article: https://dennisspan.com/printer-drivers-installation-and-troubleshooting-guide/#INFHashNotPresent
Hi Dennis
This article and script is REALLY thorough and just works out of the box.
One thing though. It fails with error 87 on 32-bit drivers when added to a 64-bit server?
Hi Thomas,
I am happy you like the article and that the script worked for you (in most cases at least). I think that error 87 is sort of a general error. I mention error 87 in the article. This error is generated when the name of the printer is not exactly the same as the one specified in the INF file, but it may be that other errors also throw the same error number. In case you believe the error is caused by the script, than please use one of the other methods to verify that the installation of the 32-bit driver on a 64-bit system actually works, for example using this command: RUNDLL32 PRINTUI.DLL,PrintUIEntry /ia /f “C:\Temp\PrinterDrivers\HP\UP_PCL6\hpcu130u.inf” /m “HP Universal Printing PCL 6 (v5.5.0)”
Bye,
Dennis
Hi Dennis,
Wonderful article you’ve made.
I’m working on the possiblity to capture the personal settings on a specific driver to push it further on anothers computers.
How could you make that?
The idea is of course to set up the printer, but also not have to change for example default settings to specifics one (page format, paper choice, authentication… etc)
My way was on this command
rundll32 printui.dll PrintUIEntry /ss to save
rundll32 printui.dll PrintUIEntry /sr and to restore
But it doesn’t work in my case (actually i have never seen it working)
Have you an idea?
Hi Remi,
Thanks for the kind feedback. Unfortunately, at this moment, I do not have any script or tool at hand to extract/export user specific printer settings. Sorry mate.
Hi Dennis! This is honestly one of the best articles on printers, if not the best, I’ve ever read.
I have a question. When trying to install a Brother 6200 on my Win 10 laptop, the installer package from the manufacturer throws an error that the file folder is corrupted and unreadable. Can you tell me maybe which folder it’s likely referring to and how I might resolve this error? I tried running a chkdsk /f but it didn’t help. You can reach me at James dot Teneyck at gmail dot com.
Thank you!!
Hi James. Thanks a lot for your kind feedback.
This error probably refers to the installation package itself (as opposed to the printer driver target directory on your local machine). When you say Brother 6200 do you mean the HL-L6200DW? That is the only Brother 6200 I can find. I just installed the printer driver on a test machine running Windows 10 1909 64-bit and it worked fine. I downloaded the following source files: https://support.brother.com/g/b/downloadend.aspx?c=us_ot&lang=en&prod=hll6200dw_us_as&os=10013&dlid=dlf102379_000&flang=4&type3=408
Hi Dennis. Thanks for the reply! That’s the printer I was referring to. I downloaded the same files and it didn’t work. That’s why I was thinking it’s a different issue. Now I’m just really confused.
Oh wait I actually downloaded the full package. You downloaded just the driver, right? Can you test the full package please?
Hi James. I am not able to fully test the full package, since I do not have a Brother printer available and the GUI tries to search for one. However, after downloading and extracting the file “Y15B_C1_ULWL-usa-inst-B2.exe” I tried each of the MSI files included in the directory “Install\Msi” and they all seem to work. So if you need any of the tools provided by Brother (other than the actual printer driver itself) than this would be the way to install them. In most cases however you really only need the driver. So my suggestion is to download and extract the driver package only, add a new printer in your W10 machine, tthe wizard should automatically detect the Brother 6200, and than point to the downloaded and extracted printer drivers.
Dennis,
Thank you for publishing this article. I’m new to consulting and recently deployed a printer using Intune & Powershell (direct IP). I had been looking for some documentation to better understand the INF and how they worked. This was the perfect article! I found this after the fact but, it gave me the answers I was looking for. I was going to write a script to grab the name of the printer from the INF and low and behold as I read your article, you had already done the leg work. Again, thank you for writing this clear, concise article with excellent examples and pertinent screenshots.
Thanks for the kind feedback Emmitt! I am happy you like the article.
Hi Dennis,
I am a little bit curious. Would this “using PowerShell and WMI” work on WS 2019?
Lastly you mentioned this script can be adapted to install all drivers (in different directory) at once irrespective of the vendor
But the function points to a specific Driver type (name) in this case the Canon —-> DS_InstallPrinterDriver -Name “Canon Inkjet Type4 Class Driver” -Path “C:\Windows\inf” -INF_Name “prncacla.inf”
How can this be achieved? Do you use wildcard in this case considering the Printer name is specified and you have used a specific INF file.
How can this work for all printer drivers in the directory. Thank you for your assistance in advance.
Looking forward to hearing from you.
Hi, yes, my example script also works on Windows Server 2019. I would honestly not recommend installing all printer drivers on your W2K19 server unless you absolutely need these drivers. I suggest to only install the ones you need. That being said, if you want to install all printer drivers included in a particular INF file without specifying each name, path and INF name then you will have to create a PowerShell script for it. This PowerShell script will have to read the INF file line by line. For each line that contains printer driver information, the function “DS_InstallPrinterDriver” has to be executed. The PowerShell script will loop through each line and install each printer driver it finds. That’s how I would do it.
Dennis,
Your article helped me a lot. Thank you very much.
The latest problem is about the print processor.
After installing 180 printers on the Windows Server 2008 R2 system, I installed other new printers, and some of the original printers disappeared.
The main reason for the disappearance is that the print processor failed to initialize.I’m confused about that.
Is there any upper limit or other resource limitation for the print processor on windows?
Is it possible for different print processors to be mutually exclusive?
Thank you very much for your advice.
Hi, concerning the Windows print spooler, there is no hard upper limit as far as my knowledge goes. When you say “printer”, are you referring to the printer object or the printer driver? I never heard of printer objects disappearing by themselves when adding new ones.
Thank you for your reply.
“printer” is referring to printer object.
I’m also confused about this problem. From the phenomenon, when the spool service is started, the print processor fails to initialize, resulting in the printer object cannot be created normally.
Hi Gavin. I am not sure how to help you without having more information.