
This article shows you how to script the Citrix App Layering Agent unattended installation and registration using PowerShell.
| Change Log 26.09.2017: updated to Citrix App Layering Agent version 4.5. This article was originally written for version 4.4 to which it still applies. I did not test the installation routine with versions older than 4.4, but it may work. 06.12.2017: updated to Citrix App Layering Agent version 4.6. 15.01.2018: updated to Citrix App Layering Agent version 4.8. |
| Table of Contents |
Introduction
The contents of this article apply to:
- Citrix App Layering Agent version 4.4 to 4.8 (may also work for older versions)
- Citrix Provisioning Server 7.15 to 7.16 (should work from Provisioning Server version 7.7 and higher though)
- Microsoft Windows Server 2016 Build 1607
As per Citrix: “The App Layering agent enables the appliance or a packaging machine to run PowerShell commands locally.”.
| Note: the Citrix App Layering management server is called the Enterprise Layer Manager, or ELM for short. I use the abbreviation ELM throughout the rest of this article. |
If you want the ELM to automatically publish a consolidated VHDX file to your Provisioning Servers you need to install the App Layering Agent on at least one Provisioning Server.
For a complete overview of Citrix App Layering, I strongly urge you to read the following articles:
- Citrix App Layering 4.8 – by Carl Stalhood
- Citrix App Layering – by George Spiers
An overview of the Citrix App Layering Agent
Before going into the details of the actual installation itself, let us first take a closer look at some of the characteristics of the Citrix App Layering Agent:
- Target device:
Install this component on any machine on which the ELM is supposed to run PowerShell commands locally, for example on your Provisioning Servers. This software is NOT intended for the local client device nor for virtual servers and desktops with the Citrix Virtual Delivery Agent (VDA) installed! - Installation file name:
- citrix_app_layering_agent_installer.exe
- Citrix App Layering Agent.msi (extracted)
- Version:
4.4 to 4.8 - Installation parameters:
The official command for unattended installation is: citrix_app_layering_agent_installer.exe /S /v”/qn”, but this does not work without throwing an error. This is explained in the section Scripting the Citrix App Layering Agent. - Uninstallation parameters:
The software can be uninstalled using the normal MSI uninstall parameters: MsiExec.exe /I{886FB0B5-5F09-4FCD-B329-B16AC8BA9E3D}. - Log files
- Default MSI log file (if not changed on the command line): %Temp%\MSIxxxxx.log. The name of the log file is generated at installation time and is never the same.
- Default log file of the executable file citrix_app_layering_agent_installer.exe: C:\Program Files (x86)\Citrix\Agent\Logs\applayering.agent.log
- Installation dependencies:
- .NET Framework 4.5 or higher
- PowerShell 3.0 or higher
- On a Windows 2008 R2 Provisioning Server run the PowerShell command Enable-PSRemoting to enable the remote execution of PowerShell commands.
- On a Provisioning Server, the PVS console as well as the PowerShell snap-in has to be installed. Please see the article Citrix Provisioning Server unattended installation for detailed information on how to do this.
- Other dependencies:
No - Reboot required:
No - Service:
Citrix App Layering Agent (the service name is: Citrix.AppLayering.Agent) - ADMX files:
No - Ports and firewall:
No (outbound communication to port 8016 on the ELM only) - Download location:
The Citrix App Layering Agent can be downloaded as a stand-alone component on the Citrix download page in the section Tools. - Reference:
Scripting the Citrix App Layering Agent
Before we start, I need to mention that the installation is not as straightforward as one might expect. I expected the installation to be a simple execution of the citrix_app_layering_agent_installer.exe including some parameters. Unfortunately, the underlying MSI does not work well for unattended installations. I explain all this in the following paragraphs.
Step 1: Installing the Citrix App Layering Agent
By default, the unattended installation should be triggered as follows:
“C:\Temp\citrix_app_layering_agent_installer.exe” /S /v”/qn”

This unfortunately does not work. At the end, the following error is thrown:

The explanation why this error is thrown takes a bit of time, therefore I describe it in a separate section below.
OK, so how do we install the agent? The correct command is as follows:
“C:\Temp\citrix_app_layering_agent_installer.exe” /S /v”/qn /l*v “C:\Logs\Install_CitrixAppLayeringAgent.log” PORT=8016 SKIP_ELM_REGISTRATION=1 TRANSFORMS=”C:\Temp\CitrixAppLayeringAgentSkipELMRegistration.mst””
| Note: make sure that the log directory exists before running the unattended installation to prevent errors! |
Let’s analyze the various parameters. The first two parameters are for the executable file citrix_app_layering_agent_installer.exe:
- /S – This parameter tells the executable file to install the software silently
- /v – This parameter initiates the parsing of the MSI parameters
| Note: the executable citrix_app_layering_agent_installer.exe is merely a wrapper containing an MSI file. |
The parameters which come after /v are the MSI parameters:
- /qn – This parameter sets the user interface (UI) level; /qn means “no UI”.
- /l*v “C:\Logs\Install_CitrixAppLayeringAgent.log” – This parameter tells the MSI to create a log file (verbose).
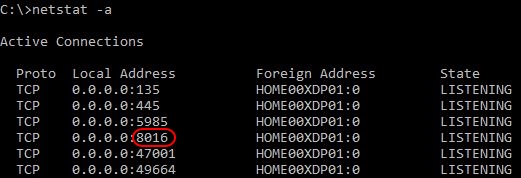
- PORT=8016 – This parameter allows the administrator to set the listening port for the App Layering Agent service. The default port is 8016. After installation, open a command window and use the NetStat command to check if the agent service is actively listening on the configured port: netstat -a.
- SKIP_ELM_REGISTRATION=1 – This parameter determines if the ELM registration is skipped or not (0 = do not skip; 1 = skip). This parameter does not work without the custom transform file (explained below).
- TRANSFORMS=”C:\Temp\CitrixAppLayeringAgentSkipELMRegistration.mst” – This parameter adds a transform file (*.MST) to the MSI file (explained below).
| Note: when using the citrix_app_layering_agent_installer.exe, the full path to the transform file is required. If you do not use the full path, the installer tries to locate the transform file in the temporary directory used to extract the MSI file (see below). The installation will fail since the MST file will not be present in this directory. |
In the command line, I have added a custom-made transform file (*.MST). I had to create this transform file to fix a small error in the original MSI file. Please see the section below for a more detailed explanation of this matter. You can download the MST file here:
Download custom MST file for Citrix App Layering Agent 4.4 to 4.8
In the section Complete installation script I prepared a PowerShell script which includes the installation and registration process including detailed logging and error handling. In this script, I use the MSI file instead of the executable file citrix_app_layering_agent_installer.exe.
This is how you retrieve the MSI file.
First, extract the MSI file. Start the citrix_app_layering_agent_installer.exe manually and wait until the first window of the MSI setup is shown.

Do NOT click Next! Instead, open your temp folder (%temp%). The installer will have created two folders and an MSI log file.
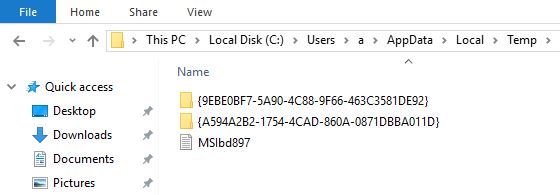
In one of the two folders you will find the MSI file Citrix App Layering Agent.msi.
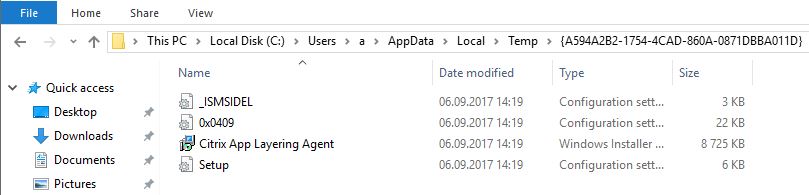
Copy the MSI to a different folder, because as soon as you close the installation wizard, the MSI will be deleted. After copying the MSI file you can cancel the installation wizard.
Before running the MSI file make sure that you have installed the prerequisites as described in the section above. Run the MSI as follows:
msiexec /i “C:\Temp\Citrix App Layering Agent.msi” /qn /l*v “C:\Logs\Install_CitrixAppLayeringAgent.log” PORT=8016 SKIP_ELM_REGISTRATION=1 TRANSFORMS=”C:\Temp\CitrixAppLayeringAgentSkipELMRegistration.mst”
| Note: make sure that the log directory exists before running the unattended installation to prevent errors! |
The parsed MSI parameters are the same as for the executable file.
| Note: when using the Citrix App Layering Agent.msi, the full path to the transform file is NOT required, as long as you keep the transform file in the same directory as the MSI file (e.g. TRANSFORMS=”CitrixAppLayeringAgentSkipELMRegistration.mst”). |
The unattended installation method described in this paragraph skips the registration of the Citrix App Layering Agent to the ELM. The registration part is covered in the following paragraph.
Step 2: Registering with the App Layering appliance
The previous paragraph explains the installation of the Citrix App Layering Agent. In the manual installation wizard, you can register the agent with the ELM directly, but this is not possible during an unattended installation. I explain this in detail in the section The Citrix App Layering Agent MSI does not enable registration parameters to be parsed during unattended installation.
The following command allows an administrator to register the ELM after installing the Citrix App Layering Agent:
“C:\Program Files (x86)\Citrix\Agent\Citrix.AppLayering.Agent.Service.exe” registerwithelm /elmaddress:”DNS or IP address” /user:”MyDomain\MyUser” /password:”MyPassword” /errorfile:”C:\Logs\ELMRegistrationErrorLog.log” /ignorecerterrors:true
| Note: make sure that the log directory exists before running the command! |
Let’s analyze the various parameters:
- registerwithelm – this parameter triggers the registration with the ELM.
- /elmaddress:”DNS or IP address” – this parameter contains the DNS name or IP address of the ELM.
- /user:”MyDomain\MyUser” – this parameter contains the user account with administrative permissions on the ELM.
- /password:”MyPassword” – this parameter contains the password of the administrative user account.
- /errorfile:”C:\Logs\ELMRegistrationErrorLog.log” – this parameter contains the path and filename (including the file extension) where the error log should be created. Please be aware that this error log is only created in case of errors. If the registration process runs without errors, the error log is NOT created.
- /ignorecerterrors:true – this parameter tells the executable to ignore any SSL/TLS errors.
The executable Citrix.AppLayering.Agent.Service.exe provides two default exit codes; 0 = success and 1 = error. In the following example, I forced an error by omitting the parameter /ignorecerterrors:true. This leads to an SSL/TLS error. You can see that the exit code is correctly set to 1.

To see all available parameters, execute the following command: “C:\Program Files (x86)\Citrix\Agent\Citrix.AppLayering.Agent.Service.exe” /?.
The complete installation script below includes the ELM registration.
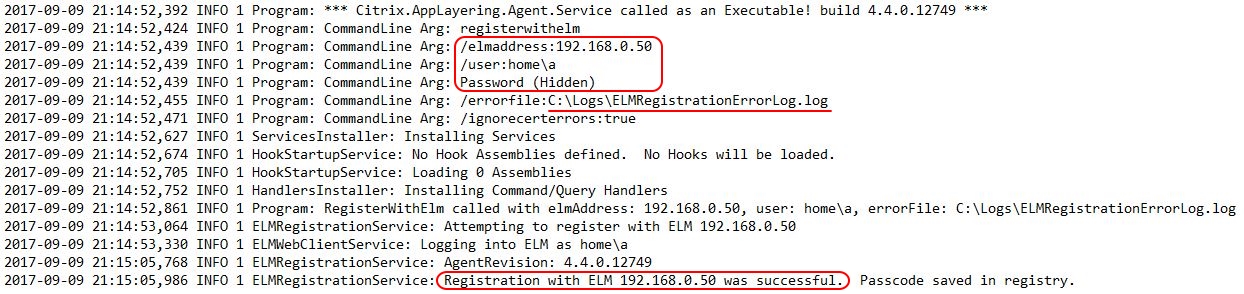
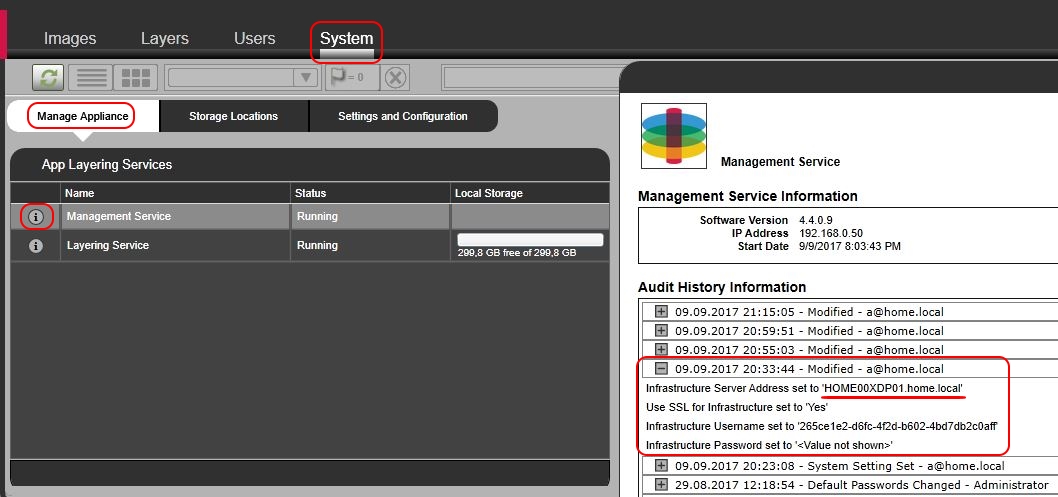
There are two manual ways to check if the registration was successful or not:
- On the Provisioning Server, open the log file C:\Program Files (x86)\Citrix\Agent\Logs\applayering.agent.log.
- In the App Layering console, go to System, Manage Appliance. Click on the information symbol next to Management Service. This opens the audit log. If successful, you will find the registration of your Provisioning Server there (the screenshot is from App Layering version 4.4, but looks the same in versions 4.5 to 4.8).
Reference:
- Citrix App Layering 4 – Install
- Install the App Layering Agent […] Register with the App Layering appliance manually
Complete installation script
The following script includes the installation and registration process of the Citrix App Layering Agent including detailed logging and error handling.
- Created for: Citrix App Layering Agent 4.4 to 4.8 (may also work for older versions).
- Supported operating systems: Windows Server 2008 R2 to Windows Server 2016 Build 1607
- Tested on: Windows Server 2016 Build 1607
This script is based on my installation template. You can change the log directory and package name in lines 202 and 203. Also, make sure to edit lines 213 to 216. These lines contain the variables required for the ELM registration (address, user account, password,d and location of the error log file).
One more thing. In the script, I parse the password of the administrative user account in plain text. I do not recommend this for your production environment. For more information on how to secure passwords in a PowerShell script see Encrypting passwords in a PowerShell script.
From beginning to end, these are the steps involved in a successful installation:
- Create an installation directory on the local computer or on a file share (UNC path). For example C:\Temp\Citrix\App Layering Agent.
- Create a subdirectory called Files.
- Copy the file Citrix App Layering Agent.msi to the folder Files. You first have to extract the MSI file from the executable as described in one of the previous sections.
- Download and copy the custom MST file CitrixAppLayeringAgentSkipELMRegistration.mst to the folder Files.
- Copy the PowerShell script below to a new PS1 file (e.g. Install_CitrixAppLayeringAgent.ps1) and add this file to the root of your installation directory (not in the subdirectory Files).
- Execute the PowerShell script: powershell.exe -file C:\Temp\Citrix\App Layering Agent\Install_CitrixAppLayeringAgent.ps1.
In case you get a security warning, set the execution policy to allow the script to run:
powershell.exe -executionpolicy bypass -file C:\Temp\Citrix\App Layering Agent\Install_CitrixAppLayeringAgent.ps1.
| Note: you can use the same script for the unattended uninstallation of the Citrix App Layering Agent. Simply add the parameter uninstall, like this: powershell.exe -file C:\Temp\Citrix\App Layering Agent\Install_CitrixAppLayeringAgent.ps1 Uninstall |
|
1 2 3 4 5 6 7 8 9 10 11 12 13 14 15 16 17 18 19 20 21 22 23 24 25 26 27 28 29 30 31 32 33 34 35 36 37 38 39 40 41 42 43 44 45 46 47 48 49 50 51 52 53 54 55 56 57 58 59 60 61 62 63 64 65 66 67 68 69 70 71 72 73 74 75 76 77 78 79 80 81 82 83 84 85 86 87 88 89 90 91 92 93 94 95 96 97 98 99 100 101 102 103 104 105 106 107 108 109 110 111 112 113 114 115 116 117 118 119 120 121 122 123 124 125 126 127 128 129 130 131 132 133 134 135 136 137 138 139 140 141 142 143 144 145 146 147 148 149 150 151 152 153 154 155 156 157 158 159 160 161 162 163 164 165 166 167 168 169 170 171 172 173 174 175 176 177 178 179 180 181 182 183 184 185 186 187 188 189 190 191 192 193 194 195 196 197 198 199 200 201 202 203 204 205 206 207 208 209 210 211 212 213 214 215 216 217 218 219 220 221 222 223 224 225 226 227 228 229 230 231 232 233 234 235 236 237 238 239 240 241 242 243 244 245 246 247 248 249 250 251 252 253 254 255 256 257 258 259 260 261 262 263 264 265 266 267 268 269 270 271 272 273 274 275 276 277 |
#========================================================================== # # CITRIX APP LAYERING AGENT # # AUTHOR: Dennis Span (https://dennisspan.com) # DATE : 10.09.2017 # # COMMENT: This script installs the Citrix App Layering Agent on a Provisioning # Server and registers the agent to the Citrix App Layering Enterprise # Layer Manager (the ELM) # # This script has been designed for the Citrix App Layering Agent version 4.4 to 4.8 # # This script has been designed for the following operating systems: # -Windows Server 2008 R2 SP1 # -Windows Server 2012 R2 # -Windows Server 2016 build 1607 # # This script has been tested on the following operating systems: # -Windows Server 2016 build 1607 # # This script works on 32-bit and 64-bit operating systems # #========================================================================== # Get the script parameters if there are any param ( # The only parameter which is really required is 'Uninstall' # If no parameters are present or if the parameter is not # 'uninstall', an installation process is triggered [string]$Installationtype ) # define Error handling # note: do not change these values $global:ErrorActionPreference = "Stop" if($verbose){ $global:VerbosePreference = "Continue" } # FUNCTION DS_WriteLog #========================================================================== Function DS_WriteLog { <# .SYNOPSIS Write text to this script's log file .DESCRIPTION Write text to this script's log file .PARAMETER InformationType This parameter contains the information type prefix. Possible prefixes and information types are: I = Information S = Success W = Warning E = Error - = No status .PARAMETER Text This parameter contains the text (the line) you want to write to the log file. If text in the parameter is omitted, an empty line is written. .PARAMETER LogFile This parameter contains the full path, the file name and file extension to the log file (e.g. C:\Logs\MyApps\MylogFile.log) .EXAMPLE DS_WriteLog -InformationType "I" -Text "Copy files to C:\Temp" -LogFile "C:\Logs\MylogFile.log" Writes a line containing information to the log file .Example DS_WriteLog -InformationType "E" -Text "An error occurred trying to copy files to C:\Temp (error: $($Error[0]))" -LogFile "C:\Logs\MylogFile.log" Writes a line containing error information to the log file .Example DS_WriteLog -InformationType "-" -Text "" -LogFile "C:\Logs\MylogFile.log" Writes an empty line to the log file #> [CmdletBinding()] Param( [Parameter(Mandatory=$true, Position = 0)][ValidateSet("I","S","W","E","-",IgnoreCase = $True)][String]$InformationType, [Parameter(Mandatory=$true, Position = 1)][AllowEmptyString()][String]$Text, [Parameter(Mandatory=$true, Position = 2)][AllowEmptyString()][String]$LogFile ) $DateTime = (Get-Date -format dd-MM-yyyy) + " " + (Get-Date -format HH:mm:ss) if ( $Text -eq "" ) { Add-Content $LogFile -value ("") # Write an empty line } Else { Add-Content $LogFile -value ($DateTime + " " + $InformationType.ToUpper() + " - " + $Text) } } #========================================================================== # FUNCTION DS_InstallOrUninstallSoftware #========================================================================== Function DS_InstallOrUninstallSoftware { <# .SYNOPSIS Install or uninstall software (MSI or SETUP.exe) .DESCRIPTION Install or uninstall software (MSI or SETUP.exe) .PARAMETER File This parameter contains the file name including the path and file extension, for example C:\Temp\MyApp\Files\MyApp.msi or C:\Temp\MyApp\Files\MyApp.exe. .PARAMETER Installationtype This parameter contains the installation type, which is either 'Install' or 'Uninstall'. .PARAMETER Arguments This parameter contains the command line arguments. The arguments list can remain empty. In case of an MSI, the following parameters are automatically included in the function and do not have to be specified in the 'Arguments' parameter: /i (or /x) /qn /norestart /l*v "c:\Logs\MyLogFile.log" .EXAMPLE DS_InstallOrUninstallSoftware -File "C:\Temp\MyApp\Files\MyApp.msi" -InstallationType "Install" -Arguments "" Installs the MSI package 'MyApp.msi' with no arguments (the function already includes the following default arguments: /i /qn /norestart /l*v $LogFile) .Example DS_InstallOrUninstallSoftware -File "C:\Temp\MyApp\Files\MyApp.msi" -InstallationType "Uninstall" -Arguments "" Uninstalls the MSI package 'MyApp.msi' (the function already includes the following default arguments: /x /qn /norestart /l*v $LogFile) .Example DS_InstallOrUninstallSoftware -File "C:\Temp\MyApp\Files\MyApp.exe" -InstallationType "Install" -Arguments "/silent /logfile:C:\Logs\MyApp\log.log" Installs the SETUP file 'MyApp.exe' #> [CmdletBinding()] Param( [Parameter(Mandatory=$true, Position = 0)][String]$File, [Parameter(Mandatory=$true, Position = 1)][AllowEmptyString()][String]$Installationtype, [Parameter(Mandatory=$true, Position = 2)][AllowEmptyString()][String]$Arguments ) $FileName = ($File.Split("\"))[-1] $FileExt = $FileName.SubString(($FileName.Length)-3,3) # Prepare variables if ( !( $FileExt -eq "MSI") ) { $FileExt = "SETUP" } if ( $Installationtype -eq "Uninstall" ) { $Result1 = "uninstalled" $Result2 = "uninstallation" } else { $Result1 = "installed" $Result2 = "installation" } $LogFileAPP = Join-path $LogDir ( "$($Installationtype)_$($FileName.Substring(0,($FileName.Length)-4))_$($FileExt).log" ) # Logging DS_WriteLog "I" "File name: $FileName" $LogFile DS_WriteLog "I" "File full path: $File" $LogFile if ([string]::IsNullOrEmpty($Arguments)) { # check if custom arguments were defined DS_WriteLog "I" "File arguments: <no arguments defined>" $LogFile } Else { DS_WriteLog "I" "File arguments: $Arguments" $LogFile } # Install the MSI or SETUP.exe DS_WriteLog "-" "" $LogFile DS_WriteLog "I" "Start the $Result2" $LogFile if ( $FileExt -eq "MSI" ) { if ( $Installationtype -eq "Uninstall" ) { $FixedArguments = "/x ""$File"" /qn /norestart /l*v ""$LogFileAPP""" } else { $FixedArguments = "/i ""$File"" /qn /norestart /l*v ""$LogFileAPP""" } if ([string]::IsNullOrEmpty($Arguments)) { # check if custom arguments were defined $arguments = $FixedArguments DS_WriteLog "I" "Command line: Start-Process -FilePath 'msiexec.exe' -ArgumentList $arguments -Wait -PassThru" $LogFile $process = Start-Process -FilePath 'msiexec.exe' -ArgumentList $arguments -Wait -PassThru } Else { $arguments = $FixedArguments + " " + $arguments DS_WriteLog "I" "Command line: Start-Process -FilePath 'msiexec.exe' -ArgumentList $arguments -Wait -PassThru" $LogFile $process = Start-Process -FilePath 'msiexec.exe' -ArgumentList $arguments -Wait -PassThru } } Else { if ([string]::IsNullOrEmpty($Arguments)) { # check if custom arguments were defined DS_WriteLog "I" "Command line: Start-Process -FilePath ""$File"" -Wait -PassThru" $LogFile $process = Start-Process -FilePath "$File" -Wait -PassThru } Else { DS_WriteLog "I" "Command line: Start-Process -FilePath ""$File"" -ArgumentList $arguments -Wait -PassThru" $LogFile $process = Start-Process -FilePath "$File" -ArgumentList $arguments -Wait -PassThru } } # Check the result (the exit code) of the installation switch ($Process.ExitCode) { 0 { DS_WriteLog "S" "The software was $Result1 successfully (exit code: 0)" $LogFile } 3 { DS_WriteLog "S" "The software was $Result1 successfully (exit code: 3)" $LogFile } # Some Citrix products exit with 3 instead of 0 1603 { DS_WriteLog "E" "A fatal error occurred (exit code: 1603). Some applications throw this error when the software is already (correctly) installed! Please check." $LogFile Exit 1 } 1605 { DS_WriteLog "I" "The software is not currently installed on this machine (exit code: 1605)" $LogFile } 1619 { DS_WriteLog "E" "The installation files cannot be found. The PS1 script should be in the root directory and all source files in the subdirectory 'Files' (exit code: 1619)" $LogFile Exit 1 } 3010 { DS_WriteLog "W" "A reboot is required (exit code: 3010)!" $LogFile } default { [string]$ExitCode = $Process.ExitCode DS_WriteLog "E" "The $Result2 ended in an error (exit code: $ExitCode)!" $LogFile Exit 1 } } } #========================================================================== ################ # Main section # ################ # Disable File Security $env:SEE_MASK_NOZONECHECKS = 1 # Custom variables [edit] $BaseLogDir = "C:\Logs" # [edit] add the location of your log directory here $PackageName = "Citrix App Layering Agent" # [edit] enter the display name of the software (e.g. 'Arcobat Reader' or 'Microsoft Office') # Global variables $StartDir = $PSScriptRoot # the directory path of the script currently being executed if (!($Installationtype -eq "Uninstall")) { $Installationtype = "Install" } $LogDir = (Join-Path $BaseLogDir $PackageName).Replace(" ","_") $LogFileName = "$($Installationtype)_$($PackageName).log" $LogFile = Join-path $LogDir $LogFileName # Custom variables for customer [edit] $ELMAddress = "DNS name or IP address" # [edit] The DNS name or IP address of the ELM $ELMAdminAccount = "MyDomain\MyUser" # [edit] The user account with administrative access to the ELM (e.g. MyDomain\MyUser, e.g. Contoso\admin1) $ELMAdminAccountPassword = "MyPassword" # [edit] The password of the user account with administrative access to the ELM console. See the article 'https://dennisspan.com/encrypting-passwords-in-a-powershell-script/' to learn how to securely parse your password (and not use plain text). $ErrorLogFile = Join-Path $LogDir "RegisterWithELMErrorLog.log" # [edit] The location of the error log. Only change this value if you DO NOT want to save the error log in the same # directory as the installation log file. The error log file is only created in case of an error. If there is no # error, no log file is created. # Create the log directory if it does not exist if (!(Test-Path $LogDir)) { New-Item -Path $LogDir -ItemType directory | Out-Null } # Create new log file (overwrite existing one) New-Item $LogFile -ItemType "file" -force | Out-Null DS_WriteLog "I" "START SCRIPT - $Installationtype $PackageName" $LogFile DS_WriteLog "-" "" $LogFile ########################################################################### # Install or uninstall software $FileName = "Citrix App Layering Agent.msi" # [edit] enter the name of the installation file (e.g. 'MyApp.msi' or 'setup.exe') if ( $Installationtype -eq "Uninstall" ) { $Arguments = "" # [edit] enter arguments (for MSI file the following arguments are added by default: /i #File# /qn /norestart / l*v #LogFile#) } else { $Arguments = "PORT=8016 SKIP_ELM_REGISTRATION=1 TRANSFORMS=""CitrixAppLayeringAgentSkipELMRegistration.mst""" # [edit] enter arguments (for MSI file the following arguments are added by default: /i #File# /qn /norestart / l*v #LogFile#) } $FileSubfolder = "Files" # [edit] enter the name of the subfolder which contains the installation file (e.g. 'Files' or 'MSI') $FileFullPath = Join-Path $StartDir $FileSubfolder # Concatenate the two directories $StartDit and $InstallFileFolder DS_InstallOrUninstallSoftware -File ( Join-Path $FileFullPath $FileName ) -InstallationType $Installationtype -Arguments $Arguments # Only run the following commands during installation, not uninstallation If (! ($Installationtype -eq "Uninstall") ) { DS_WriteLog "-" "" $LogFile # Register agent to the Enterprise Layer Manager $Executable = "C:\Program Files (x86)\Citrix\Agent\Citrix.AppLayering.Agent.Service.exe" $Param1 = "/elmaddress:$ELMAddress" $Param2 = "/user:$ELMAdminAccount" $Param3 = "/password:$ELMAdminAccountPassword" $Param4 = "/errorfile:""$ErrorLogFile""" $Param5 = "/ignorecerterrors:true" DS_WriteLog "I" "Register agent to the Enterprise Layer Manager" $LogFile DS_WriteLog "I" "Command: $Executable registerwithelm $Param1 $Param2 /password:***** $Param4 $Param5" $LogFile $Error.Clear() & $Executable registerwithelm $Param1 $Param2 $Param3 $Param4 $Param5 | Out-Null # Start the installation (& = run external command) if ( $? -eq $True ) { DS_WriteLog "S" "The agent successfully registered to the ELM ($ELMAddress)" $LogFile } else { DS_WriteLog "E" "An error occurred trying to register the agent to the ELM" $LogFile DS_WriteLog "E" "See the error log file for more information: $ErrorLogFile" $LogFile Exit 1 } } ########################################################################### # Enable File Security Remove-Item env:\SEE_MASK_NOZONECHECKS DS_WriteLog "-" "" $LogFile DS_WriteLog "I" "End of script" $LogFile |
After installation, check the log files for detailed information. By default, all log files are stored in the directory C:\Logs\Citrix_App_Layering_Agent (unless you changed the log directory and/or file name).
If you want to go one step further and create an SCCM package as well, please follow the step-by-step explanation in the article Deep dive creating SCCM packages for Citrix.
Explaining the MSI issue and the workaround (MST)
In this section, I go into more detail concerning the installation error and the MSI issues.
The Citrix App Layering Agent MSI does not skip ELM registration when running in unattended mode
An unattended installation ends in an error, because the MSI installer requires that the ELM registration is completed.
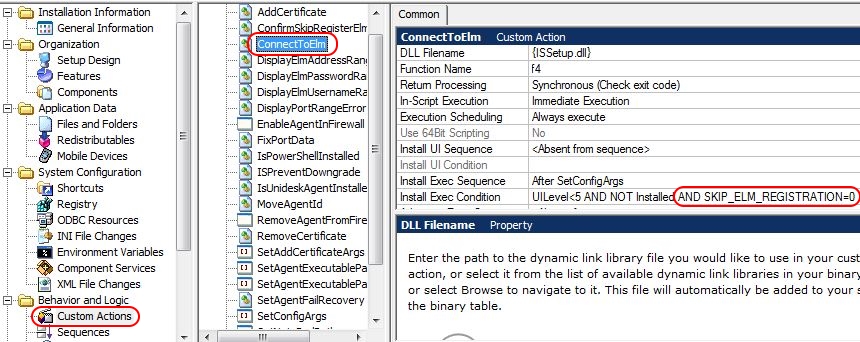
To be more precise, the custom action ConnectToElm requires this. Let us take a closer look at the contents of the MSI package. The custom action ConnectToElm is highlighted in the screenshot below. Also highlighted are the conditions under which the custom action is executed (UILevel<5 AND NOT Installed).
Now, when checking the MSI properties, I found a very promising public property called SKIP_ELM_REGISTRATION. By default, this is set to 0. 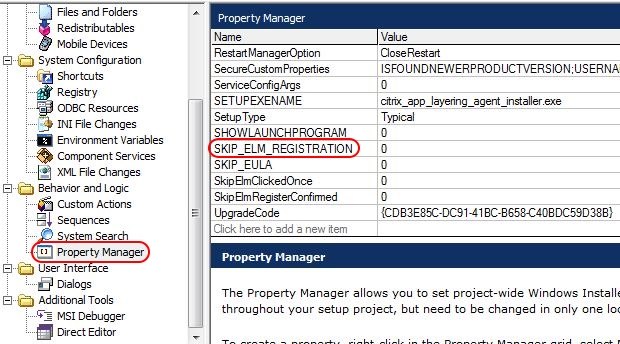
I hoped that adding this parameter to the MSI command line (and setting it to 1) would allow the unattended installation to finish without displaying an error. Unfortunately, this was not the case. The custom action ConnectToElm was still triggered and the error was still thrown.
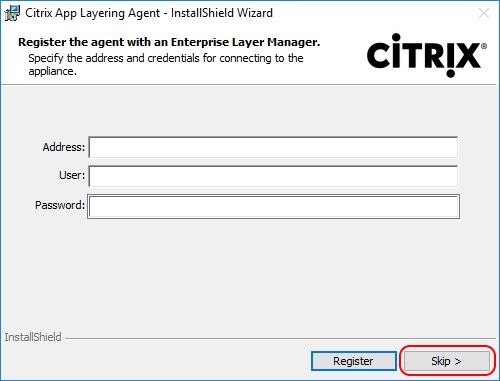
Also, the Skip button available during manual installation does not provide us with any useful public property (only a private property).
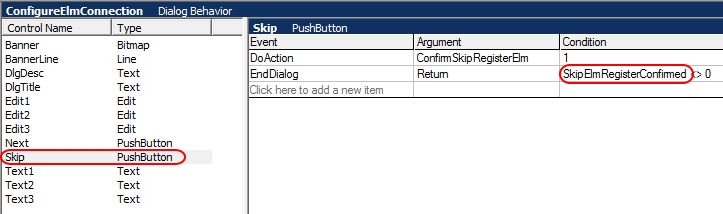
This is why I had no other option than to create a transform file (*.MST) to fix this issue. The only thing I added to the transform file is an additional condition on the custom action ConnectToElm. As you can see in the screenshot below, I added the condition AND SKIP_ELM_REGISTRATION=0. Now, when the property SKIP_ELM_REGISTRATION is added to the MSI command line and set to 1, the ELM registration is actually skipped, thus preventing the error message.
The Citrix App Layering Agent MSI does not enable registration parameters to be parsed during unattended installation
In the previous paragraph, we saw that the ELM registration cannot be skipped by default. Skipping the registration would not have been an issue at all if either the executable or the MSI file had allowed for an unattended registration.
To get to the point, there are no (public MSI) properties available to register the Citrix App Layering Agent to the ELM during an unattended installation. Let me explain.
Let’s take a look inside the MSI package and focus on the section Dialogs. This section contains the windows shown in the (manual) installation wizard. Here I found the dialog called ConfigureElmConnection. This dialog contains the registration window you see in the installation wizard when you execute it manually. 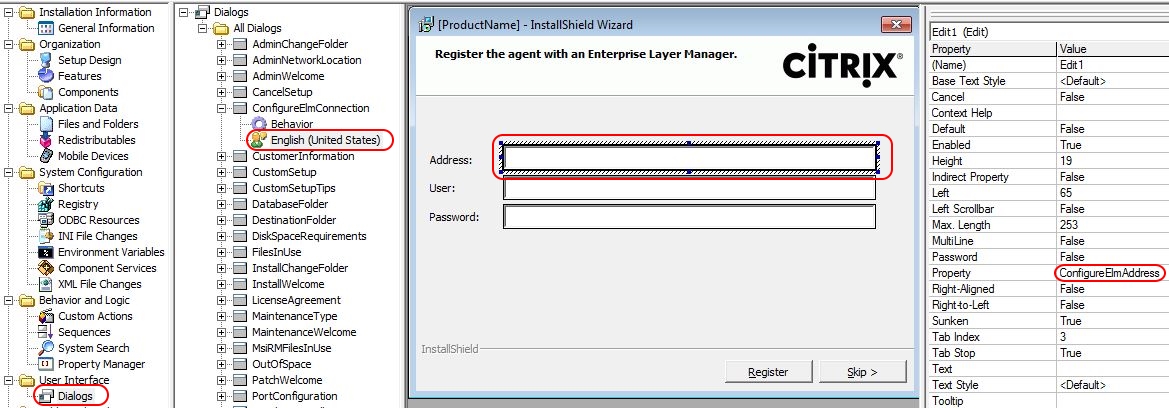
The windows contain three fields. When selecting each of the available fields, the corresponding property name of that field shows up in the column on the right. The properties for each of the three fields are:
- Field “Address” -> MSI property “ConfigureElmAddress”
- Field “User” -> MSI property “ConfigureElmUser”
- Field “Password” -> MSI property “ConfigureElmPassword”
As explained above, this property contains lowercase characters, which means that this is a private property. And private properties cannot be parsed on the command line. So, even though there are properties available for each of the three data entries (ELM address, user, and password), we cannot parse them.
This is the reason why I had to split the installation into two parts:
- The installation using the Citrix App Layering Agent.msi (skipping registration);
- The (“stand-alone”) registration using the Citrix.AppLayering.Agent.Service.exe.
Conclusion
The installation of the Citrix App Layering Agent should be simple considering it is such a small component, but unfortunately, it is not. I sincerely hope that Citrix will make the necessary improvements in future releases to allow for a less complicated unattended installation. For now, I hope this article is of some help to you.
Dennis Span works as a Principal Account Technology Strategist at Cloud Software Group in Vienna, Austria. He holds multiple Citrix certifications (CCE-V). Dennis has been a Citrix Technology Advocate (CTA) since 2017 (+ one year as Citrix Technology Professional, CTP). Besides his interest in virtualization technologies and blogging, he loves spending time with his family as well as snowboarding, playing basketball, and rowing. He is fluent in Dutch, English, German, and Slovak and speaks some Spanish.

Pingback: Scripting the complete list of Citrix components with PowerShell - Dennis Span
Pingback: Detailed Change Log – Carl Stalhood
Pingback: App Layering – Enterprise Layer Manager 4.5 – Carl Stalhood
Pingback: Site Updates – September 2017 – Carl Stalhood
Hi !
Herby I’m confirming that the mst file as well as the overall procedure described in this thread works for the ELM agent 1812 and Windows 2016.
I’m about to test this with other version of the ELM as well.
Thx Dennis !
Regards from PL.
Thanks a lot for your feedback Peter! That is great to hear! I did not have the time to test the installation using the latest versions of App Layering. Regards from Vienna.
checked against those versions, and the MST do the trick for the installation
4.300.28 – OK
4.400.5.0 – OK
4.1400.11.0 – OK
4.1500.9.0 – OK
18.1200.5.0 – OK
19.100.8.0 – OK
Thanks Peter! It is great to know that the MST works on all releases.