
In this article, Google Chrome on Citrix deep-dive, I will show you how to deploy and configure Google Chrome on Citrix. Using a comprehensive PowerShell script we will automate the unattended installation and some initial configuration for Chrome. This article also deals with the various methods how configuring Chrome, including Microsoft Group Policies and preference files.
| Change Log 22.07.2017: Correction; add lines to the master_preference file to prevent the creation of (desktop) shortcuts. 25.07.2017: Chrome adds entries to the Active Setup registry keys. Learn how to execute this command line using a VBScript. 20.09.2017: Added link to article Deploying Google Chrome extensions using Group Policy. 24.02.2018: An error occurs if the PowerShell version is not 3.0 or higher. 01.04.2018: Updated the section Google Chrome and roaming profiles. 09.04.2018: Updated the section Google Chrome and roaming profiles. Roaming profiles and the preferred method is better explained. The section Using preferences files has been updated as well. Corrected an error regarding the installation directory. 23.08.2018: Update the section Is Google Chrome supported on Citrix hosted-shared? Chrome is now officially supported! 14.01.2019: Added the section Troubleshooting and explained how the Software Reporting Tool may crash your servers. 18.01.2019: Updated article to the latest version of Chrome: 71.x released in December 2018. Before this update, this article was based on version 59 released in June 2017. |
Google Chrome on Citrix deep-dive (introduction)
Scripting the unattended installation of Google Chrome is a must in large environments. This article takes you through all the steps.
Fully automating your master images is best practice, whether it concerns FAT clients, VDI, or hosted-shared (e.g. Citrix XenApp, RDS, WTS). The installation and configuration of Google Chrome has always been somewhat difficult to manage though.
In May 2017, Google released the Google Chrome Enterprise Bundle. This bundle provides some improvement over past installations, but it still is not perfect. This article takes you through all the steps to successfully setup and configure Google Chrome in your environment. Also described in this article are the additional complexities when using Citrix XenDesktop, especially on hosted-shared (“XenApp”).
An overview of the Google Chrome Enterprise Bundle
The Google Chrome Enterprise Bundle includes all components required to successfully install and configure Google Chrome (as well as the plugin Legacy Browser Support) in an enterprise environment.
The latest version can be downloaded here:
https://chromeenterprise.google/browser/download
The version of Google Chrome that this article is based on is 71.x released in December 2018.
You can choose to download the 32-bit or 64-bit bundle or the 32-bit or 64-bit standalone Chrome installer. If you choose to download the standalone installer, the ADM/ADMX files for your Group Policies have to be downloaded separately. In this article, I work with the 64-bit version.
So, what exactly is included in this bundle? Well, after downloading and extracting the ZIP file GoogleChromeEnterpriseBundle64.zip, you will find three directories:
- Configuration
This folder contains the ADM and ADMX files, including multiple language files, which you can add to your Microsoft Group Policies. I strongly recommend using the ADMX files instead of the ADM files. In my opinion, Google added the ADM files for legacy support only. See the section Using Microsoft Group Policies (preferred) in this article for more information. The folder Configuration also contains the master_preferences file. This file contains pre-configuration settings. For more information see the section Using preference files in this article. - Documentation
As the name suggests, this folder contains documentation. The PDF file README.pdf provides a general overview of how to install, deploy, and configure both Google Chrome and the Legacy Browser Support. In the various subfolders, you find detailed documentation about all possible Group Policy settings (in multiple languages). - Installers
This directory contains the MSI installation files for both Google Chrome and the Legacy Browser Support (which allows users to switch automatically between Chrome and another browser). In July 2018, the new feature Endpoint Verification was introduced and a third MSI installer (EndpointVerification_%Version%.msi) was added to Chrome.
Google Chrome and Citrix
Is Google Chrome supported on Citrix hosted-shared (XenDesktop and XenApp)?
Yes!! I can wholeheartedly say that the Google Chrome browser is now supported on Citrix. For those of you who read this article before, the wording in this section has changed. In the past, it was not easy to find a definite statement from either Citrix or Google that Chrome is supported on Citrix. But this has changed. Before, I wrote the phrase “A clearer stance on the matter of support from both Google/Chromium and Citrix would be appreciated”. This clearer stance has now been given by both Citrix and Google.
In 2018, I had the opportunity to have a couple of one-on-one meetings with the Google Chrome development team. Together we came up with several improvements for Chrome concerning the installation and configuration in virtual environments. One of the improvements we came up with (albeit on a more organizational level) was to get Chrome listed as a Citrix Ready product and now it is!

The following two articles also clearly state that Chrome is supported on both desktop and server operating systems as well as on Citrix XenDesktop and XenApp:
- Chrome Browser system requirements
- Chrome browser in the enterprise: new admin bundle and Citrix support
Besides the previously mentioned websites, the following support articles from both Google/Chromium.org and Citrix show that Chrome is supported on Citrix:
- Run Chrome as a virtual application (Use Chrome on Citrix XenApp 6.5 or later). In this article the following statement is made: “With Chrome 58 and later, Chrome automatically detects if it is running in a remote desktop environment […]”.
- Recommended UPM exclusions for Google Chrome browser
- How to Publish Chrome Browser for XenApp so that GPU Acceleration is Enabled
- Google Chrome Becomes Unresponsive when Started as Published Application
Roaming profiles
Google Chrome supports roaming profiles. For more information, please see the section Google Chrome and roaming profiles in this article.
Publishing Google Chrome in Citrix Studio/AppCenter
Publishing Google Chrome in Citrix Studio (Virtual Applications and Desktops / XenDesktop) or AppCenter (XenApp 6.x) works the same as with any other application. The command line contains the path and executable of Chrome (chrome.exe) and the parent folder is set as the working directory:
- Command line: C:\Program Files (x86)\Google\Chrome\Application\chrome.exe
- Working directory: C:\Program Files (x86)\Google\Chrome\Application
According to the official Chromium article Run Chrome as a virtual application, Chrome 58 (released in April 2017) and later automatically detects if it is running in a remote desktop environment and adjusts its settings accordingly.
In case you use Chrome version 57 or below, Chrome may become unresponsive when started as a published application. To solve this issue, the chrome.exe should be started with the parameters –allow-no-sandbox-job –disable-gpu. For more information, see the Citrix article Google Chrome Becomes Unresponsive when Started as Published Application. The aforementioned Citrix article is obsolete for Chrome version 58 and higher.
Disabling Citrix API hooks for Chrome
In the previous paragraph, we saw that according to the official Chromium article Run Chrome as a virtual application, Chrome 58 and higher automatically detects if it is running in a remote desktop environment and adjusts its settings accordingly. This automatic adjustment only refers to the (now obsolete) command line switches (–allow-no-sandbox-job –disable-gpu)! It does not refer to the exclusions for hook injection. Let me explain.
Depending on your Citrix version, you may experience problems when launching Chrome. Besides the issue with the command line switches as described in the previous paragraph, you may also need to add the executables chrome.exe and nacl64.exe to the exclusion list for hooks injection as described in the Chromium article Run Chrome as a virtual application and the Citrix article How to Disable Citrix API Hooks on a Per-application (CTX107825). The official bug report (Chromium) can be read here: https://bugs.chromium.org/p/chromium/issues/detail?id=432595.
On the 24th of July 2017, Citrix released a new article called Chrome fails to launch in a published desktop. This article relates to Chrome errors such as “Aw, Snap!” page crashes and gray screens without any message. The solution to solve these errors is the same as above; the processes chrome.exe and nacl64.exe need to be excluded from the Citrix API hooks.
So what exactly does Chrome install on the local system?
Google Chrome and the Legacy Browser Support install the following components on your system:
- Application files:
- Chrome:
- C:\Program Files (x86)\Google\Chrome, including the master_preference file located in the directory C:\Program Files (x86)\Google\Chrome\Application. The installation directory is the same for both the 32-bit and 64-bit versions of Chrome.
- Legacy Browser Support:
- C:\Program Files (x86)\Google\Legacy Browser Support. The installation directory is the same for both the 32-bit and 64-bit versions of the Legacy Browser Support plugin.
- Endpoint Verification:
- I did not check this add-on and do not know exactly which files are included.
- Chrome:
- User files in the directory C:\Users\%UserName%\AppData\Local\Google\Chrome.
- A shortcut to Google Chrome on the public desktop. The path is %Public%\Desktop\Google Chrome.lnk, which by default is C:\Users\Public\Desktop.
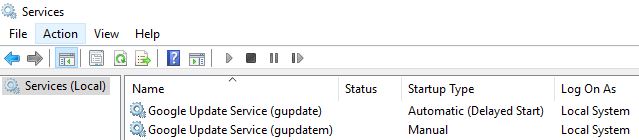
- Two services:
- Google Update Service (gupdate)
- Google Update Service (gupdatem)
- Two scheduled tasks:
- GoogleUpdateTaskMachineCore
- GoogleUpdateTaskMachineUA
- Computer-specific registry entries in the key HKEY_LOCAL_MACHINE\SOFTWARE\Google
- User-specific registry entries in the key HKEY_CURRENT_USER\SOFTWARE\Google
- Active Setup entries (see also this section in this article):
HKEY_LOCAL_MACHINE\SOFTWARE\Microsoft\Active Setup\Installed Components\{8A69D345-D564-463c-AFF1-A69D9E530F96}

Scripting the unattended installation of the Google Chrome Enterprise Bundle with PowerShell
Installing Google Chrome and the Legacy Browser Support
The basic installation procedure for both the Google Chrome and the Legacy Browser Support is a piece of cake. The command line to install both components is as follows:
msiexec.exe /i “C:\GoogleChromeStandaloneEnterprise64.msi” /qn /norestart /l*v “C:\Logs\GoogleChromeStandaloneEnterprise64.log”
msiexec.exe /i “C:\LegacyBrowserSupport_5.5.0.0_en_x64.msi” /qn /norestart /l*v “C:\Logs\LegacyBrowserSupport_5.5.0.0_en_x64.log”
msiexec.exe /i “C:\EndpointVerification_0.4.21.msi” /qn /norestart /l*v “C:\Logs\EndpointVerification_0.4.21.log”
However, you still may run into some troubles when Chrome cannot reach the Internet. The installation may hang and end in an error. This can be fixed with the MSI parameter NOGOOGLEUPDATEPING=1. As per Google:
“I’m trying to install behind a firewall, and the install is timing out and failing.
The problem is that by default, Google Update is attempting to check for an update on installation and fails at the firewall. When parsing a special parameter, the installation will not do this check and should install regardless of outside connectivity. The special parameter is “NOGOOGLEUPDATEPING=1″, and is used like this:”
msiexec.exe /i “C:\GoogleChromeStandaloneEnterprise64.msi” NOGOOGLEUPDATEPING=1 /qn /norestart /l*v “C:\Logs\GoogleChromeStandaloneEnterprise64.log”
For more information concerning installation issues, please see the article Common Problems and Solutions from the Chromium projects.
Currently, I am not aware of any other available product-specific MSI parameters.
At the end of this article, I have prepared a complete installation and configuration script based on my installation template. This script does NOT include the NOGOOGLEUPDATEPING=1 parameter! This script has been created for Windows Server 2008 R2 and higher. I have tested it on Windows Server 2016 only.
To successfully install Google Chrome and the Legacy Browser Support using this script, please follow these steps:
- Create an installation directory on the local computer or a file share (UNC path). For example: C:\Temp\Google\GoogleChrome.
- Create a subdirectory called Files.
- Download and extract the latest version of the Chrome Enterprise Bundle to the folder Files in the installation directory.
- Copy the complete PowerShell script at the end of this paragraph to a new PS1 file (e.g. Install_GoogleChrome.ps1) and add this file to the root of your installation directory (not in the subdirectory Files).
- Execute the PowerShell script:
powershell.exe -file C:\Temp\Google\GoogleChrome\Install_GoogleChrome.ps1
In case you get a security warning, set the execution policy to allow the script to run:
powershell.exe -executionpolicy bypass -file C:\Temp\Google\GoogleChrome\Install_GoogleChrome.ps1.
To uninstall Google Chrome and the Legacy Browser Support, execute the script as follows:
powershell.exe -file C:\Temp\Google\GoogleChrome\Install_GoogleChrome.ps1 Uninstall
Log files are created in the directory C:\Logs\GoogleChrome, but you can change this to any directory you want (see lines 529 to 530).
Reference:
- Chrome Deployment Guide
https://support.google.com/chrome/a/answer/3115278?hl=en - Documentation for Administrators
http://www.chromium.org/administrators
Deploying the “master_preferences” file
User settings can be managed using Microsoft Group Policies and preference files. The master_preference file contains pre-configuration settings (the default settings) for any new user who starts Chrome on the local computer. This paragraph explains how to deploy this file; for more information on how to use and configure the master_preferences file, please see the section Using preference files in this article.
In the previous paragraph Installing Google Chrome and the Legacy Browser Support, we created the directory C:\Temp\Google\GoogleChrome and the subdirectory Files. Add your customized master_preference to the subdirectory Files.
In the complete installation script at the end of this article, the customized master_preference file is copied to the directory C:\Program Files (x86)\Google\Chrome\Application. See line 594.
|
1 2 |
#Deploy the customized 'master_preference' file (copy from 'Files' directory to the 'Google\Chrome\Application' directory DS_CopyFile -SourceFiles ( Join-Path $FileFullPath "master_preferences" ) -Destination (Join-Path ${env:ProgramFiles(x86)} "Google\Chrome\Application" ) |
The actual function DS_CopyFile is located between lines 525 to 396 in the complete script.
Disabling services and scheduled tasks (disable auto-update)
On a Citrix worker, whether it concerns hosted-shared (“XenApp”) or VDI, applications should not automatically update themselves. There are many reasons for this:
- Changes to your productive virtual machine and/or golden master image should be 100% in the control of the administrator. Unplanned (and especially untested) changes can cause problems. The administrator should always be aware of changes to the system for which he or she is responsible.
- Application updates should be tested before going into production. Again, this is to ensure stability and to be able to guarantee continuity in the functionality of the application.
- Disabling auto-updates is a must for some environments, for example when Provisioning Server is in use. Any changes to the virtual machine would end up in your RAM, assuming that’s where your write cache is pointing.
To prevent Chrome from automatically updating itself, the administrator can disable the Group Policy setting Update policy override in the section Computer Configuration \ Policies \ Administrative Templates \ Google \ Google Update \ Applications \ Google Chrome. For more information on Chrome Group Policies see the section Using Microsoft Group Policies (preferred) in this article.
| Note: please be aware that Google does not recommend disabling auto-updates (as described in the article Install and update Google applications). |
Even with the auto-update policy disabled, Google’s update services and scheduled tasks are still present on the local system. I choose to disable the services Google Update Service (gupdate) and Google Update Service (gupdatem) and to remove the scheduled tasks GoogleUpdateTaskMachineCore and GoogleUpdateTaskMachineUA.
The complete installation script at the end of this article disables the update services and removes both scheduled tasks.
In lines 598 to 603, the functions DS_StopService and DS_ChangeServiceStartupType are executed to stop and disable both services:
|
1 2 3 4 5 6 |
# Stop and disable the service 'Google Update Service (gupdate)' DS_StopService -ServiceName "gupdate" DS_ChangeServiceStartupType -ServiceName "gupdate" -StartupType "Disabled" # Stop and disable the service 'Google Update Service (gupdatem)' DS_StopService -ServiceName "gupdatem" DS_ChangeServiceStartupType -ServiceName "gupdatem" -StartupType "Disabled" |
The DS_StopService (lines 183 to 245) stops the service, but the function also checks for potential depend services. In case other services depend on the service you want to stop, these services are stopped first. The last service to be stopped is the one you specified when calling the function. In this particular scenario, there are no depend services.
|
1 2 3 4 5 6 7 8 9 10 11 12 13 14 15 16 17 18 19 20 21 22 23 24 25 26 27 28 29 30 31 32 33 34 35 36 37 38 39 |
# Check if the service exists If ( Get-Service $ServiceName -erroraction silentlycontinue) { # Stop the main service If ( ((Get-Service $ServiceName -ErrorAction SilentlyContinue).Status) -eq "Running" ) { # Check for depend services and stop them first DS_WriteLog "I" "Check for depend services for service '$ServiceName' and stop them" $LogFile $DependServices = ( ( Get-Service -Name $ServiceName -ErrorAction SilentlyContinue ).DependentServices ).name If ( $DependServices.Count -gt 0 ) { foreach ( $Service in $DependServices ) { DS_WriteLog "I" "Depend service found: $Service" $LogFile DS_StopService -ServiceName $Service } } else { DS_WriteLog "I" "No depend service found" $LogFile } # Stop the (depend) service try { Stop-Service $ServiceName | out-Null } catch { DS_WriteLog "E" "An error occurred trying to stop the service $ServiceName (error: $($Error[0]))" $LogFile Exit 1 } # Check if the service stopped successfully If (((Get-Service $ServiceName -ErrorAction SilentlyContinue).Status) -eq "Stopped" ) { DS_WriteLog "I" "The service $ServiceName was stopped successfully" $LogFile } else { DS_WriteLog "E" "An error occurred trying to stop the service $ServiceName (error: $($Error[0]))" $LogFile Exit 1 } } else { DS_WriteLog "I" "The service '$ServiceName' is not running" $LogFile } } else { DS_WriteLog "I" "The service '$ServiceName' does not exist. Nothing to do" $LogFile } |
In lines 607 to 610 the scheduled tasks are removed:
|
1 2 3 4 |
# Delete the scheduled task 'GoogleUpdateTaskMachineCore' DS_DeleteScheduledTask -Name "GoogleUpdateTaskMachineCore" # Delete the scheduled task 'GoogleUpdateTaskMachineUA' DS_DeleteScheduledTask -Name "GoogleUpdateTaskMachineUA" |
Removing scheduled tasks requires two functions. The function DS_GetAllScheduledTaskSubFolders retrieves all functions in all (sub)folders. The function DS_DeleteScheduledTask deletes the scheduled task (see lines 433 to 519). Part of the code I got from the Microsoft Script Center repository (https://github.com/jaapbrasser/SharedScripts/tree/master/Get-ScheduledTask). The code of the two functions is as follows:
|
1 2 3 4 5 6 7 8 9 10 11 12 13 14 15 16 17 18 19 20 21 22 23 24 25 26 27 28 29 30 31 32 33 34 35 36 37 38 39 40 41 42 43 44 45 46 47 48 49 50 51 52 53 54 55 56 57 58 59 60 61 62 63 64 65 66 67 68 69 70 71 72 73 74 75 76 77 78 79 80 81 82 83 84 85 86 87 |
# Function DS_GetAllScheduledTaskSubFolders and DS_DeleteScheduledTask # Note:List all delete all scheduled tasks and delete the one specified in the parameter when the function is called # Reference: Get scheduled tasks from remote computer # https://gallery.technet.microsoft.com/scriptcenter/Get-Scheduled-tasks-from-3a377294 #========================================================================== function DS_GetAllScheduledTaskSubFolders { <# .SYNOPSIS Get all scheduled tasks in all subfolders .DESCRIPTION Get all scheduled tasks in all subfolders .PARAMETER FolderRef This parameter contains the starting point (folder) .EXAMPLE DS_GetAllScheduledTaskSubFolders Retrieves all scheduled tasks in all subfolders #> [cmdletbinding()] param ( # Set to use $Schedule as default parameter so it automatically list all files # For current schedule object if it exists. $FolderRef = $Schedule.getfolder("\") ) if ($FolderRef.Path -eq '\') { $FolderRef } if (-not $RootFolder) { $ArrFolders = @() if(($Folders = $folderRef.getfolders(1))) { $Folders | ForEach-Object { $ArrFolders += $_ if($_.getfolders(1)) { DS_GetAllScheduledTaskSubFolders -FolderRef $_ } } } $ArrFolders } } function DS_DeleteScheduledTask { <# .SYNOPSIS Delete a scheduled task .DESCRIPTION Delete a scheduled task .PARAMETER Name This parameter contains the name of the scheduled task that is to be deleted .EXAMPLE DS_DeleteScheduledTask -Name "GoogleUpdateTaskMachineCore" Deletes the scheduled task 'GoogleUpdateTaskMachineCore' #> [CmdletBinding()] Param( [Parameter(Mandatory=$true, Position = 0)][String]$Name ) DS_WriteLog "I" "Delete the scheduled task $Name" $LogFile try { $Schedule = New-Object -ComObject 'Schedule.Service' } catch { DS_WriteLog "E" "An error occurred trying to create the Schedule.Service COM Object (error: $($Error[0]))" $LogFile Exit 1 } $Schedule.connect($env:ComputerName) $AllFolders = DS_GetAllScheduledTaskSubFolders foreach ($Folder in $AllFolders) { if (($Tasks = $Folder.GetTasks(1))) { foreach ($Task in $Tasks) { $TaskName = $Task.Name #DS_WriteLog "I" "Task name (including folder): $($Folder.Name)\$($TaskName)" $LogFile if ($TaskName -eq $Name) { try { $Folder.DeleteTask($TaskName,0) DS_WriteLog "I" "The scheduled task $TaskName was deleted successfully" $LogFile } catch { DS_WriteLog "E" "An error occurred trying to delete the scheduled task $TaskName (error: $($Error[0]))" $LogFile Exit 1 } } } } } } #========================================================================== |
Removing the public desktop shortcut
The complete installation script at the end of this article includes the removal of the public desktop shortcut. The shortcut, Google Chrome.lnk, is located in the directory %Public%\Desktop, which by default points to C:\Users\Public.
In line 615 I execute the function DS_DeleteFile:
|
1 2 |
# Remove the public desktop shortcut 'Google Chrome.lnk' DS_DeleteFile -File "$env:public\Desktop\Google Chrome.lnk" |
The DS_DeleteFile function contains detailed logging and error handling, but the main command within this function is a simple one:
|
1 |
Remove-Item "$File" | Out-Null |
The shortcut (the name of which is stored in the variable $File) is deleted.
For most applications, this action would be sufficient to prevent the desktop shortcut from being created for new users. Unfortunately, not for Google Chrome (many thanks to Tommy Kozlowski for bringing this to my attention).
Some lines need to be added to the master_preferences file to prevent shortcuts from being created for new users:
- “create_all_shortcuts”: false,
- “do_not_create_desktop_shortcut”: true,
- “do_not_create_quick_launch_shortcut”: true
According to one comment I received (thanks Robert!), the following line is also required:
- “do_not_create_taskbar_shortcut”:true
On a side note, adding the following line will prevent the “First Use” browser wizard from launching:
- “suppress_first_run_default_browser_prompt”: true
Here is a screenshot of the custom master_preferences file shipped with Chrome 59, including the three aforementioned lines.
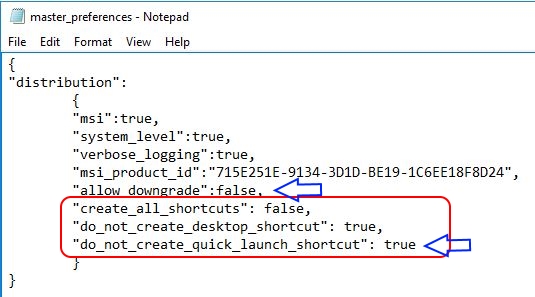
I have added two blue arrows to remind you to correctly set the commas. All grouped items within a JSON segment end with a comma; except for the last item in the segment.
Seamless applications, Active Setup, StubPath and logon script
| Note: many thanks to Bruce Spies for bringing this issue to my attention! |
Google Chrome adds a command line to the Active Setup registry keys, located here:
HKEY_LOCAL_MACHINE\SOFTWARE\Microsoft\Active Setup\Installed Components\{8A69D345-D564-463c-AFF1-A69D9E530F96}\StubPath
The command line, shipped with Chrome version 71, is as follows:
“C:\Program Files (x86)\Google\Chrome\Application\71.0.3578.98\Installer\chrmstp.exe” –configure-user-settings –verbose-logging –system-level
A command line in a StubPath registry entry (located within the Active Setup registry keys) is executed at logon. However, when starting a seamless application, the Active Setup keys are not executed. The same goes when you have disabled Active Setup, for example by renaming the registry key HKEY_LOCAL_MACHINE\SOFTWARE\Microsoft\Active Setup\Installed Components.
So how to solve this issue? One way is to use a logon script. The following example is a small VBScript that you can execute by itself or add to your own logon script. For logon scripts, I recommend using VBScript because it loads faster than a PowerShell script. What this script does is the following:
- Read the command line from the Chrome StubPath entry in Active Setup. The main reason for this is that the command line contains the Chrome version. By reading the command line directly from the registry, the command line is not hard-coded in the VBScript, keeping it flexible for future updates of Chrome.
- Execute the command line.
- Write a flag entry in the user’s registry (HKEY_CURRENT_USER) to ensure that the command line is only executed once.
|
1 2 3 4 5 6 7 8 9 10 11 12 13 14 15 16 17 18 19 20 21 22 23 24 25 26 27 28 29 30 31 32 33 34 35 36 37 38 39 40 41 42 43 44 45 46 47 48 49 50 51 52 53 54 55 56 57 58 59 60 61 62 63 64 65 66 67 68 69 70 71 72 73 74 75 |
'========================================================================== ' ' INITIALIZE GOOGLE CHROME ' ' AUTHOR: Dennis Span (https://dennisspan.com) ' DATE : 25.07.2017 ' ' COMMENT: This script initializes Google Chrome. The command line used is the one located in the ' StubPath entry for Google Chrome, by default located here: ' HKEY_LOCAL_MACHINE\SOFTWARE\Microsoft\Active Setup\Installed Components\{8A69D345-D564-463c-AFF1-A69D9E530F96}\StubPath ' A registry value serving as a 'flag' is written to the registry to ensure that the ' command line is only executed once. '========================================================================== On Error Resume Next Const HKEY_CURRENT_USER = &H80000001 Const HKEY_LOCAL_MACHINE = &H80000002 Set oShell = CreateObject("WScript.Shell") 'Define variables (customize these according to your requirements) sKeyPath = "SOFTWARE\MyKey" 'The registry key in which you want to write the flag entry sEntryName = "InitiateGoogleChrome" 'The name of the flag entry sValue = "1" 'The value of the flag entry 'Initialize Google Chrome only once. After it has been initialized, write a value (a 'flag') to the registy 'to prevent the initialization from being executed more than once. WScript.Echo "Initialize Google Chrome" Set oReg = GetObject("winmgmts:{impersonationLevel=impersonate}!\\.\root\default:StdRegProv") oReg.GetStringValue HKEY_CURRENT_USER, sKeyPath, sEntryName, sCurrentValue 'Check the registry for the flag entry If UCase(sCurrentValue) = UCase(sValue) Then 'In case the flag was found in the registry, the script will do nothing WScript.Echo "Google Chrome has already been initialized. Nothing to do" Else 'Locate the correct registry path and retrieve the command line from the registry entry called 'StubPath' Err.Clear sKeyPathActiveSetup = "Software\Microsoft\Active Setup\Installed Components" 'The Active Setup registry path oReg.EnumKey HKEY_LOCAL_MACHINE, sKeyPathActiveSetup, arrSubKeys 'Retrieve all subkeys in the Active Setup registry path For Each Key In arrSubKeys 'Loop through all the registry subkeys (which names are GUID-based) x = 0 oReg.GetStringValue HKEY_LOCAL_MACHINE, sKeyPathActiveSetup & "\" & Key, "StubPath", sStubPathValue 'Read the StubPath value If InStr(1, sStubPathValue, "\Chrome\", 1) > 0 Then 'Check the contents of StubPath to see if it is the one containing the command line for Google Chrome x = x + 1 'Initialize Google Chrome (= execute the command line retrieved from the 'StubPath' entry) Wscript.Echo "Google Chrome Active Setup command found" Wscript.Echo "Execute command: " & sStubPathValue CMD = oShell.Run(sStubPathValue, 0, True) 'Excute the command line without showing a command window ('0') and wait for the command to finish ('True') If CMD = 0 Then Wscript.Echo "Google Chrome has been successfully initialized" 'Write the flag entry (create the registry key first) oReg.CreateKey HKEY_CURRENT_USER, sKeyPath oReg.SetStringValue HKEY_CURRENT_USER,sKeyPath,sEntryName,sValue 'Double check to make sure that the flag entry was indeed created oReg.GetStringValue HKEY_CURRENT_USER,sKeyPath,sEntryName,sGetValue If UCase(sGetValue) = UCase(sValue) Then WScript.Echo "The flag entry has been created" Else If Err.Description = "" Then Err.Description = "no error description" WScript.Echo "Error writing flag entry " & Err.Number & " - " & Err.Description Err.Clear End If Else If Err.Description = "" Then Err.Description = "no error description" Wscript.Echo "Error initializing Google Chrome " & Err.Number & " - " & Err.Description Err.Clear End If Exit For 'Exit the 'for each' statement End If Next 'Error handling If x = 0 Then WScript.Echo "No Active Setup registry entries for Google Chrome found. This script will now quit" End If End If |
The VBScript does not contain true logging; please replace the lines starting with “wscript.echo” with your own logging function. The error handling is all there.
To change the location of the flag entry, please change lines 23 to 25.
Execute the script using cscript.exe, for example: cscript.exe C:\InitializeGoogleChrome.vbs
Different ways to configure Google Chrome
There are three ways to manage Google Chrome settings:
Using Microsoft Group Policies (preferred)
The recommended method to manage Chrome settings is through Microsoft Group Policy. As per Google: “For Windows, it is recommended to use Group Policy vs. preferences files because only Group Policy can be enforced”. The same statement is made in the Chrome Deployment Guide: “Use Windows Group Policies (GPO policies) and cloud policy over preferences when possible. Unlike policies, preferences do not apply to previous installations of Chrome and are only applied to a single profile. Policies also override any preferences settings for a feature. Also, note that the master_preferences file can be changed and not enforced as group policies can”.
The use of preference files is explained two sections below.
Google provides both ADM and ADMX files to manage its various products. I strongly recommend you use the ADMX files only. Before you can use Microsoft Group Policies to configure Google Chrome, you first need to import the Google Chrome ADMX files in your Group Policy Central Store.
The ADMX files, as well as the ADMX language files, (*.ADML) can be found in the directory Configuration\admx of the Chrome Enterprise Bundle (after extraction of the ZIP file).
In case you are not familiar with the Central Store for Group Policies or you require more detailed information, please see the official Microsoft article How to create and manage the Central Store for Group Policy Administrative Templates in Windows.
Google provides the following six ADMX files:
- chrome.admx
- ChromeUASwitcher.admx
- google.admx
- GoogleUpdate.admx
- LegacyBrowserSupport.admx
- PasswordAlert.admx
The purpose of most of these ADMX files is quite self-explanatory, except for the ADMX file google.admx. This file only has one purpose, which is to define the shared “Google” folder in the Group Policy editor. This folder ensures that all Google policy settings (whether for Chrome or another Google product) are grouped under one header.

The Group Policy Central Store is located on your domain controllers. The ADMX files are located in the root of the store and the language files, the ADML files, are located in a language-specific subdirectory:
- Central store root (containing the ADMX files):
\\%LogonServer%\sysvol\#DomainName#\Policies\PolicyDefinitions - Central store subdirectories for the language files:
\\%LogonServer%\sysvol\#DomainName#\Policies\PolicyDefinitions\#language-country#
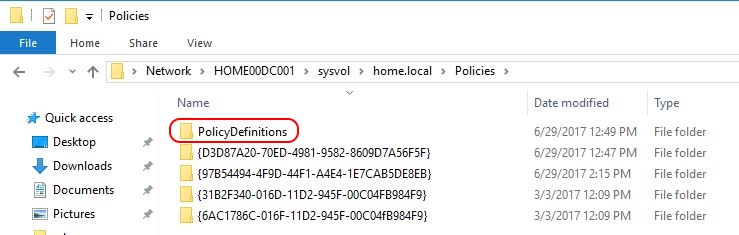
Copy the ADMX files here: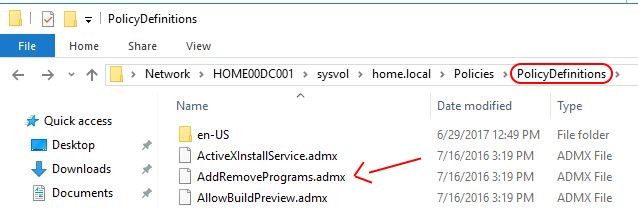
Copy the English ADML files here:
Make sure to copy non-English ADML files to their appropriate directories. The correct directory name for your specific language can be found in the directory Configuration\admx of the Chrome Enterprise Bundle (after extraction of the ZIP file).
Now that you have copied all required files, you can start configuring your settings using a Group Policy editor (such as the Group Policy Management Console).
In case you do not want to update your central store right away, you can first perform some tests by using the local ADMX repository on a server. The local repository on a Windows server is located here: C:\Windows\PolicyDefinitions. The same procedure for copying the ADMX and ADML files applies as with the central store. Use the local Group Policy editor to configure your settings (gpedit.msc).
Important: future versions of Chrome will have updated ADMX and ADML files. Please remember that your Group Policy settings are NOT affected when you update ADMX files. Your settings are stored in different files within each Group Policy itself:
- Registry.pol -> contains group policy settings
- *.xml (e.g. Files.xml) contains your group policy preference settings
The path to an individual group policy is as follows:
\\%LogonServer%\sysvol\#DomainName#\Policies\#PolicyGUID#
After configuring your Chrome settings you can see if your Chrome policies are being applied by entering chrome://policy in the Chrome address bar. This will show you all Chrome settings that are applied for your machine and user.
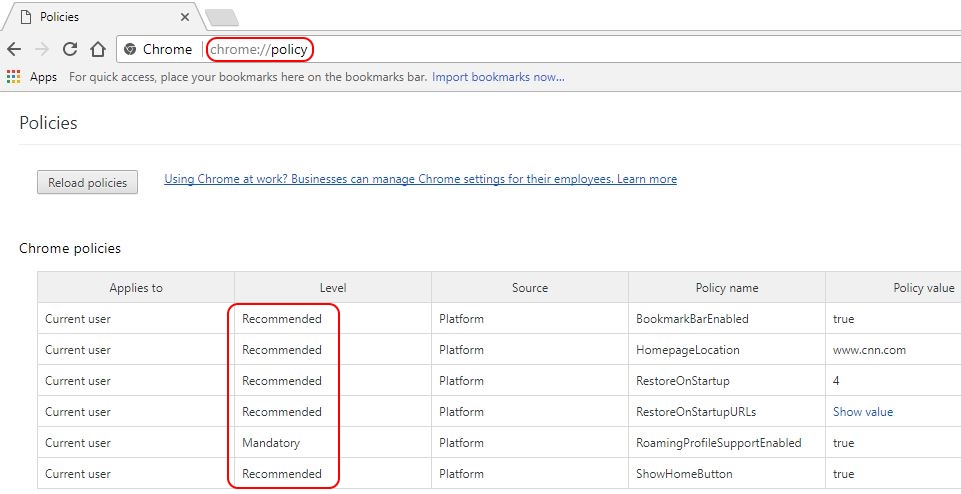
User settings can either be mandatory or recommended. Mandatory user settings are configured here:
User Configuration \ Administrative Templates \ Google \ Google Chrome
Recommended user settings are configured here:
User Configuration \ Administrative Templates \ Google \ Google Chrome – Default Settings (users can override)
On the local server or client, the Chrome computer and user policies are stored in the following registry keys:
- HKEY_CURRENT_USER \ SOFTWARE \ Policies \ Google \ Chrome
- HKEY_LOCAL_MACHINE \ SOFTWARE \ Policies \ Google \ Chrome
For more information concerning the centralized managing of Chrome extensions please see the article Deploying Google Chrome extensions using Group Policy.
Using parameters
Google provides a very long list of command line switches for the chrome.exe executable file. These switches allow an administrator to change the behavior of the application.
For a complete list of all available switches, please see the following article: https://peter.sh/experiments/chromium-command-line-switches.This article seems to be the official list since this link is referred to in the Chromium article Run Chromium with flags.
I do recommend caution when using these switches because they can only be used together with shortcuts. In case users have other ways of starting Chrome (e.g. via the command line), no shortcuts are used and therefore no switches will be applied. This can result in unplanned behavior.
Using preference files
The main and preferred method to manage Chrome settings is through Microsoft Group Policies. However, Chrome also includes a so-called master_preferences file which contains settings that are either not supported by a policy or settings you as an administrator may want to pre-configure at installation time.
Individual user settings are stored in a file called Preferences, stored in the user’s profile. This Preferences file is created on first use of Chrome. By default, this file is located in the directory C:\Users\%UserName%\AppData\Local\Google\Chrome\User Data\Default. User-specific settings are stored in the Preferences file.
As per Google/Chromium: “When users start Chromium / Google Chrome for the first time, they do not yet have any Preferences file. A file named master_preferences located next to chrome.exe or chromium executable, is used as a template for what becomes the user’s Preferences file. On a system with Chrome installed from an MSI, this will be C:\Program Files\Google\Chrome\Application\master_preferences“.
| Note: I found the above statement not to be true. First of all, the contents of the user’s Preferences file is completely different from the master_preferences file. Even if the master_preferences file serves as a template for the user’s Preferences file, this is not obvious when comparing the two files.
Secondly, the installation directory C:\Program Files is not correct. Having tested both the installation of the 32-bit and 64-bit MSI installers, the installation in both cases was C:\Program Files (x86). |
When do you as an administrator configure user settings using a preference file or Group Policies? First of all, in most cases, it will not be necessary to change anything in the master_preferences file. For most configurations, you will use the preferred method Group Policies to manage your settings.
For the most part, you will only need to modify and deploy the master_preferences file if you want to configure certain initial settings, for example, if you want to prevent shortcuts from being created. Please see the article Configuring Other Preferences for more information.
The master_preferences file and the user-specific Preferences file are just text files that contain JSON markup. JSON is similar to XML but with various advantages such as being lightweight, easily readable for humans, and language-independent. For a quick overview, please see the following article. You can use any text editor (e.g. Notepad) if you want to change the configuration of the default master_preferences file. The default file is located in the directory Configuration of the Chrome Enterprise Bundle (after extraction of the ZIP file). See the Chromium article Default user preferences for more information.
According to Google, policies always take precedence over preference files. In my experience, however, I had some issues with my user-specific Preferences file and the Chrome user policies which users can override.

You see, the settings in the “normal” Chrome user policies, in the section Google Chrome, above Google Chrome – Default Settings (users can override), cannot be changed by the user. These are true policies. The settings in the section Google Chrome – Default Settings (users can override) are preferences. They are not mandatory and can be overridden by the user.
The issue I had was the following. I enabled the setting Show Home button on toolbar in the section where the user can override this setting. I did not have this setting enabled anywhere else (e.g. in a local machine policy). The home button never appeared in my browser. In both Chrome (chrome://policy) and the resultant set of policy (gpresult /r) I saw that the policy setting was applied, but I did not see the home button. I then checked my Preferences file in my user directory and discovered that show_home_button was set to false (in the screenshot it is set to true). As soon as I set the value to true in the Preferences file all worked fine.
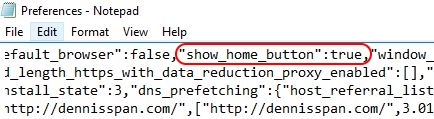
I have to honestly admit that I am still not sure why this problem occurred, but in case you experience similar issues, please make sure to check the user-specific Preferences file.
Disable Google Chrome auto-updates
Please see the section Disabling services and scheduled tasks (disable auto-update) in this article regarding disabling Chrome updates.
Google Chrome and roaming profiles
The combination of Google Chrome and roaming profiles is a bit of a confusing topic. So far, I have discovered three ways to roam user settings.
Google Account
Creating a Google account allows a user to sign in to Chrome on any device where it may be installed. This is the preferred method according to the article Common Problems and Solutions (see the section Can I store my users’ Chrome profiles on a Roaming Profile?).
By default, the following user-specific settings are stored and synchronized:
- Apps
- Autofill
- Bookmarks
- Extensions
- History
- Passwords
- Settings
- Themes & Wallpapers
- Open Tabs
- Credit cards and addresses using Google Pay
The user can modify these settings in the menu.
Google roaming profile (the Profile.pb file)
Google Chrome offers a special option to be used in combination with roaming profiles. As explained in the article Using Chrome on roaming user profiles, settings such as bookmarks, auto-fill data, passwords, per-computer browsing history, browser preferences, and installed extensions can be stored in a file called profile.pb. This file is stored in the directory:
C:\Users\%UserName%\AppData\Roaming\Google\Chrome\User Data.
By default, all profile solutions synchronize the directory C:\Users\%UserName%\AppData\Roaming (= %AppData%), thus ensuring that the file profile.pb is synchronized as well. However, the Profile.pb file can be stored in a different directory as well, even outside of the user’s profile directory.
There are three methods to create the profile.pb file:
- Enable the Group Policy setting Enable the creation of roaming copies for Google Chrome profile data in User or Computer Configuration \ Policies \ Administrative Templates \ Google \ Google Chrome.
- Set the registry value RoamingProfileSupportEnabled to 00000001 in the registry key HKEY_LOCAL_MACHINE\Software\Policies\Google\Chrome or HKEY_CURRENT_USER\Software\Policies\Google\Chrome as described in the section RoamingProfileSupportEnabled in the article Policy List on Chromium.org.
- Add the command line flag –enable-local-sync-backend to the Chrome.exe in the Chrome shortcut. See the article Using Chrome on roaming user profiles for more information.
There are three methods to change the default directory of the profile.pb file:
- Enable the Group Policy setting Set the roaming profile directory in User or Computer Configuration \ Policies \ Administrative Templates \ Google \ Google Chrome.
- Add the profile directory to the registry value RoamingProfileLocation in the registry key HKEY_LOCAL_MACHINE\Software\Policies\Google\Chrome or HKEY_CURRENT_USER\Software\Policies\Google\Chrome as described in the section RoamingProfileLocation in the article Policy List on Chromium.org.
- Add the command line flag –local-sync-backend-dir=<directory> to the Chrome.exe in the Chrome shortcut. See the article Using Chrome on roaming user profiles for more information.
Roaming profiles
If Google accounts are not supported in your organization and you are not able to use the Profile.pb file for some reason, use the standard Windows or Citrix roaming profile method.
By default, Google Chrome stores all user data in the directory C:\Users\%UserName%\AppData\Local\Google\Chrome\User Data (see also the Chromium article User Data Directory).
This directory should be synchronized with your roaming profile. The Citrix User Profile Manager includes this directory by default. Please take note that Citrix recommends to exclude the following four subfolders:
- !ctx_localappdata!\Google\Chrome\User Data\Default\Cache=
- !ctx_localappdata!\Google\Chrome\User Data\Default\Cached Theme Images=
- !ctx_localappdata!\Google\Chrome\User Data\Default\JumpListIcons=
- !ctx_localappdata!\Google\Chrome\User Data\Default\JumpListIconsOld=
As stated in the article Common Problems and Solutions, Chrome user profiles are not backward-compatible. If you try to use mismatched profiles and Chrome versions, you may experience crashes or data loss. This mismatch can often occur if a Chrome profile is synced to a roaming profile or network drive across multiple machines that have different versions of Chrome. In short, do not mix different versions of Chrome into one single roaming profile. Instead, create separate roaming profiles.
Please take note that native Windows roaming profiles by default exclude the folder C:\Users\%UserName%\AppData\Local. See the registry value ExcludeProfileDirs in the registry key HKCU\Software\Microsoft\Windows NT\CurrentVersion\Winlogon.
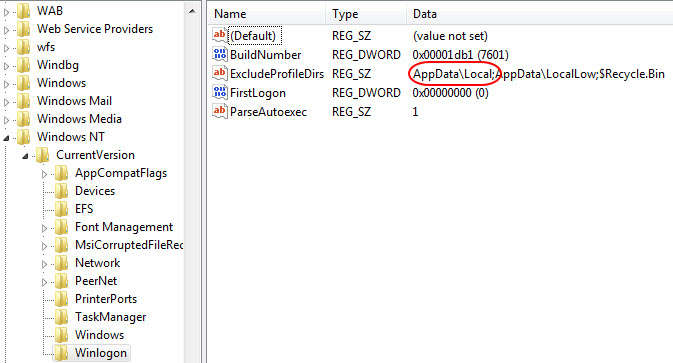
In case you use Windows roaming profiles in your environment, you have to specifically include the path C:\Users\%UserName%\AppData\Local\Google\Chrome\User Data to synchronize the user’s Chrome settings.
Troubleshooting
Software Reporting Tool may crash your servers
I recently had an issue with the Google Chrome Software Reporting Tool, part of Chrome’s Cleanup Tool, on my virtual machines in Azure. This tool caused unexpected, random server crashes, which meant that users were losing their data and that all of their applications were abruptly terminated.
| Note: in the article Analyzing system crashes on non-persistent machines I explain how I investigated this issue using dump files and the tool Windows Debugger. |
The process behind the Software Reporting Tool is software_report_tool.exe and can be found in the following directory that resides in the user profile:
C:\Users\%UserName%\AppData\Local\Google\Chrome\User Data\SwReporter\%ToolVersion%
This tool is:
- Automatically downloaded by Chrome;
- Installed in the user profile (where the user has write access);
- Installed in a subdirectory whose name carries the version of the tool.
After determining that the Software Reporting Tool was causing this, I had to somehow prevent this process from running. I am aware of three options for how to do this:
- Disable the Chrome Cleanup and Reporting Tool using a Chrome group policy
- Disable the Chrome Cleanup and Reporting Tool by modifying the registry
- Using an AppLocker policy to prevent the Software Reporting Tool from running
Option 1: disable the Chrome Cleanup and Reporting Tool using a Chrome group policy
From Chrome version 68 (released in July 2018) the ADMX files for Google Chrome contain the settings Enable Chrome Cleanup on Windows and Control how Chrome Cleanup reports data to Google. These settings can be found here:
Computer Configuration \ Policies \ Administrative Template \ Google \ Google Chrome
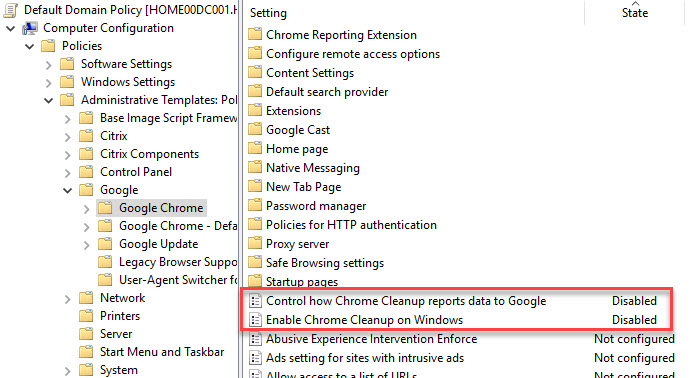
Disabling these settings prevents both the Chrome Cleanup Tool and the Software Reporting Tool from running.
These settings are also described in the official Chromium Policy List:
Thanks to Max for bringing this to my attention!
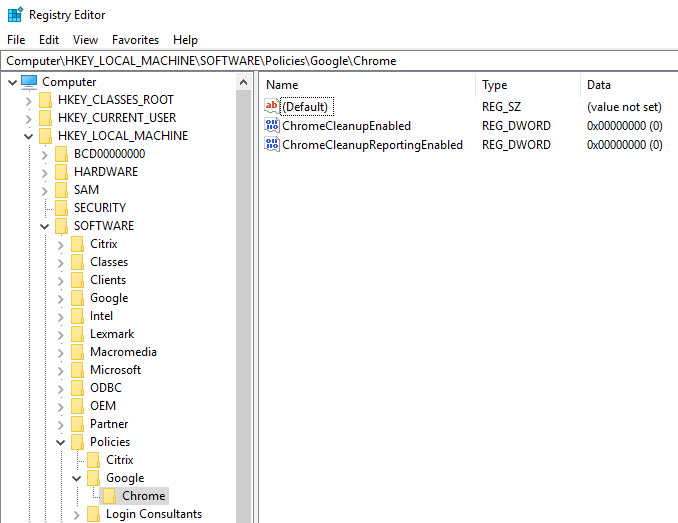
Option 2: disable the Chrome Cleanup and Reporting Tool by modifying the registry
The settings described in option 1 can also be configured directly in the registry:
- HKLM\SOFTWARE\Policies\Google\Chrome
- ChromeCleanupEnabled -> DWORD 00000000
- ChromeCleanupReportingEnabled -> DWORD 00000000
These settings are also described in the official Chromium Policy List:
Thanks to Max for bringing this to my attention!
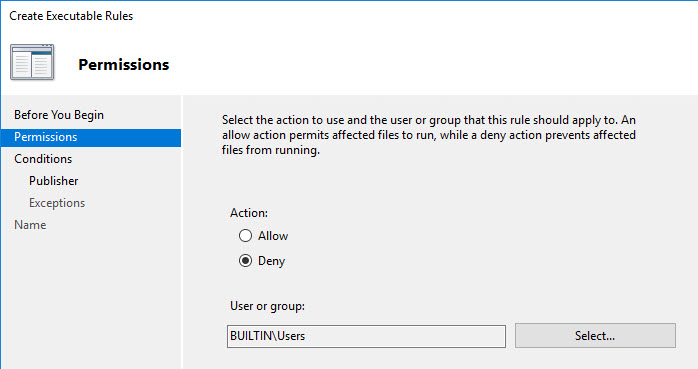
Option 3: Use an AppLocker policy to prevent the Software Reporting Tool from running
Use an AppLocker policy to block all executables in the following path:
%OSDRIVE%\Users\*\AppData\Local\Google\Chrome\User Data\SwReporter
You find the AppLocker policies in the Microsoft Group Policy Management Console under Computer Configuration \ Policies \ Windows Settings\ Security Settings\ Application Control Policies.
Set the permissions to Deny for all Users.
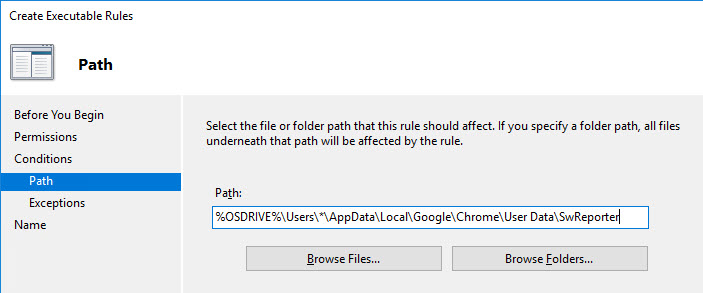
Create a path condition.

Define the path you want to block. Use the AppLocker internal variables and wildcards (environment variables do not work).
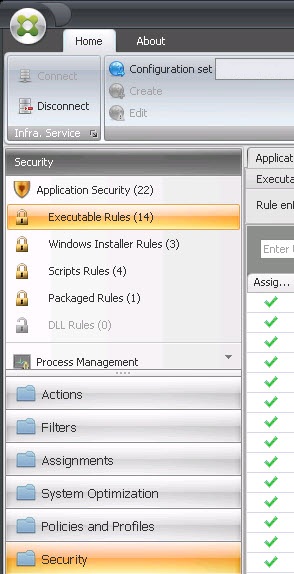
In case you are using Citrix Workspace Environment Manager (WEM), create a new rule in the Application Security section.
Complete script for installing and (partially) configuring Google Chrome
In case you use my installation template, this is what the complete script, including logging and error handling, looks like.
This script has been created for Windows Server 2008 R2 and higher. I have tested it on Windows Server 2016 only.
You can change the base logging directory and the package name (which is used to construct the log file name) in lines 529 to 530.
Make sure to prepare for the installation directory as described in the section Installing Google Chrome and the Legacy Browser Support.
|
1 2 3 4 5 6 7 8 9 10 11 12 13 14 15 16 17 18 19 20 21 22 23 24 25 26 27 28 29 30 31 32 33 34 35 36 37 38 39 40 41 42 43 44 45 46 47 48 49 50 51 52 53 54 55 56 57 58 59 60 61 62 63 64 65 66 67 68 69 70 71 72 73 74 75 76 77 78 79 80 81 82 83 84 85 86 87 88 89 90 91 92 93 94 95 96 97 98 99 100 101 102 103 104 105 106 107 108 109 110 111 112 113 114 115 116 117 118 119 120 121 122 123 124 125 126 127 128 129 130 131 132 133 134 135 136 137 138 139 140 141 142 143 144 145 146 147 148 149 150 151 152 153 154 155 156 157 158 159 160 161 162 163 164 165 166 167 168 169 170 171 172 173 174 175 176 177 178 179 180 181 182 183 184 185 186 187 188 189 190 191 192 193 194 195 196 197 198 199 200 201 202 203 204 205 206 207 208 209 210 211 212 213 214 215 216 217 218 219 220 221 222 223 224 225 226 227 228 229 230 231 232 233 234 235 236 237 238 239 240 241 242 243 244 245 246 247 248 249 250 251 252 253 254 255 256 257 258 259 260 261 262 263 264 265 266 267 268 269 270 271 272 273 274 275 276 277 278 279 280 281 282 283 284 285 286 287 288 289 290 291 292 293 294 295 296 297 298 299 300 301 302 303 304 305 306 307 308 309 310 311 312 313 314 315 316 317 318 319 320 321 322 323 324 325 326 327 328 329 330 331 332 333 334 335 336 337 338 339 340 341 342 343 344 345 346 347 348 349 350 351 352 353 354 355 356 357 358 359 360 361 362 363 364 365 366 367 368 369 370 371 372 373 374 375 376 377 378 379 380 381 382 383 384 385 386 387 388 389 390 391 392 393 394 395 396 397 398 399 400 401 402 403 404 405 406 407 408 409 410 411 412 413 414 415 416 417 418 419 420 421 422 423 424 425 426 427 428 429 430 431 432 433 434 435 436 437 438 439 440 441 442 443 444 445 446 447 448 449 450 451 452 453 454 455 456 457 458 459 460 461 462 463 464 465 466 467 468 469 470 471 472 473 474 475 476 477 478 479 480 481 482 483 484 485 486 487 488 489 490 491 492 493 494 495 496 497 498 499 500 501 502 503 504 505 506 507 508 509 510 511 512 513 514 515 516 517 518 519 520 521 522 523 524 525 526 527 528 529 530 531 532 533 534 535 536 537 538 539 540 541 542 543 544 545 546 547 548 549 550 551 552 553 554 555 556 557 558 559 560 561 562 563 564 565 566 567 568 569 570 571 572 573 574 575 576 577 578 579 580 581 582 583 584 585 586 587 588 589 590 591 592 593 594 595 596 597 598 599 600 601 602 603 604 605 606 607 608 609 610 611 612 613 614 615 616 617 618 619 620 621 622 623 624 |
#========================================================================== # # GOOGLE CHROME ENTERPRISE BUNDLE # # AUTHOR: Dennis Span (https://dennisspan.com) # DATE : 28.06.2017 # # COMMENT: This script installs Google Chrome (version 59 or higher) and # Google Legacy Browser Support (version 4.7 or higher) # # Reference: # -https://techcrunch.com/2017/05/23/google-launches-the-chrome-enterprise-bundle-for-it-admins/ # -https://enterprise.google.com/chrome/chrome-browser/ # -https://support.google.com/chrome/a/answer/3115278?hl=en # # Change log: # ----------- # <DATE> <NAME>: <CHANGE DESCRIPTION> #========================================================================== # Get the script parameters if there are any param ( # The only parameter which is really required is 'Uninstall' # If no parameters are present or if the parameter is not # 'uninstall', an installation process is triggered [string]$Installationtype ) # define Error handling # note: do not change these values $global:ErrorActionPreference = "Stop" if($verbose){ $global:VerbosePreference = "Continue" } # FUNCTION DS_WriteLog #========================================================================== Function DS_WriteLog { <# .SYNOPSIS Write text to this script's log file .DESCRIPTION Write text to this script's log file .PARAMETER InformationType This parameter contains the information type prefix. Possible prefixes and information types are: I = Information S = Success W = Warning E = Error - = No status .PARAMETER Text This parameter contains the text (the line) you want to write to the log file. If text in the parameter is omitted, an empty line is written. .PARAMETER LogFile This parameter contains the full path, the file name and file extension to the log file (e.g. C:\Logs\MyApps\MylogFile.log) .EXAMPLE DS_WriteLog -InformationType "I" -Text "Copy files to C:\Temp" -LogFile "C:\Logs\MylogFile.log" Writes a line containing information to the log file .Example DS_WriteLog -InformationType "E" -Text "An error occurred trying to copy files to C:\Temp (error: $($Error[0]))" -LogFile "C:\Logs\MylogFile.log" Writes a line containing error information to the log file .Example DS_WriteLog -InformationType "-" -Text "" -LogFile "C:\Logs\MylogFile.log" Writes an empty line to the log file #> [CmdletBinding()] Param( [Parameter(Mandatory=$true, Position = 0)][ValidateSet("I","S","W","E","-",IgnoreCase = $True)][String]$InformationType, [Parameter(Mandatory=$true, Position = 1)][AllowEmptyString()][String]$Text, [Parameter(Mandatory=$true, Position = 2)][AllowEmptyString()][String]$LogFile ) $DateTime = (Get-Date -format dd-MM-yyyy) + " " + (Get-Date -format HH:mm:ss) if ( $Text -eq "" ) { Add-Content $LogFile -value ("") # Write an empty line } Else { Add-Content $LogFile -value ($DateTime + " " + $InformationType.ToUpper() + " - " + $Text) } } #========================================================================== # FUNCTION DS_InstallOrUninstallSoftware #========================================================================== Function DS_InstallOrUninstallSoftware { <# .SYNOPSIS Install or uninstall software (MSI or SETUP.exe) .DESCRIPTION Install or uninstall software (MSI or SETUP.exe) .PARAMETER File This parameter contains the file name including the path and file extension, for example C:\Temp\MyApp\Files\MyApp.msi or C:\Temp\MyApp\Files\MyApp.exe. .PARAMETER Installationtype This parameter contains the installation type, which is either 'Install' or 'Uninstall'. .PARAMETER Arguments This parameter contains the command line arguments. The arguments list can remain empty. In case of an MSI, the following parameters are automatically included in the function and do not have to be specified in the 'Arguments' parameter: /i (or /x) /qn /norestart /l*v "c:\Logs\MyLogFile.log" .EXAMPLE DS_InstallOrUninstallSoftware -File "C:\Temp\MyApp\Files\MyApp.msi" -InstallationType "Install" -Arguments "" Installs the MSI package 'MyApp.msi' with no arguments (the function already includes the following default arguments: /i /qn /norestart /l*v $LogFile) .Example DS_InstallOrUninstallSoftware -File "C:\Temp\MyApp\Files\MyApp.msi" -InstallationType "Uninstall" -Arguments "" Uninstalls the MSI package 'MyApp.msi' (the function already includes the following default arguments: /x /qn /norestart /l*v $LogFile) .Example DS_InstallOrUninstallSoftware -File "C:\Temp\MyApp\Files\MyApp.exe" -InstallationType "Install" -Arguments "/silent /logfile:C:\Logs\MyApp\log.log" Installs the SETUP file 'MyApp.exe' #> [CmdletBinding()] Param( [Parameter(Mandatory=$true, Position = 0)][String]$File, [Parameter(Mandatory=$true, Position = 1)][AllowEmptyString()][String]$Installationtype, [Parameter(Mandatory=$true, Position = 2)][AllowEmptyString()][String]$Arguments ) $FileName = ($File.Split("\"))[-1] $FileExt = $FileName.SubString(($FileName.Length)-3,3) # Prepare variables if ( !( $FileExt -eq "MSI") ) { $FileExt = "SETUP" } if ( $Installationtype -eq "Uninstall" ) { $Result1 = "uninstalled" $Result2 = "uninstallation" } else { $Result1 = "installed" $Result2 = "installation" } $LogFileAPP = Join-path $LogDir ( "$($Installationtype)_$($FileName.Substring(0,($FileName.Length)-4))_$($FileExt).log" ) # Logging DS_WriteLog "I" "File name: $FileName" $LogFile DS_WriteLog "I" "File full path: $File" $LogFile if ([string]::IsNullOrEmpty($Arguments)) { # check if custom arguments were defined DS_WriteLog "I" "File arguments: <no arguments defined>" $LogFile } Else { DS_WriteLog "I" "File arguments: $Arguments" $LogFile } # Install the MSI or SETUP.exe DS_WriteLog "-" "" $LogFile DS_WriteLog "I" "Start the $Result2" $LogFile if ( $FileExt -eq "MSI" ) { if ( $Installationtype -eq "Uninstall" ) { $FixedArguments = "/x ""$File"" /qn /norestart /l*v ""$LogFileAPP""" } else { $FixedArguments = "/i ""$File"" /qn /norestart /l*v ""$LogFileAPP""" } if ([string]::IsNullOrEmpty($Arguments)) { # check if custom arguments were defined $arguments = $FixedArguments DS_WriteLog "I" "Command line: Start-Process -FilePath 'msiexec.exe' -ArgumentList $arguments -Wait -PassThru" $LogFile $process = Start-Process -FilePath 'msiexec.exe' -ArgumentList $arguments -Wait -PassThru } Else { $arguments = $FixedArguments + " " + $arguments DS_WriteLog "I" "Command line: Start-Process -FilePath 'msiexec.exe' -ArgumentList $arguments -Wait -PassThru" $LogFile $process = Start-Process -FilePath 'msiexec.exe' -ArgumentList $arguments -Wait -PassThru } } Else { if ([string]::IsNullOrEmpty($Arguments)) { # check if custom arguments were defined DS_WriteLog "I" "Command line: Start-Process -FilePath ""$File"" -Wait -PassThru" $LogFile $process = Start-Process -FilePath "$File" -Wait -PassThru } Else { DS_WriteLog "I" "Command line: Start-Process -FilePath ""$File"" -ArgumentList $arguments -Wait -PassThru" $LogFile $process = Start-Process -FilePath "$File" -ArgumentList $arguments -Wait -PassThru } } # Check the result (the exit code) of the installation switch ($Process.ExitCode) { 0 { DS_WriteLog "S" "The software was $Result1 successfully (exit code: 0)" $LogFile } 3 { DS_WriteLog "S" "The software was $Result1 successfully (exit code: 3)" $LogFile } # Some Citrix products exit with 3 instead of 0 1603 { DS_WriteLog "E" "A fatal error occurred (exit code: 1603). Some applications throw this error when the software is already (correctly) installed! Please check." $LogFile } 1605 { DS_WriteLog "I" "The software is not currently installed on this machine (exit code: 1605)" $LogFile } 3010 { DS_WriteLog "W" "A reboot is required (exit code: 3010)!" $LogFile } default { [string]$ExitCode = $Process.ExitCode DS_WriteLog "E" "The $Result2 ended in an error (exit code: $ExitCode)!" $LogFile Exit 1 } } } #========================================================================== # FUNCTION DS_StopService #========================================================================== Function DS_StopService { <# .SYNOPSIS Stop a service (including depend services) .DESCRIPTION Stop a service (including depend services) .PARAMETER ServiceName This parameter contains the name of the service (not the display name!) to stop, for example 'Spooler' or 'TermService'. Depend services are stopped automatically as well. Depend services do not need to be specified separately. The function will retrieve them automatically. .EXAMPLE DS_StopService -ServiceName "Spooler" Stops the service 'Spooler' (display name: 'Print Spooler') #> [CmdletBinding()] Param( [Parameter(Mandatory=$true, Position = 0)][String]$ServiceName ) DS_WriteLog "I" "Stop service '$ServiceName' ..." $LogFile # Check if the service exists If ( Get-Service $ServiceName -erroraction silentlycontinue) { # Stop the main service If ( ((Get-Service $ServiceName -ErrorAction SilentlyContinue).Status) -eq "Running" ) { # Check for depend services and stop them first DS_WriteLog "I" "Check for depend services for service '$ServiceName' and stop them" $LogFile $DependServices = ( ( Get-Service -Name $ServiceName -ErrorAction SilentlyContinue ).DependentServices ).name If ( $DependServices.Count -gt 0 ) { foreach ( $Service in $DependServices ) { DS_WriteLog "I" "Depend service found: $Service" $LogFile DS_StopService -ServiceName $Service } } else { DS_WriteLog "I" "No depend service found" $LogFile } # Stop the (depend) service try { Stop-Service $ServiceName | out-Null } catch { DS_WriteLog "E" "An error occurred trying to stop the service $ServiceName (error: $($Error[0]))" $LogFile Exit 1 } # Check if the service stopped successfully If (((Get-Service $ServiceName -ErrorAction SilentlyContinue).Status) -eq "Stopped" ) { DS_WriteLog "I" "The service $ServiceName was stopped successfully" $LogFile } else { DS_WriteLog "E" "An error occurred trying to stop the service $ServiceName (error: $($Error[0]))" $LogFile Exit 1 } } else { DS_WriteLog "I" "The service '$ServiceName' is not running" $LogFile } } else { DS_WriteLog "I" "The service '$ServiceName' does not exist. Nothing to do" $LogFile } } #========================================================================== # FUNCTION DS_ChangeServiceStartupType # Note: set/change the startup type of a service. Posstible options are: Boot, System, Automatic, Manual and Disabled #========================================================================== Function DS_ChangeServiceStartupType { <# .SYNOPSIS Change the startup type of a service .DESCRIPTION Change the startup type of a service .PARAMETER ServiceName This parameter contains the name of the service (not the display name!) to stop, for example 'Spooler' or 'TermService'. Depend services are stopped automatically as well. .PARAMETER StartupType This parameter contains the required startup type of the service (possible values are: Boot, System, Automatic, Manual and Disabled) .EXAMPLE DS_ChangeServiceStartupType -ServiceName "Spooler" -StartupType "Disabled" Disables the service 'Spooler' (display name: 'Print Spooler') .EXAMPLE DS_ChangeServiceStartupType -ServiceName "Spooler" -StartupType "Manual" Sets the startup type of the service 'Spooler' to 'manual' (display name: 'Print Spooler') #> [CmdletBinding()] Param( [Parameter(Mandatory=$true, Position = 0)][String]$ServiceName, [Parameter(Mandatory=$true, Position = 1)][String]$StartupType ) DS_WriteLog "I" "Change the startup type of the service '$ServiceName' to '$StartupType'" $LogFile # Check if the service exists If ( Get-Service $ServiceName -erroraction silentlycontinue) { # Change the startup type try { Set-Service -Name $ServiceName -StartupType $StartupType | out-Null DS_WriteLog "S" "The startup type of the service '$ServiceName' was successfully changed to '$StartupType'" $LogFile } catch { DS_WriteLog "E" "An error occurred trying to change the startup type of the service '$ServiceName' to '$StartupType' (error: $($Error[0]))" $LogFile Exit 1 } } else { DS_WriteLog "I" "The service '$ServiceName' does not exist. Nothing to do" $LogFile } } #========================================================================== # FUNCTION DS_CreateDirectory #========================================================================== Function DS_CreateDirectory { <# .SYNOPSIS Create a new directory .DESCRIPTION Create a new directory .PARAMETER Directory This parameter contains the name of the new directory including the full path (for example C:\Temp\MyNewFolder). .EXAMPLE DS_CreateDirectory -Directory "C:\Temp\MyNewFolder" Creates the new directory "C:\Temp\MyNewFolder" #> [CmdletBinding()] Param( [Parameter(Mandatory=$true, Position = 0)][String]$Directory ) DS_WriteLog "I" "Create directory $Directory" $LogFile if ( Test-Path $Directory ) { DS_WriteLog "I" "The directory $Directory already exists. Nothing to do." $LogFile } else { try { New-Item -ItemType Directory -Path $Directory -force | Out-Null DS_WriteLog "S" "Successfully created the directory $Directory" $LogFile } catch { DS_WriteLog "E" "An error occurred trying to create the directory $Directory (exit code: $($Error[0])!" $LogFile Exit 1 } } } #========================================================================== # FUNCTION DS_CopyFile #========================================================================== Function DS_CopyFile { <# .SYNOPSIS Copy one or more files .DESCRIPTION Copy one or more files .PARAMETER SourceFiles This parameter can contain multiple file and folder combinations including wildcards. UNC paths can be used as well. Please see the examples for more information. To see the examples, please enter the following PowerShell command: Get-Help DS_CopyFile -examples .PARAMETER Destination This parameter contains the destination path (for example 'C:\Temp2' or 'C:\MyPath\MyApp'). This path may also include a file name. This situation occurs when a single file is copied to another directory and renamed in the process (for example '$Destination = C:\Temp2\MyNewFile.txt'). UNC paths can be used as well. The destination directory is automatically created if it does not exist (in this case the function 'DS_CreateDirectory' is called). This works both with local and network (UNC) directories. In case the variable $Destination contains a path and a file name, the parent folder is automatically extracted, checked and created if needed. Please see the examples for more information.To see the examples, please enter the following PowerShell command: Get-Help DS_CopyFile -examples .EXAMPLE DS_CopyFile -SourceFiles "C:\Temp\MyFile.txt" -Destination "C:\Temp2" Copies the file 'C:\Temp\MyFile.txt' to the directory 'C:\Temp2' .EXAMPLE DS_CopyFile -SourceFiles "C:\Temp\MyFile.txt" -Destination "C:\Temp2\MyNewFileName.txt" Copies the file 'C:\Temp\MyFile.txt' to the directory 'C:\Temp2' and renames the file to 'MyNewFileName.txt' .EXAMPLE DS_CopyFile -SourceFiles "C:\Temp\*.txt" -Destination "C:\Temp2" Copies all files with the file extension '*.txt' in the directory 'C:\Temp' to the destination directory 'C:\Temp2' .EXAMPLE DS_CopyFile -SourceFiles "C:\Temp\*.*" -Destination "C:\Temp2" Copies all files within the root directory 'C:\Temp' to the destination directory 'C:\Temp2'. Subfolders (including files within these subfolders) are NOT copied. .EXAMPLE DS_CopyFile -SourceFiles "C:\Temp\*" -Destination "C:\Temp2" Copies all files in the directory 'C:\Temp' to the destination directory 'C:\Temp2'. Subfolders as well as files within these subfolders are also copied. .EXAMPLE DS_CopyFile -SourceFiles "C:\Temp\*.txt" -Destination "\\localhost\Temp2" Copies all files with the file extension '*.txt' in the directory 'C:\Temp' to the destination directory '\\localhost\Temp2'. The directory in this example is a network directory (UNC path). #> [CmdletBinding()] Param( [Parameter(Mandatory=$true, Position = 0)][String]$SourceFiles, [Parameter(Mandatory=$true, Position = 1)][String]$Destination ) DS_WriteLog "I" "Copy the source file(s) '$SourceFiles' to '$Destination'" $LogFile # Retrieve the parent folder of the destination path if ( $Destination.Contains(".") ) { # In case the variable $Destination contains a dot ("."), return the parent folder of the path $TempFolder = split-path -path $Destination } else { $TempFolder = $Destination } # Check if the destination path exists. If not, create it. DS_WriteLog "I" "Check if the destination path '$TempFolder' exists. If not, create it" $LogFile if ( Test-Path $TempFolder) { DS_WriteLog "I" "The destination path '$TempFolder' already exists. Nothing to do" $LogFile } else { DS_WriteLog "I" "The destination path '$TempFolder' does not exist" $LogFile DS_CreateDirectory -Directory $TempFolder } # Copy the source files DS_WriteLog "I" "Start copying the source file(s) '$SourceFiles' to '$Destination'" $LogFile try { Copy-Item $SourceFiles -Destination $Destination -Force -Recurse DS_WriteLog "S" "Successfully copied the source files(s) '$SourceFiles' to '$Destination'" $LogFile } catch { DS_WriteLog "E" "An error occurred trying to copy the source files(s) '$SourceFiles' to '$Destination'" $LogFile Exit 1 } } #========================================================================== # FUNCTION DS_DeleteFile # Description: delete one specific file #========================================================================== Function DS_DeleteFile { <# .SYNOPSIS Delete a file .DESCRIPTION Delete a file .PARAMETER File This parameter contains the full path to the file (including the file name and file extension) that needs to be deleted (for example C:\Temp\MyOldFile.txt). .EXAMPLE DS_DeleteFile -File "C:\Temp\MyOldFile.txt" Delete the file "C:\Temp\MyOldFile.txt" #> [CmdletBinding()] Param( [Parameter(Mandatory=$true, Position = 0)][String]$File ) DS_WriteLog "I" "Delete the file $File" $LogFile if ( Test-Path $File ) { try { Remove-Item "$File" | Out-Null DS_WriteLog "S" "Successfully deleted the file $File" $LogFile } catch { DS_WriteLog "E" "An error occurred trying to delete the file $File (exit code: $($Error[0])!" $LogFile Exit 1 } } else { DS_WriteLog "I" "The file $File does not exist. Nothing to do." $LogFile } } #========================================================================== # Function DS_GetAllScheduledTaskSubFolders and DS_DeleteScheduledTask # Note:List all delete all scheduled tasks and delete the one specified in the parameter when the function is called # Reference: Get scheduled tasks from remote computer # https://gallery.technet.microsoft.com/scriptcenter/Get-Scheduled-tasks-from-3a377294 #========================================================================== function DS_GetAllScheduledTaskSubFolders { <# .SYNOPSIS Get all scheduled tasks in all subfolders .DESCRIPTION Get all scheduled tasks in all subfolders .PARAMETER FolderRef This parameter contains the starting point (folder) .EXAMPLE DS_GetAllScheduledTaskSubFolders Retrieves all scheduled tasks in all subfolders #> [cmdletbinding()] param ( # Set to use $Schedule as default parameter so it automatically list all files # For current schedule object if it exists. $FolderRef = $Schedule.getfolder("\") ) if ($FolderRef.Path -eq '\') { $FolderRef } if (-not $RootFolder) { $ArrFolders = @() if(($Folders = $folderRef.getfolders(1))) { $Folders | ForEach-Object { $ArrFolders += $_ if($_.getfolders(1)) { DS_GetAllScheduledTaskSubFolders -FolderRef $_ } } } $ArrFolders } } function DS_DeleteScheduledTask { <# .SYNOPSIS Delete a scheduled task .DESCRIPTION Delete a scheduled task .PARAMETER Name This parameter contains the name of the scheduled task that is to be deleted .EXAMPLE DS_DeleteScheduledTask -Name "GoogleUpdateTaskMachineCore" Deletes the scheduled task 'GoogleUpdateTaskMachineCore' #> [CmdletBinding()] Param( [Parameter(Mandatory=$true, Position = 0)][String]$Name ) DS_WriteLog "I" "Delete the scheduled task $Name" $LogFile try { $Schedule = New-Object -ComObject 'Schedule.Service' } catch { DS_WriteLog "E" "An error occurred trying to create the Schedule.Service COM Object (error: $($Error[0]))" $LogFile Exit 1 } $Schedule.connect($env:ComputerName) $AllFolders = DS_GetAllScheduledTaskSubFolders foreach ($Folder in $AllFolders) { if (($Tasks = $Folder.GetTasks(1))) { foreach ($Task in $Tasks) { $TaskName = $Task.Name #DS_WriteLog "I" "Task name (including folder): $($Folder.Name)\$($TaskName)" $LogFile if ($TaskName -eq $Name) { try { $Folder.DeleteTask($TaskName,0) DS_WriteLog "S" "The scheduled task $TaskName was deleted successfully" $LogFile } catch { DS_WriteLog "E" "An error occurred trying to delete the scheduled task $TaskName (error: $($Error[0]))" $LogFile Exit 1 } } } } } } #========================================================================== ################ # Main section # ################ # Disable File Security $env:SEE_MASK_NOZONECHECKS = 1 # Custom variables [edit] $BaseLogDir = "C:\Logs" # [edit] add the location of your log directory here $PackageName = "GoogleChrome" # [edit] enter the display name of the software (e.g. 'Arcobat Reader' or 'Microsoft Office') # Global variables $StartDir = $PSScriptRoot # the directory path of the script currently being executed if (!($Installationtype -eq "Uninstall")) { $Installationtype = "Install" } $LogDir = (Join-Path $BaseLogDir $PackageName).Replace(" ","_") $LogFileName = "$($Installationtype)_$($PackageName).log" $LogFile = Join-path $LogDir $LogFileName # Create the log directory if it does not exist if (!(Test-Path $LogDir)) { New-Item -Path $LogDir -ItemType directory | Out-Null } # Create new log file (overwrite existing one) New-Item $LogFile -ItemType "file" -force | Out-Null DS_WriteLog "I" "START SCRIPT - $Installationtype $PackageName" $LogFile DS_WriteLog "-" "" $LogFile ########################################################################### # |||||||||||||||||||||||||||||||||||||||||||||||||||||||||||||||||||||||| # vvvvvvvvvvvvvvvvvvvvvvvvvvvvvvvvvvvvvvvvvvvvvvvvvvvvvvvvvvvvvvvvvvvvvvvv # # # Add pre-launch PowerShell commands here (e.g. read/write registry value, create file, etc.) # # ########################################################################### # Install or uninstall software $FileName = "GoogleChromeStandaloneEnterprise64.msi" # [edit] enter the name of the installation file (e.g. 'MyApp.msi' or 'setup.exe') if ( $Installationtype -eq "Uninstall" ) { $Arguments = "" # [edit] enter arguments (for MSI file the following arguments are added by default: /i #File# /qn /norestart / l*v #LogFile#) } else { $Arguments = "" # [edit] enter arguments (for MSI file the following arguments are added by default: /i #File# /qn /norestart / l*v #LogFile#) } $FileSubfolder = "Files" # [edit] enter the name of the subfolder which contains the installation file (e.g. 'Files' or 'MSI') $FileFullPath = Join-Path $StartDir $FileSubfolder # Concatenate the two directories $StartDir and $InstallFileFolder DS_InstallOrUninstallSoftware -File ( Join-Path $FileFullPath $FileName ) -InstallationType $Installationtype -Arguments $Arguments DS_WriteLog "-" "" $LogFile # Install or uninstall software $FileName = "LegacyBrowserSupport_4.7.0.0_en_x64.msi" # [edit] enter the name of the installation file (e.g. 'MyApp.msi' or 'setup.exe') if ( $Installationtype -eq "Uninstall" ) { $Arguments = "" # [edit] enter arguments (for MSI file the following arguments are added by default: /i #File# /qn /norestart / l*v #LogFile#) } else { $Arguments = "" # [edit] enter arguments (for MSI file the following arguments are added by default: /i #File# /qn /norestart / l*v #LogFile#) } $FileSubfolder = "Files" # [edit] enter the name of the subfolder which contains the installation file (e.g. 'Files' or 'MSI') $FileFullPath = Join-Path $StartDir $FileSubfolder # Concatenate the two directories $StartDir and $InstallFileFolder DS_InstallOrUninstallSoftware -File ( Join-Path $FileFullPath $FileName ) -InstallationType $Installationtype -Arguments $Arguments ########################################################################### # |||||||||||||||||||||||||||||||||||||||||||||||||||||||||||||||||||||||| # vvvvvvvvvvvvvvvvvvvvvvvvvvvvvvvvvvvvvvvvvvvvvvvvvvvvvvvvvvvvvvvvvvvvvvvv # # Add post-launch PowerShell commands here (e.g. read/write registry value, delete files, etc.) # Only run the following commands during installation, not uninstallation of Google Chrome If (! ($Installationtype -eq "Uninstall") ) { DS_WriteLog "-" "" $LogFile # Deploy the customized 'master_preference' file (copy from 'Files' directory to the 'Google\Chrome\Application' directory DS_CopyFile -SourceFiles ( Join-Path $FileFullPath "master_preferences" ) -Destination (Join-Path ${env:ProgramFiles(x86)} "Google\Chrome\Application" ) DS_WriteLog "-" "" $LogFile # Stop and disable the service 'Google Update Service (gupdate)' DS_StopService -ServiceName "gupdate" DS_ChangeServiceStartupType -ServiceName "gupdate" -StartupType "Disabled" # Stop and disable the service 'Google Update Service (gupdatem)' DS_StopService -ServiceName "gupdatem" DS_ChangeServiceStartupType -ServiceName "gupdatem" -StartupType "Disabled" DS_WriteLog "-" "" $LogFile # Delete the scheduled task 'GoogleUpdateTaskMachineCore' DS_DeleteScheduledTask -Name "GoogleUpdateTaskMachineCore" # Delete the scheduled task 'GoogleUpdateTaskMachineUA' DS_DeleteScheduledTask -Name "GoogleUpdateTaskMachineUA" DS_WriteLog "-" "" $LogFile # Remove the public desktop shortcut 'Google Chrome.lnk' DS_DeleteFile -File "$env:public\Desktop\Google Chrome.lnk" } ########################################################################### # Enable File Security Remove-Item env:\SEE_MASK_NOZONECHECKS DS_WriteLog "-" "" $LogFile DS_WriteLog "I" "End of script" $LogFile |
Execute the script as follows like this:
powershell.exe -executionpolicy bypass -file C:\Temp\Google\GoogleChrome\Install_GoogleChrome.ps1
Log files are created in the directory C:\Logs\GoogleChrome, but you can change this to any directory you want (see lines 529 to 530).
Conclusion
Scripting the unattended installation of Google Chrome is not easy, but manageable. I hope this article helps you to get your own installation and configuration up and running without any headaches.
Dennis Span works as a Principal Account Technology Strategist at Cloud Software Group in Vienna, Austria. He holds multiple Citrix certifications (CCE-V). Dennis has been a Citrix Technology Advocate (CTA) since 2017 (+ one year as Citrix Technology Professional, CTP). Besides his interest in virtualization technologies and blogging, he loves spending time with his family as well as snowboarding, playing basketball, and rowing. He is fluent in Dutch, English, German, and Slovak and speaks some Spanish.

See https://www.google.fi/amp/s/9to5google.com/2017/05/23/google-chrome-enterprise-bundle-citrix-windows-server/amp/ regarding Chrome support for RDS/XenApp.
Thanks a lot for the link, but in all honesty, I already found and read that article. It certainly seems that Citrix and especially “hosted-shared” is supported, but unfortunately I cannot find any official confirmation. To me, “official” means a clear confirmation of support on either google.com, chromium.org or citrix.com. Thanks once again for your input! I appreciate it.
Pingback: Detailed Change Log – Carl Stalhood
Pingback: EUC Weekly Digest – July 15, 2017 – Carl Stalhood
Hi Dennis,
This is a great article !
However, the desktop icons are still created, even when deleting the link from the Public profile.
You will need to use the master_preferences file for this and add these lines :
“create_all_shortcuts”: false,
“do_not_create_desktop_shortcut”: true,
“do_not_create_quick_launch_shortcut”: true,
Thanks a lot for your feedback Tommy! I will check it once again myself and update the article accordingly.
Hi Tommy,
I tested it and you are absolutely right! I have updated the article to include your comments. Thanks a lot!
Bye,
Dennis
Hi Dennis,
Tnx a lot for the credits, we deployed Chrome on our environment using your script and it works great.
No problem Tommy, credits where credits are due, right? 🙂 I am happy to hear that the script works fine!
Is there a way to hide the Legacy Browser extension icon on the Chrome menu bar by policy?
Hi Alex, I am sorry, but I do not know what you are referring to. Perhaps you can e-mail me a screenshot (dennis@dennisspan.com). Thanks.
What do you suggest for the scenario where Chrome is published as a seamless application (XA 6.5) and Active Setup’s do not run? there is an Active Setup being added by the installer, and that will not run unless the Desktop is loaded. I would normally disable that, and replace it with something in the login script to run the command (just once). However the stubpath for this new active setup points to a version specific folder, which tells me it could change as Chrome is updated and then my login script ‘hack’ would stop working. That is just a guess but I think a risk.
Thanks!
Hi Bruce,
First of all, thanks a lot for your input. I completely missed the Active Setup keys I must admit. I have just updated my article with this input. I think that you will be especially interested in the VBScript I added. The way to solve your issue is to directly read the command line from the registry (from the StubPath value). This way, you do not have to add the command line hard-coded into your logon script, which means no issues with future versions of Chrome.
You can find the updated section here: https://dennisspan.com/google-chrome-on-citrix-deep-dive/#StubPath
Good luck!
Hi Dennis,
We are having performance related issues with our XenDesktop VDI’s. Will excluding Chrome exe’s improve this at all? The external articles refers more to XenApp.
Hi Yusuf, my apologies for the late reply. I was on holiday. Perhaps you can be more precise on the kind of performance issues you are experiencing. Is the Chrome.exe consuming too much CPU? Or RAM? Do you have GPU acceleration enabled? Excluding the Chrome.exe from the Citrix API hooks can help to solve certain issues (also on VDI), but I doubt that you will experience a better performance. But give it a try I would say.
Hi Dennis,
I hope you had a nice holiday. Yes, as suggested chrome.exe is hammering the RAM. Also some users are getting infamous “Aw snap” errors.
The GPU acceleration is already disabled.
Best regards
Yusuf
Hi Yusuf,
Thanks, the holiday was great!
I am sure that you already searched for a possible solution using Google. There are many articles out there describing a great number of potential solutions. In my experience, one of the main causes for extensive RAM usage relates directly to the number of tabs simultaneously opened in Chrome. In my case, the extension called “The Great Suspender” helps a lot, because it suspends open tabs. The plugin can be downloaded from the Chrome Web Store (https://chrome.google.com/webstore/detail/the-great-suspender/klbibkeccnjlkjkiokjodocebajanakg). You can configure the time after which an open tab is suspended. I did a test with 20 open tabs, using up 1,1 GB of RAM. After the plugin suspended these tabs, only 335 MB of RAM was used. This is quite a significant reduction.
Use the Windows Task Manager and the internal Chrome task manager (Settings \ More Tools \ Task Manager) to monitor the RAM usage. Install the aforementioned plugin and do some tests of your own. In case the plugin solves the issue, you can use a Group Policy to distribute the plugin to your users (https://support.google.com/chrome/a/answer/188453?hl=en).
As I said before, there are many other tweaks you can use to try to minimize Chrome’s RAM usage, but you can easily find these with a search on Google.
Regarding the “Aw Snap” errors, there is an official Google page with some potential solutions: https://support.google.com/chrome/answer/95669?co=GENIE.Platform%3DDesktop&hl=en. Also watch out not to mix default roaming profiles with various versions of Chrome (see also the section in my article https://dennisspan.com/google-chrome-on-citrix-deep-dive/#GoogleChromeRoamingProfiles). Also check your Microsoft EMET settings in case you are using EMET. You may have to exclude Chrome.
I hope my suggestions are of help to you. Good luck!
Bye,
Dennis
Hi Yusuf, one more thing, regarding the “Aw Snap” errors, Citrix released the following new article on the 24th of July: “Chrome fails to launch in a published desktop” (https://support.citrix.com/article/CTX226044). The solution is to exclude the processes “chrome.exe” and “nacl64.exe” from the Citrix API hooks. Please don’t be fooled by the description in the section “Problem Cause”. This description is not accurate; excluding Chrome from the Citrix API hooks and adding the parameters “–allow-no-sandbox-job –disable-gpu” to your published application are two different things. You may be confused in thinking that Chrome version 58 and higher automatically includes these two processes in the registry, which is not true. What is new in Chrome 58 and higher is that you can publish the “chrome.exe” without adding the parameters “–allow-no-sandbox-job –disable-gpu”.
Pingback: Site Updates – July 2017 – Carl Stalhood
Pingback: Deploying Google Chrome extensions using Group Policy - Dennis Span
Pingback: Published Applications – Carl Stalhood
Hi dennis. I also try chrome in citrix. For me it is not clear how to deploy extensions for all users. I try adblock i add extension id in gpo but what is with the downloaded installer for the extension? Have you here also a good docu. Thx for the great article. Regards frank
Hi there Frank. Thanks a lot for the gratitude! You’re welcome.
I definitely have something for you concerning Chrome extensions: https://dennisspan.com/deploying-google-chrome-extensions-using-group-policy/
If you have any questions, just ask. You can also write to me in German if you want to. Just saying. 😉
Bye, Dennis
Hi,
I am trying to deploy Google Chrome for Enterprise for XenApp within Windows 2008R2 – VDA 7.6 CU3. For normal windows roaming profile users, no problem. But for some Citrix users with UPM – I get the following message. “Your profile can not be used because it is from a newer version of Google Chrome. Some features may be unavailable. Please specify a different profile directory or use a newer version of Chrome”. The current version installed on XenApp is 58.
Would I also need to add the API hooks on the XenApp gold image?
Hi Rikesh,
Regarding your issue I can say the following. First of all, from version 58 it should no longer be required to use the API hooks. Also, the problem at hand does not seem to be related to API hooks. Could it be that the same UPM profile is used on a system where a newer version of Google Chrome is running? This would explain the message. If this is not the case, than I suggest to try a different Chrome profile method as described in the section “Google Chrome and roaming profiles” (https://dennisspan.com/google-chrome-on-citrix-deep-dive/#GoogleChromeRoamingProfiles).
I am attempting to run your script as posted without changing anything, and am receiving the following error when running on a test box:
Join-Path : Cannot bind argument to parameter ‘Path’ because it is null.
At C:\Temp\Google\GoogleChrome\Install_GoogleChrome.ps1:566 char:26
+ $FileFullPath = Join-Path <<<< $StartDir $FileSubfolder
# Concatenate the two directories $StartDit and $InstallFileFolder
Hi Louis,
In line 566, where the error occurs, two directories are concatenated (merged); the directory defined in the variable $StartDir and the directory defined in the variable $FileSubfolder. The variable $StartDir is automatically determined by the script in line 533. The $FileSubfolder variable is defined in line 565. By default, this directory is called “Files”. I assume that this subdirectory is missing in your installation path or called differently. In case you used a different name, enter the correct name in line 565 (replacing the value “Files”). That should fix your problem. Good luck!
Hi Louis, for the sake of completeness. The issue is most likely related to the PowerShell version. I updated my article with this information, here.
Hi Dennis,
I’m also having the same problem, and my directory structure is as as follow:
Powerscript location:
“E:\Apps\Chrome\Install.ps1”
Installation MSI location:
“E:\Apps\Chrome\Files\googlechromestandaloneenterprise64.msi”
“E:\Apps\Chrome\Files\LegacyBrowserSupport_5.1.0.0_en_x64.msi”
But when executing the below command in command prompt:
E:\Apps\Chrome>powershell.exe -executionpolicy bypass -file E:\Apps\Chrome\Install.ps1
I’m also seeing the below message:
Join-Path : Cannot bind argument to parameter ‘Path’ because it is null.
At E:\Apps\Chrome\Install.ps1:566 char:26
+ $FileFullPath = Join-Path <<<< $StartDir $FileSubfolder
# Concatenate the two directories $StartDir and $InstallFileFolder
+ CategoryInfo : InvalidData: (:) [Join-Path], ParentContainsErro
rRecordException
+ FullyQualifiedErrorId : ParameterArgumentValidationErrorNullNotAllowed,M
icrosoft.PowerShell.Commands.JoinPathCommand
Am I missing something here? Thanks.
Hi Grant,
I am sorry to hear that the script is not working for you. I could not detect any obvious issue from the text in the command. Could you perhaps send me the log file? If you did not make changes to lines 529 and 530, you should have a log file in the directory C:\Logs\GoogleChrome. Please send it to dennis@dennisspan.com and I will get back to you shortly. Thanks!
Hi Dennis,
I already forward you the log file and my version of PS1 to your mailbox.
Thanks,
Grant
As discussed, the issue is most likely related to the PowerShell version. I updated my article with this information, here.
Pingback: Deploy Google Chrome Add-Ins via Group Policy – IT Stuff
Hello,
In Google Chrome for Enterprise in a Citrix VDI (Windows 7 Environment) I’ve noticed extensions do not download and I get a (COULD_NOT_GET_TEMP_DIRECTORY) when I try a test Webex to download the extension.
If I create a UserDataDir registry to point somewhere, it works. What is the best place to point this? What information does it contain. In a XenApp session, this seems to work and I have the same group policy applied, it just looks like I have to create an exception for windows 7 VDI (with mounted personal vDisk)
We do not use Roaming profile and use Citrix UPM so in Active Directory (its blank), we also have disabled Google Sync for security reasons.
Hi Rikesh,
The default path to the Google Chrome User Data directory is “C:\Users\%UserName%\AppData\Local\Google\Chrome\User Data”. Among other things, this directory contains the (per user installed) extensions in the subdirectory “Default\Extensions”. Please also see my article https://dennisspan.com/deploying-google-chrome-extensions-using-group-policy/ for more information. The error COULD_NOT_GET_TEMP_DIRECTORY indicates that the user data directory is not set or not reachable/writable for some reason. You can use a Chrome policy to configure this directory, or you can set a registry key (e.g. using a script or a Group Policy Preference), or you can add the switch –user-data-dir=”%UserDataDir%” to the Chrome shortcut. The cause for this issue may be many things. Perhaps the cause is the Personal vDisk. By default, the Citrix user profiles are stored there. Is this drive perhaps not visible to users? Or is this drive mapped without a drive letter? In some older forum entries people mention possible causes, such as drives without drive letters. There also seems to be a problem when the disk on which the user profile is stored is set to ‘dynamic’ and not to ‘basic’. Also make sure that the user has write permissions on the “%AppData%\local” path. I hope some of these suggestions help you. I strongly recommend to check your Personal vDisk first. Good luck!
Hallo Herr Span,
können Sie mir eine Info zum Software_Reporter_Tool geben. Dieses wird bei Google Chrome sporadisch im Hintergrund ausgeführt. Eventuell sind Sie während des “deep dive” damit in kontakt gekommen. Wir würden uns wünschen, dass diese Software nicht ausgeführt wird.
Vielen Dank
Hallo Max. Ich muss ehrlich gestehen dass ich dieses Tool nicht beobachtet habe. Im Internet habe ich diesen Link gefunden: http://techdows.com/2018/02/block-or-disable-chrome-software-reporter-tool.html. In dem Artikel werden einfach die NTFS Rechten von der EXE-Datei entfernt. Wäre dass eine Lösung für euch? Es könnte sein dass nach einem Update von Chrome die Rechten wieder standardgemäß gesetzt werden.
Hallo Max,
Wahrscheinlich hat sich deine Frage betreffend den “Software_Reporting_Tool” bereits längst erledigt, aber ich habe gerade was über dieses Tool in Bezug auf “Server Crashes” in diesem Artikel hinzugefügt: Software Reporting Tool may crash your servers. Wollte dir nur Bescheid geben.
Grüße,
Dennis
Hallo Herr Span,
seit Version 68 können für den Chrome folgende Werte gesetzt werden:
ChromeCleanupEnabled = REG_DWORD 0
ChromeCleanupReportingEnabled = REG_DWORD 0
Laut Dokumentation soll hierdurch das SoftwareReportingTool deaktiviert werden. Seitdem haben wir auch keine Probleme mehr.
Hallo Max,
Herzlich Dank für diese Information! Das war mir nicht bewusst. Ich werde diese Registry-Werte im Artikel aufnehmen!
Grüße,
Dennis
Hi Dennis,
Thanks very much for the update and advice, I confirm we can deploy the script across to all our Win7 endpoints without the need to first update PowerShell 3.0, that no doubt save a lot of time!
Grant
I am happy to hear that Grant! Great! 🙂
Hi Dennis,
I have another questions, based on my understanding, 32bit programs should go to “Program Files (x86)” and 64 bit should go to “Program Files”, it is noted that from both of your article and installation results of a 64bit chrome msi, it is being installed to “Program Files (x86)”, just want to confirm if this is the result of your script or if it is done by the msi installation.
Thanks again,
Grant
Hi Grant. You are right and I made a mistake in my article. The installation directory is always C:\Program Files (x86), no matter whether you use the 32-bit or 64-bit installer. I do not modify the installation directory in the PowerShell script. I have updated the article accordingly. Thanks for pointing it out to me!
Hello Dennis,
thx for your fine articel!
In my case i needed one more setting to the master_preferences to get get rid of the shortcuts:
“do_not_create_taskbar_shortcut”:true
i also added this not to get the default browser wizzard:
“suppress_first_run_default_browser_prompt”: true
Robert
Thanks Robert,
I will add the missing information to the article in the upcoming days.
Dennis
Hi Robert,
I finally managed to add your comment to my article. Thanks once again!
Cool Article, thank you.
In a scenario with
-local or mandatory profile
-roaming enabled with the profile.pb on a redirected folder
I found it difficult to supress all welcome screens.
This thread helped me:
http://www.edugeek.net/forums/enterprise-software/178319-google-chrome-welcome-screen-4.html
Important is to really disable DefaultBrowserSettingEnabled and WelcomePageOnOSUpgradeEnabled and PromotionalTabsEnabled.
Its still not possible to open with a users home page at first run. Chrome will show the google search page (with an optional user design from profile.pb;)
And there is still the option to set first start pages via GPO.
This is my GPO
====
Computer
Software\Policies\Google\Chrome
RoamingProfileLocation
SZ:H:\\……\\chrome
Computer
Software\Policies\Google\Chrome
RoamingProfileSupportEnabled
DWORD:1
Computer
Software\Policies\Google\Chrome
WelcomePageOnOSUpgradeEnabled
DWORD:0
Computer
Software\Policies\Google\Chrome
DefaultBrowserSettingEnabled
DWORD:0
Computer
Software\Policies\Google\Chrome
PromotionalTabsEnabled
DWORD:0
Computer
Software\Policies\Google\Chrome
HardwareAccelerationModeEnabled
DWORD:0
Computer
Software\Policies\Google\Chrome
BackgroundModeEnabled
DWORD:0
Computer
Software\Policies\Google\Chrome\ExtensionInstallForcelist
*
DELETEALLVALUES
Computer
Software\Policies\Google\Chrome\ExtensionInstallForcelist
1
SZ:hdppkjifljbdpckfajcmlblbchhledln;https://clients2.google.com/service/update2/crx
========master_preferences
{
“browser”:{
“show_home_button”: true
},
“distribution”: {
“msi”:true,
“system_level”:true,
“verbose_logging”:true,
“msi_product_id”:”8CAEA0A0-B65B-3773-912B-AD4AB10564A6″,
“allow_downgrade”:false,
“do_not_create_any_shortcuts”:true
}
}
Thanks a lot Markus. That is great input!
Hi Dennis, great article!
I’m seeing an issue on 2016 + VDA software where Chrome is pretty slow to launch, even with the Citrix Hooks excluded. – Procmon shows a couple of 3-5 second gaps where nothing really seems to happen. – Is this something you’ve come across?
Installation on a non-VDA, launch is instantaneous and ready to go within 3 seconds. On the VDA it’s 10-15 seconds before the default launch page appears.
Hi Omar,
My apologies for the late reply. I was on holiday. I have not come across this issue. Some thoughts from my side. First of all, did you install the 32-bit or 62-bit version of Chrome? I recommend to use the 64-bit on Windows 2016. Second of all, I read somewhere that Chrome may be slow due to the setting “Use hardware acceleration when available” (https://www.cnet.com/how-to/a-quick-fix-for-your-slow-chrome-browser/). Also check all other settings that Chrome has to offer. Perhaps there you find something that should be configured differently. Another thought is to make sure that no executables other than “chrome.exe” are allowed to run. Chrome also installs executable files in the user’s %AppData% directory, such as the Software Reporting Tool. Make sure that users are not allowed to run any of these executables (https://dennisspan.com/google-chrome-on-citrix-deep-dive/#SoftwareReportingTool).
Hi,
if we use Google roaming profile (the Profile.pb file). Is it nessacary to sync “C:\Users\%UserName%\AppData\Local\Google\Chrome\User Data” also or can this folder excluded with UPM when we are using the profile.pb?
I have one more question: I added the “AppData \ Local \ Google \ Chrome \ User Data \ Default \ Extensions” folder (https://support.citrix.com/article/CTX238525) to the folders to mirror. Then, logging off a user takes 60 seconds instead of 8 seconds. Is this a normal behavior when a folder is mirrored and not synchronized?
Thanks.
Markus
Hi Markus,
My apologies for the late reply. I was on holiday. You should be able to exclude the directory “C:\Users\%UserName%\AppData\Local\Google\Chrome\User Data”. By default, the “profile.pb” file is stored in the “AppData\Roaming” directory unless you specified a different directory. All the user’s preferences will be included in the “profile.pb” file.
Concerning your second question. I think the answer to your question can be found in a cool article by CTP Matthias Schlimm (https://eucweb.com/blog/1397). In it, he writes: “Citrix recommend to enable mirroring. With enabled Mirroring no exclusions of files or folders inside the mirrored folder are processed.” This means that any exclusions you have set for Chrome are ignored when you enable mirroring. This will probably be the reason for the slow log off. Also, I assume that you disabled Active Write-Back, which is a recommended practice. This means that nothing is written back to the profile store during the user’s session, so everything is done at logoff. I know that concerning Chrome there was an issue with Windows 10 version 1809. This is the reason for Matthias to write the article. I remember discussing this issue with him standing in Cologn Airport.
Please also read the short but informative article called “Synchronize vs Mirror” by Citrite Daniel Feller (https://virtualfeller.com/2019/01/15/synchronize-vs-mirror/).
Hi Dennis,
We’re seeing some strange behaviour in a new non-persistent XenDesktop environment. We’re installing onto Win 10 1308 OS. Chrome takes a few seconds to launch (grey screen) and hangs for a few seconds on each new tab. The internet speed is fine as IE/Edge are both much faster. CPU usage is all ok, any idea what could be causing the slow tab/launch behaviour?
Thanks,
Joseph
Hi Joseph, are you perhaps using FSLogix? There was an issue with one of the last versions of FSLogix resulting in the behavior you described.
I learn a lots of things here. It is an amazing post , thanks for help me.
Thanks a lot! Appreciate it!
As noted by previous poster, I too learnt a lot! Thank you for sharing this information! 🙂
You are welcome! I am happy you liked the article.
What is your thought on the Code Cache directory \AppData\Local\Google\Chrome\User Data\default\Code Cache.
In my environment we are seeing around 15 – 30K of files in that directory and its slowing down log on time.
Hi Samuel,
Thanks for your comment. It is true that this directory can grow quite large in size and can contain many thousands of files. Have you tried excluding this directory in your profile solution (e.g. Citrix UPM)? A few minutes ago I sent an e-mail to the Google Chrome development team asking them for more information about this directory and more importantly, whether or not it can be safely excluded, since this would solve your issue. I will keep you informed of any information I receive.
Kind regards,
Dennis
Hi Samuel,
That went faster than I thought. I already received an answer from the Chrome team. They say that you can exclude the “Code Cache” folder with minimum to no impact to the users. In case you use Citrix UPM make sure to add the following folder exclusion:
AppData\Local\Google\Chrome\User Data\Default\Code Cache
Also, here is the answer to my question concerning the purpose of the Code Cache folder: “Code caching is a cache of generated JavaScript code”.
Thank you for that very good question! Had a look at our environment and we will also start cleaning this folder
We started excluding that folder a few months ago, as it was getting large, not really in size per se but the number of files to be copied in a roaming profile was ridiculous. I googled this as well and found some people saying it was safe. I tried deleting it and launching chrome, and it seemed fine. My understanding is these files are copies of javascript websites use, so it makes the web experience snappier. But, I figure is the faster login more important than a snappy web experience? for me that is a good trade. Users will complain to me about login times. They will just shrug if a website takes an extra moment to load.
Hi Bruce,
Thanks for your feedback. I fully agree with everything you say. Your explanation coincides exactly with the response I just received from the Chrome team. 😉
Hey Dennis,
maybe you have an idea to solve our problem. We are working with Citrix, having multiple Servers (seperated in ms office and special applications). The AppData is redirected to a shared drive.
Since there are some applications which need also a chrome installed on the same server instance we got a problem for some users. Working with chrome on the default server (office) and on a special application server is not possible since chrome only allows to use one “session” at a time. Working on two servers with chrome and using only one “UserDataDir” is not possible.
Do you have a hint how to solve this? Is the Profile.pb the right way?
Hi Max,
In this case I recommend to use different profiles per server type / silo. This should solve your problem. Using the “profile.pb” file is also an option, but also here you may want to use separate “profile.pb” files per silo (instead of one “profile.pb” file for both silos).
Hey Dennis,
using different profiles will cause issues when for example adding some favorites. It will be missing in the other session or do i miss something?
Hi Max, yes, you are right. Two possible options are to redirect the user data directory, e.g. using the Group Policy Computer Configuration \ Policies \ Administrative Templates \ Google \ Google Chrome – >”Set user data directory” or by launching Chrome using the parameter –user-data-dir: “C:\Program Files (x86)\Google\Chrome\Application\chrome.exe” –user-data-dir=”H:\appdata\local\Google\Chrome\User Data”.
Just make sure that the version of both the OS as well as Google Chrome are the same in both silos, otherwise you may experience problems. As per Chromium.org:
“Chrome profiles are not backwards compatible, so storing the user profile on a network drive and using it with different versions of Chrome can cause crashes and data loss”
https://www.chromium.org/administrators/policy-list-3/user-data-directory-variables.
Hey Dennis, the “UserDataDir” is the setting we are using at the moment. The Problem we have is, that when chrome is startet a second time in a different silo, it wont come up.
Hi Max,
I guess I am not helping you here, am I? 🙂 I think only now I really understand your problem. It is also written in the article https://support.google.com/chrome/a/answer/7349337:
“A user might want to run Chrome Browser simultaneously on multiple machines on your organization’s network. But if they use Roaming User Profiles, profile changes they make in one Chrome session will not sync with other sessions. So we recommend never running simultaneous Chrome sessions when you use Roaming User Profiles.”
Is it an option for you to use a Google (Sync) Account to synchronize user settings (https://dennisspan.com/google-chrome-on-citrix-deep-dive/#GoogleAccount)? This would also help you mitigate potential problem should the situation arise whereby the Chrome versions on both silos do not match.
Hey Dennis,
help is not always giving the right solution, it is also the exchange about the topic. I had the hope you had seen that problem (with a solution) at one of your jobs. Sometimes there is more possible then the vendors are telling us 😉
Thank you so far
Good point. And you are welcome.
Fantastic! I loved reading your blogs and the way it has been written. My name is Vidit Sehgal, I truly appreciate on what the blogs you have posted on a regular basis and its meaningful deliverance before the internet users.
Thanks a lot Vidit! I appreciate your very kind feedback!
Hi Dennis,
Great Article! but I was really hoping for some best practices when running Chrome on PVS. I have a very heavy chrome user base and there seems to be some issues with their chrome behaviour and the cache drive filling up. PVS Server has 16 GB of RAM, overflow to a 20 GB disk (8 GB used for pagefile) … On a reboot, I can see in Procmon the many many writes to the %appdata%\Local\Google\Chrome\User Data\Default\Cache folder as the d: cache drive fills up. This has gotten to the point where the server will freeze after less than a day of use at times. Any ideas?
Hi Brad, I do have one idea. Please see my tweet from October 2019. I believe that excluding all “cache” folders from the user’s roaming profile may solve your issue.
Hi Dennis,
in my case, ater installing Chrome enterprise, and then get below error :
No internet
Try:
Checking the network cables, modem, and router
Reconnecting to Wi-Fi
Running Windows Network Diagnostics
DNS_PROBE_FINISHED_NO_INTERNET
Actaully there is no issue with other browser like IE, and Firefox in the server 2016.
I am sorry Semin. I don’t think I am able to help you with this error. You will have to rely on a google search.
Appreciate your efforts to share such a detailed article. Thanks for taking the time to share these informative posts with us.
Happy you like the article. Thank you for your kind feedback!
Pingback: Counting the Cost of Chrome: Bad News for the Chrome Browser on Citrix Workspaces | Citrix Professionals - ctxPRO.com
Hi Dennis,
Great Article! and Thanks for taking the time to share these informative posts. I am little bit new to this citrix and need one help from your end. I need to install one particular extension in Chrome and Edge both browser for all users without using any Group policies. Could you refer any step by step article\help me on this.
Thanks in Advance
Hi Suraj, on which types of devices do you want to install the Chrome extension? These devices must be managed devices, otherwise, you will not be able to roll out anything to your users. If these are Chromebooks for example, you can manage the ChromeOS as well as user settings using Chrome Enterprise. If they are Windows devices and they are domain joined, you can use Group Policies. I am not sure if Intune can be used to roll out Chrome extensions. Please keep in mind that Chrome extensions are stored in the user context and not per machine!
Hi Dennis,
I have been using your PowerShell script to deploy Chrome many times over the years and it works great.
However, on Windows 10 22H2, I noted the following error, which looks like something to do with the new PowerShell versions?
D:\Apps\Chrome>powershell.exe -executionpolicy bypass -file D:\Apps\Chrome\install.ps1
New-Item : The device is not ready.
At D:\Apps\Chrome\install.ps1:540 char:29
+ … t-Path $LogDir)) { New-Item -Path $LogDir -ItemType directory | Out-N …
+ ~~~~~~~~~~~~~~~~~~~~~~~~~~~~~~~~~~~~~~~~~~
+ CategoryInfo : WriteError: (E:\Apps\Chrome\Logs\GoogleChrome:String) [New-Item], IOException
+ FullyQualifiedErrorId : CreateDirectoryIOError,Microsoft.PowerShell.Commands.NewItemCommand
Hi Grant. It looks like you are missing write access to write the log file on the E: drive.
Hi,
I wonder if anyone have a copy of MSI bundle for version 109.0.5414.120 which is the last Chrome version supporting server 2012? Currently, Google removed the repositories for the download. Greatly appreciate it if anyone can share it. Cheers!