
This article explains how to build your Citrix Workspace app unattended installation with PowerShell and shows you how to tweak its configuration.
| Note: for detailed information on how to install and configure Citrix Receiver see the article Citrix Receiver unattended installation with PowerShell on this website. |
| Change Log 24.09.2018: added Prevent an unexpected MSI repair from launching. 12.10.2018: added Prevent the splash screen “Citrix Receiver is now Citrix Workspace App” from showing. Thanks to Thorsten Enderlein (@endi24) for bringing this to my attention. 27.12.2018: updated article and complete installation script to version 1812 released on the 14th of December 2018 (previous version described in this article: 1809). 04.05.2019: updated article and complete installation script to version 1904 released on the 30th of April 2019 (previous version described in this article: 1812). 29.07.2019: updated article and complete installation script to version 1907. I also updated the handling of the return code of the Workspace app installer as described in the following article: https://support.citrix.com/article/CTX257546. This new handling of the return code first appeared in version 1904.1 of Citrix Workspace (in version 1904 this was not changed yet). Rest assured, the new handling of the return code in the complete installation script also works when installing versions before 1904.1. 02.10.2019: updated article and complete installation script to version 1909 released on the 19th of September 2019. |
Introduction
Citrix Workspace app is a client component in a Citrix infrastructure that allows a user to launch resources in a Citrix Virtual Apps and Desktops (CVAD) environment, formerly known as XenApp and XenDesktop. With resources, I mean for example (Saas) applications and virtual desktops.
Installing and configuring Citrix Workspace app for Windows requires careful planning. You need to decide which components to enable, how to configure the default device access behavior, how to configure Citrix Workspace app group policies, whether or not to allow single sign-on, and more. In this article, I do my best to clarify most of these challenges.
Citrix Workspace app replaces Citrix Receiver. The latest (and last) version of Receiver is 4.12. The last LTSR release is version 4.9.6000. The version of Citrix Workspace app described in this article is 1909, released in September 2019.
So what is different in Citrix Workspace app compared to Receiver? Well, concerning files, folders, registry keys, and values, Citrix Workspace app is very similar to Receiver, with the following differences:
- The name changed from Receiver to Workspace app. However, many of the known installation paths and registry keys did not change, for example:
- C:\Program Files (x86)\Citrix\ICA Client
- C:\Program Files (x86)\Citrix\ICA Client\Receiver
- HKLM\SOFTWARE\WOW6432Node\Citrix\ICA Client
- HKLM\SOFTWARE\WOW6432Node\Citrix\Receiver
- HKLM\SOFTWARE\WOW6432Node\Citrix\ReceiverInside
- The icon color changed from black to blue.
- An embedded browser for SaaS applications was added (read more about this here).
- With each new version, new features are released, for example, support for Citrix Casting (to a Workspace Hub) and support for Citrix Files (the new name for Citrix ShareFile). In most cases, this means that a new MSI installation file is added to the Workspace app installer.
Please see the Citrix documentation What’s new in Citrix Workspace app for Windows for more details.
I strongly suggest you read the excellent article Citrix Workspace app 1909 written by CTP Carl Stalhood. This is the most detailed article on Workspace app available.
Installing and configuring Citrix Workspace app
Installing and configuring Citrix Workspace app is not as straightforward as one might think. Many details can either make or break your deployment. Read and implement the sections below to ensure a smooth and successful deployment.
Summary
- Target device:
Workspace app can be installed both on your virtual servers and desktops (alongside the VDA) as well as on the local client device. This all depends on your Citrix infrastructure and your access scenarios. - Installation file name:
CitrixWorkspaceApp.exe (or, after renaming, CitrixWorkspaceAppWeb.exe) - File size:
You may have noticed that the size of the file CitrixWorkspaceApp.exe is more than twice the size compared to the file CitrixReceiver.exe (version 4.12).
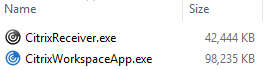
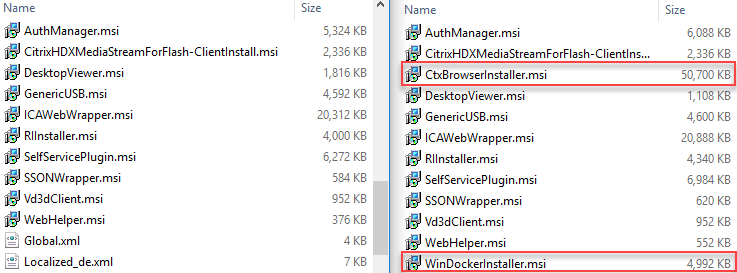
The reason for this is the new embedded browser for secure Saas applications and the new feature Citrix Screen Casting. The Citrix Receiver 4.12 executable includes 53 files. The executable of Citrix Workspace app includes three more, namely the new MSI installer file CtxBrowserInstaller.msi, which is more than 50 MB in size, the new installer file WinDockerInstaller.msi (5 MB in size) and the new installer file AppProtection.msi (1,5 MB in size). The file CtxBrowserInstaller.msi was introduced in Workspace app version 1808. The file WinDockerInstaller.msi was introduced in version 1809. The file AppProtection.msi was in introduced in Workspace app version 1909 (protects against keyloggers and screen scrapers). The name WinDockerInstaller is a bit cryptic, but it contains the new feature Citrix Screen Casting. Versions 1810 to 1907 do not include any new MSI files (only updated ones).
Citrix describes the embedded browser as follows: “The Citrix Workspace-embedded browser is a native browser running on the client machine embedded in the Citrix Workspace security sandbox. This gives end-users the best performance for rendering web pages of SaaS applications. The secure sandbox protects the end-user and the enterprise against malware, performance degradation, data loss, and unintended end-user behavior.” The embedded browser is launched automatically when a SaaS application is started. The embedded browser is not the same as the Citrix Secure Browser (for more information see the articleCitrix Workspace: Embedded Browser vs Secure Browser Service vs Secure Browsing). The installation path for the embedded browser is: C:\Program Files (x86)\Citrix\ICA Client\Browser. - Version (latest):
1909 (released in September 2019) - Installation parameters (command-line switches):
See the section Workspace app command-line switches below. - Uninstallation parameters (command-line switches):
The following two command line switches are required to uninstall Citrix Workspace app: /silent /uninstall. The /noreboot parameter is not needed during a silent installation according to the Citrix documentation. - Installation dependencies:
No - Other dependencies:
No - Reboot required:
Yes (for certain components such as Single Sign-on, /includeSSON) - ADMX files:
Yes (see the section on Group Policies in the conclusion of this article) - Ports and firewall:
No (outbound communication only, e.g. port 80, 443, 1494, 2598) - Download location:
Workspace app 1909 for Windows - Reference:
Configure and install Citrix Workspace app using command-line parameters
Citrix Workspace app installation file (CitrixWorkspaceApp.exe)
The latest version of Citrix Workspace app can be downloaded here. The download contains one file: CitrixWorkspaceApp.exe. This file contains several MSI files; one MSI installer per component. This is the list of components for Workspace app 1909:
- AppProtection.msi (new since Workspace app 1909)
- AuthManager.msi
- CitrixHDXMediaStreamForFlash-ClientInstall.msi
- CtxBrowserInstaller.msi (new since Workspace app 1808)
- DesktopViewer.msi
- GenericUSB.msi
- ICAWebWrapper.msi
- RIInstaller.msi
- SelfServicePlugin.msi
- SSONWrapper.msi
- Vd3dClient.msi
- WebHelper.msi
- WinDockerInstaller.msi (new since Workspace app 1809)
| Note: Use the following command to extract the individual MSI files from the installation file: |
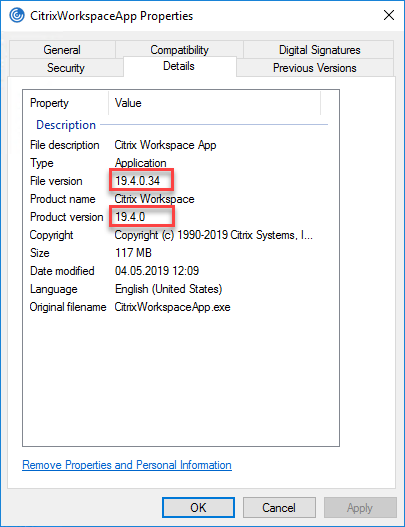
The version is not displayed in the file name, so the file name is the same for each version of Workspace app. To see the version of the executable, you have to take a look at the Details tab in the file properties.
The version displayed in the details tab is always a little bit different than the commercial version displayed on the official Citrix download page.
Example:

Version 1904 of Citrix Workspace app has product version 19.4.0 and file version 19.4.0.34.
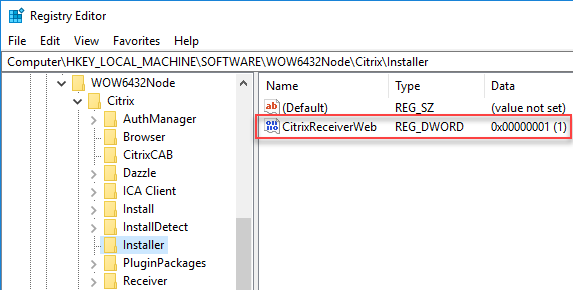
Another thing you should know about the installation file is that renaming it from CitrixWorkspaceApp.exe to CitrixWorkspaceAppWeb.exe changes the installation behavior. See the section Prevent the Add Account Window for more details.
Do you know what renaming the file name does under the hood? It sets the registry value CitrixReceiverWeb (DWORD) in the registry key HKLM\Software\Wow6432Node\Citrix\Installer to 1. This registry value is also created when the original file name is used, but then the value is set to 0. And no, I did not make a spelling mistake; the name of the registry value does include the old name Receiver and not WorkspaceApp.
Citrix Workspace app command-line switches
There are various parameters you can parse. For a detailed overview of all parameters please refer to the article Configure and install Citrix Workspace app for Windows using Command Line parameters. I strongly suggest reading the entire article before deploying Citrix Workspace app.
You can also use the Citrix Receiver Commandline Helper Tool to help you build the exact command line syntax. This tool has not yet been renamed to Citrix Workspace app Commandline Helper Tool.
It is difficult for me to tell you exactly which command line switches (= parameters) you should use. This all depends on your environment. However, you should be aware of the following:
- Some parameters are required to work together with server-side components, such as enabling bidirectional content redirection.
- Some parameters require local administrator rights, such as /includeSSON to enable single sign-on authentication.
- In some cases, a reboot may be required. For example, USB devices that are in a suspended state when Citrix Workspace app for Windows installs are not recognized by Citrix Workspace app for Windows until after the user device is restarted (reference).
Here are some of the parameters I use for my environments:
- /silent
All of my deployments are automated, including Citrix Workspace app. I therefore need to use the /silent parameter. - /includeSSON
This enables single sign-on (pass-through authentication) so a user does not need to enter authentication information for a second time after logging on to Windows. - /FORCE_LAA=1
This enables Local app Access. - EnableCEIP=false
Do not enable participation in the Citrix Customer Experience Improvement Program (CEIP). CEIP collects anonymous statistics and usage information and sends them to Citrix. - /AutoUpdateCheck=disabled
I personally prefer to test new versions of Citrix Workspace app before implementing them in production (so no automatic updates are allowed). You can also omit this parameter entirely and manage the auto-update behavior using Group Policy. See also the Auto-Update section in Carl Stalhood’s article Citrix Workspace app 1909.
| Note: In case you are updating to Citrix Workspace app from an unsupported version, make sure to use the parameter forceinstall (this command replaces the rcu parameter used for Citrix Workspace app version before 1909). This will execute the Receiver Cleanup Utility. |
The /noreboot parameter is not required for silent installations according to the Citrix documentation. If possible, I recommend rebooting the machine before using Citrix Workspace app.
Citrix Workspace app log files
The installation of Workspace app generates multiple log files: one general log file (“Trolley Express”) and one log file per MSI installation, for example:
- TrolleyExpress-%Date%-%Time%.log
- CtxInstall-CitrixHDXMediaStreamForFlash-ClientInstall-%Date%-%Time%.log
- CtxInstall-DesktopViewer-%Date%-%Time%.log
- CtxInstall-SelfServicePlugin-%Date%-%Time%.log
The total number of log files depends on the number of components you install. Each MSI log file represents one component; the more components you install, the more log files will be generated (up to a total of 12).
The installation log files generated by Citrix Workspace app are always created in the TEMP folder in the subfolder CTXReceiverInstallLogs-%Date%-%Time%. The log directory still includes the name Receiver.
| Note: in the section Troubleshooting the installation in the Citrix support article Configure and install using command-line parameters it is stated that the log files are stored in the directory %TEMP%/CTXWorkspaceInstallLogs, but this seems to be an error. The directory is still the same as it was for Citrix Receiver, namely CTXReceiverInstallLogs-%Date%-%Time%. |
The location of the TEMP folder in most environments is one of the following:
- C:\Users\%UserName%\AppData\Local\Temp
This directory is for sure used in many environments. Each user has a temporary directory. - C:\Users\%UserName%\AppData\Local\Temp\%SessionNumber%
This is almost the same directory as the previous one. The difference is that each user has a temporary directory per session. If allowed by the administrator, a user can have multiple sessions on one system.
- C:\Windows\Temp
This is the TEMP of the local SYSTEM account. Software deployment tools such as Microsoft SCCM use the SYSTEM account for installations on the local machine. - C:\Temp
This directory may be used on a FAT client. On a multi-user system, it is not typical to use one temp directory for multiple users.
Of course, the TEMP directory in your environment may be different than the ones listed above. The environment variable %TEMP% will always contain the correct location of the TEMP directory.
Unfortunately, there is no installation (or uninstallation) parameter that allows the log files to be written to another directory besides TEMP. There is no command-line switch like /Logfile or /Log.
The only way to capture the log files in a directory other than TEMP is to copy them from the TEMP folder after the installation has finished.
In the complete installation script below, the script starts by deleting any existing Citrix Workspace app log files from the TEMP directory (lines 71 to 80). By using the environment variable %TEMP% the script makes sure that the correct TEMP directory is used.
After the installation (or uninstallation), the script copies the newly created log files to the log directory declared in the variable $LogDir. The log directory ($LogDir) is a combination of the variables $BaseLogDir and $PackageName. You can change these variables in lines 45 and 46.
Updating from Receiver to Workspace app (warning)
I experienced an issue updating the last version of Citrix Receiver (4.12) to the new Workspace app version 1909 and it had to do with the HDX RealTime Media Engine.
The warning message I received was:
“You might be having an issue with a Citrix virtual driver (HDX RealTime Media Engine). Contact your system administrator for further assistance.”

Although this is a warning message, I was not able to start any published applications.
Even reinstalling the HDX RealTime Media Engine (forcing a repair) did not work. At the end, I did the following, which worked:
- Uninstall the HDX RealTime Media Engine
- Uninstall Receiver
- Reboot machine*
- Install Workspace app
- Install the HDX RealTime Media Engine
- Reboot machine*
A reboot may not have been strictly necessary, but since I installed Receiver including Single Sign-On I decided to restart the machine.
Configure default device access behavior (Client Selective Trust)
As per Citrix: “With the introduction of Receiver 3.x (Workspace app) client, administrators can configure the default behavior for device access when connecting to a Citrix XenDesktop or XenApp environment. By default, the Desktop Viewer client device restrictions are based on the Internet region and this behavior can be changed by creating the Client Selective Trust feature registry keys under the HKEY_LOCAL_MACHINE hive in the registry and by modifying the required values.”
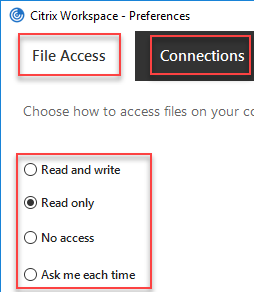
For example, when you allow the user to access files on the local client device, you may see the following security warning:

The security popup can concern the following local resources:
- Client Drives
- Microphones and Webcams
- USB and other Devices
The default behavior of Workspace app is to prompt the user. As an administrator, you can define the access level by modifying the registry or by using the ADMX group policy template. There are four access levels:
- 0 = No Access
- 1 = Read Only Access
- 2 = Full Access
- 3 = Prompt User for Access
Please see the Citrix article How to Configure Default Device Access Behavior of Receiver, XenDesktop and XenApp for more information.
I decided to modify the default behavior using the registry. I downloaded the ZIP file from the aforementioned article and modified the file ReceiverCSTRegUpx86.reg. I set all relevant registry entries to 2 (= Full Access) except for the Restricted Sites region/zone (these values remain on 0 = No Access).
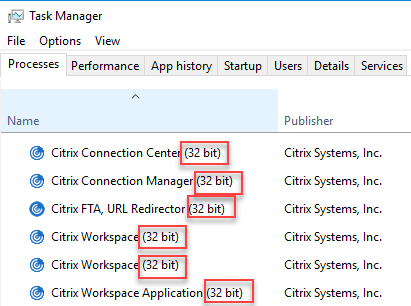
| Note: Yes, I used the file ReceiverCSTRegUpx86.reg even though I installed Workspace app on a 64-bit operating system. On a 64-bit operating system, Workspace app installs itself in the folder C:\Program Files (x86) and all processes run in 32-bit mode. |
You can download a copy of this modified file here:
Citrix Workspace app Client Selective Trust x86 Dennisspan.com.zip
In the complete installation script below, the script imports the registry file in lines 201 to 205. Please make sure that you copy the actual file to the subdirectory Files. Also, in case you rename the registry file, please make sure to change the file name in the script as well (line 204).
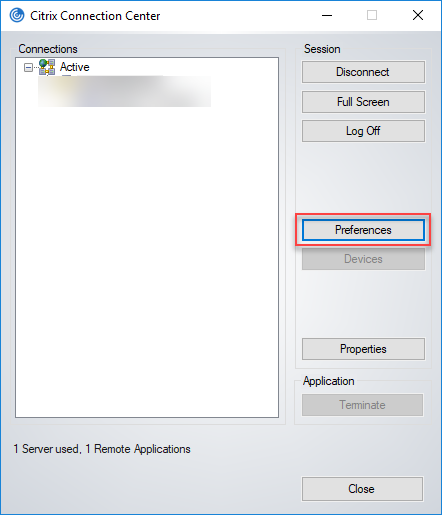
Please be aware that pre-configuring the Client Selective Trust settings does NOT prevent a user from changing these settings! A user can configure his or her connection preferences in the Connection Center under Preferences.
In case you want to prevent the user from changing the preferences, set the value (Default) in the following registry key to false:
HKLM\SOFTWARE\WOW6432Node\Citrix\ICA Client\Client Selective Trust\oidPredefinedSecurityPolicySettings\InstantiatedSecurityPolicyEditable
Like this:
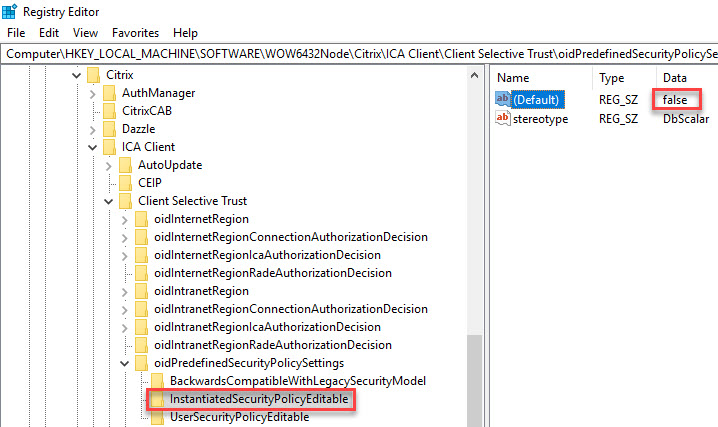
As you can see in the screenshot below, after changing the (Default) value (REG_SZ) to false, the user is no longer able to change the preferences.

You do not even need to close the active session for this setting to work. You only have to close the Preferences window and open it again after changing the registry value. The change is active instantly.
The complete installation script below does NOT change the (Default) registry value. In case you would like to change it, please add the following code:
|
1 |
DS_SetRegistryValue -RegKeyPath "hklm:\SOFTWARE\WOW6432Node\Citrix\ICA Client\Client Selective Trust\oidPredefinedSecurityPolicySettings\InstantiatedSecurityPolicyEditable" -RegValueName "(Default)" -RegValue "false" -Type "STRING" |
Place it somewhere between lines 199 and 266.
A big thanks to my colleague Wolfgang Thürr (X, Twitter) for bringing this to my attention.
Prevent the Add Account window from launching
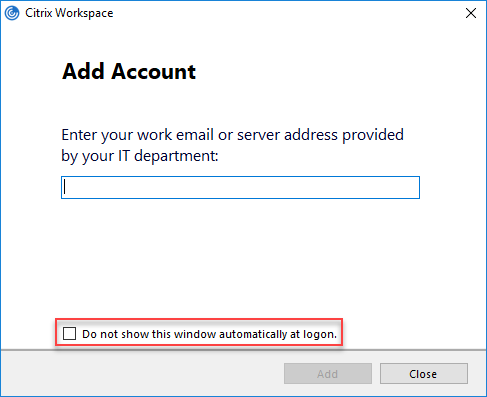
In the Add Account window, as per Citrix “users can […] set up a Citrix Workspace app account by entering an email address or a server URL. Citrix Workspace app determines the NetScaler Gateway, StoreFront server, or AppController virtual appliance associated with the email address and then prompts the user to log on for enumeration.”
The Add Account wizard can be triggered in three ways:
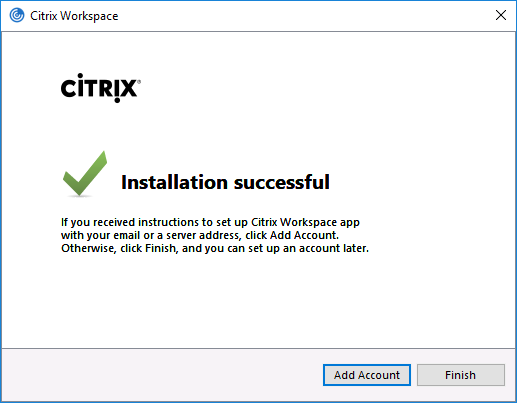
- At the end of the installation by clicking the Add Account button.
- At logon time.
- By double-clicking the Workspace app icon in the system tray.
By default, at the end of the installation, the Add Account button is shown.
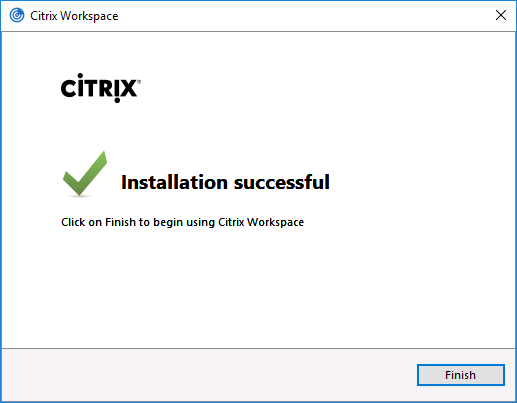
To prevent this button from appearing you can do one of two things:
- Rename the installation file CitrixWorkspaceApp.exe to CitrixWorkspaceAppWeb.exe (this name has to be exact including camel-case letters). Reference: Deploy Citrix Workspace app for Windows using Workspace for Web.
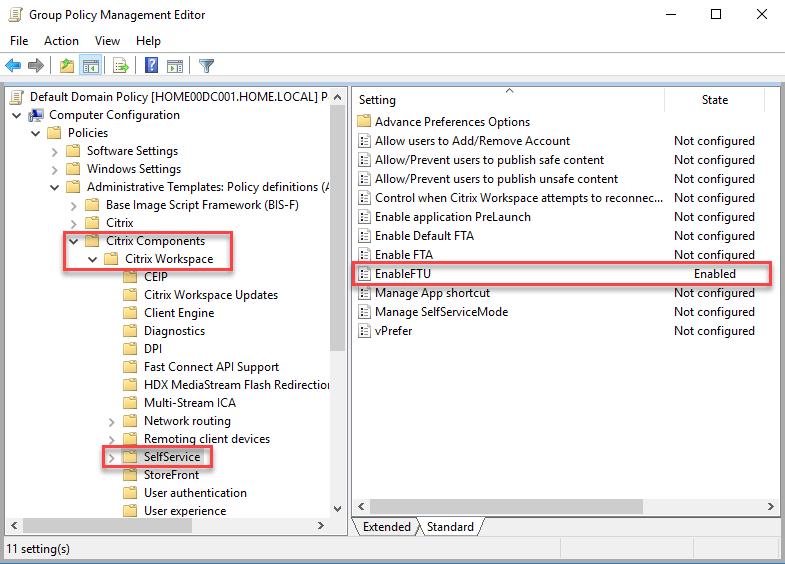
- Use the group policy setting EnableFTU* or create the registry item EnableX1FTU in the registry key HKLM\SOFTWARE\Wow6432Node\Policies\Citrix with a DWORD value of 0 before running the installation.
*You can now configure the EnableFTU setting using a Citrix Workspace app group policy. See the section below on the Workspace app ADMX files. This group policy setting sets the following two registry values:
- HKLM\SOFTWARE\Policies\Citrix -> EnableX1FTU -> DWORD 1
- HKLM\SOFTWARE\Wow6432Node\Policies\Citrix -> EnableX1FTU -> DWORD 1
The result is that the Add Account button is not shown.
In the complete installation script below, the registry item EnableX1FTU is created before installation, although strictly speaking it is not necessary since the PowerShell script triggers a silent installation (so no GUI is shown anyway).
By default, the Add Account window is also triggered at user logon.
To prevent this window from appearing, there are three options:
- Add the registry item HideAddAccountOnRestart (DWORD) with a value of 1 to the registry key HKCU\Software\Citrix\Receiver (yes, the old name Receiver is still used). The tick box “Do not show this window automatically at logon” creates the same registry entry. Please be aware that this is a current user setting. I therefore recommend using a Group Policy Preference (the article Configuring the time zone and code page with Group Policy demonstrates how to configure Group Policy Preferences).
- Set the value of the registry item AllowAddStore (REG_SZ) to N in the registry key HKLM\SOFTWARE\WOW6432Node\Citrix\Dazzle. You can also control this setting using a Group Policy.
- Rename the installation file CitrixWorkspaceApp.exe to CitrixWorkspaceAppWeb.exe (this name has to be exact including camel-case letters).
The complete installation script does not prevent the Add Account window from appearing at user logon. In case you want to prevent this from happening and you do not want to configure a Group Policy Preference, simply rename the file CitrixWorkspaceApp.exe to CitrixWorkspaceAppWeb.exe as mentioned previously (this is the simplest solution).
| Note: renaming the CitrixWorkspaceApp.exe means that e-mail-based account discovery is no longer supported (reference: Deploy Citrix Receiver for Windows from Receiver for Web). Also, see the official Citrix article How to Suppress the Add Account Window in Citrix Receiver for Windows for more information. |
Prevent an unexpected MSI repair from launching
It may happen that when you try to start a published application, an MSI installer repair of the component “Citrix Online Plug-in” is started.

The exact cause for this behavior is unknown to me, but I can offer you a workaround. To solve this issue, you simply have to delete all data from the registry value WEB_CLIENT (part of the Citrix Online Plug-in MSI). Do not delete the registry value itself! Just remove the data from it (“empty” it) as shown in the screenshot below.
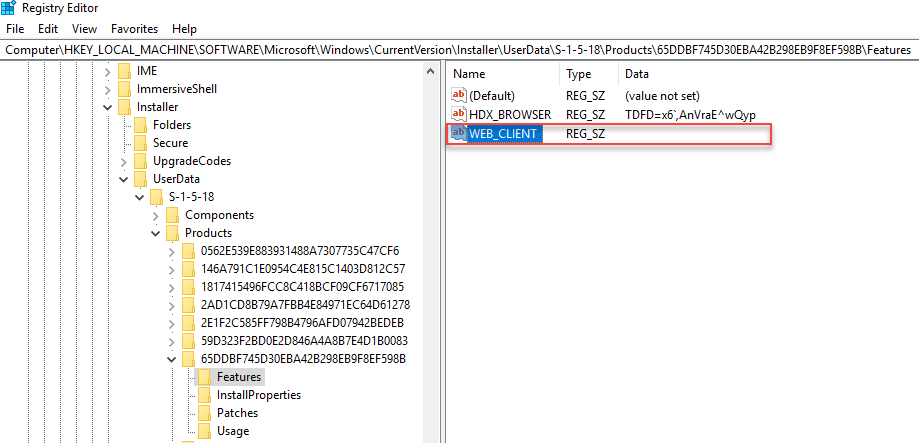
The registry value WEB_CLIENT (string / REG_SZ) is located here:
HKEY_LOCAL_MACHINE\SOFTWARE\Microsoft\Windows\CurrentVersion\Installer\UserData\S-1-5-18\Products\%ProductGUID%\Features
The product GUID is different for each version of Citrix Workspace app:
- D40311B1F8DD0004B8715A85DAECC4CF -> Workspace app version 1808
- 65DDBF745D30EBA42B298EB9F8EF598B -> Workspace app version 1809
- 230369BA6C7C7464683823509A70DF6E -> Workspace app version 1810
- 691BFE598F3E06243B378CC91B536771 -> Workspace app version 1812
- 52593DD2E7A97DE41BF6EED7F1579FA5 -> Workspace app version 1902
- 9BBCC4F9C00B64B4990698B41BB1A3AF -> Workspace app version 1903
- 88759762CEE8CF04C85B2D3727441362 -> Workspace app version 1904
- D2C5650F878893E40B9B9562ED9373CA -> Workspace app version 1904.1
- 6A325AD5754E1B044A29EBB5065A2C67 -> Workspace app version 1905
- 195324F90296A2B46A9766A17E548F7D -> Workspace app version 1907
- ACD95015F191DC94A873EF5561AE259C -> Workspace app version 1909
In the complete installation script below, the data in the WEB_CLIENT registry value for Citrix Workspace app 1909 is removed (lines 209 to 225).
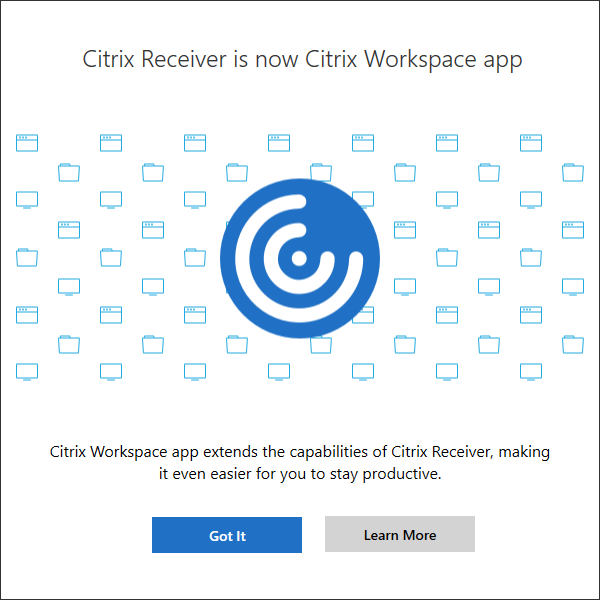
Prevent the splash screen “Citrix Receiver is now Citrix Workspace App” from showing
When a user opens Citrix Workspace app for the first time, the splash screen “Citrix Receiver is now Citrix Workspace App” is shown:
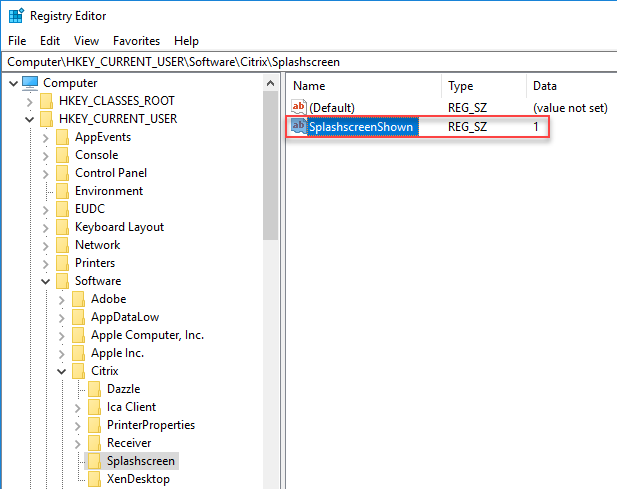
The following registry value prevents the splash screen from appearing:
- Key: HKEY_CURRENT_USER\Software\Citrix\Splashscreen
- Value name (REG_SZ / string): SplashscreenShown
- Value: 1
This value is not included in the complete installation script below. I recommend using a Group Policy Preference to configure this setting (the article Configuring the time zone and code page with Group Policy demonstrates how to configure Group Policy Preferences).
Remove Citrix Workspace app shortcuts
During installation, Citrix Workspace app creates a shortcut in the Programs folder in the Start Menu of the public user (= All Users):
C:\ProgramData\Start Menu\Programs\Citrix Workspace.lnk
In the complete installation script below, this shortcut is removed (lines 261 to 264).
| Note: In the past, Citrix Receiver (now Workspace app) created a shortcut in the public Programs\Startup folder in the Start Menu (= All Users). This is no longer the case, but the installation script does check for this value and removes it in case it exists.Citrix Workspace app automatically starts at logon time by running the command “C:\Program Files (x86)\Citrix\ICA Client\concentr.exe” /startup (HKLM\SOFTWARE\WOW6432Node\Microsoft\ Windows\CurrentVersion\Run -> ConnectionCenter). |
Prevent Windows 10 Game Bar popup (Win+G)
As per Citrix: “When launching published apps or desktops from a Windows 10 OS a […] popup windows briefly appears prompting to press Win + G for the game bar or the search bar.”

As described in the article, you can disable the game bar with the following registry entry:
- Key: HKLM\SOFTWARE\Policies\Microsoft\Windows\GameDVR
- Item: AllowGameDVR
- Value: 00000000
- Type: DWORD
The complete installation script below sets this registry value (line 237).
Modify the Network Provider order (for Windows 10 1709 only)
When you install the Workspace app Single Sign-on feature (/includeSSON), an entry is created in the network provider order.
| What is the network provider order? Using network providers, Windows can support many different types of network protocols without having to know the network-specific details of each network (reference). By default, Windows ships with the following three network providers in the following order:
In the registry, the list and order of the Microsoft and third-party network providers can be found here: HKLM\System\CurrentControlSet\ Control\NetworkProvider. The network provider settings can also be viewed/managed using the GUI: |
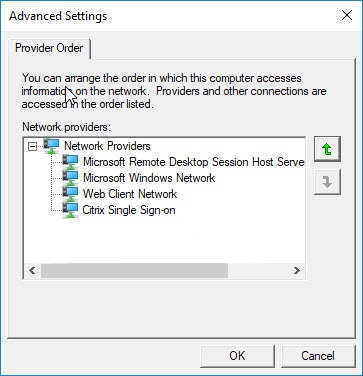
Citrix adds the entry PnSson (= Citrix Single Sign-on). Citrix recommends that this entry be listed as number four, after the three default Windows network providers (see the info box above).
With Windows 10 version 1709, two things are important to know:
- There is a known bug with the network provider
- The network provider order is handled differently compared to older operating systems
Let’s start with the bug. As described by Citrix in the article Windows 10 Fall Creators Update (v1709) – Citrix Known Issues, the network provider has a bug (which is fixed in Windows 10 version 1803 and higher). The bug is that no third-party network provider, including Citrix’s PnSson value, is populated under the newly introduced registry key ProviderOrder under HKLM\System\ CurrentControlSet\Control\NetworkProvider. This bug causes the error “failed to get network providers” when you try to display the network provider order graphically.
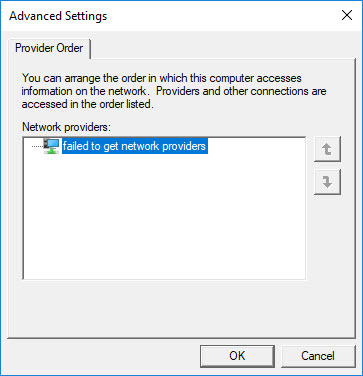
Please be aware that the actual functionality of the network provider still works.
In the past, the order of the network provider was determined by the order of the entries in the registry item ProviderOrder under HKLM\System\CurrentControlSet\Control\NetworkProvider\Order. With Windows 10, this is no longer the case. The order is now determined by the decimal value of the network provider (HKLM\System\CurrentControlSet\Control\NetworkProvider\ProviderOrder). The item with the lowest number is executed first and the item with the highest number last.
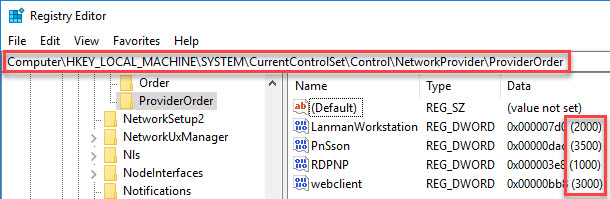
In the article Windows 10 Fall Creators Update (v1709) – Citrix Known Issues, Citrix recommends creating the missing item using the decimal DWORD value of 4000. I recommend using a different number, for example, 3001 or 3500. The reason for this is simple; you may have another third-party product that already occupies the number 4000. This is for example the case when you install a product such as Lotus Notes including the Notes Single logon service. The main goal is that the PnSson value is listed as the fourth item, after the three default Microsoft ones. The third Microsoft entry has a value of 3000, so the value PnSson needs to have a higher value (at least 3001 or higher).
In the complete installation script below, the missing network provider registry item is created in lines 241 to 251, but only for Windows 10 version 1709.
Performance optimizations
There seem to be a couple of registry values that may improve the performance of Workspace app. I did not add these to the complete installation script. In case you experience slow enumerations of (start menu) icons, please test the following registry values:
- InitialRefreshMinMs (REG_SZ) = 1 – minimizes the launch delay before contacting the store
- InitialRefreshMaxMs (REG_SZ) = 1 – minimizes the launch delay before contacting the store
- MaxSimultaneousFetches (REG_DWORD) = 6 – improves the time of loading icons in the Start Menu
- MaxSimultaneousSubscribes (REG_DWORD) = 6 – improves the time of loading icons in the Start Menu
See the example in the previous section on how to add these values to the complete installation script.
Complete installation script
I packed the complete Citrix Workspace app installation in my installation template. The script below contains the installation and all configurations for Citrix Workspace app as described in the previous sections, including detailed logging and error handling. The functions used in the scripts require my PowerShell Functions Library to be present on the local system. This means that before you can use the script, you need to copy the PowerShell module file DS_PowerShell_Function_Library.psm1 to the local system first.
The script was created for Windows 10 (all versions) and Windows Server 2016 version 1607 and higher. I tested this script on Windows 10 version 1803.
To use this script, please follow these steps:
- Create an installation directory on the local computer or a file share (UNC path). For example C:\Temp\Citrix\WorkspaceApp.
- Create a subdirectory called Files.
- Download and copy the Workspace app CitrixWorkspaceApp.exe to the folder Files in the installation directory.
- Optional: rename the CitrixWorkspaceApp.exe to CitrixWorkspaceAppWeb.exe.
- Download and copy the registry file (*.reg) containing the Client Selective Trust registry keys and values to the folder Files in the installation directory.
- Download and copy the PowerShell module file DS_PowerShell_Function_Library.psm1 to a directory on your local system.
- Copy the complete PowerShell script below to a new PS1 file (e.g. Install_CitrixWorkspaceApp.ps1) and add this file to the root of the installation directory (not in the subdirectory Files).
- Modify the PowerShell script:
- Optional: modify the location of the log directory and log file name in lines 45 and 46.
- Optional: in case you renamed the CitrixWorkspaceApp.exe to CitrixWorkspaceAppWeb.exe, enter the correct file name in line 100.
- Optional: in case you use a different sub-directory name instead of Files, change it in line 106.
- Enter the correct path to the PowerShell module file in line 62.
- Enter the correct product ID of the version of the Workspace app you are installing in line 223. You find all product IDs in the comments above line 223 as well as in this section of this article.
- Execute the PowerShell script as follows:
powershell.exe -executionpolicy bypass -file C:\Temp\Citrix\WorkspaceApp\Install_CitrixWorkspaceApp.ps1
|
1 2 3 4 5 6 7 8 9 10 11 12 13 14 15 16 17 18 19 20 21 22 23 24 25 26 27 28 29 30 31 32 33 34 35 36 37 38 39 40 41 42 43 44 45 46 47 48 49 50 51 52 53 54 55 56 57 58 59 60 61 62 63 64 65 66 67 68 69 70 71 72 73 74 75 76 77 78 79 80 81 82 83 84 85 86 87 88 89 90 91 92 93 94 95 96 97 98 99 100 101 102 103 104 105 106 107 108 109 110 111 112 113 114 115 116 117 118 119 120 121 122 123 124 125 126 127 128 129 130 131 132 133 134 135 136 137 138 139 140 141 142 143 144 145 146 147 148 149 150 151 152 153 154 155 156 157 158 159 160 161 162 163 164 165 166 167 168 169 170 171 172 173 174 175 176 177 178 179 180 181 182 183 184 185 186 187 188 189 190 191 192 193 194 195 196 197 198 199 200 201 202 203 204 205 206 207 208 209 210 211 212 213 214 215 216 217 218 219 220 221 222 223 224 225 226 227 228 229 230 231 232 233 234 235 236 237 238 239 240 241 242 243 244 245 246 247 248 249 250 251 252 253 254 255 256 257 258 259 260 261 262 263 264 265 266 267 268 269 270 271 272 273 274 275 276 277 278 279 280 281 282 283 284 285 286 287 288 289 290 291 292 |
#========================================================================== # # CITRIX WORKSPACE APP FOR WINDOWS version 1909 (released September 2019) # # AUTHOR: Dennis Span (https://dennisspan.com) # DATE : 11.09.2018 # # COMMENT: This script installs and configured Citrix Workspace app for Windows version 1909 (released in September 2019) # # This script has been created for Windows 10 (all versions) and Windows Server 2016 version 1607 and higher # This script has been tested on Windows Server 2016 version 1607 and Windows 10 version 1803 # # Change log: # ----------- # 24.09.2018 Dennis Span: added registry value change to prevent unexpected MSI repairs from starting (line 225) # 27.12.2018 Dennis Span: updated script for Citrix Workspace app version 1812 # 04.05.2019 Dennis Span: updated script for Citrix Workspace app version 1904 # 29.07.2019 Dennis Span: updated script for Citrix Workspace app version 1907 # Note: I also had to make some changes concerning the output of the Workspace app installer (see the article 'https://support.citrix.com/article/CTX257546' for more information). # And don't worry, the changes I made to this script also work with older versions of Citrix Workspace app # 02.10.2019 Dennis Span: updated script for Citrix Workspace app version 1909 #========================================================================== # Get the script parameters if there are any param ( # The only parameter which is really required is 'Uninstall' # If no parameters are present or if the parameter is not # 'uninstall', an installation process is triggered [string]$Installationtype ) # define Error handling # note: do not change these values $global:ErrorActionPreference = "Stop" if($verbose){ $global:VerbosePreference = "Continue" } ############################ # Preparation # ############################ # Disable File Security $env:SEE_MASK_NOZONECHECKS = 1 # Custom variables [edit] $BaseLogDir = "C:\Logs" # [edit] add the location of your log directory here $PackageName = "Citrix Workspace app" # [edit] enter the display name of the software (e.g. 'Arcobat Reader' or 'Microsoft Office') # Global variables $StartDir = $PSScriptRoot # the directory path of the script currently being executed if (!($Installationtype -eq "Uninstall")) { $Installationtype = "Install" } $LogDir = (Join-Path $BaseLogDir $PackageName).Replace(" ","_") $LogFileName = "$($Installationtype)_$($PackageName).log" $LogFile = Join-path $LogDir $LogFileName # Create the log directory if it does not exist if (!(Test-Path $LogDir)) { New-Item -Path $LogDir -ItemType directory | Out-Null } # Create new log file (overwrite existing one) New-Item $LogFile -ItemType "file" -force | Out-Null # Import the Dennis Span PowerShell Function Library Import-Module "C:\Temp\DS_PowerShell_Function_Library.psm1" DS_WriteLog "I" "START SCRIPT - $Installationtype $PackageName" $LogFile DS_WriteLog "-" "" $LogFile ############################ # Pre-launch commands # ############################ # Delete old log folders in the TEMP directory (in case there are any) DS_WriteLog "I" "Delete old log folders" $LogFile $Folders = Get-ChildItem $env:Temp -filter "CTXReceiverInstallLogs*" if ( $Folders.Count -gt 0 ) { Foreach ( $Folder in $Folders ) { DS_DeleteDirectory -Directory $Folder.FullName } } else { DS_WriteLog "I" "No existing log folders were found. Nothing to do." $LogFile } DS_WriteLog "-" "" $LogFile # Only execute the following section during installation, not uninstallation if (! ( $Installationtype -eq "Uninstall" )) { # Prevent the 'Add account' button right after installation # Note 1: this section is not required in case you rename 'CitrixWorkspaceApp.exe' to 'CitrixWorkspaceAppWeb.exe' (but it also does no harm so you can leave it as it is) # Note 2: 'CitrixWorkspaceAppWeb.exe' does NOT set the value 'EnableX1FTU' in the registry: it merely shows a Window at the end of the installation without the 'Add Account' button DS_WriteLog "I" "Prevent the 'Add account' button right after installation" $LogFile DS_SetRegistryValue -RegKeyPath "hklm:\SOFTWARE\Wow6432Node\Policies\Citrix" -RegValueName "EnableX1FTU" -RegValue "00000000" -Type "DWORD" DS_WriteLog "-" "" $LogFile } ############################ # Installation # ############################ # Install or uninstall software $FileName = "CitrixWorkspaceApp.exe" # [edit] enter the name of the installation file (e.g. 'MyApp.msi' or 'setup.exe') if ( $Installationtype -eq "Uninstall" ) { $Arguments = "/silent /uninstall" # [edit] enter arguments (for MSI file the following arguments are added by default: /i #File# /qn /norestart / l*v #LogFile#) } else { $Arguments = "/silent /includeSSON /FORCE_LAA=1 EnableCEIP=false /AutoUpdateCheck=disabled" # [edit] enter arguments (for MSI file the following arguments are added by default: /i #File# /qn /norestart / l*v #LogFile#) } $FileSubfolder = "Files" # [edit] enter the name of the subfolder which contains the installation file (e.g. 'Files' or 'MSI') $FileFullPath = Join-Path $StartDir $FileSubfolder # Concatenate the two directories $StartDir and $InstallFileFolder $File = Join-Path $FileFullPath $FileName # Input for logging if ( $Installationtype -eq "Uninstall" ) { $Result0 = "Uninstall" $Result1 = "uninstalled" $Result2 = "uninstallation" } else { $Result0 = "Install" $Result1 = "installed" $Result2 = "installation" } # Logging DS_WriteLog "I" "$Result0 Citrix Workspace app" $LogFile DS_WriteLog "I" "-File name: $FileName" $LogFile DS_WriteLog "I" "-File full path: $File" $LogFile # Check if the installation file exists if (! (Test-Path $File) ) { DS_WriteLog "E" "The file '$File' does not exist!" $LogFile Exit 1 } DS_WriteLog "I" "-Command: Start-Process -FilePath $File -ArgumentList $arguments -PassThru -ErrorAction Stop" $LogFile DS_WriteLog "I" "Run the $Result2..." $LogFile try { $process = Start-Process -FilePath $File -ArgumentList $arguments -PassThru -ErrorAction Stop try { Wait-Process -InputObject $process switch ($Process.ExitCode) { 0 { DS_WriteLog "S" "The software was $Result1 successfully (exit code: 0)" $LogFile } 3 { DS_WriteLog "S" "The software was $Result1 successfully (exit code: 3)" $LogFile } # Some Citrix products exit with 3 instead of 0 1603 { DS_WriteLog "E" "A fatal error occurred (exit code: 1603). Some applications throw this error when the software is already (correctly) installed! Please check." $LogFile } 1605 { DS_WriteLog "I" "The software is not currently installed on this machine (exit code: 1605)" $LogFile } 1619 { DS_WriteLog "E" "The installation files cannot be found. The PS1 script should be in the root directory and all source files in the subdirectory 'Files' (exit code: 1619)" $LogFile Exit 1 } 3010 { DS_WriteLog "W" "A reboot is required (exit code: 3010)!" $LogFile } default { [string]$ExitCode = $Process.ExitCode DS_WriteLog "E" "The $Result2 ended in an error (exit code: $ExitCode)!" $LogFile Exit 1 } } } catch { DS_WriteLog "E" "An error occurred while trying to wait for the $Result2 process (error: $($Error[0]))." $LogFile } } catch { switch ($Process.ExitCode) { 0 { DS_WriteLog "S" "The software was $Result1 successfully (exit code: 0)" $LogFile } 3 { DS_WriteLog "S" "The software was $Result1 successfully (exit code: 3)" $LogFile } # Some Citrix products exit with 3 instead of 0 1603 { DS_WriteLog "E" "A fatal error occurred (exit code: 1603). Some applications throw this error when the software is already (correctly) installed! Please check." $LogFile } 1605 { DS_WriteLog "I" "The software is not currently installed on this machine (exit code: 1605)" $LogFile } 1619 { DS_WriteLog "E" "The installation files cannot be found. The PS1 script should be in the root directory and all source files in the subdirectory 'Files' (exit code: 1619)" $LogFile Exit 1 } 3010 { DS_WriteLog "W" "A reboot is required (exit code: 3010)!" $LogFile } default { [string]$ExitCode = $Process.ExitCode DS_WriteLog "E" "The $Result2 ended in an error (exit code: $ExitCode)!" $LogFile Exit 1 } } } #DS_InstallOrUninstallSoftware -File $File -InstallationType $Installationtype -Arguments $Arguments DS_WriteLog "-" "" $LogFile ############################ # Post-launch commands # ############################ if ( $Installationtype -eq "Uninstall" ) { # POST-CONFIGURATION FOR UNINSTALLATIONS # Cleanup remaining registry entries: # Reference: https://docs.citrix.com/en-us/citrix-workspace-app-for-windows/install/ica-install-manual.html#to-uninstall-citrix-workspace-app-for-windows-using-the-command-line-interface DS_WriteLog "I" "Cleanup: delete the Citrix Workspace app local machine keys" $LogFile DS_DeleteRegistryKey -RegKeyPath "hklm:\SOFTWARE\Policies\Citrix\ICA Client" DS_DeleteRegistryKey -RegKeyPath "hklm:\SOFTWARE\Wow6432Node\Policies\Citrix\ICA Client" DS_DeleteRegistryValue -RegKeyPath "hklm:\SOFTWARE\Wow6432Node\Policies\Citrix" -RegValueName "EnableX1FTU" DS_DeleteRegistryValue -RegKeyPath "hklm:\SYSTEM\CurrentControlSet\Control\NetworkProvider\ProviderOrder" -RegValueName "PnSson" # This is merely an additional check/cleanup. Under normal circumstances this is not required. DS_WriteLog "-" "" $LogFile } else { # POST-CONFIGURATION FOR INSTALLATIONS # Import the Client Selective Trust registry keys and values. This prevents annoying security popup message regarding permissions for access to files, microphones, cameras, scanners, etc. in the local intranet and trusted sites. # Reference: How to Configure Default Device Access Behavior of Receiver, XenDesktop and XenApp (https://support.citrix.com/article/CTX133565) DS_WriteLog "I" "Import the Client Selective Trust registry keys and values. This prevents security popup messages during logon" $LogFile $RegFile = Join-Path $StartDir "Files\CitrixWorkspaceApp_Client_Selective_Trust_x86_Dennisspan.com.reg" DS_ImportRegistryFile -FileName $RegFile DS_WriteLog "-" "" $LogFile # Prevent unexpected MSI repairs from starting # -Delete the value data from the WEB_CLIENT registry value (part of the Citrix Online Plug-in MSI) # -Each version of Citrix Workspace app has its own product ID: # -AC1889E2C14E5E540855164ACCB19FF3 -> Citrix Receiver 4.12 (this is the latest and last version of Receiver. The replacement for Receiver is Workspace app) # -D40311B1F8DD0004B8715A85DAECC4CF -> Citrix Workspace app version 1808 # -65DDBF745D30EBA42B298EB9F8EF598B -> Citrix Workspace app version 1809 # -230369BA6C7C7464683823509A70DF6E -> Citrix Workspace app version 1810 # -691BFE598F3E06243B378CC91B536771 -> Citrix Workspace app version 1812 # -52593DD2E7A97DE41BF6EED7F1579FA5 -> Citrix Workspace app version 1902 # -9BBCC4F9C00B64B4990698B41BB1A3AF -> Citrix Workspace app version 1903 # -88759762CEE8CF04C85B2D3727441362 -> Citrix Workspace app version 1904 # -D2C5650F878893E40B9B9562ED9373CA -> Citrix Workspace app version 1904.1 # -6A325AD5754E1B044A29EBB5065A2C67 -> Citrix Workspace app version 1905 # -195324F90296A2B46A9766A17E548F7D -> Citrix Workspace app version 1907 # -ACD95015F191DC94A873EF5561AE259C -> Citrix Workspace app version 1909 $ProductID = "ACD95015F191DC94A873EF5561AE259C" DS_WriteLog "I" "Prevent unexpected MSI repairs from starting" $LogFile DS_SetRegistryValue -RegKeyPath "hklm:\SOFTWARE\Microsoft\Windows\CurrentVersion\Installer\UserData\S-1-5-18\Products\$($ProductID)\Features" -RegValueName "WEB_CLIENT" -RegValue "" -Type "String" DS_WriteLog "-" "" $LogFile # This section only runs on Windows 10 and higher [int]$WindowsVersion = ([environment]::OSVersion.Version).Major if ( $WindowsVersion -ge 10 ) { # Prevent the Win+G popup on Windows 10 machines # Reference: -https://support.citrix.com/article/CTX226423 # -http://www.carlstalhood.com/receiver-for-windows/#registryvalues DS_WriteLog "I" "Prevent the Win+G popup on Windows 10 machines" $LogFile DS_SetRegistryValue -RegKeyPath "hklm:\SOFTWARE\Policies\Microsoft\Windows\GameDVR" -RegValueName "AllowGameDVR" -RegValue "00000000" -Type "DWORD" DS_WriteLog "-" "" $LogFile # Fix the error ‘Failed to get network providers’ under Advanced Settings of the Network Adaptor when Citrix Workspace app with Single Sign-on (SSON) is installed (reference: https://support.citrix.com/article/CTX229052) # Note 1: this issue is fixed from Windows 10 version 1803. That is why this section only runs on Windows 10 version 1709. # Note 2: in Windows 10, the provider order is based on the value of the particular item in the registry key 'HKEY_LOCAL_MACHINE\SYSTEM\CurrentControlSet\Control\NetworkProvider\ProviderOrder' # By default, each network provider item gets a value of one thousands or higher, always an even 1000 value. For example: 1000, 2000, 3000, etc. [string]$WindowsVersionRelease = (Get-ItemProperty "HKLM:\SOFTWARE\Microsoft\Windows NT\CurrentVersion\" -Name ReleaseID).ReleaseId if ( $WindowsVersionRelease -eq "1709" ) { DS_WriteLog "I" "Fix the error 'Failed to get network providers' under Advanced Settings of the Network Adapter (for Windows 10 version 1709 only!)" $LogFile DS_SetRegistryValue -RegKeyPath "hklm:\SYSTEM\CurrentControlSet\Control\NetworkProvider\ProviderOrder" -RegValueName "PnSson" -RegValue "3001" -Type "DWORD" DS_WriteLog "-" "" $LogFile } } # Remove the shortcut from the 'Programs\Startup' folder (if exist) DS_WriteLog "I" "Remove the Citrix Workspace app shortcut from the 'Programs\Startup' folder" $LogFile $File = Join-Path $env:AllUsersProfile "Start Menu\Programs\Startup\Citrix Workspace.lnk" DS_DeleteFile -File $File DS_WriteLog "-" "" $LogFile # Remove the shortcut from the 'Programs' folder (if exist) DS_WriteLog "I" "Remove the Citrix Workspace app shortcut from the 'Programs' folder" $LogFile $File = Join-Path $env:AllUsersProfile "Start Menu\Programs\Citrix Workspace.lnk" DS_DeleteFile -File $File DS_WriteLog "-" "" $LogFile } # Do the following for both installations and uninstallations # Determine the folder name containing the Citrix log files (e.g. C:\Windows\Temp\CTXReceiverInstallLogs-20160218-202413) DS_WriteLog "I" "Copy the log files from the TEMP directory to '$LogDir'" $LogFile $CitrixLogPath = (gci -directory -path $env:Temp -filter "CTXReceiverInstallLogs*").FullName if ( Test-Path ( $CitrixLogPath + "\*.log" ) ) { $Source = Join-Path $CitrixLogPath "*.log" DS_WriteLog "I" "Source files = $Source" $LogFile DS_WriteLog "I" "Destination directory = $LogDir " $LogFile DS_CopyFile -SourceFiles $Source -Destination $LogDir } else { DS_WriteLog "I" "There are no log files in the directory '$CitrixLogPath'. Nothing to copy." $LogFile } ############################ # Finalize # ############################ # Enable File Security Remove-Item env:\SEE_MASK_NOZONECHECKS DS_WriteLog "-" "" $LogFile DS_WriteLog "I" "End of script" $LogFile |
To uninstall Workspace app, execute the script as follows:
powershell.exe -executionpolicy bypass -file C:\Temp\Citrix\WorkspaceApp\Install_CitrixWorkspaceApp.ps1 Uninstall
The uninstallation removes any custom configuration the installation may have set as well as the following two registry keys:
- HKLM\Software\Policies\Citrix\ICA Client
- HKLM\Software\Wow6432Node\Policies\Citrix\ICA Client
Removing these two registry keys is recommended by Citrix in the section To uninstall Citrix Workspace app for Windows using the command line interface in the article Install and uninstall Citrix Workspace app for Windows manually.
If you want to go one step further and create an SCCM package as well, please follow the step-by-step explanation in the article Deep dive creating SCCM packages for Citrix.
Conclusion
Installing and configuring Citrix Workspace app can get quite complicated and requires a bit of planning. Also, please be aware of the following:
- More settings can be directly configured during the installation of Citrix Workspace app. Most of these configurations concern the Windows registry. Please see the section Registry Values in Carl Stalhood’s article Citrix Workspace app 1909 for more information. In case you want to add additional configurations to the complete installation script, I recommend copying and reusing existing lines of code. Please be aware that many settings can nowadays be managed using Group Policy.
- Citrix Workspace app comes with a large collection of Group Policy settings. Please see the section Workspace app / Receiver Group Policy ADMX Template in Carl Stalhood’s article Citrix Workspace app 1909 for more information. The actual ADMX files can be downloaded on the Citrix website (in the section Downloads for admins), but they are also included in the installation directory of Workspace app (C:\Program Files (x86)\Citrix\ICA Client\Configuration).
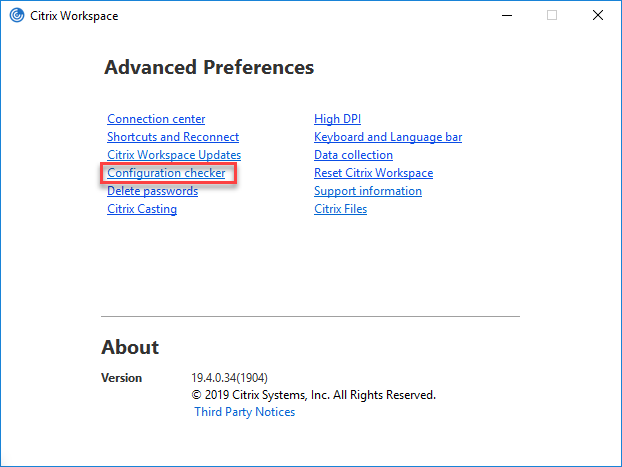
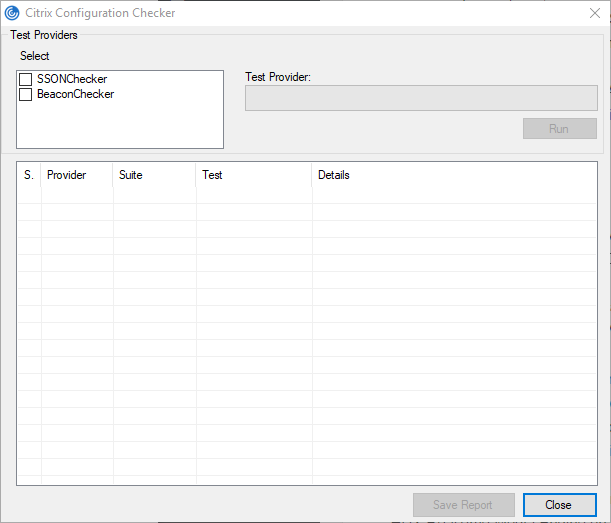
- Pass-through authentication (or single sign-on) requires many different settings to be correctly configured, such as Trusted Sites, Trust XML Requests on the Delivery Controller, installing the Single Sign-On component in Workspace app, and more. Please see the section Pass-through Authentication in Carl Stalhood’s article Citrix Workspace app 1909 for a complete overview of what needs to be configured. Citrix Workspace app comes with a built-in tool for checking the SSON configuration (see the Citrix article SSON Configuration Checker for Citrix Receiver for Windows for more information).
- The latest version of Workspace app is also included in the installation sources of the Virtual Delivery Agent. On a Citrix worker, there are two possible strategies you can follow:
- You install Workspace app as a stand-alone installation (as described in this article) and install the Virtual Delivery Agent excluding Workspace app. This is accomplished by using the command line /components VDA as described in the section Citrix Virtual Delivery Agent in my article Scripting the complete list of Citrix components with PowerShell.
- You install the version of Workspace app included in the Virtual Delivery Agent installation sources (in this case you do the parameter /components VDA,PLUGINS). In this case, you do NOT install Workspace app as a stand-alone installation.
- When using Skype for Business in your environment, you may want to install the HDX RealTime Media Engine on your client device together with Citrix Workspace app. Citrix Workspace app is a prerequisite for the Media Engine; without Workspace app, Media Engine cannot be installed. To automate the installation of the HDX RealTime Media Engine, please see the section HDX RealTime Media Engine for Windows in my article Scripting the complete list of Citrix components with PowerShell. Also, for extensive information on Skype for Business, Citrix, and the HDX RealTime Optimization Pack, please see the section Skype for Business in Carl Stalhood’s article Citrix Workspace app 1909. I also highly recommend you to read the article Skype for Business with XenApp & XenDesktop written by Citrix CTP George Spiers.
- Citrix Workspace app 1809 and higher supports Citrix Screen Casting for the Citrix Ready workspace hub.
I hope the information in this article was of some help to you. Happy scripting!
Dennis Span works as a Principal Account Technology Strategist at Cloud Software Group in Vienna, Austria. He holds multiple Citrix certifications (CCE-V). Dennis has been a Citrix Technology Advocate (CTA) since 2017 (+ one year as Citrix Technology Professional, CTP). Besides his interest in virtualization technologies and blogging, he loves spending time with his family as well as snowboarding, playing basketball, and rowing. He is fluent in Dutch, English, German, and Slovak and speaks some Spanish.

Pingback: Detailed Change Log – Carl Stalhood
I felt I had to let you know, thanks so much for this mate. Saved me a heap of pain getting this ready to deploy!
Cheers
Dean
Well thank you very much for your very kind words Dean! Feedback such as yours is the currency of bloggers such as myself! 🙂 I am happy to have been of some help. Enjoy your day mate!
Hi , thanks for a great work.
I get it to work with the install and uninstall, i wanna add-in the url to the Storefront server.
On Line 99 $Arguments i tried to add STORE0=SITENAME;https://servername/iis-webpath/
After i have install receiver with this i get error that site cant be found.
Hi,
I suggest that you confirm your parameters in the Citrix Receiver (Workspace App) command line tool just to make sure you enter everything correctly: https://support.citrix.com/article/CTX227370.
Also make sure that you enter the correct path. If you do not specify the path full qualified you have to make sure that your store is set as default store so it can be located.
Hi.
In the script on line 99
the values for the $Arguments are already set in ” ”
The Store0= path to SF server also have to be in ” ”
How can i solve this?
I had the same problem, its work if u put in double “” “”
Im not a god on powershell, but how can we add in the Store0=”NAME;https://server.domain.com/citrix/storename”
To your line 99 with $Arguments = “/Silent ..”
This will add double ” ” ” ” to that $Argument
Hi,
One way how to solve this is to use double quotes, like this: Store0=””NAME;https://server.domain.com/citrix/storename“”
Pingback: Receiver / Workspace app 1810 – Carl Stalhood
Any suggestions on how to get the app shortcuts to show up on the Start Menu upon deployment? Right now, it seems like even with SSO enable upon deployment, the Workspace app needs to be launched once and logged in (via SSO) before pulling down all the app shortcuts a user is permissioned for. Ideally, this should happen upon log on automatically as was the case for receiver.
Thanks in advance.
Hi Wai,
I do not have an answer for you right this moment. I will test it and get back to you.
Hello Dennis. Thank you for such a nice article. I have a question.
– I have installed Citrix Workspace App. And have connected to citrix server by giving server address, username and password.
– Now I want that on startup it should read all three things server address, username and password from a file and it shoul be auto filled.
I hope that I have explained it well.
Hi Asad,
Thanks for your kind feedback. I am not sure I understand your question correctly. How exactly do you logon to the server? Through the web browser or do you connect directly using a store? Do you use pass-through authentication?
I am connecting to it through Citrix Workspace desktop application.
Hi. Thanks again for a great work with this script, have saved me hours of hands on time.
On line 100 our syntax looks like this.
$Arguments = “/silent /includeSSON STORE0=””STORE1;https://sfbaseurl/IIS/discovery;on“” /FORCE_LAA=1 EnableCEIP=false /AutoUpdateCheck=disabled”
As u can see we have to put in double “” in the store url to get this to work, but after the installation of workspace client it have double storefront url to same Store, client work but how to get rid of the double account in the client?
Hi Roger,
I am happy that you like the article! I never had the issue concerning double stores myself. I found an older article that describes the SRIDs on StoreFront. Perhaps it can help you (https://www.virtualexperience.no/2015/11/04/fixing-citrix-receiver-duplicate-icons-and-stores/). Did you by chance create new StoreFront servers or did you just migrate to a new environment? What about the local machine where you install Workspace app? Did you upgrade from an older version of Receiver perhaps? Can it be that the StoreFront URL is already cached on these machines? Did you run the Receiver Cleanup Utility before installing Workspace app? Just a few idea of the top of my head.
Yes , this was a upgrade to 1903 from 1902 workspaceapp, no pre-uninstall was done. To upgrade workspaceapp seems difficult, only got post problems with a upgrade. So im looking over a automate workflow with a uninstall>reboot>clean install>reboot with your script
What you can try is to add the command line parameter /rcu to your installation. This should cleanup any older client as well as older settings. This way you would not have to do any uninstall->reboot->new install->reboot (reference: https://docs.citrix.com/en-us/citrix-workspace-app-for-windows/install.html).
Hello Dennis,
there is a new CTX articel “Updates to Citrix Workspace app installer” https://support.citrix.com/article/CTX257546.
Does your script also need to be adjusted?
Greetings from Germany
Michael
Hi Michael,
Yes, you are right. My installation script needs to be modified. Unfortunately I did not have the chance to do this before my holiday, but I will fix it as soon as I am back (end of July). Thanks for reminding me though!
Hi Michael, I have updated the installation script.
I’m testing the script with the actual WorkspaceApp 1907.
The script starts and “hangs” on “start installation”.
the workspace app is installed although, but I have to cancel the script.
the same problem I have with workspace app 1904.
Hi Andi,
I added a comment right at the start of this article. In this comment I explain that Citrix made a change in their installer routine. My installation script does not work correctly because of this change. I am currently on holiday and I will update my script latest at the end of July, hopefully sooner. My apologies for the inconvenience.
Hi Andi, I have updated the installation script.
thx.
it works again
Great!
Hi Dennis,
Just wondering if you ever found a solution for the below? I am having the same issue when trying to switch our Citrix environment from Receiver to Workspace App.
“Any suggestions on how to get the app shortcuts to show up on the Start Menu upon deployment? Right now, it seems like even with SSO enable upon deployment, the Workspace app needs to be launched once and logged in (via SSO) before pulling down all the app shortcuts a user is permissioned for. Ideally, this should happen upon log on automatically as was the case for receiver.
Thanks in advance.
Reply ↓
Dennis Span
on April 2, 2019 at 08:59 said:
Hi Wai,
I do not have an answer for you right this moment. I will test it and get back to you.”
Hi David,
You are absolutely right. I still have to give you an answer. I will get back to you next week. My apologies for the delay and thanks for reminding me!
Hi David,
I did some testing on this matter and was not able to reproduce the matter, unless I had subscriptions enabled. So the first question to you would be; did you set the StoreFront store setting “Manage User Subscriptions” to “Disable User Subscriptions (Mandatory Store)”? Furthermore, which version of Citrix Workspace app are you using and to which Citrix infrastructure are you connecting (Xenapp 6.5, XenDesktop xx, Citrix Virtual Apps and Desktop?).
Pingback: Site Updates – September 2018 – Carl Stalhood
Awesome script can’t wait to try. We have the client in a Non-Persistent Environment and also needed to add the FW Rule for the workspace client… Else users with no admin rights will get prompted to accept the FW rule.
New-NetfirewallRule -DisplayName “Citrix HDX Engine” -Profile Any -Direction Outbound -Action Allow -Program “C:\Program Files (x86)\Citrix\ICA Client\wfica32.exe”
Hello Dennis, we test the script with the actual WorkspaceApp 1911. The App is installed, but the script hangs on the installation step
Hi Andi,
I am sorry to hear that. Please send me the log file so I can take a look (dennis@dennisspan.com). Thanks.
Hello Dennis,
my problem was an old installationscript (pre workspace app 1904 ) I had the wrong one in out installation file.
So all is ok.
Thanks anyway.
Hi, I hope you’re ok
The scenario is as follows, I deploy a VDI virtual desktop Windows 10, in the VDI Citrix Worskpace is installed, from the VDI I deploy applications via XenApp, but in the VDI desktop the shortcut of the VDI Windows 10 is shown.
How can I remove the shortcut from the VDI?
Hello,
I hope you are well.I have a question, can you also reset the workspace app via powershell. since I’m not yet so fit in powershell I ask for
Hi Thomas,
Good question, but there is an easier way than using PowerShell. You can use the “CleanUp.exe” that is part of Citrix Workspace app to do a reset. The exact command-line is described here: https://support.citrix.com/article/CTX140149. The article was originally written for Citrix Receiver, but it works for the latest versions of Workspace app as well.
Hi Dennis,
Thank you for the quick answer.
Great information , thanks for sharing !
I will deploy a Virtual Lab , with 2 VDI with XenApp, and Xendesktop, a Delivery Controller , and a Storefront, maybe a shared cluster with SQL DB and a Licence server, to test all Scripts from Carl Webster , XA, DX , etc . whats best scenario or deployment recommendation you would like to give me before starting ?
Hi Pablo. I am sorry, but your question is pretty general. What kind of recommendations are you looking for? Which version to use? LTSR versus CR? On-Prem or public cloud? Automated installation or manual?
I also have a question to which you may have additional insight:
I get the following in the installation logs:
16:13:18: Information – CProcess_Execution_help::Execute_ReceiverEXE(770) – Executing command : C:\Program Files (x86)\Citrix\ICA Client\Receiver\receiver.exe -noshowconfigurationwizard
16:13:18: Error – CProcess_Execution_help::Execute_ReceiverEXE(775) – Unable to start process.
16:13:18: Information – CProcess_Execution_help::Execute_RedirectorEXE(512) – Executing command : “C:\Program Files (x86)\Citrix\ICA Client\redirector.exe” /regserver
16:13:19: Information – CProcess_Execution_help::Execute_RedirectorEXE(528) – Executing command : “C:\Program Files (x86)\Citrix\ICA Client\redirector.exe” /startup
16:13:19: Error – CProcess_Execution_help::Execute_RedirectorEXE(533) – Unable to start process.Return code=5
16:13:19: Information – CProcess_Execution_help::Execute_ConcentrEXE(727) – Executing command : C:\Program Files (x86)\Citrix\ICA Client\concentr.exe /startup
16:13:19: Error – CProcess_Execution_help::Execute_ConcentrEXE(732) – Unable to start process.
16:13:19: Information – CProcess_Execution_help::Execute_SelfServiceEXE(602) – Executing command : C:\Program Files (x86)\Citrix\ICA Client\SelfServicePlugin\SelfService.exe -cleanPNA -exit
16:13:19: Error – CProcess_Execution_help::Execute_SelfServiceEXE(607) – Unable to start process.
16:13:19: Information – CProcess_Execution_help::Execute_SelfServicePluginEXE(677) – Executing command : C:\Program Files (x86)\Citrix\ICA Client\SelfServicePlugin\SelfServicePlugin.exe
16:13:19: Error – CProcess_Execution_help::Execute_SelfServicePluginEXE(682) – Unable to start process.
This results in error messages popping up, and occurs when installing as Local System instead of with a user context. The installation still succeeds, but I’m trying to figure out why this happens and if it’s possible to prevent.
Hi Matthew,
What does the error message say? Can you send me your exact installation syntax? Does the error message appear on multiple machines? Is an existing Receiver or Workspace app installed on these machines?
The title bar of the error message says, “Receiver.exe – Application Error”. The content: “The application was unable to start correctly (0xc0000142). Click OK to close the application.”
This is the command that I’m using:
$t = Start-Process -FilePath C:\temp\Citrix_ePad\CitrixWorkspaceAppWeb.exe -ArgumentList ‘/silent /AutoUpdateCheck=disabled’ -PassThru -ErrorAction Stop
if($t -ne $null)
{
Wait-Process -InputObject $t
}
Part of the reason I’m using that command is due to this article, which actually makes a mention of this issue: https://support.citrix.com/article/CTX257546
I’m also seeking to suppress auto updates, the request for email, and security prompts (I have the .reg file being imported after installation). Everything seems to work except for the error messages I’m receiving.
This only results in the error when deploying using automation policy; that is, if I run the command in a user-context with an elevated PowerShell instance, then I won’t see the error. I get the error when running automation policy as Local System/non-user context. I’ve had to log the end-users out as part of the automation policy for other reasons, and as long as no one is logged in then obviously the error doesn’t show. It will show if the end-user logs in during the installation. This happens on multiple machines.
There is an existing installation on these machines at the time the automation policy starts; however, Citrix Receiver/Workspace is uninstalled before the installation is performed. I can also try this on a machine that doesn’t have it previously installed.
Based on my understanding of the issue, this issue may be resolved by simply suppressing the commands to start these processes as part of the installation. It just doesn’t seem to be an option.
Hi Matthew. Your PowerShell lines look correct. I am not sure what is causing the issue. I suggest that you open a support case at Citrix.
Did you ever find a resolution to this issue?
I never heard anything back and I did not follow up on this issue. Sorry.
Hello,
I have a question please, i need to uninstall Citrix workspace with powershell or command ligne, thank you.
Hi Mo. You will find all information in the article. Just search for “uninstall”. You will find the command lines and it is part of the script section as well.