
Learn how to configure and run BIS-F in an SCCM task sequence. This allows you to build, optimize and seal your images 100% automated.
Table of Contents |
Introduction
In this article, we will use a Microsoft SCCM task sequence in combination with BIS-F to build a 100% automated master target device. This master target device may be deployed using different technologies, such as Citrix Machine Creation Services (MCS) and Citrix Provisioning Server (PVS).
In case you use PVS, please make sure to install the PVS Target Device Software on the master target device. From version 6.1.0 of BIS-F, you are able to create a VHDX file directly on a UNC path.
BIS-F is an image optimization and sealing framework. The abbreviation stands for Base Image Script Framework and is one of our community’s great free tools. The company behind the tool is Login Consultants and it’s main developer is Matthias Schlimm. The framework supports Citrix XenApp/XenDesktop with MCS and PVS, VMware View and Microsoft RDS. What is also great is that BIS-F allows for the integration of third-party image optimization tools such as the Citrix Optimizer, the VMware OS Optimization Tool, CCleaner and more. BIS-F also optimizes a number of settings out-of-the-box.
The following link provides more information on the various features of BIS-F:
https://www.loginconsultants.com/en/news/all/item/base-image-script-framework-bis-f
Scroll to the bottom of the page to download the latest stable release. I also recommend to check out the website Eucweb.com.
| Note: when following the steps in this article, please make sure to use BIS-F version 6.1.0 or higher. |
Unattended installation of BIS-F
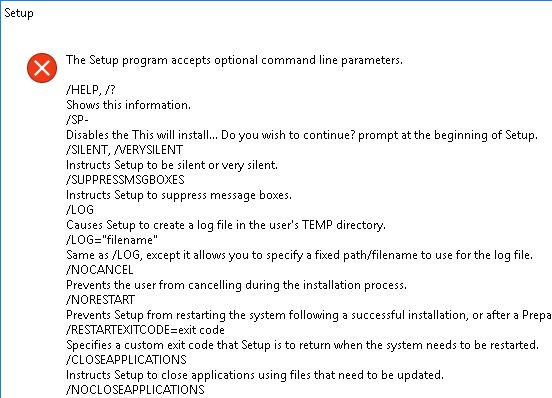
Before you can use BIS-F, you first have to download and extract the source file. After extracting the executable file you need to install BIS-F on your master target device. BIS-F supports a silent installation and offers a number of command line switches:
setup-BIS-F-X.X.X.exe /?
This is the complete command line I use for my installation:
setup-BIS-F-X.X.X.exe /verysilent /log:C:\Logs\BIS-F /norestart /noicons
In the following section you find a complete PowerShell script for installing BIS-F, including detailed logging and error handling.
By default, BIS-F is installed in the directory C:\Program Files (x86)\Base Image Script Framework (BIS-F). Also, the following shortcut is created during installation:
- C:\ProgramData\Microsoft\Windows\Start Menu\Programs\Base Image Script Framework (BIS-F).lnk
Another shortcut is created on the desktop of the administrator:
- C:\Users\%UserName%\Desktop\PrepareBaseImage (BIS-F) Admin Only.lnk
These shortcuts enable an administrator to execute BIS-F. They trigger the main script PrepareBaseImage.cmd in the directory C:\Program Files (x86)\Base Image Script Framework (BIS-F).
In a 100% automated environment, these shortcuts are not required. The command line switch /NOICONS ensures that the shortcut PrepareBaseImage (BIS-F) Admin Only.lnk is not created on the desktop. However, the start menu shortcut Base Image Script Framework (BIS-F).lnk is still created during setup. The code in lines 305 to 315 in the complete installation script in the following paragraph checks the existence of both shortcuts and deletes them if found.
Complete script for installing BIS-F
The script below is based on my installation template and installs BIS-F. To start using this script, do the following:
- Create an installation directory on the package source of your SCCM environment. For example: \\MyServer\PackageSource\LoginConsultants\BIS-F.
- Create a subdirectory called Files.
- Download the latest version of BIS-F. Extract the ZIP file and copy the executable to the folder Files in the installation directory.
- Copy the script below to a new PS1 file (e.g. Install_BIS-F.ps1) and add this file to the root of your installation directory (not in the subdirectory Files).
- Enter your preferred log directory in the variable $BaseLogDir in line 266.
- Enter the name of the package in the variable $PackageName in line 267.
- Enter the exact file name including file extension of the executable, for example setup-BIS-F-6.1.0.exe in the variable $FileName in line 291.
- In case you would like to use different command line switches, please make sure to modify the value of the variable $Arguments in line 295.
- The command line to add to your SCCM package is as follows:
%WinDir%\Sysnative\WindowsPowershell\v1.0\powershell.exe -executionpolicy Bypass -file “Install_BIS-F.ps1”
By default, log files are created in the directory C:\Logs\BIS-F (unless you modified the directory in the variable $BaseLogDir in the script).
|
1 2 3 4 5 6 7 8 9 10 11 12 13 14 15 16 17 18 19 20 21 22 23 24 25 26 27 28 29 30 31 32 33 34 35 36 37 38 39 40 41 42 43 44 45 46 47 48 49 50 51 52 53 54 55 56 57 58 59 60 61 62 63 64 65 66 67 68 69 70 71 72 73 74 75 76 77 78 79 80 81 82 83 84 85 86 87 88 89 90 91 92 93 94 95 96 97 98 99 100 101 102 103 104 105 106 107 108 109 110 111 112 113 114 115 116 117 118 119 120 121 122 123 124 125 126 127 128 129 130 131 132 133 134 135 136 137 138 139 140 141 142 143 144 145 146 147 148 149 150 151 152 153 154 155 156 157 158 159 160 161 162 163 164 165 166 167 168 169 170 171 172 173 174 175 176 177 178 179 180 181 182 183 184 185 186 187 188 189 190 191 192 193 194 195 196 197 198 199 200 201 202 203 204 205 206 207 208 209 210 211 212 213 214 215 216 217 218 219 220 221 222 223 224 225 226 227 228 229 230 231 232 233 234 235 236 237 238 239 240 241 242 243 244 245 246 247 248 249 250 251 252 253 254 255 256 257 258 259 260 261 262 263 264 265 266 267 268 269 270 271 272 273 274 275 276 277 278 279 280 281 282 283 284 285 286 287 288 289 290 291 292 293 294 295 296 297 298 299 300 301 302 303 304 305 306 307 308 309 310 311 312 313 314 315 316 317 318 319 320 321 322 323 |
#========================================================================== # # LOGIN CONSULTANTS BIS-F - INSTALLATION # # AUTHOR: Dennis Span (https://dennisspan.com) # DATE : 24.10.2017 # BLOG POST: https://dennisspan.com/how-to-configure-and-run-bis-f-in-an-sccm-task-sequence # # COMMENT: This script installs the 'Base Image Script Framework' (BIS-F) from Login Consultants # # This script was created for Windows Server 2008 R2 and higher and Microsoft SCCM 2012 and was tested on Windows Server 2008 R2 and Windows 10 version 1703. # # # Change log: # ----------- # <DATE> <NAME>: <CHANGE DESCRIPTION> #========================================================================== # Get the script parameters if there are any param ( # The only parameter which is really required is 'Uninstall' # If no parameters are present or if the parameter is not # 'uninstall', an installation process is triggered [string]$Installationtype ) # define Error handling # note: do not change these values $global:ErrorActionPreference = "Stop" if($verbose){ $global:VerbosePreference = "Continue" } # FUNCTION DS_WriteLog #========================================================================== Function DS_WriteLog { <# .SYNOPSIS Write text to this script's log file .DESCRIPTION Write text to this script's log file .PARAMETER InformationType This parameter contains the information type prefix. Possible prefixes and information types are: I = Information S = Success W = Warning E = Error - = No status .PARAMETER Text This parameter contains the text (the line) you want to write to the log file. If text in the parameter is omitted, an empty line is written. .PARAMETER LogFile This parameter contains the full path, the file name and file extension to the log file (e.g. C:\Logs\MyApps\MylogFile.log) .EXAMPLE DS_WriteLog -$InformationType "I" -Text "Copy files to C:\Temp" -LogFile "C:\Logs\MylogFile.log" Writes a line containing information to the log file .Example DS_WriteLog -$InformationType "E" -Text "An error occurred trying to copy files to C:\Temp (error: $($Error[0]))" -LogFile "C:\Logs\MylogFile.log" Writes a line containing error information to the log file .Example DS_WriteLog -$InformationType "-" -Text "" -LogFile "C:\Logs\MylogFile.log" Writes an empty line to the log file #> [CmdletBinding()] Param( [Parameter(Mandatory=$true, Position = 0)][ValidateSet("I","S","W","E","-",IgnoreCase = $True)][String]$InformationType, [Parameter(Mandatory=$true, Position = 1)][AllowEmptyString()][String]$Text, [Parameter(Mandatory=$true, Position = 2)][AllowEmptyString()][String]$LogFile ) begin { } process { $DateTime = (Get-Date -format dd-MM-yyyy) + " " + (Get-Date -format HH:mm:ss) if ( $Text -eq "" ) { Add-Content $LogFile -value ("") # Write an empty line } Else { Add-Content $LogFile -value ($DateTime + " " + $InformationType.ToUpper() + " - " + $Text) } } end { } } #========================================================================== # FUNCTION DS_InstallOrUninstallSoftware #========================================================================== Function DS_InstallOrUninstallSoftware { <# .SYNOPSIS Install or uninstall software (MSI or SETUP.exe) .DESCRIPTION Install or uninstall software (MSI or SETUP.exe) .PARAMETER File This parameter contains the file name including the path and file extension, for example C:\Temp\MyApp\Files\MyApp.msi or C:\Temp\MyApp\Files\MyApp.exe. .PARAMETER Installationtype This parameter contains the installation type, which is either 'Install' or 'Uninstall'. .PARAMETER Arguments This parameter contains the command line arguments. The arguments list can remain empty. In case of an MSI, the following parameters are automatically included in the function and do not have to be specified in the 'Arguments' parameter: /i (or /x) /qn /norestart /l*v "c:\Logs\MyLogFile.log" .EXAMPLE DS_InstallOrUninstallSoftware -File "C:\Temp\MyApp\Files\MyApp.msi" -InstallationType "Install" -Arguments "" Installs the MSI package 'MyApp.msi' with no arguments (the function already includes the following default arguments: /i /qn /norestart /l*v $LogFile) .Example DS_InstallOrUninstallSoftware -File "C:\Temp\MyApp\Files\MyApp.msi" -InstallationType "Uninstall" -Arguments "" Uninstalls the MSI package 'MyApp.msi' (the function already includes the following default arguments: /x /qn /norestart /l*v $LogFile) .Example DS_InstallOrUninstallSoftware -File "C:\Temp\MyApp\Files\MyApp.exe" -InstallationType "Install" -Arguments "/silent /logfile:C:\Logs\MyApp\log.log" Installs the SETUP file 'MyApp.exe' #> [CmdletBinding()] Param( [Parameter(Mandatory=$true, Position = 0)][String]$File, [Parameter(Mandatory=$true, Position = 1)][AllowEmptyString()][String]$Installationtype, [Parameter(Mandatory=$true, Position = 2)][AllowEmptyString()][String]$Arguments ) begin { [string]$FunctionName = $PSCmdlet.MyInvocation.MyCommand.Name DS_WriteLog "I" "START FUNCTION - $FunctionName" $LogFile } process { $FileName = ($File.Split("\"))[-1] $FileExt = $FileName.SubString(($FileName.Length)-3,3) # Prepare variables if ( !( $FileExt -eq "MSI") ) { $FileExt = "SETUP" } if ( $Installationtype -eq "Uninstall" ) { $Result1 = "uninstalled" $Result2 = "uninstallation" } else { $Result1 = "installed" $Result2 = "installation" } $LogFileAPP = Join-path $LogDir ( "$($Installationtype)_$($FileName.Substring(0,($FileName.Length)-4))_$($FileExt).log" ) # Logging DS_WriteLog "I" "File name: $FileName" $LogFile DS_WriteLog "I" "File full path: $File" $LogFile # Check if the installation file exists if (! (Test-Path $File) ) { DS_WriteLog "E" "The file '$File' does not exist!" $LogFile Exit 1 } # Check if custom arguments were defined if ([string]::IsNullOrEmpty($Arguments)) { DS_WriteLog "I" "File arguments: <no arguments defined>" $LogFile } Else { DS_WriteLog "I" "File arguments: $Arguments" $LogFile } # Install the MSI or SETUP.exe DS_WriteLog "-" "" $LogFile DS_WriteLog "I" "Start the $Result2" $LogFile if ( $FileExt -eq "MSI" ) { if ( $Installationtype -eq "Uninstall" ) { $FixedArguments = "/x ""$File"" /qn /norestart /l*v ""$LogFileAPP""" } else { $FixedArguments = "/i ""$File"" /qn /norestart /l*v ""$LogFileAPP""" } if ([string]::IsNullOrEmpty($Arguments)) { # check if custom arguments were defined $arguments = $FixedArguments DS_WriteLog "I" "Command line: Start-Process -FilePath 'msiexec.exe' -ArgumentList $arguments -Wait -PassThru" $LogFile $process = Start-Process -FilePath 'msiexec.exe' -ArgumentList $arguments -Wait -PassThru } Else { $arguments = $FixedArguments + " " + $arguments DS_WriteLog "I" "Command line: Start-Process -FilePath 'msiexec.exe' -ArgumentList $arguments -Wait -PassThru" $LogFile $process = Start-Process -FilePath 'msiexec.exe' -ArgumentList $arguments -Wait -PassThru } } Else { if ([string]::IsNullOrEmpty($Arguments)) { # check if custom arguments were defined DS_WriteLog "I" "Command line: Start-Process -FilePath ""$File"" -Wait -PassThru" $LogFile $process = Start-Process -FilePath "$File" -Wait -PassThru } Else { DS_WriteLog "I" "Command line: Start-Process -FilePath ""$File"" -ArgumentList $arguments -Wait -PassThru" $LogFile $process = Start-Process -FilePath "$File" -ArgumentList $arguments -Wait -PassThru } } # Check the result (the exit code) of the installation switch ($Process.ExitCode) { 0 { DS_WriteLog "S" "The software was $Result1 successfully (exit code: 0)" $LogFile } 3 { DS_WriteLog "S" "The software was $Result1 successfully (exit code: 3)" $LogFile } # Some Citrix products exit with 3 instead of 0 1603 { DS_WriteLog "E" "A fatal error occurred (exit code: 1603). Some applications throw this error when the software is already (correctly) installed! Please check." $LogFile } 1605 { DS_WriteLog "I" "The software is not currently installed on this machine (exit code: 1605)" $LogFile } 1619 { DS_WriteLog "E" "The installation files cannot be found. The PS1 script should be in the root directory and all source files in the subdirectory 'Files' (exit code: 1619)" $LogFile Exit 1 } 3010 { DS_WriteLog "W" "A reboot is required (exit code: 3010)!" $LogFile } default { [string]$ExitCode = $Process.ExitCode DS_WriteLog "E" "The $Result2 ended in an error (exit code: $ExitCode)!" $LogFile Exit 1 } } } end { DS_WriteLog "I" "END FUNCTION - $FunctionName" $LogFile } } #========================================================================== # FUNCTION DS_DeleteFile # Description: delete one specific file #========================================================================== Function DS_DeleteFile { <# .SYNOPSIS Delete a file .DESCRIPTION Delete a file .PARAMETER File This parameter contains the full path to the file (including the file name and file extension) that needs to be deleted (for example C:\Temp\MyOldFile.txt). .EXAMPLE DS_DeleteFile -File "C:\Temp\MyOldFile.txt" Deletes the file "C:\Temp\MyOldFile.txt" #> [CmdletBinding()] Param( [Parameter(Mandatory=$true, Position = 0)][String]$File ) begin { [string]$FunctionName = $PSCmdlet.MyInvocation.MyCommand.Name DS_WriteLog "I" "START FUNCTION - $FunctionName" $LogFile } process { DS_WriteLog "I" "Delete the file '$File'" $LogFile if ( Test-Path $File ) { try { Remove-Item "$File" | Out-Null DS_WriteLog "S" "Successfully deleted the file '$File'" $LogFile } catch { DS_WriteLog "E" "An error occurred trying to delete the file '$File' (exit code: $($Error[0])!" $LogFile Exit 1 } } else { DS_WriteLog "I" "The file '$File' does not exist. Nothing to do." $LogFile } } end { DS_WriteLog "I" "END FUNCTION - $FunctionName" $LogFile } } #========================================================================== ################ # Main section # ################ # Disable File Security $env:SEE_MASK_NOZONECHECKS = 1 # Custom variables [edit] $BaseLogDir = "C:\Logs" # [edit] add the location of your log directory here $PackageName = "BIS-F" # [edit] enter the display name of the software (e.g. 'Arcobat Reader' or 'Microsoft Office') # Global variables $StartDir = $PSScriptRoot # the directory path of the script currently being executed if (!($Installationtype -eq "Uninstall")) { $Installationtype = "Install" } $LogDir = (Join-Path $BaseLogDir $PackageName).Replace(" ","_") $LogFileName = "$($Installationtype)_$($PackageName).log" $LogFile = Join-path $LogDir $LogFileName # Create the log directory if it does not exist if (!(Test-Path $LogDir)) { New-Item -Path $LogDir -ItemType directory | Out-Null } # Create new log file (overwrite existing one) New-Item $LogFile -ItemType "file" -force | Out-Null DS_WriteLog "I" "START SCRIPT - $Installationtype $PackageName" $LogFile DS_WriteLog "-" "" $LogFile ########################################################################## # INSTALL BIS-F ########################################################################## # Install or uninstall software $LogFileEXE = Join-path $LogDir "$($Installationtype)_$($PackageName)_EXE.log" $FileName = "setup-BIS-F-6.1.0.exe" # [edit] enter the name of the installation file (e.g. 'MyApp.msi' or 'setup.exe') if ( $Installationtype -eq "Uninstall" ) { $Arguments = "" # [edit] enter arguments (for MSI file the following arguments are added by default: /i #File# /qn /norestart / l*v #LogFile#) } else { $Arguments = "/VERYSILENT /NORESTART /CLOSEAPPLICATIONS /NOICONS /LOG=""$LogFileEXE""" # [edit] enter arguments (for MSI file the following arguments are added by default: /i #File# /qn /norestart / l*v #LogFile#) } $FileSubfolder = "Files" # [edit] enter the name of the subfolder which contains the installation file (e.g. 'Files' or 'MSI') $FileFullPath = Join-Path $StartDir $FileSubfolder # Concatenate the two directories $StartDir and $InstallFileFolder DS_InstallOrUninstallSoftware -File ( Join-Path $FileFullPath $FileName ) -InstallationType $Installationtype -Arguments $Arguments ########################################################################## # DELETE SHORTCUTS ########################################################################## DS_WriteLog "-" "" $LogFile $File = "$env:UserProfile\Desktop\PrepareBaseImage (BIS-F) Admin Only.lnk" DS_WriteLog "I" "Delete the BIS-F desktop shortcut" $LogFile DS_DeleteFile -File $File DS_WriteLog "-" "" $LogFile $File = "$env:AllUsersProfile\Microsoft\Windows\Start Menu\Programs\Base Image Script Framework (BIS-F).lnk" DS_WriteLog "I" "Delete the BIS-F start menu shortcut" $LogFile DS_DeleteFile -File $File ########################################################################### # Enable File Security Remove-Item env:\SEE_MASK_NOZONECHECKS DS_WriteLog "-" "" $LogFile DS_WriteLog "I" "End of script" $LogFile |
| Note: this script was created for the operating systems Windows Server 2008 R2 and higher and Microsoft SCCM 2012. I have tested the above script on Windows Server 2008 R2 and Windows 10 version 1703. |
Unattended configuration and execution of BIS-F
In the previous section, we dealt with the unattended installation of BIS-F on the master target device. In this section, we will execute BIS-F, but before we can do that, we first need to configure some settings and prepare for logging and error handling. All of this is described in the following sections:
- Configure BIS-F group policy settings offline
- Set BIS-F log path using a task sequence variable
- Execute BIS-F with PowerShell
At the end of this article, you find a complete PowerShell script that includes all of the aforementioned configurations.
Configure BIS-F group policy settings offline
The default and preferred method for configuring BIS-F settings is to use a Microsoft Group Policy. BIS-F comes with its own ADMX file containing BIS-F specific configuration settings. You can find the ADMX and ADML files in the installation directory:
C:\Program Files (x86)\Base Image Script Framework (BIS-F)\ADMX
You need to copy the ADMX and ADML files to your local or Active Directory Group Policy repository before you can use them. Afterwards, the BIS-F settings are available in your Group Policies.
| Note: for more information on how to implement ADMX/ADML files in your environment, please see the article Citrix ADMX files explained (deep dive) or the section Using Microsoft Group Policies (preferred) in the article Google Chrome on Citrix deep-dive. |
When using SCCM to create your image, you may not want to or be able to rely on Group Policies. Here are a number of reasons why:
- On some operating systems, Group Policies are only applied after the Microsoft SCCM task sequence is finished, which is too late.
As per Microsoft: “The Setup Windows and ConfigMgr task sequence action is responsible for running Group Policy on the newly installed computer. The time at which Group Policy is applied during the task sequence action depends on the operating system being deployed. For example, with Windows XP and Windows Server 2003 Group Policy is applied after the Setup Windows and ConfigMgr task sequence action is completed. On Windows Vista and Windows Server 2008, Group Policy is applied after the task sequence is finished.” This also applies to all operating systems that came after Windows Server 2008. - You may not want to rely on Group Policies during the installation sequence, because you want to keep the image clean (no registry tattooing). When joining the computer to the domain, you may even choose to add the computer to an Organizational Unit with the Block Inheritance option configured.
- During installation, you may choose to leave the computer in a workgroup instead of joining the computer to an Active Directory domain. In this case, no Group Policies are available.
In case you need to apply the BIS-F settings offline I suggest one of the following two methods:
Using the BIS-F Shared Configuration option
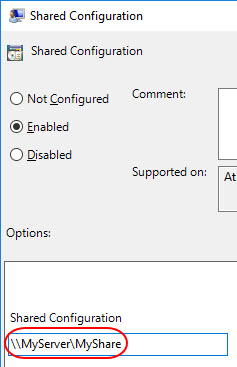
The BIS-F integrated way to configure settings offline is to use something called Shared Configuration.
Shared Configuration is a BIS-F policy setting. This setting enables an administrator to create an XML file which includes all BIS-F policy settings.
The way this works is as follows:
- Configure the BIS-F Group Policies (as described in previous section).
- Configure the BIS-F policy Global \ Shared Configuration.

Enter either a local or a UNC path where to save the XML file.
- Install BIS-F on a test machine on which the BIS-F Group Policies are applied.
- Run the PowerShell script PrepBISF_Start.ps1 with the parameter -ExportSharedConfiguration. This script is located in the installation folder in the sub directory Framework. For example:
1powershell.exe -executionpolicy Bypass -file "C:\Program Files (x86)\Base Image Script Framework (BIS-F)\Framework\PrepBISF_Start.ps1" -ExportSharedConfiguration - Two XML files should now be created in the directory as specified in the policy setting Global \ Shared Configuration.:
- The file BISFconfig_Microsoft%OS%_%Architecture%-bit.xml contains the exported BIS-F settings (e.g. BISFconfig_MicrosoftWindows10_64-bit.xml).
- The file BISFSharedConfig.xml is only a reference file and contains the path to the BISFconfig_Microsoft%OS%_%Architecture%-bit.xml file.
- During unattended installation, make sure to copy the XML file BISFSharedConfig.xml to the BIS-F installation directory. By default, this is the directory C:\Program Files (x86)\Base Image Script Framework (BIS-F). BIS-F will automatically detect the XML file and read the path to XML file that actually contains the BIS-F settings (BISFconfig_Microsoft%OS%_%Architecture%-bit.xml).
- When running BIS-F in an SCCM task sequence please make sure that:
- The XML file BISFconfig_Microsoft%OS%_%Architecture%-bit.xml is present in the directory as specified in the file BISFSharedConfig.xml.
- The directory specified in the file BISFSharedConfig.xml is reachable from the master target device.
- The system account has read access to this directory. If the master target device is in a workgroup, you must set the path NTFS rights to “Everyone read” to get access without prompting.
Please be aware that the complete configuration script below uses a Windows registry import to configure the offline BIS-F settings. If you want to use this script with the BIS-F Shared Configuration option you will have to:
- Copy the file BISFSharedConfig.xml to the BIS-F installation directory. This is NOT included in the complete installation script above.
- Disable lines 282 to 287 in the complete PowerShell script below. This prevents the script from trying to import a Windows registry file. The easiest way to disable these lines is to put <# before the first line and #> after the last line, like this:
12345678<## Import the BIS-F registry settings$FileFullPath = Join-Path $StartDir $FileSubfolder # Concatenate the two directories $StartDir and $InstallFileFolder$RegFile = Join-Path $FileFullPath $FileName # Concatenate the path stored in the variable $FileFullPath and the file name in the variable $FileNameDS_WriteLog "I" "Import the BIS-F registry settings" $LogFileDS_ImportRegFile -FileName $RegFileDS_WriteLog "-" "" $LogFile#>
Using a Windows registry export
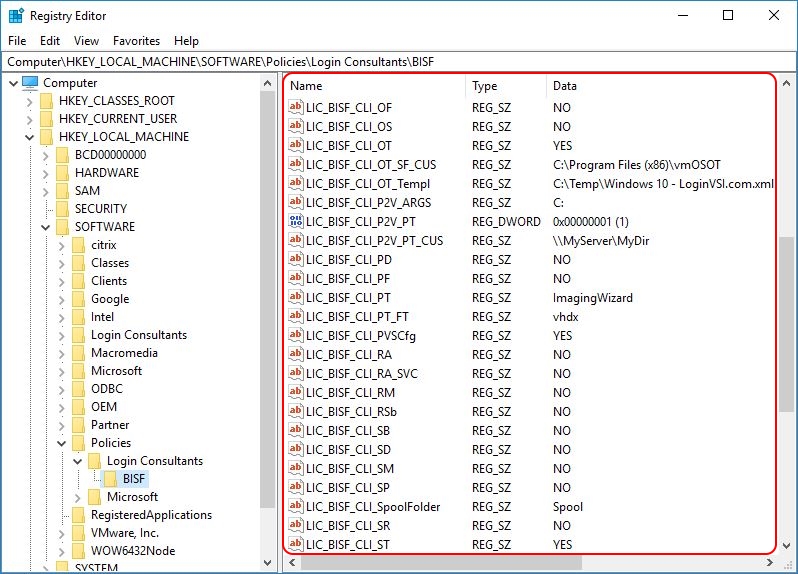
Another method to configure BIS-F settings offline is to export the registry settings created by the BIS-F policies.
When BIS-F Group Policy settings are applied, they are written to the registry of the local computer. Here to be exact:
HKEY_LOCAL_MACHINE\SOFTWARE\Policies\Login Consultants\BISF
The approach I suggest is the following:
- Configure all relevant BIS-F settings using Group Policy
- Apply this Group Policy to a non-productive machine
- Export the registry values of the non-productive machine to a *.reg file
- Import the *.reg file on the master target device using a script
- Run BIS-F
Lines 279 to 284 in the complete PowerShell script below contain the code that imports the registry file to the Windows registry of your master target device. The main code doing the actual importing can be found in the function DS_ImportRegFile in line 128:
|
1 |
start-process -FilePath "reg.exe" -ArgumentList "IMPORT ""$FileName""" -WindowStyle Hidden -Wait -PassThru |
So which settings should you configure? Well, this highly depends on your environment of course, but I can share some thoughts on the matter:
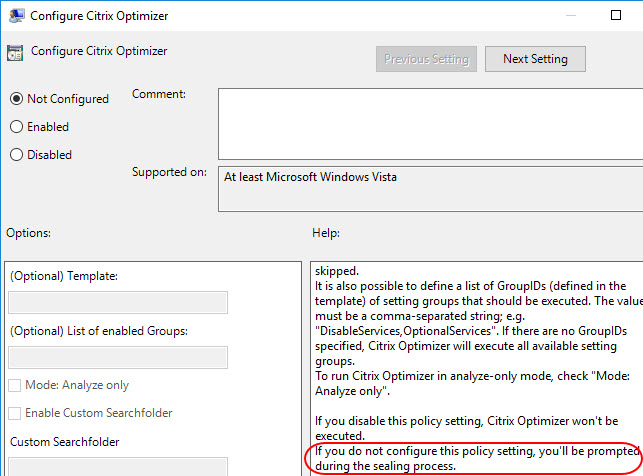
- First of all, and most importantly, make sure to configure all settings that would otherwise prompt you during the sealing process. In an automated environment you do not want any “prompting” to occur.
- Defining a central log share will not do you much good (Global \ Configure Logging). This value will be overwritten by the task sequence log path variable (see the following section).
- I recommend to enable at least some of the optimization tools, such as the Citrix Optimizer (Citrix \ Configure Citrix Optimizer) and CCleaner (3rd Party Tools \ Run CCleaner).
- In case you are preparing an image for PVS, make sure to configure the settings under Citrix \ Configure Citrix PVS Target Device.
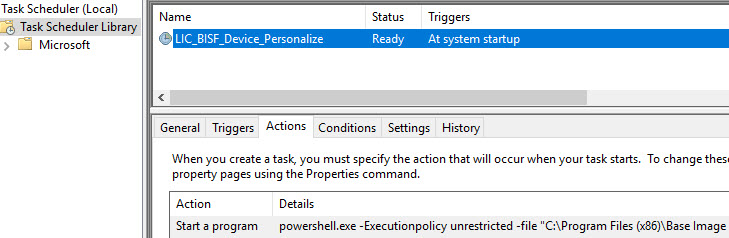
- Decide whether or not you want to enable personalization on your image (Global \ Configure Personalization). If you enable this, a scheduled task is created which is included in your image and runs at system startup (every time, not only once).
- Enable the setting Microsoft \ Run Defrag. This will defragment your master target device. In case you are creating a VHDX file for PVS on a UNC path, an offline defragmentation is triggered as well. Defragmenting your image will give you some performance benefits. For more information, please see the article Automate VHD Offline Defrag for Citrix Provisioning Server.
I recommend you to go through each and every available setting and configure whatever is appropriate for your environment.
Set BIS-F log path using a task sequence variable
BIS-F is MDT and SCCM aware. During run time, BIS-F checks if it is currently running in an MDT or SCCM task sequence. If this is the case, BIS-F checks if the task sequence variable LogPath exists. If yes, the value of LogPath is used as the log path for the BIS-F log file (and overwrites the central log share if this has been configured).
You can specify a task sequence variable before running a script and during script execution time. This complete PowerShell script below can handle both options. Lines 290 to 342 make sure that BIS-F uses the same log path as all of your other installations. So how does it work?
First, the script needs to be able to read the existing task sequence variables. We need the COM object Microsoft.SMS.TSEnvironment for this.
|
1 |
$TSenv = New-Object -COMObject Microsoft.SMS.TSEnvironment |
The script then checks all available Task Sequence variables to see if the variable LogPath exists. For example, you may have added this variable to your SCCM collection.

Using $TSenv.GetVariables, all existing task sequence variables are retrieved and stored in the array $TSVariables. The script then loops through each of the variables in the array to see if one of them matches the name LogPath. In case the variable LogPath exists, its value is stored in the variable $BISF_TS_LogPath and will be used later on in the script.
|
1 2 3 4 5 6 7 8 9 10 11 12 |
# Check if the TS Variable 'LogPath' already exists. If not, create it. $TSVarExists = $False DS_WriteLog "I" "Check if the TS Variable '$TSVariableName' already exists. If not, create it." $LogFile $TSVariables = ($TSenv.GetVariables() | sort-object) foreach ( $Item in $TSVariables ) { if ( $Item -eq $TSVariableName ) { $TSVarExists = $True [string]$BISF_TS_LogPath = $TSenv.Value($Item) DS_WriteLog "I" "The TS variable '$TSVariableName' already exists with value '$BISF_TS_LogPath'" $LogFile Break } } |
So what if you can only determine the log path at run time of the main script? How do you deal with the task sequence variable LogPath in this scenario? This is the issue that I face. I can only determine the exact log path when the main script is already running. Luckily, a task sequence variable can also be created during script execution, like this:
|
1 |
$TSenv.Value("LogPath") = "C:\Logs\BIS-F" |
If you add some logging and error handling to this line of code, it looks something like this:
|
1 2 3 4 5 6 7 8 9 10 11 |
# Create the TS variable 'LogPath' if it does not already exist If ( $TSVarExists -eq $False ) { DS_WriteLog "I" "The TS Variable '$TSVariableName' does not yet exist. Create it." $LogFile try { [string]$BISF_TS_LogPath = $BISFLogPath $TSenv.Value($TSVariableName) = $BISF_TS_LogPath DS_WriteLog "I" "The new TS variable '$TSVariableName' with value '$BISF_TS_LogPath' has been created" $LogFile } catch { DS_WriteLog "E" "An error occurred trying to create the new TS variable '$TSVariableName'" $LogFile Exit 1 } |
Now, it is important to understand the logic here. The above code snippet is only executed if no existing task sequence variable was found. For example, if you added the task sequence variable LogPath to your SCCM collection property, this value is used and that is it. The script looks no further.
In case you did not specify the LogPath task sequence variable before running the script, the script will use the same log directory as set in the variable $LogDir in line 262. If this still is not to your liking, than you can go to line 296 and add your log directory to the variable $BISFLogPath, for example $BISFLogPath = “C:\MyLogDir”.
![]()
The script also checks if the log directory actually exists and creates it in case it does not. Any existing BIS-F log files (*.bis) are deleted; this is needed, because of error handling as explained in the following section.

Execute BIS-F with PowerShell
Now that the BIS-F values have been imported in the registry and the log path has been set we can execute BIS-F.
Line 364 in the complete PowerShell script is responsible for installing BIS-F.
|
1 |
start-process -FilePath "powershell.exe" -ArgumentList "-executionpolicy bypass -file ""$BISFMainScript""" -Wait -PassThru |
What happens under the hood is that the script PrepBISF_Start.ps1 in the directory C:\Program Files (x86)\Base Image Script Framework (BIS-F) is started.
Unfortunately, BIS-F does not return any exit codes to SCCM besides 0 (= success). Therefore, after BIS-F finishes, we need to examine the BIS-F log file to determine if any errors occurred or not. The complete error logging takes place in lines 370 to 413.
| Note: if you are creating a VHDX file on a UNC path, please make sure that the local computer (the system account) has at minimum modify rights on the share (NTFS). SCCM always runs under the local system account. You can either assign the required access rights to individual computer objects ($MyComputerName) or you can use the Active Directory group Domain Computers. This group includes all computer objects within Active Directory. |
Afterwards, an e-mail is sent to inform the administrator that the task sequence has finished. The reason for sending the mail is that the SCCM task sequence cannot finish properly and keeps hanging in the In Progress state. The task sequence cannot finish because in preparation of the image, BIS-F resets the SCCM client.
Make sure that the SMTP server can be reached from your master target device. The default port is 25. You can use telnet to test if the port answers:
telnet MySMTPServer.mydomain.com 25
If you want to perform a more comprehensive test to absolutely make sure that an SMTP message can be send, connect to the master target device, open a PowerShell window and execute the following command:
|
1 2 |
Send-MailMessage -from "<name>@mycompany.com" -to "<name>@mycompany.com" -subject "Test mail" - body "This is a test mail" -smtpServer "<IP address from SMTP server>" -BodyAsHtml |
Enter the correct e-mail addresses as well as the IP address of your corporate SMTP server. See also the following section.
Complete script for configuring and running BIS-F
The script below is based on my installation template. The script configures and executes BIS-F and uses the registry import method as described in the section Using a Windows registry export. To start using this script, do the following:
- Use the same installation directory on the package source of your SCCM environment as created in the section Complete script for installing BIS-F.
- Copy the *.reg file to the folder Files in the installation directory.
- Copy the script below to a new PS1 file (e.g. ConfigureAndRun_BIS-F.ps1) and add this file to the root of your installation directory (not in the subdirectory Files).
- Enter your preferred log directory in the variable $BaseLogDir in line 254.
- Enter the name of the package in the variable $PackageName in line 255.
- Enter the exact file name including file extension of the *.reg file, for example MyRegSettings.reg in the variable $FileName in line 256.
- In line 258, enter the e-mail address you want to send the e-mail from. This address does not have to exist (no actual mailbox is needed). For example: SCCM_TS_BIS-F@mycompany.com.
- In line 259, enter one or more e-mail recipients you want to send the e-mail to. Separate multiple addresses using a comma, for example: “<name>@mycompany.com”, “<name>@mycompany.com”.
- In line 260, enter the IP address of your internal SMTP server. Do not use the DNS name, because you will not be able to resolve it after BIS-F cleans your master target device!
- The command line to add to your SCCM package is as follows:
%WinDir%\Sysnative\WindowsPowershell\v1.0\powershell.exe -executionpolicy Bypass -file “ConfigureAndRun_BIS-F.ps1”
By default, log files are created in the directory C:\Logs\BIS-F (unless you modified the directory in the variable $BaseLogDir in the script).
|
1 2 3 4 5 6 7 8 9 10 11 12 13 14 15 16 17 18 19 20 21 22 23 24 25 26 27 28 29 30 31 32 33 34 35 36 37 38 39 40 41 42 43 44 45 46 47 48 49 50 51 52 53 54 55 56 57 58 59 60 61 62 63 64 65 66 67 68 69 70 71 72 73 74 75 76 77 78 79 80 81 82 83 84 85 86 87 88 89 90 91 92 93 94 95 96 97 98 99 100 101 102 103 104 105 106 107 108 109 110 111 112 113 114 115 116 117 118 119 120 121 122 123 124 125 126 127 128 129 130 131 132 133 134 135 136 137 138 139 140 141 142 143 144 145 146 147 148 149 150 151 152 153 154 155 156 157 158 159 160 161 162 163 164 165 166 167 168 169 170 171 172 173 174 175 176 177 178 179 180 181 182 183 184 185 186 187 188 189 190 191 192 193 194 195 196 197 198 199 200 201 202 203 204 205 206 207 208 209 210 211 212 213 214 215 216 217 218 219 220 221 222 223 224 225 226 227 228 229 230 231 232 233 234 235 236 237 238 239 240 241 242 243 244 245 246 247 248 249 250 251 252 253 254 255 256 257 258 259 260 261 262 263 264 265 266 267 268 269 270 271 272 273 274 275 276 277 278 279 280 281 282 283 284 285 286 287 288 289 290 291 292 293 294 295 296 297 298 299 300 301 302 303 304 305 306 307 308 309 310 311 312 313 314 315 316 317 318 319 320 321 322 323 324 325 326 327 328 329 330 331 332 333 334 335 336 337 338 339 340 341 342 343 344 345 346 347 348 349 350 351 352 353 354 355 356 357 358 359 360 361 362 363 364 365 366 367 368 369 370 371 372 373 374 375 376 377 378 379 380 381 382 383 384 385 386 387 388 389 390 391 392 393 394 395 396 397 398 399 400 401 402 403 404 405 406 407 408 409 410 411 412 413 414 415 416 417 418 419 420 421 422 423 424 425 426 427 428 429 430 431 432 433 434 435 436 437 438 439 440 441 442 443 444 445 446 447 448 449 450 451 452 453 454 455 456 457 458 459 460 461 462 |
#========================================================================== # # LOGIN CONSULTANTS BIS-F - CONFIGURATION AND EXECUTION # # AUTHOR: Dennis Span (https://dennisspan.com) # DATE : 25.10.2017 # BLOG POST: https://dennisspan.com/how-to-configure-and-run-bis-f-in-an-sccm-task-sequence # # COMMENT: This script configures the settings for the 'Base Image Script Framework' (BIS-F) from Login Consultants. # This script also executes BIS-F. # # This script was created for Windows Server 2008 R2 and higher and Microsoft SCCM 2012 and was tested on Windows Server 2008 R2 and Windows 10 version 1703. # # The preferred way to configure BIS-F settings is to use Group Policy settings (using the BIS-F ADMX file), # but in this script all configurations are done directly in the Windows registry. There are a number of reasons why # Group Policies are not desirable during image creation: # 1) On some operating systems, Group Policies are only applied after the Microsoft SCCM task sequence is finished, which is too late. # 2) You may not want to rely on Group Policies during the installation sequence, because you want to keep the image clean. When joining # the computer to the domain, you may even choose to add the computer to an Organizational Unit with the "Group Policy Block Inheritance" # option configured. # 3) During installation, you may choose to leave the computer in a workgroup instead of joining the computer to an Active Directory domain # # This script sets the same registry values as the Group Policy would. All BIS-F Group Policy settings are stored in the following registry key: # HKEY_LOCAL_MACHINE\SOFTWARE\Policies\Login Consultants\BISF # # # Change log: # ----------- # <DATE> <NAME>: <CHANGE DESCRIPTION> #========================================================================== # Get the script parameters if there are any param ( # The only parameter which is really required is 'Uninstall' # If no parameters are present or if the parameter is not # 'uninstall', an installation process is triggered [string]$Installationtype ) # define Error handling # note: do not change these values $global:ErrorActionPreference = "Stop" if($verbose){ $global:VerbosePreference = "Continue" } # FUNCTION DS_WriteLog #========================================================================== Function DS_WriteLog { <# .SYNOPSIS Write text to this script's log file .DESCRIPTION Write text to this script's log file .PARAMETER InformationType This parameter contains the information type prefix. Possible prefixes and information types are: I = Information S = Success W = Warning E = Error - = No status .PARAMETER Text This parameter contains the text (the line) you want to write to the log file. If text in the parameter is omitted, an empty line is written. .PARAMETER LogFile This parameter contains the full path, the file name and file extension to the log file (e.g. C:\Logs\MyApps\MylogFile.log) .EXAMPLE DS_WriteLog -$InformationType "I" -Text "Copy files to C:\Temp" -LogFile "C:\Logs\MylogFile.log" Writes a line containing information to the log file .Example DS_WriteLog -$InformationType "E" -Text "An error occurred trying to copy files to C:\Temp (error: $($Error[0]))" -LogFile "C:\Logs\MylogFile.log" Writes a line containing error information to the log file .Example DS_WriteLog -$InformationType "-" -Text "" -LogFile "C:\Logs\MylogFile.log" Writes an empty line to the log file #> [CmdletBinding()] Param( [Parameter(Mandatory=$true, Position = 0)][ValidateSet("I","S","W","E","-",IgnoreCase = $True)][String]$InformationType, [Parameter(Mandatory=$true, Position = 1)][AllowEmptyString()][String]$Text, [Parameter(Mandatory=$true, Position = 2)][AllowEmptyString()][String]$LogFile ) begin { } process { $DateTime = (Get-Date -format dd-MM-yyyy) + " " + (Get-Date -format HH:mm:ss) if ( $Text -eq "" ) { Add-Content $LogFile -value ("") # Write an empty line } Else { Add-Content $LogFile -value ($DateTime + " " + $InformationType.ToUpper() + " - " + $Text) } } end { } } #========================================================================== # FUNCTION DS_ImportRegFile #========================================================================== Function DS_ImportRegFile { <# .SYNOPSIS Import a registry (*.reg) file into the registry .DESCRIPTION Import a registry (*.reg) file into the registry .PARAMETER FileName This parameter contains the full path, file name and file extension of the registry file, for example "C:\Temp\MyRegFile.reg" .EXAMPLE DS_ImportRegFile -FileName "C:\Temp\MyRegFile.reg" Imports registry settings from the file "C:\Temp\MyRegFile.reg" #> [CmdletBinding()] Param( [Parameter(Mandatory=$true, Position = 0)][String]$FileName ) begin { [string]$FunctionName = $PSCmdlet.MyInvocation.MyCommand.Name DS_WriteLog "I" "START FUNCTION - $FunctionName" $LogFile } process { if ( Test-Path $FileName ) { try { $process = start-process -FilePath "reg.exe" -ArgumentList "IMPORT ""$FileName""" -WindowStyle Hidden -Wait -PassThru if ( $process.ExitCode -eq 0 ) { DS_WriteLog "S" "The registry settings were imported successfully (exit code: $($process.ExitCode))" $LogFile } else { DS_WriteLog "E" "An error occurred trying to import registry settings (exit code: $($process.ExitCode))" $LogFile Exit 1 } } catch { DS_WriteLog "E" "An error occurred trying to import the registry file '$FileName' (exit code: $($Error[0])!" $LogFile Exit 1 } } else { DS_WriteLog "E" "The file '$FileName' does NOT exist!" $LogFile Exit 1 } } end { DS_WriteLog "I" "END FUNCTION - $FunctionName" $LogFile } } #========================================================================== # FUNCTION DS_CreateDirectory #========================================================================== Function DS_CreateDirectory { <# .SYNOPSIS Create a new directory .DESCRIPTION Create a new directory .PARAMETER Directory This parameter contains the name of the new directory including the full path (for example C:\Temp\MyNewFolder). .EXAMPLE DS_CreateDirectory -Directory "C:\Temp\MyNewFolder" Creates the new directory "C:\Temp\MyNewFolder" #> [CmdletBinding()] Param( [Parameter(Mandatory=$true, Position = 0)][String]$Directory ) begin { [string]$FunctionName = $PSCmdlet.MyInvocation.MyCommand.Name DS_WriteLog "I" "START FUNCTION - $FunctionName" $LogFile } process { DS_WriteLog "I" "Create directory $Directory" $LogFile if ( Test-Path $Directory ) { DS_WriteLog "I" "The directory $Directory already exists. Nothing to do." $LogFile } else { try { New-Item -ItemType Directory -Path $Directory -force | Out-Null DS_WriteLog "S" "Successfully created the directory $Directory" $LogFile } catch { DS_WriteLog "E" "An error occurred trying to create the directory $Directory (exit code: $($Error[0])!" $LogFile Exit 1 } } } end { DS_WriteLog "I" "END FUNCTION - $FunctionName" $LogFile } } #========================================================================== # FUNCTION DS_DeleteFile # Description: delete one specific or multiple files #========================================================================== Function DS_DeleteFile { <# .SYNOPSIS Delete one or more file(s) .DESCRIPTION Delete one or more file(s) .PARAMETER File This parameter contains the full path to the file (including the file name and file extension) that needs to be deleted (for example C:\Temp\MyOldFile.txt). Wildcards can be used. .EXAMPLE DS_DeleteFile -File "C:\Temp\MyOldFile.txt" Deletes the file "C:\Temp\MyOldFile.txt" .EXAMPLE DS_DeleteFile -File "C:\Temp\*.txt" Deletes all files with the file extension *.txt in the folder C:\Temp #> [CmdletBinding()] Param( [Parameter(Mandatory=$true, Position = 0)][String]$File ) begin { [string]$FunctionName = $PSCmdlet.MyInvocation.MyCommand.Name DS_WriteLog "I" "START FUNCTION - $FunctionName" $LogFile } process { DS_WriteLog "I" "Delete the file(s) '$File'" $LogFile if ( Test-Path $File ) { try { Remove-Item "$File" | Out-Null DS_WriteLog "S" "Successfully deleted the file(s) '$File'" $LogFile } catch { DS_WriteLog "E" "An error occurred trying to delete the file(s) '$File' (exit code: $($Error[0])!" $LogFile Exit 1 } } else { DS_WriteLog "I" "The file(s) '$File' does/do not exist. Nothing to do." $LogFile } } end { DS_WriteLog "I" "END FUNCTION - $FunctionName" $LogFile } } #========================================================================== ################ # Main section # ################ # Disable File Security $env:SEE_MASK_NOZONECHECKS = 1 # Custom variables [edit] $BaseLogDir = "C:\Logs" # [edit] add the location of your log directory here $PackageName = "BIS-F" # [edit] enter the display name of the software (e.g. 'Arcobat Reader' or 'Microsoft Office') $FileName = "BIS-F_settings.reg" # [edit] enter the name of the registry file containing the BIS-F settings you want to import (e.g. "BIS-F_settings.reg"). Do not add any path or directory name. $FileSubfolder = "Files" # [edit] enter the name of the subfolder which contains the installation file (e.g. 'Files' or 'MSI'). The default, if you follow my instruction in the blog post, is 'Files' $From = "SCCM_TS_BIS-F@mycompany.com" # [edit] enter the e-mail address from which you would like to send the e-mail. The e-mail address does not need to exist. For example: SCCM_Message@mycompany.com $To = "<name>@mycompany.com", "<name>@mycompany.com" # [edit] enter one or more e-mail addresses you would like to send the e-mail to. Separate multiple e-mail addresses using a comma, e.g. "<name>@mycompany.com", "<name>@mycompany.com" $SMTPSServer = "<enter the IP address, not the DNS name>" # [edit] enter your SMTP server. Make sure to enter the IP address! DNS resolving will fail after BIS-F cleanup tasks run (e.g. delete ARP cache). # Global variables $StartDir = $PSScriptRoot # the directory path of the script currently being executed $Installationtype = "Configure" $LogDir = (Join-Path $BaseLogDir $PackageName).Replace(" ","_") $LogFileName = "$($Installationtype)_$($PackageName).log" $LogFile = Join-path $LogDir $LogFileName # Create the log directory if it does not exist if (!(Test-Path $LogDir)) { New-Item -Path $LogDir -ItemType directory | Out-Null } # Create new log file (overwrite existing one) New-Item $LogFile -ItemType "file" -force | Out-Null DS_WriteLog "I" "START SCRIPT - $Installationtype $PackageName" $LogFile DS_WriteLog "-" "" $LogFile ########################################################################## # IMPORT THE BIS-F REGISTRY SETTINGS ########################################################################## # Import the BIS-F registry settings $FileFullPath = Join-Path $StartDir $FileSubfolder # Concatenate the two directories $StartDir and $InstallFileFolder $RegFile = Join-Path $FileFullPath $FileName # Concatenate the path stored in the variable $FileFullPath and the file name in the variable $FileName DS_WriteLog "I" "Import the BIS-F registry settings" $LogFile DS_ImportRegFile -FileName $RegFile DS_WriteLog "-" "" $LogFile ########################################################################## # RETRIEVE OR CREATE THE TASK SEQUENCE VARIABLE 'LOGPATH' (required by BIS-F) ########################################################################## # References: # -https://docs.microsoft.com/en-us/sccm/develop/osd/how-to-use-task-sequence-variables-in-a-running-task-sequence # -https://technet.microsoft.com/en-us/library/hh273375.aspx?f=255&MSPPError=-2147217396 # -https://blogs.technet.microsoft.com/mniehaus/2010/04/26/dumping-task-sequence-variables/ $TSVariableName = "LogPath" # DO NOT EDIT! The variable name 'LogPath' is hard coded in BIS-F. $BISFLogPath = $LogDir # In case the TS variable 'LogPath' has not been set, the BIS-F log will be created in the same log directory as the log file of this current script. Only edit this value if you want to use a completely different log directory. DS_WriteLog "I" "Retrieve or create the task sequence variable '$TSVariableName' (required by BIS-F)" $LogFile # Create the COM object to connect to the SCCM task sequence DS_WriteLog "I" "Create the COM object to connect to the SCCM task sequence" $LogFile try { $TSenv = New-Object -COMObject Microsoft.SMS.TSEnvironment DS_WriteLog "S" "The new COM object has been created" $LogFile } catch { DS_WriteLog "E" "An error occurred trying the create the COM object" $LogFile Exit 1 } # Check if the TS Variable 'LogPath' already exists. If not, create it. $TSVarExists = $False DS_WriteLog "I" "Check if the TS Variable '$TSVariableName' already exists. If not, create it." $LogFile $TSVariables = ($TSenv.GetVariables() | sort-object) foreach ( $Item in $TSVariables ) { if ( $Item -eq $TSVariableName ) { $TSVarExists = $True [string]$BISF_TS_LogPath = $TSenv.Value($Item) DS_WriteLog "I" "The TS variable '$TSVariableName' already exists with value '$BISF_TS_LogPath'" $LogFile Break # Exit the current foreach loop } } # Create the TS variable 'LogPath' if it does not already exist If ( $TSVarExists -eq $False ) { # Create the TS variable 'LogPath' in case the variable does not yet exist DS_WriteLog "I" "The TS Variable '$TSVariableName' does not yet exist. Create it." $LogFile try { [string]$BISF_TS_LogPath = $BISFLogPath $TSenv.Value($TSVariableName) = $BISF_TS_LogPath # The variable '$BISFLogPath' contains the directory where the log files are saved DS_WriteLog "I" "The new TS variable '$TSVariableName' with value '$BISF_TS_LogPath' has been created" $LogFile } catch { DS_WriteLog "E" "An error occurred trying to create the new TS variable '$TSVariableName'" $LogFile Exit 1 } # Create the log directory in case it does not exist DS_CreateDirectory -Directory $BISF_TS_LogPath # Delete existing BIS-F log files (*.bis) in case there are any DS_DeleteFile -File (Join-Path $BISF_TS_LogPath "*.bis") } DS_WriteLog "-" "" $LogFile ########################################################################## # EXECUTE BIS-F ########################################################################## $BISFInstallDir = "${env:ProgramFiles(x86)}\Base Image Script Framework (BIS-F)\Framework" $BISFMainScript = Join-Path $BISFInstallDir "PrepBISF_Start.ps1" DS_WriteLog "I" "Execute BIS-F..." $LogFile # Logging DS_WriteLog "I" " Note: BIS-F will run for a while (at least for 10 minutes or so)" $LogFile DS_WriteLog "I" " For more information, please see the BIS-F log file in the directory '$BISF_TS_LogPath'" $LogFile if ( $MoveLogFile -eq $True ) { DS_WriteLog "I" " If no errors occur, BIS-F will copy the log file to the central log file location '$BISFCentralLogDir' at the end" $LogFile } # Run BIS-F if ( Test-Path $BISFMainScript ) { $Errors = $False try { $process = start-process -FilePath "powershell.exe" -ArgumentList "-executionpolicy bypass -file ""$BISFMainScript""" -Wait -PassThru # Execute BIS-F } catch { DS_WriteLog "E" "An error occurred trying to execute BIS-F (exit code: $($Error[0])!" $LogFile } # Note: BIS-F does not return exit codes except for 0, which means 'success'. In geek terms: '$process.ExitCode' only reports back '0'. # Because of this issue, the only reliable source for (potential) errors is the BIS-F log file itself. # The code below analyses the BIS-F log file in search for errors. $BISFLogFile = (Get-ChildItem $BISF_TS_LogPath -Recurse | where {$_.extension -eq ".bis"}).FullName # Retrieve the full name (= full path, file name and file extension) of the log file (e.g. 'C:\Logs\BIS-F\Prep_BIS_TEST_20170925-215659.bis') DS_WriteLog "I" "BIS-F has finished. Now determine if there were any errors." $LogFile DS_WriteLog "I" "Analyze BIS-F log file: $BISFLogFile" $LogFile # Analyze the log file in seach for errors. Please note that all '*.bis' files were deleted in the previous section, so now only one '*.bis' file can exist. # Note: many thanks to Matthias Schlimm (the developer of BIS-F) for the following code snippet. $LogContents = @() try { foreach ($line in (Get-Content $BISFLogFile)) { $Object = New-Object PSObject $Object | add-member Noteproperty Time $line.split("|")[0] $Object | add-member Noteproperty User $line.split("|")[1] $Object | add-member Noteproperty Event $line.split("|")[2] $Object | add-member Noteproperty Message $line.split("|")[3] $LogContents += $Object } } catch { DS_WriteLog "E" "An error occurred trying to analyze the BIS-F log file ""$BISFLogFile""" $LogFile $Errors = $True } if ($Errors -eq $False ) { # Start analyzing ForEach ($Entry in $LogContents) { if ($Entry.Event -match "Error") { $Errors = $True DS_WriteLog "E" "An error was found in the log file ""$BISFLogFile""" $LogFile DS_WriteLog "E" "Please resolve the error and run this script / task sequence again" $LogFile } } # Logging in case of no errors if ($Errors -eq $False ) { DS_WriteLog "I" "The BIS-F log file showed no errors" $LogFile DS_WriteLog "S" "BIS-F was executed successfully!" $LogFile } } } else { DS_WriteLog "E" "The main BIS-F script ""$BISFMainScript"" does NOT exist! BIS-F could not be started!" $LogFile Exit 1 } DS_WriteLog "-" "" $LogFile ########################################################################## # SEND E-MAIL ########################################################################## # Send an e-mail to the administrator or administrator team # Note: because the SCCM client is reset in BIS-F, the SCCM Task Sequence remains in the "In Progress" state and never truly completes. # Sending an e-mail on completion of the image informs the administrator that the new image is ready. if ( $LogDir -eq $BISFLogPath ) { $Text = "For more information, please the see the log files in the directory ""$LogDir"" on server $env:ComputerName" } else { $Text = "For more information, please the see the log files in the directories ""$LogDir"" and ""$BISFLogPath"" on server $env:ComputerName" } DS_WriteLog "I" "Send e-mail" $LogFile if ($Errors -eq $False ) { try { Send-MailMessage -from "SCCM TS BIS-F <$From>" -to $To -subject "SUCCESS - Task sequence on server $env:ComputerName executed successfully" -body $Text -smtpServer $SMTPSServer -BodyAsHtml DS_WriteLog "S" "E-mail successfully sent" $LogFile Exit 0 } catch { DS_WriteLog "E" "An error occurred trying to send the e-mail (exit code: $($Error[0])" $LogFile Exit 1 } } else { try { Send-MailMessage -from "SCCM TS BIS-F <$From>" -to $To -subject "ERROR - Task sequence on server $env:ComputerName ended in an error" -body $Text -smtpServer $SMTPSServer -BodyAsHtml DS_WriteLog "S" "E-mail successfully sent" $LogFile Exit 1 } catch { DS_WriteLog "E" "An error occurred trying to send the e-mail (exit code: $($Error[0])" $LogFile Exit 1 } } ########################################################################### # Enable File Security Remove-Item env:\SEE_MASK_NOZONECHECKS DS_WriteLog "-" "" $LogFile DS_WriteLog "I" "End of script" $LogFile |
| Note: this script was created for the operating systems Windows Server 2008 R2 and higher and Microsoft SCCM 2012. I have tested the above script on Windows Server 2008 R2 and Windows 10 version 1703. |
SCCM
In the previous sections, we prepared the package source directory and added all required source files and scripts. Now the SCCM package can be created. For an in-depth overview how to create an SCCM package, please see the article Deep dive creating SCCM packages for Citrix. This article also explains why the alias sysnative is used in the command line. For an explanation why I recommend using SCCM packages see the article Microsoft SCCM packages versus SCCM applications.
Do not be surprised or worried when the task sequence never truly seems to finish. During my tests, the task sequence never showed the Success state and always remained in the In Progress state. As explained before, an e-mail is send to the administrator that the task sequence has finished.
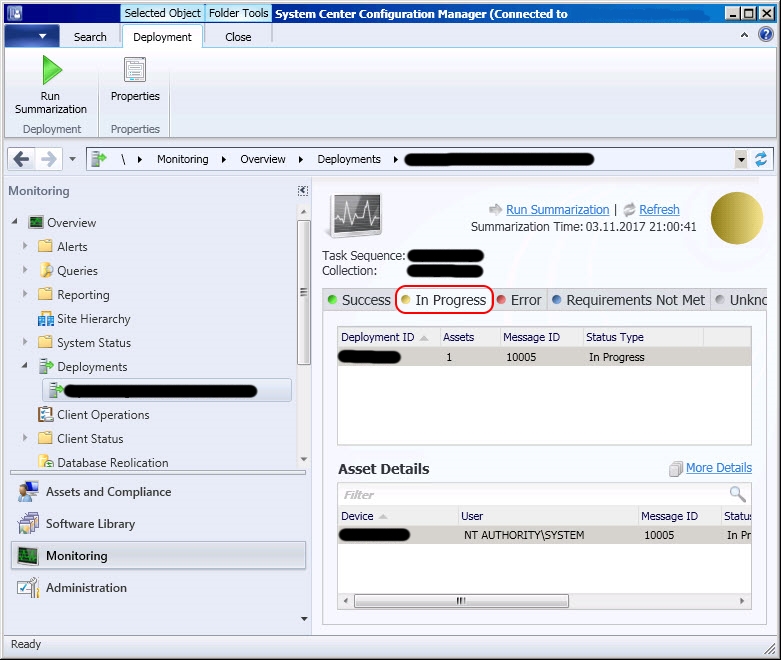
In the task sequence log files (including the *.bis from BIS-F) you will see that everything completed successfully.
The reason for the permanent In Progress state is the reset of the SCCM client by BIS-F. Resetting the SCCM client is necessary. It ensures that when the image is deployed, the SCCM agent on each individual target device receives a new identity from the SCCM server.
Create the SCCM package and programs
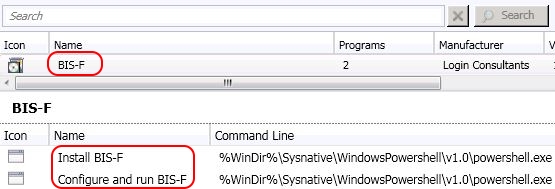
My recommendation is to create one SCCM package containing two programs.
- SCCM package: BIS-F
- Program 1: Install BIS-F
- Program 2: Configure and run BIS-F
Please set the maximum allowed run time for the program Configure and run BIS-F to an appropriate time to allow BIS-F to finish. The minimum run time allowed by SCCM is 15 minutes and when this time is up, SCCM ends the currently running program, effectively killing BIS-F. Especially when creating a VHDX file on a UNC path, BIS-F requires some time to finish. I therefore set the maximum allowed run time to 60 minutes. This should be sufficient for most scenarios.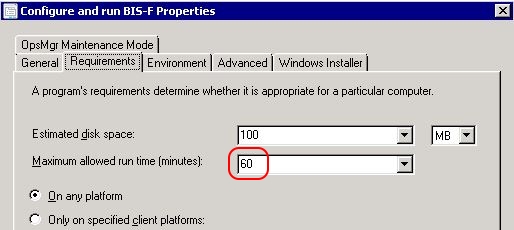
Prepare the SCCM task sequence
Add the two BIS-F programs to your task sequence. The installation of BIS-F is independent from the configuring and execution of BIS-F. You can install BIS-F at any time in the task sequence.
However, the configuration of BIS-F has to be the last step in the task sequence.

One of the many configurations of BIS-F is to reset the SCCM client. The result of this is that afterwards, no other installation can run because the SCCM client no longer communicates with the SCCM server. So BIS-F can only be executed as the very last step in the task sequence.
Conclusion
BIS-F is a great image optimization and sealing tool. Image optimization and sealing is quite complicated in nowadays world with its many operating systems, deployment technologies, anti-virus vendors and so on. BIS-F saves us administrators a lot of time and potential headaches. It is a community tool managed by community leaders. SCCM and BIS-F is a powerful combination and allows you to create stable, optimized and 100% automated images.
Dennis Span works as a Lead Account Technology Strategist at Cloud Software Group in Vienna, Austria. He holds multiple Citrix certifications (CCE-V). Dennis has been a Citrix Technology Advocate (CTA) since 2017 (+ one year as Citrix Technology Professional, CTP). Besides his interest in virtualization technologies and blogging, he loves spending time with his family as well as snowboarding, playing basketball and rowing. He is fluent in Dutch, English, German and Slovak and speaks some Spanish.

Hi Dennis, thanks for this very useful blog and mention the advantages of BIS-F.
regards
Matthias
You are very welcome Matthias! Thank you for creating, updating and continuously developing BIS-F!
Pingback: Image Optimization Tools Comparison Matrix - Dennis Span
Hi,
Is there a way to disable the SCCM client reset? I am getting an SCCM error inside the base image script framework: “Status agent hasn’t been initialized yet. Attempting to create a pending event”, followed by some other stuff and then ending the program with “Failed to create an instance of COM progress UI object. Error code 0x80040154”.
I am not worried about the sccm client talking to the image afterwards so i would like to see if disabling the SCCM reset fixes my error.
Hi Teodor,
I would simply move the file “C:\Program Files (x86)\Base Image Script Framework (BIS-F)\Framework\SubCall\Preparation\10_PrepBISF_SCCM.ps1” to another location outside of the BIS-F installation directory and run BIS-F again. Perhaps also move the file “C:\Program Files (x86)\Base Image Script Framework (BIS-F)\Framework\SubCall\Personalization\10_PersBISF_SCCM.ps1” to prevent the reset of SCCM during personalization.
Bye,
Dennis
Hi Dennis,
I get a failure during the PVS P2V stage. This is presumably because the account I am running the ‘ConfigureAndRun_BIS-F’ do not have access to the remote PVS server to create a vDisk. Is there a way of specifying a account with correct permissions to create the vDisk?
Hi Yusuf,
First of all, there is no need to create a vDisk. Using BIS-F version 6.1 and higher, you are able to directly create a VHDX file on a network share. You only have to make sure that the local machine has access rights on the network share. The easiest way how to do this is by assigning the group Domain Computers modify rights on the share. After the VHDX has been created you can than import it in PVS.
That being said, if you really want to create a vDisk than, as you already said, the account executing BIS-F will need the appropriate permissions in PVS. In the last script in this article I execute BIS-F using the PowerShell cmdlet “start-process”. This cmdlet also supports the “credential” object, thus allowing you to run the process under a different user account (https://docs.microsoft.com/en-us/powershell/module/microsoft.powershell.management/start-process?view=powershell-6). In another article of mine, Encrypting password in a PowerShell script, I explain how to securely parse the password so you do not have to enter is in plain-text within your script.
I hope this information answers your question.
You’re very welcome Yusuf! Kind regards Dennis.
Hi Dennis,
Thank you, that’s really helpful.
Kind regards
Yusuf
Hi Dennis,
Can we use this tool for Horizon VDI ?
My VMware Horizon VDI pool failed to update after windows patching. Also with new snapshot I am unable to create new fresh VDI pool too.
Hi Milind, yes, you can use BIS-F with Horizon as well: https://eucweb.com/docs/bis-f
Hi Dennis, nice work!
Do you know if there is any way to stop the personalisation task from been created as a scheduled task? I am creating a VDP build and i am only looking to seal the image and shut down. For the life of me i can’t get the task not to be created.
Any ideas?
Hi Mike,
There is a good reason why the task is created. You can of course always disable the task using a Microsoft Group Policy Preference with an Item-Level Targeting filter (“if task exists then disable scheduled task”). Also, I would advise you to check the support section of the official BIS-F website https://eucweb.com or contact Matthias Schlimm, the developer of BIS-F, directly (https://eucweb.com/contact).