
The installation and configuration of all Citrix products can be automated. This article covers the Citrix Delivery Controller unattended installation with PowerShell and SCCM. Also included is the unattended creation and configuration of the XenDesktop site.
| Change Log 22.05.2017: updated create/join site routine (read SQL site database directly). 23.05.2017: updated to version 7.14 (this article was originally written for version 7.13). All settings still apply to version 7.13 as well. 30.08.2017: updated to version 7.15 (previously 7.14 / 7.14.1). All settings still apply to version 7.13 and 7.14 / 7.14.1 as well. One small change is that Local Host Cache is now enabled by default and Connection Leasing is disabled by default. This applies to new XenDesktop sites only (not site upgrades). For more information see the Citrix What’s New section. 06.12.2017: updated to version 7.16 (previously 7.15). All settings still apply to versions 7.13 to 7.15 as well. One small change is that adaptive transport (EDT) is enabled by default with fallback to TCP (before TCP was the default). This applies to new XenDesktop sites only (not site upgrades). For more information see the Citrix What’s New section. |
| Table of Contents |
Before continuing with this article please be aware of the following:
Important: please be aware that starting from XenDesktop 7.16, the Virtual Delivery Agent (VDA) only supports the following operating systems:
Older operating systems are no longer supported! For more information please refer to the System Requirements. |
- The version of Citrix Delivery Controller in this article is 7.16 (but all scripts work from version 7.13 and higher).
- The software can be downloaded here:
https://www.citrix.com/downloads/xenapp-and-xendesktop/product-software/xenapp-and-xendesktop-716.html - The installation and configuration scripts are designed for the following operating systems:
- Microsoft Windows Server 2008 R2 SP1 (this applies to the XenDesktop infrastructure components only; not the Virtual Delivery Agent)
- Microsoft Windows Server 2012 R2
- Microsoft Windows Server 2016
- The installation and configuration script have been tested on the following operating systems:
- Microsoft Windows Server 2008 R2 SP1
- Microsoft Windows Server 2016
- The assumption is that you execute the example script in this article on a server that has been pre-installed with one of the aforementioned operating systems including all the latest hotfixes.
This article consists of three parts:
- Part 1 focuses on the installation of the Windows Roles and Features;
- Part 2 deals with the installation of the Citrix Delivery Controller;
- Part 3 describes the configuration of the XenDesktop site.
| Note: |
Part 1: Install Windows Roles and Features
Before we install the Citrix Delivery Controller software, I recommend installing some commonly used roles and features.
In this example, we will install the following features:
- .Net Framework 3.5.1 (for W2K8R2 only)
- .Net Framework 4.5.x (for W2K12 and W2K16 only)
- Desktop experience (for W2K8R2 and W2K12 only)
- Group Policy Management Console
- Remote Server Administration Tools (AD DS Snap-Ins)
- Remote Desktop Licensing Tools
- Telnet Client
- Windows Process Activation Service
You can remove or add any role or feature you need. Please be aware though that not all features can be installed at the same time. Some features need a reboot. After that, other features can be installed.
In PowerShell, roles and features are installed using the Add-WindowsFeature (Windows Server 2008 R2) or Install-WindowsFeature command (Windows Server 2012 and higher). For example:
Windows Server 2008 (R2):
|
1 |
Add-WindowsFeature NET-Framework-Core,Desktop-Experience,GPMC,RSAT-ADDS-Tools,RSAT-RDS-Licensing,WAS,Telnet-Client |
Windows Server 2012 (R2):
|
1 |
Install-WindowsFeature NET-Framework-45-Core,Desktop-Experience,GPMC,RSAT-ADDS-Tools,RDS-Licensing-UI,WAS,Telnet-Client |
Windows Server 2016:
|
1 |
Install-WindowsFeature NET-Framework-45-Core,GPMC,RSAT-ADDS-Tools,RDS-Licensing-UI,WAS,Telnet-Client |
The names of the individual roles and features differ between the various operating systems:
- .Net Framework:
- Windows Server 2008 R2 only offers version 3.5.1 (Add-WindowsFeature command NET-Framework-Core)
- Windows Server 2012 (R2) offers both the versions 3.5.1 and 4.5.x (Install-WindowsFeature command NET-Framework-Core and NET-Framework-45-Core), but I only install the 4.5.x version.
- Windows Server 2016 only offers version 4.5.x (Install-WindowsFeature command NET-Framework-45-Core)
- Desktop-Experience:
This feature no longer exists as a separate item in Windows Server 2016. Let me clarify; when you use the full version of Windows Server 2016 (not the core/nano version), desktop experience is included out of the box. - Remote Desktop Licensing Tools:
In Windows Server 2008 (R2), this abbreviation of this feature is called RSAT-RDS-Licensing. In Windows Server 2012 and higher, this feature is called RDS-Licensing-UI.
To establish the version of the running operating system, I use the following PowerShell command:
|
1 |
[string]$WindowsVersion = ( Get-WmiObject -class Win32_OperatingSystem ).Version |
Complete script Installing Roles and Features
In case you use my installation template, this is what the complete script, including logging, looks like:
|
1 2 3 4 5 6 7 8 9 10 11 12 13 14 15 16 17 18 19 20 21 22 23 24 25 26 27 28 29 30 31 32 33 34 35 36 37 38 39 40 41 42 43 44 45 46 47 48 49 50 51 52 53 54 55 56 57 58 59 60 61 62 63 64 65 66 67 68 69 70 71 72 73 74 75 76 77 78 79 80 81 82 83 84 85 86 87 88 89 90 91 92 93 94 95 96 97 98 99 100 101 102 103 104 105 106 107 108 109 110 111 112 113 114 115 116 117 118 119 120 121 122 123 124 125 126 127 128 129 130 131 132 133 134 135 136 137 138 139 140 141 142 143 144 145 146 147 148 149 150 151 152 153 154 155 156 157 158 159 160 161 162 163 164 165 166 167 168 169 170 171 172 173 174 175 176 177 178 179 180 181 182 183 184 185 186 187 188 189 190 191 192 193 194 195 196 197 198 199 200 201 202 203 204 205 206 207 208 209 210 211 212 213 214 215 216 217 218 219 220 221 222 223 224 225 226 227 228 229 230 231 232 233 234 235 236 237 238 239 240 241 242 243 244 245 246 247 |
#========================================================================== # # Installation of Microsoft Roles and Features for Citrix Delivery Controller # # AUTHOR: Dennis Span (https://dennisspan.com) # DATE : 16.03.2017 # # COMMENT: # This script installs the following roles: # -.Net Framework 3.5 (W2K8R2 only) # -.Net Framework 4.6 (W2K12 + W2K16) # -Desktop experience (W2K8R2 + W2K12) # -Group Policy Management Console # -Remote Server Administration Tools (AD DS Snap-Ins) # -Remote Desktop Licensing Tools # -Telnet Client # -Windows Process Activation Service # # This script has been prepared for Windows Server 2008 R2, 2012 R2 and 2016. # #========================================================================== # Get the script parameters if there are any param ( # The only parameter which is really required is 'Uninstall' # If no parameters are present or if the parameter is not # 'uninstall', an installation process is triggered [string]$Installationtype ) # define Error handling # note: do not change these values $global:ErrorActionPreference = "Stop" if($verbose){ $global:VerbosePreference = "Continue" } # FUNCTION DS_WriteLog #========================================================================== Function DS_WriteLog { <# .SYNOPSIS Write text to this script's log file .DESCRIPTION Write text to this script's log file .PARAMETER InformationType This parameter contains the information type prefix. Possible prefixes and information types are: I = Information S = Success W = Warning E = Error - = No status .PARAMETER Text This parameter contains the text (the line) you want to write to the log file. If text in the parameter is omitted, an empty line is written. .PARAMETER LogFile This parameter contains the full path, the file name and file extension to the log file (e.g. C:\Logs\MyApps\MylogFile.log) .EXAMPLE DS_WriteLog -InformationType "I" -Text "Copy files to C:\Temp" -LogFile "C:\Logs\MylogFile.log" Writes a line containing information to the log file .Example DS_WriteLog -InformationType "E" -Text "An error occurred trying to copy files to C:\Temp (error: $($Error[0]))" -LogFile "C:\Logs\MylogFile.log" Writes a line containing error information to the log file .Example DS_WriteLog -InformationType "-" -Text "" -LogFile "C:\Logs\MylogFile.log" Writes an empty line to the log file #> [CmdletBinding()] Param( [Parameter(Mandatory=$true, Position = 0)][String]$InformationType, [Parameter(Mandatory=$true, Position = 1)][AllowEmptyString()][String]$Text, [Parameter(Mandatory=$true, Position = 2)][AllowEmptyString()][String]$LogFile ) $DateTime = (Get-Date -format dd-MM-yyyy) + " " + (Get-Date -format HH:mm:ss) if ( $Text -eq "" ) { Add-Content $LogFile -value ("") # Write an empty line } Else { Add-Content $LogFile -value ($DateTime + " " + $InformationType + " - " + $Text) } } #========================================================================== ################ # Main section # ################ # Disable File Security $env:SEE_MASK_NOZONECHECKS = 1 # Custom variables [edit] $BaseLogDir = "C:\Logs" # [edit] add the location of your log directory here $PackageName = "Citrix Delivery Controller Roles" # [edit] enter the display name of the software (e.g. 'Arcobat Reader' or 'Microsoft Office') # Global variables $StartDir = $PSScriptRoot # the directory path of the script currently being executed if (!($Installationtype -eq "Uninstall")) { $Installationtype = "Install" } $LogDir = (Join-Path $BaseLogDir $PackageName).Replace(" ","_") $LogFileName = "$($Installationtype)_$($PackageName).log" $LogFile = Join-path $LogDir $LogFileName # Create the log directory if it does not exist if (!(Test-Path $LogDir)) { New-Item -Path $LogDir -ItemType directory | Out-Null } # Create new log file (overwrite existing one) New-Item $LogFile -ItemType "file" -force | Out-Null DS_WriteLog "I" "START SCRIPT - $Installationtype $PackageName" $LogFile DS_WriteLog "-" "" $LogFile ################################################# # INSTALL MICROSOFT ROLES AND FEATURES # ################################################# DS_WriteLog "I" "Add Windows roles and features:" $LogFile DS_WriteLog "I" "-.Net Framework 3.5 (W2K8R2 only)" $LogFile DS_WriteLog "I" "-.Net Framework 4.6 (W2K12 + W2K16)" $LogFile DS_WriteLog "I" "-Desktop experience (W2K8R2 + W2K12)" $LogFile DS_WriteLog "I" "-Group Policy Management Console" $LogFile DS_WriteLog "I" "-Remote Server Administration Tools (AD DS Snap-Ins)" $LogFile DS_WriteLog "I" "-Remote Desktop Licensing Tools" $LogFile DS_WriteLog "I" "-Telnet Client" $LogFile DS_WriteLog "I" "-Windows Process Activation Service" $LogFile DS_WriteLog "-" "" $LogFile DS_WriteLog "I" "Retrieve the OS version and name" $LogFile # Check the windows version # URL: https://en.wikipedia.org/wiki/List_of_Microsoft_Windows_versions # -Windows Server 2016 -> NT 10.0 # -Windows Server 2012 R2 -> NT 6.3 # -Windows Server 2012 -> NT 6.2 # -Windows Server 2008 R2 -> NT 6.1 # -Windows Server 2008 -> NT 6.0 [string]$WindowsVersion = ( Get-WmiObject -class Win32_OperatingSystem ).Version switch -wildcard ($WindowsVersion) { "*10*" { $OSVER = "W2K16" $OSName = "Windows Server 2016" $LogFile2 = Join-Path $LogDir "Install_RolesAndFeatures.log" DS_WriteLog "I" "The current operating system is $($OSNAME) ($($OSVER))" $LogFile DS_WriteLog "-" "" $LogFile DS_WriteLog "I" "Roles and Features installation log file: $LogFile2" $LogFile DS_WriteLog "I" "Start the installation ..." $LogFile # Install Windows Features try { Install-WindowsFeature NET-Framework-45-Core,GPMC,RSAT-ADDS-Tools,RDS-Licensing-UI,WAS,Telnet-Client -logpath $LogFile2 DS_WriteLog "S" "The windows features were installed successfully!" $LogFile } catch { DS_WriteLog "E" "An error occurred while installing the windows features (error: $($error[0]))" $LogFile Exit 1 } } "*6.3*" { $OSVER = "W2K12R2" $OSName = "Windows Server 2012 R2" $LogFile2 = Join-Path $LogDir "Install_RolesAndFeatures.log" DS_WriteLog "I" "The current operating system is $($OSNAME) ($($OSVER))" $LogFile DS_WriteLog "-" "" $LogFile DS_WriteLog "I" "Roles and Features installation log file: $LogFile2" $LogFile DS_WriteLog "I" "Start the installation ..." $LogFile # Install Windows Features try { Install-WindowsFeature NET-Framework-45-Core,Desktop-Experience,GPMC,RSAT-ADDS-Tools,RDS-Licensing-UI,WAS,Telnet-Client -logpath $LogFile2 DS_WriteLog "S" "The windows features were installed successfully!" $LogFile } catch { DS_WriteLog "E" "An error occurred while installing the windows features (error: $($error[0]))" $LogFile Exit 1 } } "*6.2*" { $OSVER = "W2K12" $OSName = "Windows Server 2012" $LogFile2 = Join-Path $LogDir "Install_RolesAndFeatures.log" DS_WriteLog "I" "The current operating system is $($OSNAME) ($($OSVER))" $LogFile DS_WriteLog "-" "" $LogFile DS_WriteLog "I" "Roles and Features installation log file: $LogFile2" $LogFile DS_WriteLog "I" "Start the installation ..." $LogFile # Install Windows Features try { Install-WindowsFeature NET-Framework-45-Core,Desktop-Experience,GPMC,RSAT-ADDS-Tools,RDS-Licensing-UI,WAS,Telnet-Client -logpath $LogFile2 DS_WriteLog "S" "The windows features were installed successfully!" $LogFile } catch { DS_WriteLog "E" "An error occurred while installing the windows features (error: $($error[0]))" $LogFile Exit 1 } } "*6.1*" { $OSVER = "W2K8R2" $OSName = "Windows Server 2008 R2" $LogFile2 = Join-Path $LogDir "Install_RolesAndFeatures.log" DS_WriteLog "I" "The current operating system is $($OSNAME) ($($OSVER))" $LogFile DS_WriteLog "-" "" $LogFile DS_WriteLog "I" "Roles and Features installation log file: $LogFile2" $LogFile DS_WriteLog "I" "Start the installation ..." $LogFile # Install Windows Features try { Add-WindowsFeature NET-Framework-Core,Desktop-Experience,GPMC,RSAT-ADDS-Tools,RSAT-RDS-Licensing,WAS,Telnet-Client -logpath $LogFile2 DS_WriteLog "S" "The windows features were installed successfully!" $LogFile } catch { DS_WriteLog "E" "An error occurred while installing the windows features (error: $($error[0]))" $LogFile Exit 1 } } "*6.0*" { $OSVER = "W2K8" $OSName = "Windows Server 2008" $LogFile2 = Join-Path $LogDir "Install_RolesAndFeatures.log" DS_WriteLog "I" "The current operating system is $($OSNAME) ($($OSVER))" $LogFile DS_WriteLog "-" "" $LogFile DS_WriteLog "I" "Roles and Features installation log file: $LogFile2" $LogFile DS_WriteLog "I" "Start the installation ..." $LogFile # Install Windows Features try { Add-WindowsFeature NET-Framework-Core,Desktop-Experience,GPMC,RSAT-ADDS-Tools,RSAT-RDS-Licensing,WAS,Telnet-Client -logpath $LogFile2 DS_WriteLog "S" "The windows features were installed successfully!" $LogFile } catch { DS_WriteLog "E" "An error occurred while installing the windows features (error: $($error[0]))" $LogFile Exit 1 } } default { $OSName = ( Get-WmiObject -class Win32_OperatingSystem ).Caption DS_WriteLog "E" "The current operating system $($OSName) is unsupported" $LogFile DS_WriteLog "I" "This script will now be terminated" $LogFile DS_WriteLog "-" "" $LogFile Exit 1 } } # Enable File Security Remove-Item env:\SEE_MASK_NOZONECHECKS DS_WriteLog "-" "" $LogFile DS_WriteLog "I" "End of script" $LogFile |
Execute the script as follows:
powershell.exe -file %Directory%\Install_CitrixDeliveryControllerRoles.ps1
In case you get a security warning, execute the script as follows:
powershell.exe -executionpolicy bypass -file %Directory%\Install_CitrixDeliveryControllerRoles.ps1
Log files are created in the directory C:\Logs\Citrix_Delivery_Controller_Roles, but you can change this to any directory you want (see lines 91 and 92).
| Note: The installation of the roles and features requires a reboot. The reboot is NOT part of the example script. You can either add it to the script yourself or if you use a deployment tool such as Microsoft SCCM, you can add a reboot task in the task sequence. |
If you want to go one step further and create an SCCM package as well, please follow the step-by-step explanation in the article Deep dive creating SCCM packages for Citrix.
Part 2: Install Citrix Delivery Controller
The second part of this article focuses on the installation of the Citrix Delivery Controller. So how do you start?
- Create an installation directory on the local computer or a file share (UNC path). For example: C:\Temp\Citrix\DeliveryController.
- Create a subdirectory called Files.
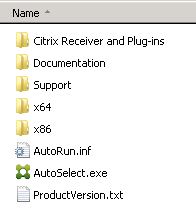
- Download and extract the XenDesktop 7.16 ISO file to the folder Files in the installation directory. The contents of the directory Files should now look like this:
- Copy the complete PowerShell script at the end of this paragraph to a new PS1 file (e.g. Install_CitrixDeliveryController.ps1) and add this file to the root of your installation directory (not in the subdirectory Files).
- Execute the PowerShell script:
powershell.exe -executionpolicy bypass -file C:\Temp\Citrix\DeliveryController\Install_CitrixDeliveryController.ps1
During installation, the built-in firewall is configured automatically (the MSI parameter /configure_firewall takes care of this). The parameter /nosql prevents the installation of a local SQL database. As per Citrix:
[The /nosql parameter] Prevents installation of Microsoft SQL Server Express on the server where you are installing the Controller. If this option is omitted, SQL Server Express is installed for use as the Site database. (This option does not affect the installation of SQL Server Express LocalDB used for Local Host Cache.)
The basic installation command line (included in the complete PowerShell script at the end of this paragraph) is as follows:
|
1 |
XenDesktopServerSetup.exe /components controller,desktopstudio /configure_firewall /nosql /noreboot /quiet /logpath C:\Logs |
The installation file XenDesktopServerSetup.exe is located in the subfolder x64\XenDesktop Setup.
For more information on the command line options for the XenDesktopServerSetup.exe, please refer to the XenDesktop 7.16 knowledge base article Install using the command line.
Complete script for installing the Citrix Delivery Controller
In case you use my installation template, this is what the complete script, including logging and error handling, looks like:
|
1 2 3 4 5 6 7 8 9 10 11 12 13 14 15 16 17 18 19 20 21 22 23 24 25 26 27 28 29 30 31 32 33 34 35 36 37 38 39 40 41 42 43 44 45 46 47 48 49 50 51 52 53 54 55 56 57 58 59 60 61 62 63 64 65 66 67 68 69 70 71 72 73 74 75 76 77 78 79 80 81 82 83 84 85 86 87 88 89 90 91 92 93 94 95 96 97 98 99 100 101 102 103 104 105 106 107 108 109 110 111 112 113 114 115 116 117 118 119 120 121 122 123 124 125 126 127 128 129 130 131 132 133 134 135 136 137 138 139 140 141 142 143 144 145 146 147 148 149 150 151 152 153 154 155 156 157 158 159 160 161 162 163 164 165 166 167 168 169 170 171 172 173 174 175 176 177 178 179 180 181 182 183 184 185 186 187 188 189 190 191 192 193 194 195 196 197 198 199 200 201 202 203 204 205 206 207 208 209 210 211 212 213 214 215 216 217 218 219 220 221 222 223 |
#========================================================================== # # Install Citrix Delivery Controller # # AUTHOR: Dennis Span (https://dennisspan.com) # DATE : 05.04.2017 # # COMMENT: # This script has been prepared for Windows Server 2008 R2, 2012 R2 and 2016 # # This script only installs the Citrix Delivery Controller. It does not configure it. # The version of XenDesktop used in this script is 7.16 (released in Q4 2017). # Versions 7.13 to 7.15 have been tested as well. # #========================================================================== # Get the script parameters if there are any param ( # The only parameter which is really required is 'Uninstall' # If no parameters are present or if the parameter is not # 'uninstall', an installation process is triggered [string]$Installationtype ) # define Error handling # note: do not change these values $global:ErrorActionPreference = "Stop" if($verbose){ $global:VerbosePreference = "Continue" } # FUNCTION DS_WriteLog #========================================================================== Function DS_WriteLog { <# .SYNOPSIS Write text to this script's log file .DESCRIPTION Write text to this script's log file .PARAMETER InformationType This parameter contains the information type prefix. Possible prefixes and information types are: I = Information S = Success W = Warning E = Error - = No status .PARAMETER Text This parameter contains the text (the line) you want to write to the log file. If text in the parameter is omitted, an empty line is written. .PARAMETER LogFile This parameter contains the full path, the file name and file extension to the log file (e.g. C:\Logs\MyApps\MylogFile.log) .EXAMPLE DS_WriteLog -InformationType "I" -Text "Copy files to C:\Temp" -LogFile "C:\Logs\MylogFile.log" Writes a line containing information to the log file .Example DS_WriteLog -InformationType "E" -Text "An error occurred trying to copy files to C:\Temp (error: $($Error[0]))" -LogFile "C:\Logs\MylogFile.log" Writes a line containing error information to the log file .Example DS_WriteLog -InformationType "-" -Text "" -LogFile "C:\Logs\MylogFile.log" Writes an empty line to the log file #> [CmdletBinding()] Param( [Parameter(Mandatory=$true, Position = 0)][String]$InformationType, [Parameter(Mandatory=$true, Position = 1)][AllowEmptyString()][String]$Text, [Parameter(Mandatory=$true, Position = 2)][AllowEmptyString()][String]$LogFile ) $DateTime = (Get-Date -format dd-MM-yyyy) + " " + (Get-Date -format HH:mm:ss) if ( $Text -eq "" ) { Add-Content $LogFile -value ("") # Write an empty line } Else { Add-Content $LogFile -value ($DateTime + " " + $InformationType + " - " + $Text) } } #========================================================================== # FUNCTION DS_InstallOrUninstallSoftware #========================================================================== Function DS_InstallOrUninstallSoftware { <# .SYNOPSIS Install or uninstall software (MSI or SETUP.exe) .DESCRIPTION Install or uninstall software (MSI or SETUP.exe) .PARAMETER File This parameter contains the file name including the path and file extension, for example C:\Temp\MyApp\Files\MyApp.msi or C:\Temp\MyApp\Files\MyApp.exe. .PARAMETER Installationtype This parameter contains the installation type, which is either 'Install' or 'Uninstall'. .PARAMETER Arguments This parameter contains the command line arguments. The arguments list can remain empty. In case of an MSI, the following parameters are automatically included in the function and do not have to be specified in the 'Arguments' parameter: /i (or /x) /qn /norestart /l*v "c:\Logs\MyLogFile.log" .EXAMPLE DS_InstallOrUninstallSoftware -File "C:\Temp\MyApp\Files\MyApp.msi" -InstallationType "Install" -Arguments "" Installs the MSI package 'MyApp.msi' with no arguments (the function already includes the following default arguments: /i /qn /norestart /l*v $LogFile) .Example DS_InstallOrUninstallSoftware -File "C:\Temp\MyApp\Files\MyApp.msi" -InstallationType "Uninstall" -Arguments "" Uninstalls the MSI package 'MyApp.msi' (the function already includes the following default arguments: /x /qn /norestart /l*v $LogFile) .Example DS_InstallOrUninstallSoftware -File "C:\Temp\MyApp\Files\MyApp.exe" -InstallationType "Install" -Arguments "/silent /logfile:C:\Logs\MyApp\log.log" Installs the SETUP file 'MyApp.exe' #> [CmdletBinding()] Param( [Parameter(Mandatory=$true, Position = 0)][String]$File, [Parameter(Mandatory=$true, Position = 1)][AllowEmptyString()][String]$Installationtype, [Parameter(Mandatory=$true, Position = 2)][AllowEmptyString()][String]$Arguments ) $FileName = ($File.Split("\"))[-1] $FileExt = $FileName.SubString(($FileName.Length)-3,3) # Prepare variables if ( !( $FileExt -eq "MSI") ) { $FileExt = "SETUP" } if ( $Installationtype -eq "Uninstall" ) { $Result1 = "uninstalled" $Result2 = "uninstallation" } else { $Result1 = "installed" $Result2 = "installation" } $LogFileAPP = Join-path $LogDir ( "$($Installationtype)_$($FileName.Substring(0,($FileName.Length)-4))_$($FileExt).log" ) # Logging DS_WriteLog "I" "File name: $FileName" $LogFile DS_WriteLog "I" "File full path: $File" $LogFile if ([string]::IsNullOrEmpty($Arguments)) { # check if custom arguments were defined DS_WriteLog "I" "File arguments: <no arguments defined>" $LogFile } Else { DS_WriteLog "I" "File arguments: $Arguments" $LogFile } # Install the MSI or SETUP.exe DS_WriteLog "-" "" $LogFile DS_WriteLog "I" "Start the $Result2" $LogFile if ( $FileExt -eq "MSI" ) { if ( $Installationtype -eq "Uninstall" ) { $FixedArguments = "/x ""$File"" /qn /norestart /l*v ""$LogFileAPP""" } else { $FixedArguments = "/i ""$File"" /qn /norestart /l*v ""$LogFileAPP""" } if ([string]::IsNullOrEmpty($Arguments)) { # check if custom arguments were defined $arguments = $FixedArguments DS_WriteLog "I" "Command line: Start-Process -FilePath 'msiexec.exe' -ArgumentList $arguments -Wait -PassThru" $LogFile $process = Start-Process -FilePath 'msiexec.exe' -ArgumentList $arguments -Wait -PassThru } Else { $arguments = $FixedArguments + " " + $arguments DS_WriteLog "I" "Command line: Start-Process -FilePath 'msiexec.exe' -ArgumentList $arguments -Wait -PassThru" $LogFile $process = Start-Process -FilePath 'msiexec.exe' -ArgumentList $arguments -Wait -PassThru } } Else { if ([string]::IsNullOrEmpty($Arguments)) { # check if custom arguments were defined DS_WriteLog "I" "Command line: Start-Process -FilePath ""$File"" -Wait -PassThru" $LogFile $process = Start-Process -FilePath "$File" -Wait -PassThru } Else { DS_WriteLog "I" "Command line: Start-Process -FilePath ""$File"" -ArgumentList $arguments -Wait -PassThru" $LogFile $process = Start-Process -FilePath "$File" -ArgumentList $arguments -Wait -PassThru } } # Check the result (the exit code) of the installation switch ($Process.ExitCode) { 0 { DS_WriteLog "S" "The software was $Result1 successfully (exit code: 0)" $LogFile } 3 { DS_WriteLog "S" "The software was $Result1 successfully (exit code: 3)" $LogFile } # Some Citrix products exit with 3 instead of 0 1603 { DS_WriteLog "E" "A fatal error occurred (exit code: 1603). Some applications throw this error when the software is already (correctly) installed! Please check." $LogFile } 1605 { DS_WriteLog "I" "The software is not currently installed on this machine (exit code: 1605)" $LogFile } 3010 { DS_WriteLog "W" "A reboot is required (exit code: 3010)!" $LogFile } default { [string]$ExitCode = $Process.ExitCode DS_WriteLog "E" "The $Result2 ended in an error (exit code: $ExitCode)!" $LogFile Exit 1 } } } #========================================================================== ################ # Main section # ################ # Disable File Security $env:SEE_MASK_NOZONECHECKS = 1 # Custom variables [edit] $BaseLogDir = "C:\Logs" # [edit] add the location of your log directory here $PackageName = "Citrix Delivery Controller (installation)" # [edit] enter the display name of the software (e.g. 'Arcobat Reader' or 'Microsoft Office') # Global variables $StartDir = $PSScriptRoot # the directory path of the script currently being executed if (!($Installationtype -eq "Uninstall")) { $Installationtype = "Install" } $LogDir = (Join-Path $BaseLogDir $PackageName).Replace(" ","_") $LogFileName = "$($Installationtype)_$($PackageName).log" $LogFile = Join-path $LogDir $LogFileName # Create the log directory if it does not exist if (!(Test-Path $LogDir)) { New-Item -Path $LogDir -ItemType directory | Out-Null } # Create new log file (overwrite existing one) New-Item $LogFile -ItemType "file" -force | Out-Null DS_WriteLog "I" "START SCRIPT - $Installationtype $PackageName" $LogFile DS_WriteLog "-" "" $LogFile ################################################# # INSTALL CITRIX DELIVERY CONTROLLER # ################################################# DS_WriteLog "I" "Install the Citrix Delivery Controller" $LogFile DS_WriteLog "-" "" $LogFile $File = Join-Path $StartDir "Files\x64\XenDesktop Setup\XenDesktopServerSetup.exe" $Arguments = "/components controller,desktopstudio /configure_firewall /nosql /noreboot /quiet /logpath ""$LogDir""" DS_InstallOrUninstallSoftware -File $File -InstallationType "Install" -Arguments $Arguments # Enable File Security Remove-Item env:\SEE_MASK_NOZONECHECKS DS_WriteLog "-" "" $LogFile DS_WriteLog "I" "End of script" $LogFile |
Execute the script as follows:
powershell.exe -file C:\Temp\Citrix\DeliveryController\Install_CitrixDeliveryController.ps1
In case you get a security warning, execute the script as follows:
powershell.exe -executionpolicy bypass -file C:\Temp\Citrix\DeliveryController\Install_CitrixDeliveryController.ps1
Log files are created in the directory C:\Logs\Citrix_Delivery_Controller_(installation), but you can change this to any directory you want (see lines 188 and 189).
If you want to go one step further and create an SCCM package as well, please follow the step-by-step explanation in the article Deep dive creating SCCM packages for Citrix.
| Note: Before you continue with part 3, first reboot the server, otherwise importing the XenDesktop module ends in an error. The reboot is NOT part of the example script. You can either add it to the script yourself, or if you use a deployment tool such as Microsoft SCCM, you can add a reboot task in the task sequence. |
Part 3: Create and configure or join the XenDesktop site
The third part of this article focuses on the creation and configuration of the Citrix XenDesktop site. In this part, the three main XenDesktop databases are created as well as the XenDesktop site. Also, the first delivery controller is added to the new site. All other servers, except for the first one, are joined to the site.
If you have created the installation directory as described in part 2, you can continue as follows:
- Make sure that your Citrix License Server is up and running (the latest version). The actual product licenses do not need to be installed yet. Please read the article Citrix License Server unattended installation with PowerShell and SCCM for more information on how to install and configure your Citrix License Server using PowerShell.
- XenDesktop requires three databases. In order to create these databases, you need a Windows (Active Directory) account with the appropriate SQL permissions (securityadmin or sysadmin). The script below assumes that the currently logged-on administrator has sufficient permissions.
- Copy the complete PowerShell script at the end of this paragraph to a new PS1 file (e.g. Configure_CitrixXenDesktopSite.ps1) and add this file to the root of your installation directory (not in the subdirectory Files).
- Execute the PowerShell script:
powershell.exe -executionpolicy bypass -file C:\Temp\Citrix\DeliveryController\Configure_CitrixXenDesktopSite.ps1
The complete PowerShell script at the end of this part includes all of these steps! When you use this script, you do not need to execute any of the individual steps described below.
The first step when creating an XenDesktop site is to create the required databases (site, logging, and monitoring). Prepare the following input parameters (required in lines 124 to 129 in the complete PowerShell script):
- $SiteName
The name of your XenDesktop site. For example: “MySite”. - $DatabaseServer
The name of your SQL server or SQL server instance (e.g. “SQLServer1” or “SQLServer1\SQLCTX01”). - $DatabaseName_Site
The name of the site database. For example: “CTX_Site_DB”. - $DatabaseName_Logging
The name of the logging database. For example: “CTX_Logging_DB”. - $DatabaseName_Monitoring
The name of the monitoring database. For example: “CTX_Monitoring_DB”. - $DatabaseCredentials -> This parameter is not included in the complete PowerShell script. Please add if required (see the section Handling Passwords at the end of the article).
The service account (AD user) with the required SQL permissions including password. This PowerShell variable needs to be constructed using the PSCredential object (New-Object System.Management.Automation.PSCredential). For more information please see the article Encrypting passwords in a PowerShell script.
A XenDesktop site requires the following three databases:
- Site database
- Logging database
- Monitoring database
The first step when creating a new site is to create these databases using the following PowerShell commands:
|
1 2 3 4 5 6 7 |
asnp citrix* New-XDDatabase -AdminAddress $env:COMPUTERNAME -SiteName $SiteName -DataStore Site -DatabaseServer $DatabaseServer -DatabaseName $DatabaseName_Site New-XDDatabase -AdminAddress $env:COMPUTERNAME -SiteName $SiteName -DataStore Logging -DatabaseServer $DatabaseServer -DatabaseName $DatabaseName_Logging New-XDDatabase -AdminAddress $env:COMPUTERNAME -SiteName $SiteName -DataStore Monitor -DatabaseServer $DatabaseServer -DatabaseName $DatabaseName_Monitoring |
The above commands require dbcreator permissions on the SQL server (https://support.citrix.com/article/CTX127998).
The complete PowerShell script at the end of this part includes the creation of the databases and the site (as well as joining servers) including detailed logging and error handling.
Create or join XenDesktop site
If the current server is the first one on the site, the first action is to create all service-specific database schemas and to add this server as the first controller to the site. Any other server is joined to the site.
For both creating and joining, securityadmin permissions on the SQL server are required (https://support.citrix.com/article/CTX127998).
The PowerShell command to create the site, and to subsequently add the first controller to the site, is as follows:
|
1 2 3 |
asnp citrix* New-XDSite -DatabaseServer $DatabaseServer -LoggingDatabaseName $DatabaseName_Logging -MonitorDatabaseName $DatabaseName_Monitoring -SiteDatabaseName $DatabaseName_Site -SiteName $Sitename -AdminAddress $env:ComputerName |
The basic command to join a server to an existing site is:
|
1 2 3 |
asnp citrix* Add-XDController -SiteControllerAddress $Controller |
In the complete PowerShell script at the end of this paragraph, a custom routine is used to determine if the site is up and running. Using PowerShell and SQL queries, this information is read directly from the site database.

When joining a controller to the site, an existing controller has to be parsed in one of the required parameters (Add-XDController -SiteControllerAddress $Controller). The complete PowerShell script handles this automatically. It reads all available controllers directly from the site database and uses the first one it finds to join the controller. Should the joining fail for some reason, the second available controller is used until there are no more controllers or no more errors.
Connect to the Citrix License Server
The next step is to connect to your Citrix License Server. Prepare the following input parameters (required in lines 130 to 134 in the complete PowerShell script):
- $LicenseServer
The name of your license server, for example: mylicserver.mycompany.com. - $LicenseServerPort
The port number for the initial contact, for example, 27000 (this is the default value) - $LicensingModel
The license model. Possible values are UserDevice and Concurrent.
- $ProductCode
The product code. Possible values are XDT (for XenDesktop) or MPS (for the XenDesktop 7.x App Edition).
- $ProductEdition
The product edition. Possible values are STD (Standard), ENT (Enterprise), or PLT (Platinum).
The first action is to set the license server address ($LicenseServer) and the port number ($LicenseServerPort). In case you change the port number, please do not forget to modify your firewall rules if needed.
|
1 2 3 |
asnp citrix* Set-XDLicensing -AdminAddress $env:COMPUTERNAME -LicenseServerAddress $LicenseServer -LicenseServerPort $LicenseServerPort -Force |
The “-Force” parameter makes sure that the server and port combination are NOT checked. This is handy in case your license server is temporarily offline or if you are installing your delivery controller before installing your license server.
The next step is to set the licensing model, product code, and product edition:
|
1 2 3 |
asnp citrix* Set-ConfigSite -AdminAddress $env:COMPUTERNAME -LicensingModel $LicensingModel -ProductCode $ProductCode -ProductEdition $ProductEdition |
The last step is to add the hash value of the self-signed security certificate, used to enable SSL communication, to the site.
|
1 2 3 |
asnp citrix* Set-ConfigSiteMetadata -AdminAddress $env:COMPUTERNAME -Name 'CertificateHash' -Value $(Get-LicCertificate -AdminAddress "https://$LicenseServer:8083").CertHash |
For more information regarding the self-signed certificate read the section Install Citrix License Server in the article Citrix License Server unattended installation with PowerShell and SCCM.
The complete PowerShell script at the end of this part includes the configuration of the Citrix license server including detailed logging and error handling.
You may want to add some administrators to your site. Two steps are needed to create and configure a new administrator. First, the administrator has to be created and secondly, the role and scope need to be set. For more information on how to create and configure administrators, please refer to the following Citrix article: https://docs.citrix.com/en-us/xenapp-and-xendesktop/current-release/secure/delegated-administration.html.
Prepare the following input parameters (required in lines 135 to 137 in the complete PowerShell script):
- $AdminGroup
The name of the Active Directory user or group, for example, MyDomain\CTXAdmins. - $Role
The role to assign to the new XenDesktop administrator. The following built-in roles are available:- Full Administrator
- Read Only Administrator
- Help Desk Administrator
- Machine Catalog Administrator
- Delivery Group Administrator
- Host Administrator
- $Scope
The scope (the objects) to which the permissions (defined in the role) apply. There is only one built-in role, namely All.
The following PowerShell command creates a new XenDesktop administrator:
|
1 2 3 |
asnp citrix* New-AdminAdministrator -AdminAddress $env:COMPUTERNAME -Name $AdminGroup |
The following command assigns the role and scope defined in the variables in the beginning of this paragraph:
|
1 2 3 |
asnp citrix* Add-AdminRight -AdminAddress $env:COMPUTERNAME -Administrator $AdminGroup -Role $Role -Scope $Scope |
The complete PowerShell script at the end of this part includes the creation of an XenDesktop administrator including detailed logging and error handling.
The grooming (retention) settings refer to the monitoring settings. For example, the grooming settings include how long data is kept in your monitoring database. The longer data is kept, the larger the database will grow.
Use the following PowerShell commands to check the current configuration of the grooming settings:
|
1 2 3 4 5 |
# Load the Citrix PowerShell snap-ins asnp citrix* # Retrieve all site info Get-MonitorConfiguration |
The default grooming settings for a XenDesktop 7.16 site with platinum licenses are as follows:
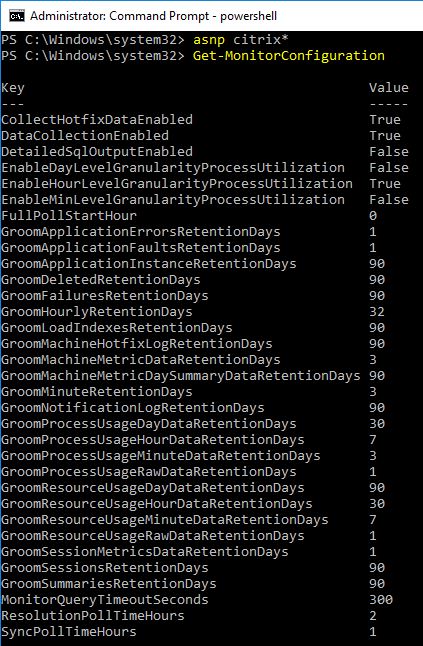
As you can see in the screenshot, there are other settings besides retention days.
In this example, we increase the days that data is stored in the monitoring database for the following data types:
- GroomApplicationInstanceRetentionDays
- GroomDeletedRetentionDays
- GroomFailuresRetentionDays
- GroomLoadIndexesRetentionDays
- GroomMachineHotfixLogRetentionDays
- GroomNotificationLogRetentionDays
- GroomResourceUsageDayDataRetentionDays
- GroomSessionsRetentionDays
- GroomSummariesRetentionDays
Prepare the following input parameter (required in line 138 in the complete PowerShell script):
- $GroomingDays
The number of days you want the monitoring data to be saved in the database, for example, 365 days.
The PowerShell command is as follows:
|
1 2 3 |
asnp citrix* Set-MonitorConfiguration -GroomApplicationInstanceRetentionDays $GroomingDays -GroomDeletedRetentionDays $GroomingDays -GroomFailuresRetentionDays $GroomingDays -GroomLoadIndexesRetentionDays $GroomingDays -GroomMachineHotfixLogRetentionDays $GroomingDays -GroomNotificationLogRetentionDays $GroomingDays -GroomResourceUsageDayDataRetentionDays $GroomingDays -GroomSessionsRetentionDays $GroomingDays -GroomSummariesRetentionDays $GroomingDays |
The complete PowerShell script at the end of this part includes configuring the grooming settings including detailed logging and error handling.
To allow pass-through authentication, the Delivery Controller needs to trust XML requests sent by the StoreFront server. In a XenDesktop 7.15 site, these XML requests are not trusted by default.
Use the following PowerShell commands to check the configuration:
|
1 2 3 4 5 |
# Load the Citrix PowerShell snap-ins asnp citrix* # Retrieve all site info Get-BrokerSite |
Check the setting TrustRequestsSentToTheXmlServicePort and see that it is set to False.

To enable trusted XML requests, we need to change this setting to True. The following PowerShell command does just that:
|
1 2 3 |
asnp citrix* Set-BrokerSite -TrustRequestsSentToTheXmlServicePort $true |
The complete PowerShell script at the end of this part includes enabling trusted XML requests including detailed logging and error handling.
Disable Connection Leasing and Enable Local host Cache
| Note (30.08.2017): from Citrix XenDesktop version 7.15, Connection Leasing is disabled by default and Local Host Cache is enabled by default. Please be aware that this applies to new sites only! If you are upgrading to XenDesktop 7.15 from an existing, pre-XenDesktop 7.15, site, the settings of the existing site are used as-is. |
Connection Leasing is the pre-XenDesktop 7.12 version of Local Host Cache. In XenDesktop 7.12, Local Host Cache was introduced. Local Host Cache is preferred to Connection Leasing. In a pre-XenDesktop 7.15 site, Connection Leasing is enabled by default and Local Host Cache is disabled by default. Use the following PowerShell commands to check the active configuration:
|
1 2 3 4 5 |
# Load the Citrix PowerShell snap-ins asnp citrix* # Retrieve all site info Get-BrokerSite |
The screenshot below shows the default settings in XenDesktop 7.16.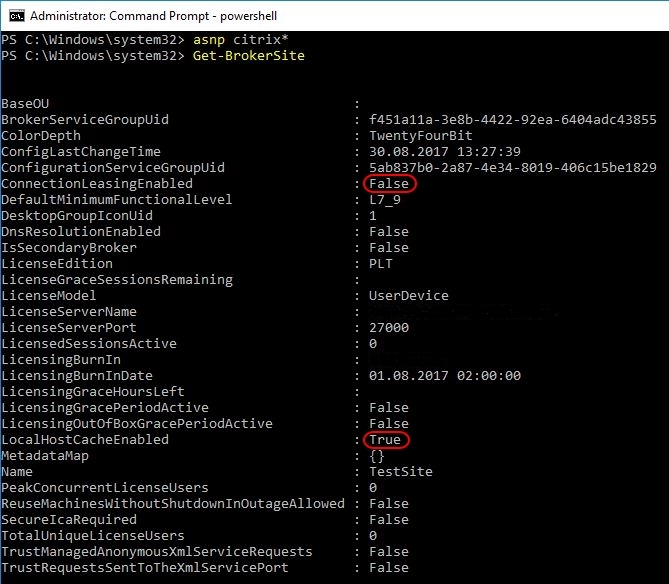
The following PowerShell commands disable Connection Leasing and enable Local Host Cache:
|
1 2 3 4 |
asnp citrix* Set-BrokerSite -ConnectionLeasingEnabled $false Set-BrokerSite -LocalHostCacheEnabled $true |
In the complete PowerShell script at the end of this part, Connection Leasing is disabled and Local Host Cache enabled. The script includes detailed logging and error handling. It is no problem to execute this script on a new XenDesktop 7.15 site where these settings are already configured correctly.
The Customer Experience Improvement Program (CEIP) can be disabled in Citrix Studio: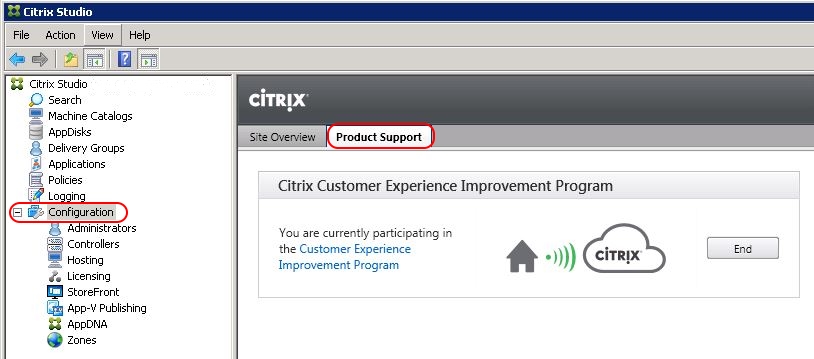
The same can be accomplished with the following PowerShell command:
|
1 2 3 |
asnp citrix* Set-AnalyticsSite -Enabled $false |
Please note that I am not stating that CEIP should be disabled! I am only showing you how to do it in case you want to.
The complete PowerShell script at the end of this part includes the disabling of CEIP including detailed logging and error handling.
Complete script for configuring the XenDesktop site
In case you use my installation template, this is what the complete script, including logging and error handling, looks like.
| Handling passwords
The complete PowerShell script below assumes that the user executing the script has all necessary permissions (see the Citrix article Database Access and Permission Model for XenDesktop). If this is not the case, you will have to make the following modifications:
The security credentials have to be presented in the form of a PSCredential object. Please the article Encrypting passwords in a PowerShell script for more information on how to create such an object. No credentials are needed for the New-XDSite cmdlet since the cmdlet New-XDDatabase already adds the local server to the security permissions of the SQL database. |
Please make sure to customize the variables from line 124 to line 138 to your requirements!
|
1 2 3 4 5 6 7 8 9 10 11 12 13 14 15 16 17 18 19 20 21 22 23 24 25 26 27 28 29 30 31 32 33 34 35 36 37 38 39 40 41 42 43 44 45 46 47 48 49 50 51 52 53 54 55 56 57 58 59 60 61 62 63 64 65 66 67 68 69 70 71 72 73 74 75 76 77 78 79 80 81 82 83 84 85 86 87 88 89 90 91 92 93 94 95 96 97 98 99 100 101 102 103 104 105 106 107 108 109 110 111 112 113 114 115 116 117 118 119 120 121 122 123 124 125 126 127 128 129 130 131 132 133 134 135 136 137 138 139 140 141 142 143 144 145 146 147 148 149 150 151 152 153 154 155 156 157 158 159 160 161 162 163 164 165 166 167 168 169 170 171 172 173 174 175 176 177 178 179 180 181 182 183 184 185 186 187 188 189 190 191 192 193 194 195 196 197 198 199 200 201 202 203 204 205 206 207 208 209 210 211 212 213 214 215 216 217 218 219 220 221 222 223 224 225 226 227 228 229 230 231 232 233 234 235 236 237 238 239 240 241 242 243 244 245 246 247 248 249 250 251 252 253 254 255 256 257 258 259 260 261 262 263 264 265 266 267 268 269 270 271 272 273 274 275 276 277 278 279 280 281 282 283 284 285 286 287 288 289 290 291 292 293 294 295 296 297 298 299 300 301 302 303 304 305 306 307 308 309 310 311 312 313 314 315 316 317 318 319 320 321 322 323 324 325 326 327 328 329 330 331 332 333 334 335 336 337 338 339 340 341 342 343 344 345 346 347 348 349 350 351 352 353 354 355 356 357 358 359 360 361 362 363 364 365 366 367 368 369 370 371 372 373 374 375 376 377 378 379 380 381 382 383 384 385 386 387 388 389 390 391 392 393 394 395 396 397 398 399 400 401 402 403 404 405 406 407 408 409 410 411 412 413 414 415 416 417 418 419 420 421 422 423 424 425 426 427 428 429 430 431 432 433 434 435 436 437 438 439 440 441 442 443 444 445 446 447 448 449 450 451 452 453 454 455 456 457 458 459 460 461 462 463 464 465 466 467 468 469 470 471 472 473 474 475 476 477 478 479 480 481 482 483 484 485 |
#========================================================================== # # Configure the Citrix XenDeskop Site # # AUTHOR: Dennis Span (https://dennisspan.com) # DATE : 05.04.2017 # # COMMENT: # This script has been prepared for Windows Server 2008 R2, 2012 R2 and 2016 # and Citrix XenDesktop 7.13 to 7.16 # # This script creates the XenDesktop site and all its databases. It configures the site # and it adds the first Delivery Controller to the site. # # Changes: # # 23.05.2017: added join site routine. Improved create/join farm routine (read information directly # from the SQL site database). Updated function DS_WriteLog. # #========================================================================== # Get the script parameters if there are any param ( # The only parameter which is really required is 'Uninstall' # If no parameters are present or if the parameter is not # 'uninstall', an installation process is triggered [string]$Installationtype ) # define Error handling # note: do not change these values $global:ErrorActionPreference = "Stop" if($verbose){ $global:VerbosePreference = "Continue" } # FUNCTION DS_WriteLog #========================================================================== Function DS_WriteLog { <# .SYNOPSIS Write text to this script's log file .DESCRIPTION Write text to this script's log file .PARAMETER InformationType This parameter contains the information type prefix. Possible prefixes and information types are: I = Information S = Success W = Warning E = Error - = No status .PARAMETER Text This parameter contains the text (the line) you want to write to the log file. If text in the parameter is omitted, an empty line is written. .PARAMETER LogFile This parameter contains the full path, the file name and file extension to the log file (e.g. C:\Logs\MyApps\MylogFile.log) .EXAMPLE DS_WriteLog -InformationType "I" -Text "Copy files to C:\Temp" -LogFile "C:\Logs\MylogFile.log" Writes a line containing information to the log file .Example DS_WriteLog -InformationType "E" -Text "An error occurred trying to copy files to C:\Temp (error: $($Error[0]))" -LogFile "C:\Logs\MylogFile.log" Writes a line containing error information to the log file .Example DS_WriteLog -InformationType "-" -Text "" -LogFile "C:\Logs\MylogFile.log" Writes an empty line to the log file #> [CmdletBinding()] Param( [Parameter(Mandatory=$true, Position = 0)][String]$InformationType, [Parameter(Mandatory=$true, Position = 1)][AllowEmptyString()][String]$Text, [Parameter(Mandatory=$true, Position = 2)][AllowEmptyString()][String]$LogFile ) $DateTime = (Get-Date -format dd-MM-yyyy) + " " + (Get-Date -format HH:mm:ss) if ( $Text -eq "" ) { Add-Content $LogFile -value ("") # Write an empty line } Else { Add-Content $LogFile -value ($DateTime + " " + $InformationType + " - " + $Text) } } #========================================================================== ################ # Main section # ################ # Disable File Security $env:SEE_MASK_NOZONECHECKS = 1 # Custom variables [edit] $BaseLogDir = "C:\Logs" # [edit] add the location of your log directory here $PackageName = "Citrix XenDesktop Site (configure)" # [edit] enter the display name of the software (e.g. 'Arcobat Reader' or 'Microsoft Office') # Global variables $ComputerName = $env:ComputerName $StartDir = $PSScriptRoot # the directory path of the script currently being executed if (!($Installationtype -eq "Uninstall")) { $Installationtype = "Install" } $LogDir = (Join-Path $BaseLogDir $PackageName).Replace(" ","_") $LogFileName = "$($Installationtype)_$($PackageName).log" $LogFile = Join-path $LogDir $LogFileName # Create the log directory if it does not exist if (!(Test-Path $LogDir)) { New-Item -Path $LogDir -ItemType directory | Out-Null } # Create new log file (overwrite existing one) New-Item $LogFile -ItemType "file" -force | Out-Null DS_WriteLog "I" "START SCRIPT - $PackageName" $LogFile DS_WriteLog "-" "" $LogFile ################################################# # INSTALL CITRIX DELIVERY CONTROLLER # ################################################# DS_WriteLog "I" "Create and configure the XenDesktop site" $LogFile DS_WriteLog "-" "" $LogFile # Define the variables needed in this script: DS_WriteLog "I" "Define the variables needed in this script:" $LogFile # ----------------------------------- # CUSTOMIZE THE FOLLOWING VARIABLES TO YOUR REQUIREMENTS # ----------------------------------- $SiteName = "MySite" # The name of your XenDesktop site. For example: "MySite". $DatabaseServer = "MySQLServer" # The name of your SQL server or SQL server instance (e.g. "SQLServer1.mycompany.com" or "SQLCTX01.mycompany.com\InStance1"). $DatabaseServerPort = "1433" # The SQL port number (1433 by default) $DatabaseName_Site = "CTX_Site_DB" # The name for the site database. For example: "CTX_Site_DB". $DatabaseName_Logging = "CTX_Logging_DB" # The name for the logging database. For example: "CTX_Logging_DB". $DatabaseName_Monitoring = "CTX_Monitoring_DB" # The name for the monitoring database. For example: "CTX_Monitoring_DB". $LicenseServer = "MyLicenseServer" # The name of your license server, for example: mylicserver.mycompany.com. $LicenseServerPort = 27000 # The port number for the initial contact, for example 27000 (this is the default value) $LicensingModel = "UserDevice" # The licensing model. Possible values are UserDevice and Concurrent. $ProductCode = "XDT" # The product code. Possible values are XDT (for XenDesktop) or MPS (for the XenDesktop 7.x App Edition). $ProductEdition = "PLT" # The product edition. Possible values are STD (Standard), ENT (Enterprise) or PLT (Platinum). $AdminGroup = "MyDomain\MyAdminGroup" # The name of the Active Directory user or group, for example "MyDomain\CTXAdmins". $Role ="Full Administrator" # The role to assign to the new XenDesktop administrator. The following built-in roles are available: $Scope = "All" # The scope (the objects) to which the permissions (defined in the role) apply $GroomingDays = 365 # The number of days you want to monitoring data to be saved in the database, for example 365 days. # ----------------------------------- # Log Variables DS_WriteLog "I" "-Site name = $SiteName" $LogFile DS_WriteLog "I" "-Database server (+ instance) = $DatabaseServer" $LogFile DS_WriteLog "I" "-Database server port = $DatabaseServerPort" $LogFile DS_WriteLog "I" "-Database name for site DB = $DatabaseName_Site" $LogFile DS_WriteLog "I" "-Database name for logging DB = $DatabaseName_Logging" $LogFile DS_WriteLog "I" "-Database name for monitoring DB = $DatabaseName_Monitoring" $LogFile DS_WriteLog "I" "-License server = $DatabaseServer" $LogFile DS_WriteLog "I" "-License server port = $LicenseServerPort" $LogFile DS_WriteLog "I" "-Licensing model = $LicensingModel" $LogFile DS_WriteLog "I" "-Product code = $ProductCode" $LogFile DS_WriteLog "I" "-Product edition = $ProductEdition" $LogFile DS_WriteLog "I" "-Administrator group name = $AdminGroup" $LogFile DS_WriteLog "I" "-Administrator group role = $Role" $LogFile DS_WriteLog "I" "-Administrator group scope = $Scope" $LogFile DS_WriteLog "I" "-Grooming days = $GroomingDays" $LogFile DS_WriteLog "-" "" $LogFile # IMPORT MODULES AND SNAPINS # -------------------------- # Import the XenDesktop Admin module DS_WriteLog "I" "Import the XenDesktop Admin module" $LogFile try { Import-Module Citrix.XenDesktop.Admin DS_WriteLog "S" "The XenDesktop Admin module was imported successfully" $LogFile } catch { DS_WriteLog "E" "An error occurred trying to import the XenDesktop Admin module (error: $($Error[0]))" $LogFile Exit 1 } DS_WriteLog "-" "" $LogFile # Load the Citrix snap-ins DS_WriteLog "I" "Load the Citrix snap-ins" $LogFile try { asnp citrix.* DS_WriteLog "S" "The Citrix snap-ins were loaded successfully" $LogFile } catch { DS_WriteLog "E" "An error occurred trying to load the Citrix snap-ins (error: $($Error[0]))" $LogFile Exit 1 } DS_WriteLog "-" "" $LogFile # CREATE DATABASES # ---------------- # Create the site database (the classical try / catch statement does not work for some reason, so I had to use an "uglier" method for error handling) DS_WriteLog "I" "Create the site database" $LogFile try { New-XDDatabase -AdminAddress $ComputerName -SiteName $SiteName -DataStore Site -DatabaseServer $DatabaseServer -DatabaseName $DatabaseName_Site -ErrorAction Stop | Out-Null DS_WriteLog "S" "The site database '$DatabaseName_Site' was created successfully" $LogFile } catch { [string]$ErrorText = $Error[0] If ( $ErrorText.Contains("already exists")) { DS_WriteLog "I" "The site database '$DatabaseName_Site' already exists. Nothing to do." $LogFile } else { DS_WriteLog "E" "An error occurred trying to create the site database '$DatabaseName_Site' (error: $($Error[0]))" $LogFile Exit 1 } } DS_WriteLog "-" "" $LogFile # Create the logging database DS_WriteLog "I" "Create the logging database" $LogFile try { New-XDDatabase -AdminAddress $ComputerName -SiteName $SiteName -DataStore Logging -DatabaseServer $DatabaseServer -DatabaseName $DatabaseName_Logging -ErrorAction Stop | Out-Null DS_WriteLog "S" "The logging database '$DatabaseName_Logging' was created successfully" $LogFile } catch { [string]$ErrorText = $Error[0] If ( $ErrorText.Contains("already exists")) { DS_WriteLog "I" "The logging database '$DatabaseName_Logging' already exists. Nothing to do." $LogFile } else { DS_WriteLog "E" "An error occurred trying to create the logging database '$DatabaseName_Logging' (error: $($Error[0]))" $LogFile Exit 1 } } DS_WriteLog "-" "" $LogFile # Create the monitoring database DS_WriteLog "I" "Create the monitoring database" $LogFile try { New-XDDatabase -AdminAddress $ComputerName -SiteName $SiteName -DataStore Monitor -DatabaseServer $DatabaseServer -DatabaseName $DatabaseName_Monitoring -ErrorAction Stop | Out-Null DS_WriteLog "S" "The monitoring database '$DatabaseName_Monitoring' was created successfully" $LogFile } catch { [string]$ErrorText = $Error[0] If ( $ErrorText.Contains("already exists")) { DS_WriteLog "I" "The monitoring database '$DatabaseName_Monitoring' already exists. Nothing to do." $LogFile } else { DS_WriteLog "E" "An error occurred trying to create the monitoring database '$DatabaseName_Monitoring' (error: $($Error[0]))" $LogFile Exit 1 } } DS_WriteLog "-" "" $LogFile # CREATE OR JOIN XENDESKTOP SITE # ------------------------------ # Check if the XenDesktop site is configured and retrieve the site version number DS_WriteLog "I" "Check if the XenDesktop site is configured and retrieve the site version number" $LogFile $SiteExists = $False try { $SQL_ConnectionString = "Server=$DatabaseServer,$DatabaseServerPort;Database=$DatabaseName_Site;Integrated Security=True;" $SQL_Connection = New-Object System.Data.SqlClient.SqlConnection $SQL_Connection.ConnectionString = $SQL_ConnectionString $SQL_Connection.Open() $SQL_Command = $SQL_Connection.CreateCommand() $SQL_Query = "SELECT [ProductVersion] FROM [ConfigurationSchema].[Site]" $SQL_Command.CommandText = $SQL_Query $SQL_QUERY_ProductVersion = new-object "System.Data.DataTable" $SQL_QUERY_ProductVersion.Load( $SQL_Command.ExecuteReader() ) foreach ($Element in $SQL_QUERY_ProductVersion) { $SiteVersion = [string]$Element.Productversion } # If the variable '$SiteVersion' is empty, the site has not yet been created if ( [string]::IsNullOrEmpty($SiteVersion)) { DS_WriteLog "I" "The site database '$DatabaseName_Site' exists, but the site still needs to be created." $LogFile } else { DS_WriteLog "I" "The site has already been created. The version of the site is: $SiteVersion" $LogFile $SiteExists = $True } $SQL_Connection.Close() } catch { DS_WriteLog "E" "An error occurred trying to retrieve the site and site version (error: $($Error[0]))" $LogFile Exit 1 } DS_WriteLog "-" "" $LogFile # Create a new site, or if the site exists, compare the site version to the version of the XenDesktop product software installed on the local server and join the local server to the site if ( $SiteExists ) { DS_WriteLog "I" "Compare the site version to the version of the XenDesktop product software installed on the local server and join the local server to the site" $LogFile # Get the version of the XenDesktop product software installed on the local server try { [string]$XenDesktopSoftwareVersion = (gwmi win32_product | Where-Object { $_.Name -like "*Citrix Broker Service*" }).Version } catch { DS_WriteLog "E" "An error occurred trying to retrieve the version of the locally installed XenDesktop software (error: $($Error[0]))" $LogFile } # JOIN SITE # --------- if ( $SiteVersion -eq $XenDesktopSoftwareVersion.Substring(0,$SiteVersion.Length) ) { DS_WriteLog "I" "The site version ($SiteVersion) is equal to the XenDesktop product software installed on the local server ($XenDesktopSoftwareVersion)" $LogFile DS_WriteLog "I" "Check if the local server already has been joined to the site" $LogFile # Check if the local server already has been joined $SQL_ConnectionString = "Server=$DatabaseServer,$DatabaseServerPort;Database=$DatabaseName_Site;Integrated Security=True;" $SQL_Connection = New-Object System.Data.SqlClient.SqlConnection $SQL_Connection.ConnectionString = $SQL_ConnectionString $SQL_Connection.Open() $SQL_Command = $SQL_Connection.CreateCommand() $SQL_Query = "SELECT [MachineName] FROM [ConfigurationSchema].[Services]" $SQL_Command.CommandText = $SQL_Query $SQL_QUERY_Controllers = new-object "System.Data.DataTable" $SQL_QUERY_Controllers.Load( $SQL_Command.ExecuteReader() ) $ServerAlreadyJoined = $False $x = 0 foreach ($Element in $SQL_QUERY_Controllers) { $x++ if ( $Element.MachineName -eq $ComputerName ) { $ServerAlreadyJoined = $True } } $SQL_Connection.Close() # Join the local server to the site (if needed) if ( $ServerAlreadyJoined ) { DS_WriteLog "I" "The local machine $Computername has already been joined to the site '$SiteName'. Nothing to do." $LogFile } else { DS_WriteLog "I" "The local machine $Computername is not joined to the site '$SiteName'" $LogFile # Use one of the available controllers for the parameter 'SiteControllerAddress' $y = 0 foreach ($Element in $SQL_QUERY_Controllers) { $y++ $Controller = ($Element.MachineName).ToUpper() DS_WriteLog "I" "Join site using controller $Controller ($y of $x)" $LogFile try { Add-XDController -SiteControllerAddress $Controller | Out-Null DS_WriteLog "S" "The local server was successfully joined to the site '$SiteName'" $LogFile Break } catch { DS_WriteLog "E" "An error occurred trying to join using controller $Controller (error: $($Error[0]))" $LogFile } } } } else { DS_WriteLog "E" "The site version ($SiteVersion) and the version of the locally installed XenDesktop product software ($XenDesktopSoftwareVersion) are not equal!" $LogFile Exit 1 } } else { # CREATE SITE # ----------- DS_WriteLog "I" "Create the XenDesktop site '$SiteName'" $LogFile try { New-XDSite -DatabaseServer $DatabaseServer -LoggingDatabaseName $DatabaseName_Logging -MonitorDatabaseName $DatabaseName_Monitoring -SiteDatabaseName $DatabaseName_Site -SiteName $SiteName -AdminAddress $ComputerName -ErrorAction Stop | Out-Null DS_WriteLog "S" "The site '$SiteName' was created successfully" $LogFile } catch { DS_WriteLog "E" "An error occurred trying to create the site '$SiteName' (error: $($Error[0]))" $LogFile Exit 1 } DS_WriteLog "-" "" $LogFile # LICENSE SERVER CONFIG # --------------------- # Configure license server DS_WriteLog "I" "Configure licensing" $LogFile DS_WriteLog "I" "Set the license server" $LogFile try { Set-XDLicensing -AdminAddress $ComputerName -LicenseServerAddress $LicenseServer -LicenseServerPort $LicenseServerPort -Force | Out-Null DS_WriteLog "S" "The license server '$LicenseServer' was configured successfully" $LogFile } catch { DS_WriteLog "E" "An error occurred trying to configure the license server '$LicenseServer' (error: $($Error[0]))" $LogFile Exit 1 } DS_WriteLog "-" "" $LogFile # Configure the licensing model, product and edition DS_WriteLog "I" "Configure the licensing model, product and edition" $LogFile try { Set-ConfigSite -AdminAddress $ComputerName -LicensingModel $LicensingModel -ProductCode $ProductCode -ProductEdition $ProductEdition | Out-Null DS_WriteLog "I" "The licensing model, product and edition have been configured correctly" $LogFile } catch { DS_WriteLog "E" "An error occurred trying to configure the licensing model, product and edition (error: $($Error[0]))" $LogFile Exit 1 } DS_WriteLog "-" "" $LogFile # Register the certificate hash DS_WriteLog "I" "Register the certificate hash" $LogFile try { Set-ConfigSiteMetadata -AdminAddress $ComputerName -Name 'CertificateHash' -Value $(Get-LicCertificate -AdminAddress "https://$($LicenseServer):8083").CertHash | Out-Null DS_WriteLog "I" "The certificate hash from server '$LicenseServer' has been confirmed successfully" $LogFile } catch { DS_WriteLog "E" "An error occurred trying to confirm the certificate hash from server '$LicenseServer' (error: $($Error[0]))" $LogFile Exit 1 } DS_WriteLog "-" "" $LogFile # CREATE ADMINISTRATORS # --------------------- # Create a full admin group "CTXAdmins" DS_WriteLog "I" "Create the Citrix administrator $AdminGroup" $LogFile try { Get-AdminAdministrator $AdminGroup | Out-Null DS_WriteLog "I" "The Citrix administrator $AdminGroup already exists. Nothing to do." $LogFile } catch { try { New-AdminAdministrator -AdminAddress $ComputerName -Name $AdminGroup | Out-Null DS_WriteLog "S" "The Citrix administrator $AdminGroup has been created successfully" $LogFile } catch { DS_WriteLog "E" "An error occurred trying to create the Citrix administrator $AdminGroup (error: $($Error[0]))" $LogFile Exit 1 } } # Assign full admin rights to the admin group "CTXAdmins" DS_WriteLog "I" "Assign full admin rights to the Citrix administrator $AdminGroup" $LogFile try { Add-AdminRight -AdminAddress $ComputerName -Administrator $AdminGroup -Role 'Full Administrator' -Scope "All" | Out-Null DS_WriteLog "S" "Successfully assigned full admin rights to the Citrix administrator $AdminGroup" $LogFile } catch { DS_WriteLog "E" "An error occurred trying to assign full admin rights to the Citrix administrator $AdminGroup (error: $($Error[0]))" $LogFile Exit 1 } DS_WriteLog "-" "" $LogFile # ADDITIONAL SITE CONFIGURATIONS # ------------------------------ # Configure grooming settings DS_WriteLog "I" "Configure grooming settings" $LogFile try { Set-MonitorConfiguration -GroomApplicationInstanceRetentionDays $GroomingDays -GroomDeletedRetentionDays $GroomingDays -GroomFailuresRetentionDays $GroomingDays -GroomLoadIndexesRetentionDays $GroomingDays -GroomMachineHotfixLogRetentionDays $GroomingDays -GroomNotificationLogRetentionDays $GroomingDays -GroomResourceUsageDayDataRetentionDays $GroomingDays -GroomSessionsRetentionDays $GroomingDays -GroomSummariesRetentionDays $GroomingDays | Out-Null DS_WriteLog "S" "Successfully changed the grooming settings to $GroomingDays days" $LogFile } catch { DS_WriteLog "E" "An error occurred trying to change the grooming settings to $GroomingDays days (error: $($Error[0]))" $LogFile Exit 1 } DS_WriteLog "-" "" $LogFile # Enable the Delivery Controller to trust XML requests sent from StoreFront (https://docs.citrix.com/en-us/receiver/windows/4-7/secure-connections/receiver-windows-configure-passthrough.html) DS_WriteLog "I" "Enable the Delivery Controller to trust XML requests sent from StoreFront" $LogFile try { Set-BrokerSite -TrustRequestsSentToTheXmlServicePort $true | Out-Null DS_WriteLog "S" "Successfully enabled trusted XML requests" $LogFile } catch { DS_WriteLog "E" "An error occurred trying to enable trusted XML requests (error: $($Error[0]))" $LogFile Exit 1 } DS_WriteLog "-" "" $LogFile # Disable connection leasing (enabled by default in a new site) DS_WriteLog "I" "Disable connection leasing" $LogFile try { Set-BrokerSite -ConnectionLeasingEnabled $false | Out-Null DS_WriteLog "S" "Connection leasing was disabled successfully" $LogFile } catch { DS_WriteLog "E" "An error occurred trying to disable connection leasing (error: $($Error[0]))" $LogFile Exit 1 } DS_WriteLog "-" "" $LogFile # Enable Local Host Cache (disabled by default in a new site) DS_WriteLog "I" "Enable Local Host Cache" $LogFile try { Set-BrokerSite -LocalHostCacheEnabled $true | Out-Null DS_WriteLog "S" "Local Host Cache was enabled successfully" $LogFile } catch { DS_WriteLog "E" "An error occurred trying to enable Local Host Cache (error: $($Error[0]))" $LogFile Exit 1 } DS_WriteLog "-" "" $LogFile # Disable the Customer Experience Improvement Program (CEIP) DS_WriteLog "I" "Disable the Customer Experience Improvement Program (CEIP)" $LogFile try { Set-AnalyticsSite -Enabled $false | Out-Null DS_WriteLog "S" "The Customer Experience Improvement Program (CEIP) was disabled successfully" $LogFile } catch { DS_WriteLog "E" "An error occurred trying to disable the Customer Experience Improvement Program (CEIP) (error: $($Error[0]))" $LogFile Exit 1 } } # Enable File Security Remove-Item env:\SEE_MASK_NOZONECHECKS DS_WriteLog "-" "" $LogFile DS_WriteLog "I" "End of script" $LogFile |
| Note: in some cases, the database connection (lines 249 to 252) may end in an error (“cannot open database”). This can happen if you use the standard SQL port 1433. In this case, please remove the variable $DatabaseServerPort (including the preceding comma) from line 249. The credit (and my thanks) for finding this error goes to Thorsten Enderlein (@endi24). |
Execute the script as follows:
powershell.exe -file C:\Temp\Citrix\DeliveryController\Configure_CitrixXenDesktopSite.ps1
In case you get a security warning, execute the script as follows:
powershell.exe -executionpolicy bypass -file C:\Temp\Citrix\DeliveryController\Configure_CitrixXenDesktopSite.ps1
Log files are created in the directory C:\Logs\Citrix_XenDesktop_Site_(configure), but you can change this to any directory you want (see lines 90 and 91).
If you want to go one step further and create an SCCM package as well, please follow the step-by-step explanation in the article Deep dive creating SCCM packages for Citrix.
This article covers most initial settings. Of course, you can automate many more things, such as creating machine catalogs or delivery groups. Some recommended settings for a XenDesktop site, for example enabling Read-Committed Snapshot on the XenDesktop databases in large environments, is not covered in this article.
I strongly recommend reading Carl Stalhood’s very detailed installation procedure for XenDesktop 7.16: https://www.carlstalhood.com/delivery-controller-7-16-and-licensing/.
If you want to go one step further and create an SCCM package, please follow the step-by-step explanation in the article Deep dive creating SCCM packages for Citrix.
You can customize the scripts in this article in any way you see fit. If you have any questions or recommendations please leave a comment below. Happy scripting!
Dennis Span works as a Lead Account Technology Strategist at Cloud Software Group in Vienna, Austria. He holds multiple Citrix certifications (CCE-V). Dennis has been a Citrix Technology Advocate (CTA) since 2017 (+ one year as Citrix Technology Professional, CTP). Besides his interest in virtualization technologies and blogging, he loves spending time with his family as well as snowboarding, playing basketball and rowing. He is fluent in Dutch, English, German and Slovak and speaks some Spanish.

Pingback: Detailed Change Log – Carl Stalhood
Pingback: Delivery Controller 7.13 and Licensing – Carl Stalhood
Pingback: EUC Weekly Digest – April 8, 2017 – Carl Stalhood
Hi Dennis,
I’m new to powershell scripting. These look great and will go thru them.
Question, do have further ones like script for the other components, Studio, Storefront and XenApp Servers as opposed to XenDesktop? Any insight greatly appreciated.
Hi Jeff,
First of all thanks for using my scripts! I am currently working on a number of articles concerning the installation and configuration of all major Citrix products. Please see my site map for everything that I have written so far: https://dennisspan.com/sitemap
At the moment I am working on Citrix Provisioning Server. I hope to have it finished by the end of the week. Components for which I still need (and want) to write are StoreFront, Director and XenServer. These will follow in the upcoming weeks.
Perhaps I may also point you to the following article: https://dennisspan.com/scripting-the-complete-list-of-citrix-components-with-powershell/. This one includes all (smaller) Citrix components and plugins and can be quite useful.
If you want to stay informed on any new stuff I write you can follow me on Twitter (@dennisspan) or LinkedIn.
Bye,
Dennis
Pingback: Delivery Controller 7.14 and Licensing – Carl Stalhood
Hi Dennis,
I’m always getting this message in the logfile:
23-06-2017 10:06:18 I – Check if the XenDesktop site is configured and retrieve the site version number
23-06-2017 10:06:33 E – An error occurred trying to retrieve the site and site version (error: Exception calling “Open” with “0” argument(s): “A network-related or instance-specific error occurred while establishing a connection to SQL Server. The server was not found or was not accessible. Verify that the instance name is correct and that SQL Server is configured to allow remote connections. (provider: TCP Provider, error: 0 – The remote computer refused the network connection.)”)
Do you have an idea what could be wrong?
Thanks
Regards Walter
Hi Walter,
First of all, thanks for using my scripts! 🙂
According to the error, the SQL server was not found. Did you specify the server name (+ instance) correctly in the variable ‘$DatabaseServer’ in line 124? If you do not use instance names, the server name is something like “MySQLServer.mydomain.com”. If you use instances, you have to add this instance to the server name like this: “MySQLServer.mydomain.com\\MyInStanceName”. Also, in line 125 you have to specify the port (variable $DatabaseServerPort) . Did you enter the correct one? By default SQL uses port 1433, but you may use a different port in your environment. You can use the telnet command to check if your SQL server is reachable, e.g.: telnet MySQLServer.mydomain.com 1433. Another issue may be the local or remote firewall. Again, use the telnet command to see if you can reach your SQL server. And yet another issue may be that the service “SQL Server” on your SQL server is not running. Please check this as well.
Kind regards,
Dennis
Hi Dennis,
thanks for the quick answer. SQL Server was not listening on 1433 Port. Need to change TCP dynamic Port to specific port (in SQL Server Configuration Manager) and reboot SQL Service. Now it works 😉
Thank you
Regards Walter
Hi Walter,
Great! I am happy it works now.
Bye,
Dennis
Pingback: Delivery Controller 7.15 LTSR and Licensing – Carl Stalhood
Pingback: Scripting the complete list of Citrix components with PowerShell - Dennis Span
Pingback: Delivery Controller 7.17 and Licensing – Carl Stalhood
Pingback: Delivery Controller 7.16 and Licensing – Carl Stalhood
Dennis,
Thanks for taking the time to write these scripts. Can this script be used for Citrix XenApp, and if so what needs to change other than product code?
Hi Tom,
You’re welcome and thanks for using my scripts. And yes, you can use these scripts also for XenApp (assuming we are talking about XenApp 7.x :-). In case you run into any issues please feel free to contact me.
Hi Dennis
Did you ever get round the issue of having to reboot?
I try with out a reboot before i import the citrix snappin and get the following:
Attempting to perform the Start operation on the ‘CitrixGroupPolicy’ provider failed. Retrieving the COM class factory for component with CLSID {54C5637D-BAC7-4C38-A2FA-E
314971F6090} failed due to the following error: 8007007e The specified module could not be found. (Exception from HRESULT: 0x8007007E).
Hi Martin,
Yeah, that is exactly the issue at hand. Without rebooting the machine first, the module is not yet registered apparently and therefore cannot be found. Is is a problem in your environment to reboot the server after installing the delivery controller?
Hi Dennis,
Thanks for the reply, there is no issue with doing a reboot, im just a bit confused as to why we need one, and would like to try and work around it 🙂
I haven’t seen any other hit on my searches for this issue, and bizarrely the other snap-ins do seem to load, even with this error , i will keep looking 🙂
Thanks again.
Hi Martin,
Just some thoughts from my side. Make sure to check the Run/RunOnce keys in the registry. Perhaps something specific is triggered at boot time. Or restart some of the Citrix services. Perhaps this does the trick.
Hi Dennis
Thanks again, but just a slight update, i have noticed this troublesome SnapIn is version 1.0 and the rest that work are 2.0, as below:
Name : Citrix.Broker.Admin.V2
PSVersion : 2.0
Description : This PowerShell snap-in contains cmdlets used to manage the Citrix Broker.
Name : Citrix.Common.GroupPolicy
PSVersion : 1.0
Description : Citrix Group Policy Provider
I am now just calling the SnappIns i need for DB creation and Site config for now, and i dont require re-boot, i will get back to you if i find a better way 🙂
Ta
Nice Martin! That is an interesting solution. Thanks for sharing!
Pingback: Delivery Controller 7.18 and Licensing – Carl Stalhood
Hi Dennis,
Amazing stuff. Your site is impressive and your work is appreciated.
I am looking to use your delivery controller configuration script with SQL AlwaysOn availability groups. Wondering if this is possible or if it would require a bunch of rewriting. Are you familiar with how that is setup?
Thanks again!
Brett Molitor
Hi Brett,
Thanks a lot for your kind feedback. I appreciate it.
I am not an expert on SQL Server, and I do not use AlwaysOn Availability groups myself, but assuming you can create the AlwaysOn Availability groups after you have created the three XenDesktop databases you can use the scripts. One thing I know for sure, even when you install XenDesktop manually, the setup routine does not allow you to configure AlwaysOn Availability groups. The creation of the individual databases is not directly related to the Availability group.
Thanks Dennis. I am no SQL expert either. I am walking through a design based off of:
https://patrickvandenborn.blogspot.com/2018/03/how-to-configure-citrix.html
Check out the screencap on the 7.16 install in the post – https://1.bp.blogspot.com/-kICsKLnHfh4/Wp_didYvTOI/AAAAAAAACgY/DcJxWyvCV9MQdfhjpgBGEo_ArNXVg4-0QCEwYBhgL/s640/image028.png
This tells me there must be some parameters for the AlwaysOn groups. In Patrick’s example, you create the databases manually and then add them as a replica to the second server.
To your point, I suppose one could create the databases using the scripts and then create the BAGs. You would then have to run the script to configure Citrix controller for AlwaysOn – https://support.citrix.com/article/CTX216504
I think that would do it. I will give that a whirl. Thanks for your response!
Hi Brett,
In all articles I find on the subject of AlwaysOn Availability groups, the empty XenDesktop databases are created first. I never tested it, but I assume that the PowerShell command “New-XDDatabase” can also deal with existing, but empty databases. So I suggest to follow the article by fellow CTA Patrick (he really knows his stuff!) concerning the preparation of SQL, creating the empty databases first, then the Availability groups and then the XenDesktop configuration. The screenshot you are referring to concerns the location, which in the case of Availability groups means the listener (and not just the SQL server + SQL instance). When you use my script, the listener should be added to the parameter “$DatabaseServer” (for more information see my article). I never tested this though; the value I add to this parameter is always the SQL server (+ instance) and never the listener (since I do not use AlwaysOn or even Basic Availability groups).
Also, make sure to read the VERY detailed article on this topic by Citrix CTP Fellow Carl Webster: https://blog.citrix24.com/xendesktop-7-7-configure-sql-database-alwayson-availability-group/
Keep me posted of your results!
There is an issue with using that order of operations – by specifying SERVER + SQL Instance, there are actually three different values because each BAG uses it’s own listener. I think I am going to try the method i mentioned to see if that produces the correct results. I will update with my findings. Thanks!
Hi Brett, yes, that is true. You need to change my code a little bit because of these three different values.
Hi Dennis,
Thank you so much for sharing your advanced scripts. I am a novice when it comes to powershell so very much a beginner. I am trying to use your SIte creation script for my lab setup and can’t seem to make it run. It seems to be erroring out when creating the site DB – An error occurred trying to create the site database ‘CTX715_Site.DB’ (error: There was a problem communicating with the server.)
The SQL server is listening on 1433, I have tested it using telnet. Will be grateful if you are able to shed any light.
Thanks,
Mark
Hi Mark,
First of all, you’re welcome. Secondly, looking at the error it seems to me that you may not have entered the parameters correctly. The name of the site database ”CTX715_Site.DB’ seems a bit strange (due to the dot). Please make sure that you filled out all the parameters correctly. You can always send me a copy of your script (not including any passwords please) so I may check it. Just send it to dennis@dennisspan.com. Oh yeah, and also make sure that there is no firewall blocking the connection from the delivery controller to the SQL server.
Good luck!
Hi Dennis,
Thank you for your quick reply. The DB name was an error on my part when typing into the post. I managed to move forward a little and I can now create the DB’s on the SQL server but it fails to create the Site. I will send you the script with the changes I have added pertaining to the credentials. I would prefer not needing to use any user ID/Passwords. So this is what I have done.
1. Created a Domain user called LAB\Service.CTXSQL and added this account to the SQL server and give it SysAdmin and DBCreator roles.
I am a bit confused as to how I should be running the script using a MDT Task sequence considering it runs as Local Administrator. I take it I need to run the script using the LAB\Service.CTXSQL account? Does it need to also load the user’s profile?
Thanks!
Make sure account running the script has permission on the SQL instance as well.
Pingback: Delivery Controller 1808 and Licensing – Carl Stalhood
Pingback: Delivery Controller 1811 and Licensing – Carl Stalhood
Hi Dennis,
Thanks for your work! Can I ask what your experience is with upgrading existing components via powershell? E.g. can i just run something like with quiet only, or should I still include all applicable flags? I’m just trying to make my upgrades more efficient. Thanks!
XenDesktopServerSetup.exe /components controller,desktopstudio /quiet
Hi Eric,
You’re welcome. When upgrading existing components include the parameters as well.
Do you have any of this in a public git repository?
Hi Paul, no sorry. I publish everything directly on my blog.
Pingback: Delivery Controller 1903 and Licensing – Carl Stalhood
Pingback: Delivery Controller 1912 LTSR and Licensing – Carl Stalhood
Pingback: Delivery Controller 1912 LTSR CU1 and Licensing – Carl Stalhood
Hi Dennis,
Do you know the PowerShell command to add a StoreFront server to the Citrix site once is created.
Thanks for the help