
This article shows you how to script the Citrix Application Probe Agent unattended installation and configuration using PowerShell.
Table of Contents |
Introduction
The contents of this article applies to:
- Citrix Application Probe Agent version 1.0.0.0 (released with XenDesktop 7.18 in Q2 2018)
- Microsoft Windows 10 1709 and higher
As per Citrix: “Application probing automates the process of checking the health of XenApp and XenDesktop applications that are published in a Site. The results of application probing are available in Director.”
I strongly urge you to read the following articles if you are new to application probing:
- Director – StoreFront Probes – by Citrix CTP Carl Stalhood
- Application probing – Citrix Docs
An overview of the Citrix Application Probe Agent
Before going into the details of the actual installation and configuration, let us first take a closer look at some of the characteristics of the Citrix Application Probe Agent:
- Target device:
Install this component on the local client. This software is NOT intended for virtual servers and desktops with the Citrix VDA installed. - Installation file name:
CitrixAppProbeAgent.msi - Version:
1.0.0.0 - Installation parameters:
Standard MSI parameters only (e.g. /qn for silent installations or /l*v C.\logfile.log to generate a log file). - Uninstallation parameters:
The software can be uninstalled using the normal MSI uninstall parameters: MsiExec.exe /X{86CFA6FB-AE23-44EB-BA85-BFF09A72F1B6}. - Default installation directory:
C:\Program Files (x86)\Citrix\Citrix Probe Agent - Shortcuts:
Yes, the shortcut Citrix Probe Agent is created on the public desktop. - Log file:
Default MSI log file, if specified on the command line (/l*v %LogFile%). The installation does not create a log file by default. - Installation dependencies:
Citrix Receiver (minimum version 4.8). - Other dependencies:
No - Reboot required:
No - Service:
Citrix Probe Agent Service (the service name is: ProbeAgent). - ADMX files:
No - Ports and firewall:
No (communication takes place within the HDX protocol). - Download location:
The Citrix Application Probe Agent can be downloaded as a stand-alone component on the Citrix download page. - Documentation:
- Director – StoreFront Probes – by Citrix CTP Carl Stalhood
- Application probing – Citrix Docs
Prerequisites
Citrix application probing has the following prerequisites:
- Delivery Controller version 7.18 or later.
- Citrix Receiver version 4.8 or later. In case Citrix Receiver is not installed before attempting to install the Citrix Application Probe Agent, the installation will end in an error (error 1603 to be precise).
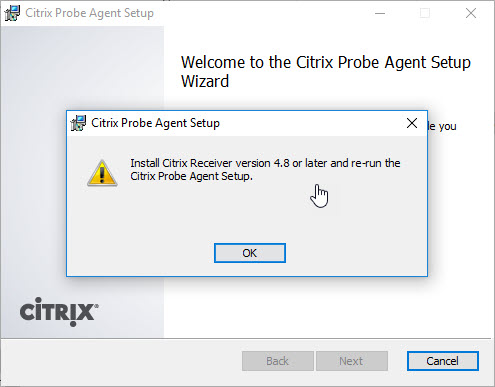 In the event log you see the following error event:
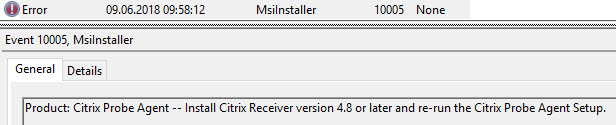 To automate the installation and configuration of Citrix Receiver see the article Citrix Receiver unattended installation with PowerShell on this website.
 - HTTP Basic authentication has to be enabled on the StoreFront store:
 To automate the configuration of the store authentication methods with PowerShell, see the section Manage Authentication Methods in the article Translating the Citrix StoreFront console to PowerShell on this website.
Citrix Director supports the default form-based authentication. Therefore no additional configuration in Director is required.
Installing the Citrix Application Probe Agent with PowerShell
The installation of the Citrix Application Probe Agent is pretty straightforward: it is only a simple MSI installation without any custom parameters. The following command line installs the probe agent silently including logging:
msiexec /i CitrixAppProbeAgent.msi /qn /l*v C:\Logs\CitrixAppProbeAgent.log
I recommend using my PowerShell Function Library together with the scripting template found on this website. This is what I use in the complete installation script below. The function DS_InstallOrUninstallSoftware takes care of the installation.

Configuring the Citrix Application Probe Agent with PowerShell
The manual configuration of the Citrix Application Probe Agent can be started by executing the file ProbeEndpointUI.exe in the installation directory C:\Program Files (x86)\Citrix\Citrix Probe Agent. You can also start the wizard by double-clicking the
shortcut Citrix Probe Agent on the desktop:
C:\Users\Public\Desktop\Citrix Probe Agent.lnk
This shortcut is created on the public desktop during installation.
| Note: the complete installation script in the section below deletes the public shortcut Citrix Probe Agent. |
This ProbeEndpointUI.exe starts the Citrix Application Probe Agent wizard.
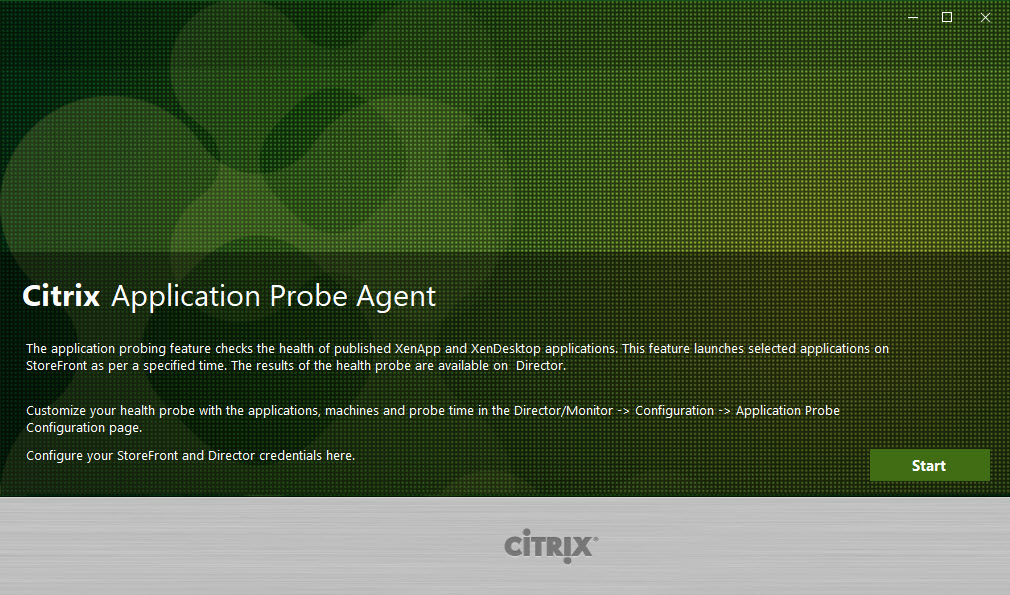
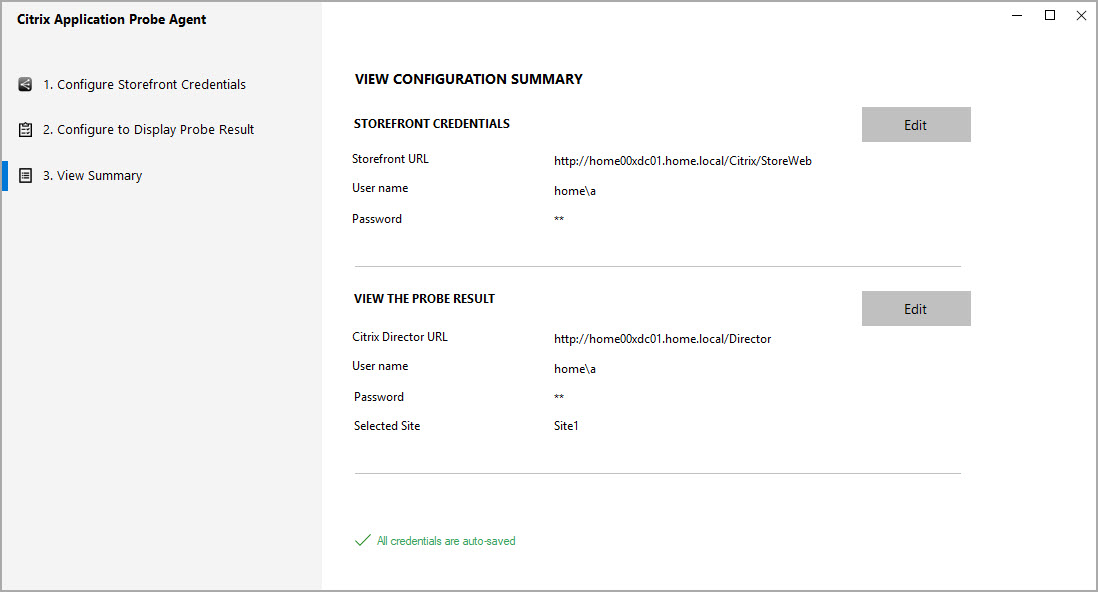
The wizard requires the following parameters:
- StoreFront:
- StoreFront URL (make sure to use the web store!)
- StoreFront user name (has to be in the format domain\user or user@domain.com)
- Password
- Director:
- Director URL
- Director user name (can be in the format domain/user or user. If the domain is not specified, the domain has to be specified in the Domain field)
- Domain (this value is only required if the domain is not specified in the user name)
- Password
- Site (farm) name
After configuring the StoreFront and Director settings, all settings are stored in the registry, here to be precise:
- StoreFront configuration
- Registry key: HKLM\SOFTWARE\WOW6432Node\Citrix\ProbeAgent\SF
- Registry values:
- param1 -> contains the StoreFront URL
- param2 -> contains the name of the StoreFront user account (the format must be domain\user).
- param3 -> contains the password for the StoreFront user account (the password is not stored in a readable format)
- Director configuration
- Registry key: HKLM\SOFTWARE\WOW6432Node\Citrix\ProbeAgent\DIR
- Registry values:
- param1 -> contains the Director URL
- param2 -> contains the name of the Director user account including the domain name (domain\user) or without the domain name (user). In case the domain name is not added, the domain has to be specified (param4)
- param3 -> contains the password for the Director user account (the password is not stored in a readable format)
- param4 -> contains the domain name (this value is empty if the user name already includes the domain name (domain\user)
- param5 -> contains the site (farm) name
- param6 -> contains the (IIS) site ID (the default is 1)
There are two ways how to configure the probe agent silently:
Configuring the Probe Agent through a named inter-process communication pipe
In the complete installation script below, the probe agent is configured using a named pipe. A named pipe is a stream-based mechanism for inter-process communication (IPC). The function WriteToPipe is at the heart of this.

I have to be clear on one thing though: this very cool and relatively complex piece of automation was not written by me. This code was created by Sharath Babu, the Citrix developer of the Application Probe Agent (many thanks Sharath!). I also extend a big thank you to fellow CTA and Citrite Martin Zugec for his continuous help and support!
| Note: when configuring the probe agent in production, I strongly recommend using the complete installation script using a 256-bit AES encrypted password! |
Configuring the Probe Agent by exporting and importing the registry
The second method how to automate the configuration of the probe agent is not as “sexy” as the previous one, but it works. After configuring the probe agent manually, the registry values in the aforementioned registry keys can be exported and saved as a *.REG file. This registry file can then be imported when installing and configuring the probe agent.
In case you use my PowerShell Function Library, you can use the function DS_ImportRegistryFile to import the registry file.
As said, this method works, but the obvious disadvantage is that you first have to manually configure the probe settings to be able to export the *.REG file. Since the probe agent should use different StoreFront credentials for each worker, you will have to repeat this process multiple times.
Complete installation script
The scripts below include both the installation and configuration of the Citrix Application Probe Agent, including detailed logging and error handling. One script uses a plain-text password (good for testing) and the other one a secure 256-bit AES key (for production). Besides the security level of the password, the scripts are the same:
- Complete installation script using an unsecure plain-text password
- Complete installation script using a 256-bit AES encrypted password
| Note: when configuring the probe agent in production, I strongly recommend using the Complete installation script using a 256-bit AES encrypted password! |
The scripts are based on my installation template. Also, the functions used in the scripts require my PowerShell Functions Library to be present on the local system. This means that before you can use the script, you need to copy the PowerShell module file DS_PowerShell_Function_Library.psm1 to the local system first.
In order to use the scripts, please follow these steps:
- Create an installation directory on the local computer or a file share (UNC path). For example: C:\Temp\Citrix\ProbeAgent.
- Create a subdirectory called Files.
- Download and copy the Probe Agent installation file CitrixAppProbeAgent.msi to the folder Files in the installation directory.
- Download and copy the PowerShell module file DS_PowerShell_Function_Library.psm1 to a directory on your local system.
- Copy one of the two complete PowerShell scripts below to a new PS1 file (e.g. Install_CitrixProbeAgent.ps1) and add this file to the root of the installation directory (not in the subdirectory Files).
- Modify the following lines in the script:
- Enter the user name in line 83 (the same user is used for both StoreFront and Director).
- Modify the location of the log directory (optional):
- Lines 85 and 86 in the complete installation script using an unsecure plain-text password;
- Lines 86 and 87 in the complete installation script using a 256-bit AES encrypted password.
- Enter the StoreFront URL:
- Lines 87 in the complete installation script using an unsecure plain-text password;
- Lines 88 in the complete installation script using a 256-bit AES encrypted password.
- Enter the Director URL:
- Lines 88 in the complete installation script using an unsecure plain-text password;
- Lines 89 in the complete installation script using a 256-bit AES encrypted password.
- Enter the (IIS) site ID (default is 1):
- Lines 89 in the complete installation script using an unsecure plain-text password;
- Lines 90 in the complete installation script using a 256-bit AES encrypted password.
- Enter the XenDesktop site name (farm name):
- Lines 90 in the complete installation script using an unsecure plain-text password;
- Lines 91 in the complete installation script using a 256-bit AES encrypted password.
- The correct path where the the PowerShell module file DS_PowerShell_Function_Library.psm1 is stored:
- Line 106 in the complete installation script using an unsecure plain-text password;
- Line 118 in the complete installation script using a 256-bit AES encrypted password.
- Execute the PowerShell script as follows:
powershell.exe -executionpolicy bypass -file C:\Temp\Citrix\ProbeAgent\Install_CitrixProbeAgent.ps1
The complete installation scripts write a detailed log file. By default, you can find the log file here: C:\Logs\Citrix Application Probe Agent.log. The directory and log file names may be different in case you change the variables $BaseLogDir and $PackageName.
Complete installation script using an unsecure plain-text password
|
1 2 3 4 5 6 7 8 9 10 11 12 13 14 15 16 17 18 19 20 21 22 23 24 25 26 27 28 29 30 31 32 33 34 35 36 37 38 39 40 41 42 43 44 45 46 47 48 49 50 51 52 53 54 55 56 57 58 59 60 61 62 63 64 65 66 67 68 69 70 71 72 73 74 75 76 77 78 79 80 81 82 83 84 85 86 87 88 89 90 91 92 93 94 95 96 97 98 99 100 101 102 103 104 105 106 107 108 109 110 111 112 113 114 115 116 117 118 119 120 121 122 123 124 125 126 127 128 129 130 131 132 133 134 135 136 137 138 139 140 141 142 143 144 145 146 147 148 149 150 151 152 153 154 155 156 157 158 159 160 161 162 163 164 165 166 167 168 169 170 171 172 173 174 175 176 177 178 179 180 181 182 183 184 |
#========================================================================== # # Citrix Application Probe Agent (without secure password) # # AUTHOR: Dennis Span # DATE : 20.06.2018 # # Comment: this script installs and configures the Citrix Application Probe Agent without a secure password # # Note: this script is included in the article 'https://dennisspan.com/citrix-application-probe-agent-unattended-installation/' # Note: for a more detailed description on how to decrypt secure password see the article 'https://dennisspan.com/encrypting-passwords-in-a-powershell-script/' # # Note: see the article 'https://dennisspan.com/powershell-scripting-template-for-sccm-packages/' for a detailed description how to use this template # # Note: for an overview of all functions in the PowerShell function library 'DS_PowerShell_Function_Library.psm1' see: # -Windows functions: https://dennisspan.com/powershell-function-library/powershell-functions-for-windows/ # -Citrix functions: https://dennisspan.com/powershell-function-library/powershell-functions-for-citrix/ # # Change log: # ----------- # <DATE> <NAME>: <CHANGE DESCRIPTION> #========================================================================== # Get the script parameters if there are any param ( # The only parameter which is really required is 'Uninstall' # If no parameters are present or if the parameter is not # 'uninstall', an installation process is triggered [string]$Installationtype ) # define Error handling # note: do not change these values $global:ErrorActionPreference = "Stop" if($verbose){ $global:VerbosePreference = "Continue" } ##################################################### # Functions (not included in the PSM function file) # ##################################################### # Function WriteToPipe # Note: this function connects to the inter-process pipe of the Probe Agent configuration UI Function WriteToPipe { param( [string]$Message ) DS_WriteLog -InformationType "I" -Text "Connect to the inter-process pipe of the Probe Agent" -LogFile $LogFile try { $pipeClient = new-object System.IO.Pipes.NamedPipeClientStream('.', '2a70ffbe-3280-46e4-8e4e-5bf2feff4373', [System.IO.Pipes.PipeDirection]::InOut,[System.IO.Pipes.PipeOptions]::None,[System.Security.Principal.TokenImpersonationLevel]::Impersonation) $pipeClient.Connect() $pipeReader = new-object System.IO.StreamReader($pipeClient) $pipeWriter = new-object System.IO.StreamWriter($pipeClient) $pipeWriter.AutoFlush = $true $pipeWriter.WriteLine($Message) $returnValue = $pipeReader.ReadLine() $pipeClient.Dispose() return $returnValue } catch { DS_WriteLog -InformationType "E" -Text "An error occurred trying to connect to the inter-process pipe (error: $($Error[0]))" -LogFile $LogFile Exit 1 } } ############################################ # Preparation # ############################################ # Disable File Security $env:SEE_MASK_NOZONECHECKS = 1 # Check if the current user is a local administrator on this machine $CurrentUser = [Security.Principal.WindowsIdentity]::GetCurrent(); if ((New-Object Security.Principal.WindowsPrincipal $CurrentUser).IsInRole([Security.Principal.WindowsBuiltinRole]::Administrator) -ne $True) { DS_WriteLog -InformationType "E" -Text "Check if the current user is a local administrator on this machine" -LogFile $LogFile DS_WriteLog -InformationType "E" -Text "The currently logged on user does not have administrative rights on the local machine" -LogFile $LogFile DS_WriteLog -InformationType "I" -Text "This script will now quit" -LogFile $LogFile Exit 1 } # Custom variables [edit] [string]$UserName = "home\a" # [edit] enter the name of the user that launches the application from StoreFront (e.g. %mydomain%\%MyProbeUser%) and has access to Director. The format has to be %domain%\%username%. This can be the same user as the one for Director [string]$Password = "a" # [edit] enter the plain-text password of the probe agent user [string]$BaseLogDir = "C:\Logs" # [edit] add the location of your log directory here [string]$PackageName = "Citrix Application Probe Agent" # [edit] enter the display name of the software (e.g. 'Arcobat Reader' or 'Microsoft Office') [string]$StoreFrontUrl = "http://home00xdc01.home.local/Citrix/StoreWeb" # [edit] enter the StoreFront URL (e.g. https://storefront.mydomain.com/Citrix/StoreWeb). Make sure that you use the website URL!!! [string]$DirectorUrl = "http://home00xdc01.home.local/Director" # [edit] enter the Director URL (e.g. https://server.mydomain.com/Director) [string]$SiteId = "1" # [edit] enter the IIS site ID. If you only have one StoreFront deployment (= one IIS site) than the site ID is 1 [string]$SiteName = "Site1" # [edit] enter the name of the XenDesktop site # Global variables $StartDir = $PSScriptRoot # the directory path of the script currently being executed if (!($Installationtype -eq "Uninstall")) { $Installationtype = "Install" } $LogDir = (Join-Path $BaseLogDir $PackageName).Replace(" ","_") $LogFileName = "$($Installationtype)_$($PackageName).log" $LogFile = Join-path $LogDir $LogFileName # Create the log directory if it does not exist if (!(Test-Path $LogDir)) { New-Item -Path $LogDir -ItemType directory | Out-Null } # Create new log file (overwrite existing one) New-Item $LogFile -ItemType "file" -force | Out-Null # Import the Dennis Span PowerShell Function Library Import-Module "C:\Scripts\DS_PowerShell_Function_Library.psm1" DS_WriteLog "I" "START SCRIPT - $Installationtype $PackageName" $LogFile DS_WriteLog "-" "" $LogFile ############################################ # Installation # ############################################ # Install or uninstall software $FileName = "CitrixAppProbeAgent.msi" # [edit] enter the name of the installation file (e.g. 'MyApp.msi' or 'setup.exe') if ( $Installationtype -eq "Uninstall" ) { $Arguments = "" # [edit] enter arguments (for MSI file the following arguments are added by default: /i #File# /qn /norestart / l*v #LogFile#) } else { $Arguments = "" # [edit] enter arguments (for MSI file the following arguments are added by default: /i #File# /qn /norestart / l*v #LogFile#) } $FileSubfolder = "Files" # [edit] enter the name of the subfolder which contains the installation file (e.g. 'Files' or 'MSI') $FileFullPath = Join-Path $StartDir $FileSubfolder # Concatenate the two directories $StartDit and $InstallFileFolder DS_InstallOrUninstallSoftware -File ( Join-Path $FileFullPath $FileName ) -InstallationType $Installationtype -Arguments $Arguments DS_WriteLog -InformationType "-" -Text "" -LogFile $LogFile ############################################ # Configure the Application Probe Agent # ############################################ DS_WriteLog -InformationType "I" -Text "Configure the Citrix Application Probe Agent" -LogFile $LogFile DS_WriteLog -InformationType "-" -Text "" -LogFile $LogFile DS_WriteLog -InformationType "I" -Text "Input parameters:" -LogFile $LogFile DS_WriteLog -InformationType "I" -Text "-User name : $UserName" -LogFile $LogFile DS_WriteLog -InformationType "I" -Text "-StoreFront URL : $StoreFrontUrl" -LogFile $LogFile DS_WriteLog -InformationType "I" -Text "-Director URL : $DirectorUrl" -LogFile $LogFile DS_WriteLog -InformationType "I" -Text "-Site ID : $SiteId" -LogFile $LogFile DS_WriteLog -InformationType "I" -Text "-Site name : $SiteName" -LogFile $LogFile DS_WriteLog -InformationType "-" -Text "" -LogFile $LogFile # Write the Citrix StoreFront configuration DS_WriteLog -InformationType "I" -Text "Write the Citrix StoreFront configuration" -LogFile $LogFile $StoreFront_Config = '1{"Url":"' + $StoreFrontUrl + '","UserName":"' + $UserName.replace("\","\\") + '","Password":"' + $Password + '"}'; $result = WriteToPipe($StoreFront_Config) if($result) { DS_WriteLog -InformationType "S" -Text "The StoreFront configuration was written successfully" -LogFile $LogFile } Else { DS_WriteLog -InformationType "E" -Text "An error occurred writing the StoreFront configuration (error: $result)" -LogFile $LogFile Exit 1 } DS_WriteLog -InformationType "-" -Text "" -LogFile $LogFile # Write the Citrix Director configuration DS_WriteLog -InformationType "I" -Text "Write the Citrix Director configuration" -LogFile $LogFile $Director_Config = '2{"Domain":"","SiteName":"' + $SiteName + '","SiteId":"' + $SiteId + '","Url":"' + $DirectorUrl + '","UserName":"' + $UserName.replace("\","\\") + '","Password":"'+ $Password + '"}'; $result = WriteToPipe($Director_Config) if($result) { DS_WriteLog -InformationType "S" -Text "The Director configuration was written successfully" -LogFile $LogFile } Else { DS_WriteLog -InformationType "E" -Text "An error occurred writing the Director configuration (error: $result)" -LogFile $LogFile Exit 1 } DS_WriteLog -InformationType "-" -Text "" -LogFile $LogFile # Delete the public desktop shortcut (C:\Users\Public\Desktop\Citrix Probe Agent.lnk) DS_WriteLog "I" "Delete the public desktop shortcut 'Citrix Probe Agent.lnk'" $LogFile $File = Join-Path $env:Public "Desktop\Citrix Probe Agent.lnk" DS_DeleteFile -File $File ############################################ # Finalize # ############################################ # Enable File Security Remove-Item env:\SEE_MASK_NOZONECHECKS DS_WriteLog -InformationType "-" -Text "" -LogFile $LogFile DS_WriteLog "I" "End of script" $LogFile |
Complete installation script using a 256-bit AES-encrypted password
Use this script for your production. The only difference compared to the complete installation script using an unsecure plain-text password is that a 256-bit AES key file and accompanying password file are used to securely parse the password.
Please see the section Using a 256-bit AES key file and a password file in the article Encrypting passwords in a PowerShell script to learn how to create these two files. It is quite simple, I promise.
Just make sure to copy the key file and password file to a directory on the local machine or on a file share and that lines 84 and 85 in the script point to the correct directory.
One more thing. Please note that the inter-process communication pipe requires that the password be parsed as a standard string (the PSCredential object cannot be used in this case). The Marshal class handles the decrypting of the secure password.

|
1 2 3 4 5 6 7 8 9 10 11 12 13 14 15 16 17 18 19 20 21 22 23 24 25 26 27 28 29 30 31 32 33 34 35 36 37 38 39 40 41 42 43 44 45 46 47 48 49 50 51 52 53 54 55 56 57 58 59 60 61 62 63 64 65 66 67 68 69 70 71 72 73 74 75 76 77 78 79 80 81 82 83 84 85 86 87 88 89 90 91 92 93 94 95 96 97 98 99 100 101 102 103 104 105 106 107 108 109 110 111 112 113 114 115 116 117 118 119 120 121 122 123 124 125 126 127 128 129 130 131 132 133 134 135 136 137 138 139 140 141 142 143 144 145 146 147 148 149 150 151 152 153 154 155 156 157 158 159 160 161 162 163 164 165 166 167 168 169 170 171 172 173 174 175 176 177 178 179 180 181 182 183 184 185 186 187 188 189 190 191 192 193 194 195 196 |
#========================================================================== # # Citrix Application Probe Agent (with secure password) # # AUTHOR: Dennis Span # DATE : 20.06.2018 # # Comment: this script installs and configures the Citrix Application Probe Agent with a secure password # # Note: this script is included in the article 'https://dennisspan.com/citrix-application-probe-agent-unattended-installation/' # Note: for a more detailed description on how to decrypt secure password see the article 'https://dennisspan.com/encrypting-passwords-in-a-powershell-script/' # # Note: see the article 'https://dennisspan.com/powershell-scripting-template-for-sccm-packages/' for a detailed description how to use this template # # Note: for an overview of all functions in the PowerShell function library 'DS_PowerShell_Function_Library.psm1' see: # -Windows functions: https://dennisspan.com/powershell-function-library/powershell-functions-for-windows/ # -Citrix functions: https://dennisspan.com/powershell-function-library/powershell-functions-for-citrix/ # # Change log: # ----------- # <DATE> <NAME>: <CHANGE DESCRIPTION> #========================================================================== # Get the script parameters if there are any param ( # The only parameter which is really required is 'Uninstall' # If no parameters are present or if the parameter is not # 'uninstall', an installation process is triggered [string]$Installationtype ) # define Error handling # note: do not change these values $global:ErrorActionPreference = "Stop" if($verbose){ $global:VerbosePreference = "Continue" } ##################################################### # Functions (not included in the PSM function file) # ##################################################### # Function WriteToPipe # Note: this function connects to the inter-process pipe of the Probe Agent configuration UI Function WriteToPipe { param( [string]$Message ) DS_WriteLog -InformationType "I" -Text "Connect to the inter-process pipe of the Probe Agent" -LogFile $LogFile try { $pipeClient = new-object System.IO.Pipes.NamedPipeClientStream('.', '2a70ffbe-3280-46e4-8e4e-5bf2feff4373', [System.IO.Pipes.PipeDirection]::InOut,[System.IO.Pipes.PipeOptions]::None,[System.Security.Principal.TokenImpersonationLevel]::Impersonation) $pipeClient.Connect() $pipeReader = new-object System.IO.StreamReader($pipeClient) $pipeWriter = new-object System.IO.StreamWriter($pipeClient) $pipeWriter.AutoFlush = $true $pipeWriter.WriteLine($Message) $returnValue = $pipeReader.ReadLine() $pipeClient.Dispose() return $returnValue } catch { DS_WriteLog -InformationType "E" -Text "An error occurred trying to connect to the inter-process pipe (error: $($Error[0]))" -LogFile $LogFile Exit 1 } } ############################################ # Preparation # ############################################ # Disable File Security $env:SEE_MASK_NOZONECHECKS = 1 # Check if the current user is a local administrator on this machine $CurrentUser = [Security.Principal.WindowsIdentity]::GetCurrent(); if ((New-Object Security.Principal.WindowsPrincipal $CurrentUser).IsInRole([Security.Principal.WindowsBuiltinRole]::Administrator) -ne $True) { DS_WriteLog -InformationType "E" -Text "Check if the current user is a local administrator on this machine" -LogFile $LogFile DS_WriteLog -InformationType "E" -Text "The currently logged on user does not have administrative rights on the local machine" -LogFile $LogFile DS_WriteLog -InformationType "I" -Text "This script will now quit" -LogFile $LogFile Exit 1 } # Custom variables [edit] [string]$UserName = "home\a" # [edit] enter the name of the user that launches the application from StoreFront (e.g. %mydomain%\%MyProbeUser%) and has access to Director. The format has to be %domain%\%username%. This can be the same user as the one for Director [string]$KeyFile = "C:\Temp\AES_KEY_FILE.key" # [edit] enter the path and name of the 256-bit AES key file used to encrypt and decrypt the password (e.g. 'C:\Temp\AES_KEY_FILE.key' or '\\Server\Share\AES_KEY_FILE.key') [string]$PasswordFile = "C:\Temp\AES_PASSWORD_FILE.txt" # [edit] enter the path and name of the file containing the encrypted password (e.g. 'C:\Temp\AES_PASSWORD_FILE.txt' or '\\Server\Share\AES_PASSWORD_FILE.txt') [string]$BaseLogDir = "C:\Logs" # [edit] add the location of your log directory here [string]$PackageName = "Citrix Application Probe Agent" # [edit] enter the display name of the software (e.g. 'Arcobat Reader' or 'Microsoft Office') [string]$StoreFrontUrl = "http://home00xdc01.home.local/Citrix/StoreWeb" # [edit] enter the StoreFront URL (e.g. https://storefront.mydomain.com/Citrix/StoreWeb). Make sure that you use the website URL!!! [string]$DirectorUrl = "http://home00xdc01.home.local/Director" # [edit] enter the Director URL (e.g. https://server.mydomain.com/Director) [string]$SiteId = "1" # [edit] enter the IIS site ID. If you only have one StoreFront deployment (= one IIS site) than the site ID is 1 [string]$SiteName = "Site1" # [edit] enter the name of the XenDesktop site # Read the secure password from a file and decrypt it to a normal readable string # -See my article "https://dennisspan.com/encrypting-passwords-in-a-powershell-script/#AESKeyFile' to learn how to create a key file and password file # -The key file contains the 256-bit AES key used to encrypt and decrypt the password stored in the password file # -Copy the key and password file to a folder on the local computer or on a network share # -Security tip: deny NTFS rights to standard users on the directory where the key and password files are stored # -Reference: https://blogs.msdn.microsoft.com/besidethepoint/2010/09/21/decrypt-secure-strings-in-powershell/ $SecurePassword = ( (Get-Content $PasswordFile) | ConvertTo-SecureString -Key (Get-Content $KeyFile) ) # Convert the standard encrypted password stored in the password file to a secure string using the AES key file $SecurePasswordInMemory = [Runtime.InteropServices.Marshal]::SecureStringToBSTR($SecurePassword); # Write the secure password to unmanaged memory (specifically to a binary or basic string) $PasswordAsString = [Runtime.InteropServices.Marshal]::PtrToStringBSTR($SecurePasswordInMemory); # Read the plain-text password from memory and store it in a variable [Runtime.InteropServices.Marshal]::ZeroFreeBSTR($SecurePasswordInMemory); # Delete the password from the unmanaged memory (for security reasons) # Global variables $StartDir = $PSScriptRoot # the directory path of the script currently being executed if (!($Installationtype -eq "Uninstall")) { $Installationtype = "Install" } $LogDir = (Join-Path $BaseLogDir $PackageName).Replace(" ","_") $LogFileName = "$($Installationtype)_$($PackageName).log" $LogFile = Join-path $LogDir $LogFileName # Create the log directory if it does not exist if (!(Test-Path $LogDir)) { New-Item -Path $LogDir -ItemType directory | Out-Null } # Create new log file (overwrite existing one) New-Item $LogFile -ItemType "file" -force | Out-Null # Import the Dennis Span PowerShell Function Library Import-Module "C:\Scripts\DS_PowerShell_Function_Library.psm1" DS_WriteLog "I" "START SCRIPT - $Installationtype $PackageName" $LogFile DS_WriteLog "-" "" $LogFile ############################################ # Installation # ############################################ # Install or uninstall software $FileName = "CitrixAppProbeAgent.msi" # [edit] enter the name of the installation file (e.g. 'MyApp.msi' or 'setup.exe') if ( $Installationtype -eq "Uninstall" ) { $Arguments = "" # [edit] enter arguments (for MSI file the following arguments are added by default: /i #File# /qn /norestart / l*v #LogFile#) } else { $Arguments = "" # [edit] enter arguments (for MSI file the following arguments are added by default: /i #File# /qn /norestart / l*v #LogFile#) } $FileSubfolder = "Files" # [edit] enter the name of the subfolder which contains the installation file (e.g. 'Files' or 'MSI') $FileFullPath = Join-Path $StartDir $FileSubfolder # Concatenate the two directories $StartDit and $InstallFileFolder DS_InstallOrUninstallSoftware -File ( Join-Path $FileFullPath $FileName ) -InstallationType $Installationtype -Arguments $Arguments DS_WriteLog -InformationType "-" -Text "" -LogFile $LogFile ############################################ # Configure the Application Probe Agent # ############################################ DS_WriteLog -InformationType "I" -Text "Configure the Citrix Application Probe Agent" -LogFile $LogFile DS_WriteLog -InformationType "-" -Text "" -LogFile $LogFile DS_WriteLog -InformationType "I" -Text "Input parameters:" -LogFile $LogFile DS_WriteLog -InformationType "I" -Text "-User name : $UserName" -LogFile $LogFile DS_WriteLog -InformationType "I" -Text "-StoreFront URL : $StoreFrontUrl" -LogFile $LogFile DS_WriteLog -InformationType "I" -Text "-Director URL : $DirectorUrl" -LogFile $LogFile DS_WriteLog -InformationType "I" -Text "-Site ID : $SiteId" -LogFile $LogFile DS_WriteLog -InformationType "I" -Text "-Site name : $SiteName" -LogFile $LogFile DS_WriteLog -InformationType "-" -Text "" -LogFile $LogFile # Write the Citrix StoreFront configuration DS_WriteLog -InformationType "I" -Text "Write the Citrix StoreFront configuration" -LogFile $LogFile $StoreFront_Config = '1{"Url":"' + $StoreFrontUrl + '","UserName":"' + $UserName.replace("\","\\") + '","Password":"' + $PasswordAsString + '"}'; $result = WriteToPipe($StoreFront_Config) if($result) { DS_WriteLog -InformationType "S" -Text "The StoreFront configuration was written successfully" -LogFile $LogFile } Else { DS_WriteLog -InformationType "E" -Text "An error occurred writing the StoreFront configuration (error: $result)" -LogFile $LogFile Exit 1 } DS_WriteLog -InformationType "-" -Text "" -LogFile $LogFile # Write the Citrix Director configuration DS_WriteLog -InformationType "I" -Text "Write the Citrix Director configuration" -LogFile $LogFile $Director_Config = '2{"Domain":"","SiteName":"' + $SiteName + '","SiteId":"' + $SiteId + '","Url":"' + $DirectorUrl + '","UserName":"' + $UserName.replace("\","\\") + '","Password":"'+ $PasswordAsString + '"}'; $result = WriteToPipe($Director_Config) if($result) { DS_WriteLog -InformationType "S" -Text "The Director configuration was written successfully" -LogFile $LogFile } Else { DS_WriteLog -InformationType "E" -Text "An error occurred writing the Director configuration (error: $result)" -LogFile $LogFile Exit 1 } DS_WriteLog -InformationType "-" -Text "" -LogFile $LogFile # Delete the public desktop shortcut (C:\Users\Public\Desktop\Citrix Probe Agent.lnk) DS_WriteLog "I" "Delete the public desktop shortcut 'Citrix Probe Agent.lnk'" $LogFile $File = Join-Path $env:Public "Desktop\Citrix Probe Agent.lnk" DS_DeleteFile -File $File ############################################ # Finalize # ############################################ # Enable File Security Remove-Item env:\SEE_MASK_NOZONECHECKS DS_WriteLog -InformationType "-" -Text "" -LogFile $LogFile DS_WriteLog "I" "End of script" $LogFile |
You can check if the script did its job by running the configuration wizard once again. Since the script deleted the desktop shortcut you can either run the wizard from the start menu (Citrix \ Citrix Probe Agent) or execute it directly (“C:\Program Files (x86)\Citrix\Citrix Probe Agent\ProbeEndpointUI.exe”). Click the top right Edit button and go through each step of the wizard without changing anything until you reach the last page. If you reach the end without any (authentication) errors your automation routine worked.
I hope this article was of some help to you. As always, happy scripting!
Dennis Span works as a Principal Account Technology Strategist at Cloud Software Group in Vienna, Austria. He holds multiple Citrix certifications (CCE-V). Dennis has been a Citrix Technology Advocate (CTA) since 2017 (+ one year as Citrix Technology Professional, CTP). Besides his interest in virtualization technologies and blogging, he loves spending time with his family as well as snowboarding, playing basketball, and rowing. He is fluent in Dutch, English, German, and Slovak and speaks some Spanish.

Pingback: Director 7.18 – Carl Stalhood
Pingback: Detailed Change Log – Carl Stalhood
Pingback: Director 1808 – Carl Stalhood
Does a ”downed” probe agent result in a ”outage” alert in Director?
Or does one monitor the probe via other monitoring software like OP5?
Hi Miguel,
I am not sure if I understand your question correctly, but Director is the tool where all probe results are stored (in the monitoring database to be exact). As far as I am aware you cannot use a third-party monitoring tool in combination with Citrix probes. Please check the detailed description written by Citrix CTP Carl Stalhood (https://www.carlstalhood.com/director-7-18/#storefrontprobes) for more information on how to use probes.
Hi and thanks for replying!
Great atticle btw.
What I meant was like this:
If a monitor agent device for some reason krasches, then nothing will alert if an app goes unavailabe.
So my thought was around availability of the actual agents ibut i suppose running a minimum of two agents per/site or app would minimize the risk of not getting application outage alerts
Hi Miguel,
First of all, you’re welcome. Second of all, you are most likely right. In case the probe agent is not available (e.g. because the endpoint from which the probe agent has been shutdown) nothing will be visible in Director. Director will not alert you when a probe agent is not running any checks, only when an application probe fails. I never actually tested this though.
Pingback: Director 1811 – Carl Stalhood
Pingback: Citrix Director 1912 LTSR – Carl Stalhood
Pingback: Citrix Director 1912 LTSR CU2 – Carl Stalhood
Pingback: Citrix Director 2203 LTSR – Carl Stalhood
Good Day, We are installing Citrix Probe, using the script you have, it works as designed, just one thing we need to find a resolution for. The validate button that needs to be pressed manually at this moment in time. What are we missing in the command line that will automatically initiate the validate portion, as we are going to use SCCM to push install the agent.
Regards
Riekerd
Did you find a solution for this in the mean time Riekerd?