Configuring multiple URLs on a single-site StoreFront deployment allows an organization to have different URLs for different stores. It also allows you to redirect HTTP traffic to HTTPS and NETBIOS names to Fully Qualified Domain Names (FQDN).
| Note: this article applies to internal connections to StoreFront as opposed to connections made via Citrix ADC (“NetScaler”). Citrix ADC offers different methods for URL redirects, such as creating multiple vServers. For pure HTTP to HTTPS redirection, there are three methods available as described in detail by Citrix CTP Carl Stalhood in his article SSL Virtual Servers – NetScaler 12.0 / Citrix ADC 12.1. |
Introduction
A single-site StoreFront deployment is a prerequisite to be able to use the StoreFront console. A singe-site StoreFront deployment means that only one IIS site is used:
As opposed to a multi-site StoreFront deployment, which means that two or more IIS sites are created on your StoreFront server.
The moment you create more than one StoreFront deployment (= more than one IIS site) on a single StoreFront server, the StoreFront console can no longer be used. You will have to resort to PowerShell to manage your environment.
I can imagine that for this reason, multi-site StoreFront deployments are undesirable in many organizations. But what if you still want to use multiple stores within your single-site deployment and you want to use different internal URLs to reach these stores? And what if you want to allow people to log on using HTTP and then automatically redirect them to HTTPS? Let me present you with a very simple solution how to accomplish this, without having to install more than one (pair of) StoreFront server(s).
| Note: the solution presented in this article is mainly intended for connections made using Receiver for Web (through your web browser) as opposed to Receiver. The simple reason is that one StoreFront deployment can only have one baseline URL, which is used by Receiver. In this article, I assume that you would like to offer your users more URLs besides the baseline URL. |
My proposed solution has the following requirements:
- You need a list of the URLs you would like to use and which store(s) they should resolve. You can have multiple URLs pointing to the same store.
- For each of the URLs, you need to create DNS names in your LAN infrastructure.
- You will need a wildcard or a Subject Alternative Names (SAN) certificate. In case you are using a SAN certificate, make sure that the certificate includes all URLs you want to use.
- A redirection file. In this article, I provide a template you can use.
Additionally, your StoreFront baseline URL needs to be the same for all connections through Receiver as opposed to Receiver for Web (browser).
The following sections explain each of the requirements in more detail.
List of URLs and store(s) and DNS names
In this article, I assume that your StoreFront infrastructure consists of two servers (for load balancing and high availability). This is not a requirement though. You can have more or less StoreFront servers within your StoreFront group.
I use the following URLs as an example:
- storefront1.mydomain.com
The DNS name of the first StoreFront server. For testing purposes, it is handy that an administrator can enter the server name of an individual StoreFront server without having to use the load-balancing name. This URL is redirected to the store /Citrix/StoreWeb. - storefront2.mydomain.com
The DNS name of the second StoreFront server. For testing purposes, it is handy that an administrator can enter the server name of an individual StoreFront server without having to use the load-balancing name. This URL is redirected to the store /Citrix/StoreWeb. - portal.mydomain.com
The load balancing name of your StoreFront infrastructure. Let us assume that this is the name of the baseline URL. This URL is redirected to the store /Citrix/StoreWeb. - salesapps.mydomain.com
An additional URL that can be used using Receiver for Web. This is not the baseline URL. This URL is redirected to the store /Citrix/SalesWeb. - Optional: director.mydomain.com
In case you have StoreFront installed on the same server as Citrix Director, you can also redirect administrative users to the home page of Director. By default, the director URL resolves the following path and file name: /Director/LogOn.aspx?cc=true.
Now that we decided which URLs to use and which stores to resolve, we have to create the DNS names and create (or request) the certificate. Creating the DNS names is outside the scope of this article.
Wildcard or SAN certificate
Since you are running a single-site StoreFront deployment on a single IIS site, you can only bind one certificate.
If you want to use multiple URLs, you will need either a wildcard certificate (e.g. *.mydomain.com) or a SAN certificate with multiple DNS names.
| Note: a wildcard certificate only works when all URLs have the same domain suffix, e.g. *.mydomain.com. In case you would like to use different domain suffixes, e.g. *.mydomain.com and *.myotherdomain.com, a SAN certificate is required. |
In case you are using a SAN certificate, the DNS names of each of the URLs you want to use should be included. I strongly recommend using Fully Qualified Domain Names (FQDN). As described in the following section, NETBIOS names can be redirected to FQDN URLs in the redirection file.
So, to follow our example, the SAN certificate should include the following DNS names:
- storefront1.mydomain.com
- storefront2.mydomain.com
- portal.mydomain.com
- salesapps.mydomain.com
- director.mydomain.com
One more thing, since these URLs are only used internally, you can create them using your internal PKI infrastructure, for example, Microsoft Certification Authority. Just make sure that your internal root certificates and intermediate certificates are present on your StoreFront server as well as on your local clients. The easiest way to deploy these certificates is via Group Policy. We will deal with this in the section Install the root and intermediate certificates on the local StoreFront server (and on your clients) in this article.
Creating the redirection file
Let me start by explaining what exactly I mean with a redirection file. I am talking about a JavaScript function that redirects URLs stored in an *.HTM file (Default.htm). It looks like this:
The main purpose of this file is to redirect users that land in the root directory of IIS, which by default is C:\inetpub\wwwroot, to a different subdirectory or virtual directory. Often, a user does not know the full URL. The user only knows the hostname portion of the URL. For example:
- Full URL of a StoreFront store: https://portal.mydomain.com/Citrix/StoreWeb/
- What the users know: http(s)://portal.mydomain.com
A redirection file accomplishes the following:
- It ensures that the user lands on the correct page.
- It allows the use of multiple URLs on a single IIS site.
- It ensures that hostnames are called fully qualified to prevent certification errors.
- It ensures that the HTTPS protocol is used instead of HTTP.
- It reduces support calls, incidents, and troubleshooting.
I have prepared a working example of such a file (as seen in the previous screenshot). Click the button below to download the ZIP file that contains the Default.htm file.
You can open this file in your favorite editor such as notepad.exe. Let me take you through the contents of this file.
The main portion of the file consists of the redirect function. Within this function, I compare certain components of the URL to determine how to redirect the user. Let’s take a closer look at these components.
- Example URL: https://portal.mydomain.com:444/Citrix/StoreWeb
- https: = the protocol of the URL
- portal.mydomain.com = the hostname of the URL
- 444 = the port of the URL (default ports such as 80 and 443 are not shown in most browsers)
- Citrix/StoreWeb = the pathname of the URL
- The complete URL is referred to as HREF.
So when a user enters http://salesapp in the address bar of the browser for example, the Default.htm file redirects the user to the URL https://salesapp.mydomain.com/Citrix/SalesWeb/. The redirect function in this case does three things:
- Changes the protocol from HTTP to HTTPS
- Adds the fully qualified domain name to the hostname portion of the URL to prevent certificate errors (remember, the certificate should contain the FQDN).
- Adds the pathname Citrix/SalesWeb/.
The same principle applies when a user (administrator) enters the URL http://storefrontserver1.mydomain.com. The Default.htm file redirects the user to the URL https://storefront1.mydomain.com/Citrix/StoreWeb/. In this example, the redirect function performs two actions:
- Changes the protocol from HTTP to HTTPS
- Adds the pathname Citrix/StoreWeb/.
Bringing it all together: configuring your StoreFront servers
Now it is time that we bring it all together and that we prepare our StoreFront servers. The following steps have to be repeated on each StoreFront server in your StoreFront group:
- Install the wildcard or SAN certificate on the local StoreFront server
- Install the root and intermediate certificates on the local StoreFront server (and on your clients)
- Bind the wildcard or SAN certificate to your IIS site
- Set “Default.htm” first in the list of Default Documents
- Disable HTTP Redirect
- Copy the redirection file to the IIS root directory
Install the wildcard or SAN certificate on the local StoreFront server
Your wildcard or SAN certificate needs to be installed in the certificate store of your local StoreFront server.
There are several ways to install a certificate. The manual way is to open the Microsoft Management Console (mmc.exe), add the Certificates (Local Computer) snap-in, and import the certificate into the Personal store.
To automate the installation of the certificate I recommend using the function DS_InstallCertificate in my PowerShell Function Library. This function uses the PowerShell cmdlet Import-PfxCertificate.
You can also use tools to install the certificate, for example, Microsoft’s CertUtil.exe which is included in the operating system (C:\Windows\System32).
Install the root and intermediate certificates on the local StoreFront server (and on your clients)
Your wildcard or SAN certificate will be issued by either a root or an intermediate authority.
Assuming you issued your wildcard or SAN certificate using an internal PKI, the root and intermediate certificates need to be installed on the local StoreFront server as well as on any internal (Windows) client that will access the URLs. In case you used an external provider, the public third-party root and intermediate certificates should already be present in the corresponding certificate stores.
Root certificates are placed in the Trusted Root Certification Authorities store and intermediate certificates in the Intermediate Certification Authorities store.
There are several ways to install a certificate. The manual way is to open the Microsoft Management Console (mmc.exe), add the Certificates (Local Computer) snap-in, and import the certificate into either the Trusted Root Certification Authorities or Intermediate Certification Authorities store.
You can also use the function DS_InstallCertificate in my PowerShell Function Library to automate the installation.
What I recommend though is to use a Microsoft Group Policy.
Add your certificate to the appropriate store in Computer Configuration \ Policies \ Windows Settings \ Security Settings \ Public Key Policies.
As said, please make sure that you install the root and intermediate certificates both on the local StoreFront server as well as on any internal (Windows) client that will access the URLs.
Bind the wildcard or SAN certificate to your IIS site
After installing the wildcard or SAN certificate on the local StoreFront server you need to bind the certificate to the IIS Default Web Site.
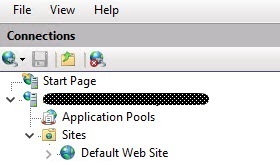
The manual way is to open the IIS Manager, right-click Default Web Site, select Edit Bindings, select or add https port 443 and select the certificate.
You can use the function DS_BindCertificateToIISPort in my PowerShell Function Library to automate the installation.
Copy the redirection file to the IIS root directory
Copy the redirection file to the IIS root directory, which by default is C:\inetpub\wwwroot.
You can use the function DS_CopyFile in my PowerShell Function Library to automate this step.
Set “Default.htm” first in the list of Default Documents
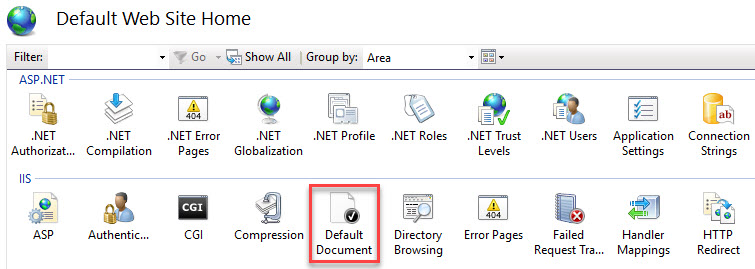
Make sure that Default.htm appears first in the list in the Default Document setting.
The manual way is to open the IIS Manager, and select Default Web Site. In the right window pane, select Default Document. 
Move Default.htm to the top of the list. In case the document name does not exist, create it by clicking the Add… button.
In case you want to automate this you can use the following code snippet:
|
1 2 3 4 5 6 7 8 9 10 11 12 13 14 15 16 17 18 19 20 21 22 23 24 25 26 27 28 29 30 |
# Add the redirection file to the top of the list of default documents in IIS (first remove the entry from the default documents if it exists) # Reference: https://technet.microsoft.com/en-us/library/hh867867(v=wps.630).aspx Import-Module WebAdministration # Remove the redirection file from the list of default documents (if exists) try { if ( Get-WebConfigurationProperty -Filter "//defaultDocument" -PSPath "IIS:\sites\Default Web Site" -Name files.collection | Where-Object { $_.value -eq "Default.htm" } ) { try { Remove-WebConfigurationProperty -Filter "//defaultDocument" -PSPath "IIS:\sites\Default Web Site" -Name files -atElement @{value="Default.htm"} -ErrorAction Stop } catch { Write-Host "An error occurred trying to remove the file 'Default.htm' from the default documents (error: $($Error[0]))" Exit 1 } } else { Write-Host "The file 'Default.htm' is not listed in the default documents" } } catch { Write-Host "An error occurred trying to check and remove the file 'Default.htm' from the default documents (error: $($Error[0]))" Exit 1 } # Add the redirection file to the top of the list of default documents in IIS try { Add-WebConfiguration -Filter "//defaultDocument/files" -PSPath "IIS:\sites\Default Web Site" -AtIndex 0 -Value @{value="Default.htm"} Write-Host "The file 'Default.htm' was successfully added to the top of the default documents" } catch { Write-Host "An error occurred trying add the file 'Default.htm' to the top of the default documents (error: $($Error[0]))" Exit 1 } |
Please also see the section Set Director Default Webpage in my article Citrix Director unattended installation with PowerShell. This section describes a similar situation.
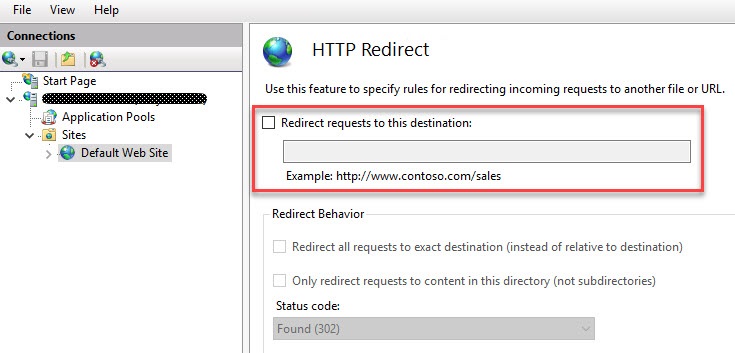
Disable HTTP Redirect
In case you configured a specific store as the default website in the StoreFront console, this has to be removed. If you are not sure what I mean, please check out the section Set Default Website in my article Translating the Citrix StoreFront console to PowerShell. The point is that HTTP Redirect should not be configured. Otherwise, it overrules the Default.htm redirection file.
In case you want to automate this you can use the following code snippet to disable HTTP Redirect:
|
1 2 3 |
# Disable HTTP Redirect Import-Module WebAdministration Set-WebConfiguration system.webServer/httpRedirect "IIS:\sites\Default Web Site" -Value @{enabled="false"} |
Conclusion
It is possible to have multiple URLs for a single-site StoreFront deployment using a JavaScript-based redirection file.
I tested this method in the following browsers:
- Internet Explorer 11
- Google Chrome 72
- Mozilla Firefox 65
Please be aware that when using an internal PKI infrastructure, Firefox, by default, does not use the local Windows certificate store. To enable this, the setting security.enterprise_roots.enabled must be set to true. See the Bugzilla Bug 1314010 for more information. To enable this feature on a single computer:
- In Firefox, type ‘about:config’ in the address bar
- If prompted, accept any warnings
- Right-click to create a new boolean value, and enter ‘security.enterprise_roots.enabled‘ as the Name
- Set the value to ‘true’
Reference: Configuring Firefox to use the Windows Certificate Store
I hope that this article was of some help to you.
Dennis Span works as a Principal Account Technology Strategist at Cloud Software Group in Vienna, Austria. He holds multiple Citrix certifications (CCE-V). Dennis has been a Citrix Technology Advocate (CTA) since 2017 (+ one year as Citrix Technology Professional, CTP). Besides his interest in virtualization technologies and blogging, he loves spending time with his family as well as snowboarding, playing basketball, and rowing. He is fluent in Dutch, English, German, and Slovak and speaks some Spanish.


Hi Dennis, I am confused. If the base URL is portal.mydomain.com then how will https://salesapp.mydomain.com/Citrix/SalesWeb/ work? Shouldn’t it be https://portal.mydomain.com/Citrix/SalesWeb/ ?
This is because as far as I know, every new store you create inherits the baseURL and then appends /Citrix/Storename+Web to the URL of the store.
Please correct me if I am wrong.
Hi Nishith,
It is true that the base URL is “inherited” by each store. However, the base URL is used by Receiver, not Receiver for Web (browser). So when accessing your (StoreFront) applications via a browser, you can use any URL you want. If you want to use HTTPS, you of course need to install a certificate on the StoreFront server. If you want to be able to use the StoreFront console you can only have one IIS site (= single-site StoreFront deployment). Since you can only bind one certificate to an IIS site and if you want to use multiple URLs, either a wildcard certificate (e.g. *.mydomain.com) or a SAN certificate containing multiple DNS names (URLs) is required. I hope this clarifies your question.
Great article Dennis! appreciate your effort on this. This information is not available in Citrix formal training. This truly validates your experience and knowledge…
Thanks a lot Hamidi! You are too kind.
Nice write Dennis. I always follow your work. Thank you.
Thanks a lot Ray! Very kind of you!
Thanks for sharing outstanding workarounds.