This article, Azure hosting connections in Citrix DaaS Service deep-dive, will guide you through the most common configurations.
| Change Log 06.06.2022: updated screenshots with the new Full Configuration Web Studio look-and-feel; updated the Azure app registration permissions; updated the name Citrix Virtual Apps and Desktops Service (CVADS) to the new name Citrix DaaS (DaaS). |
Table of Contents |
Understanding Azure RBAC and app registrations
Before creating a hosting connection in Citrix DaaS it is important to understand Azure RBAC and Azure app registrations.
Azure RBAC stands for role-based access control which, as defined by Microsoft, is an authorization system that provides fine-grained access management of Azure resources.
To grant access to resources in Azure you need the following:
- A security principal
- A role
- A scope
A security principal is an object that requests access to resources. This can for example be a user, but it can also be a service principal, such as an app registration.
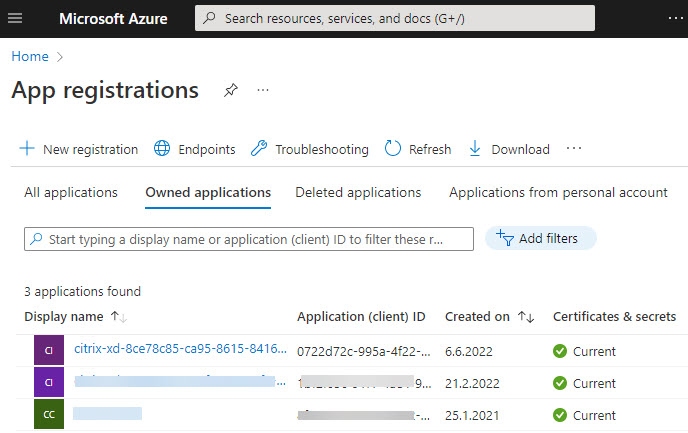
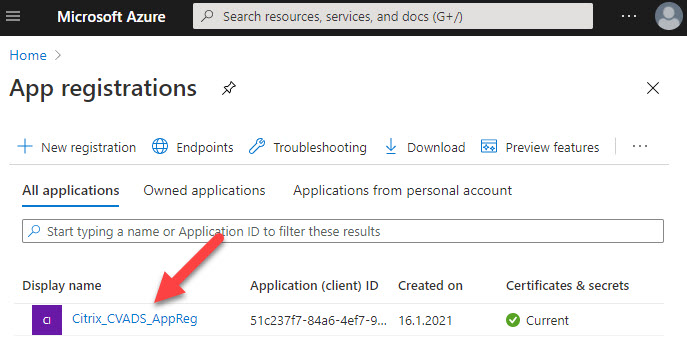
Citrix DaaS requires an app registration (= service principal) to access resources. This is what an automatically created app registration (using Citrix Web Studio) in Azure looks like:
An app registration in itself still has no access to resources. It first needs to be assigned to a role and a scope.
A role is a collection of permissions. Azure offers many built-in roles such as Owner, Contributor, Reader, and many more. A complete list of all available roles can be viewed on the Roles tab in the Access control (IAM) section of any scope or resource. The screenshot below shows the Access control (IAM) section of the resource group Citrix.
A scope is the set of resources that the access applies to. In Azure, you can specify a scope at four levels:
- Management group
- Subscription
- Resource group
- Resource, for example:
- Virtual machine
- Network interface
- Public IP address
- Hard disk
Scopes are structured in a parent-child relationship. You can assign roles at any of these levels of scope. Access rights are inherited to lower-level scopes.
Let’s take a look at an example in my Azure tenant I use for testing and for writing this article. In the screenshot below I am looking at the Access control (IAM) section of one of my virtual machines called CloudConnector1. Under the tab Role assignments, you can see two security principals, an app registration called citrix-xd-cde55[…] that is assigned the Contributor role, and my user Dennis Span who has the Owner role. You can also see that both security principals are inherited from the scope subscription.
Why it is important to use separate subscriptions for your Citrix workers
Citrix recommends using a separate and dedicated subscription (or even multiple subscriptions) for your Citrix workers. By default, when creating the Azure hosting connection automatically in Citrix Web Studio, the app registration is assigned the Contributor role on the subscription scope.
Why is the subscription scope so important? And why should a subscription be dedicated to Citrix Workers only? There are a couple of reasons:
- Citrix DaaS requires access to the necessary resources in the Azure tenant to be able to create, delete, modify, and manage virtual machines. These resources include resource groups, virtual networks, and storage accounts. When the machine catalog is deleted, these resource group(s), including all resources such as virtual machines and storage accounts, are deleted as well. Granting the app registration Contributor rights on the subscription scope means that these access rights are inherited by lower-level scopes. This assures that Citrix Web Studio can perform all operations without restrictions.
- Billing is another reason for working with dedicated subscriptions. Subscriptions are used to be able to segment costs and invoices.
- Probably the most important reason for using separate and dedicated subscriptions is performance. This is especially important in larger deployments. As explained in the article Citrix TIPs: Citrix on Azure – Enterprise-Scale Landing Zones – Part 2, “an Azure subscription is a logical limit of scale by which resources can be allocated. These limits include thresholds for numerous resource types and throttling limits based on reads and writes made against Azure (e.g., 1200 writes per hour per subscription). Subscription requests, such as virtual machine power management, drive the recommended VDAs per Microsoft Azure subscription from a Citrix Machine Creation Services perspective. For this reason, Citrix recommends using dedicated subscriptions for Citrix workloads. Due to these limitations, the current recommended maximum number of VDAs per subscription is 1200“. For more information also see the following articles:
- Citrix TIPs: Azure Subscription Sizing by Rob Zylowski (Citrix)
- Improving Azure performance with Machine Creation Services by Katie Gould (Citrix)
- Citrix Cloud limits (citrix.com)
- Azure subscription and service limits, quotas, and constraints (microsoft.com)
Prerequisites for creating hosting connections in Citrix Web Studio
Before you can create an Azure hosting connection in Citrix Web Studio in Citrix DaaS you first have to create a resource location in Citrix Cloud and you need to install at least one Cloud Connector in your Azure tenant.
Create a resource location in Citrix Cloud
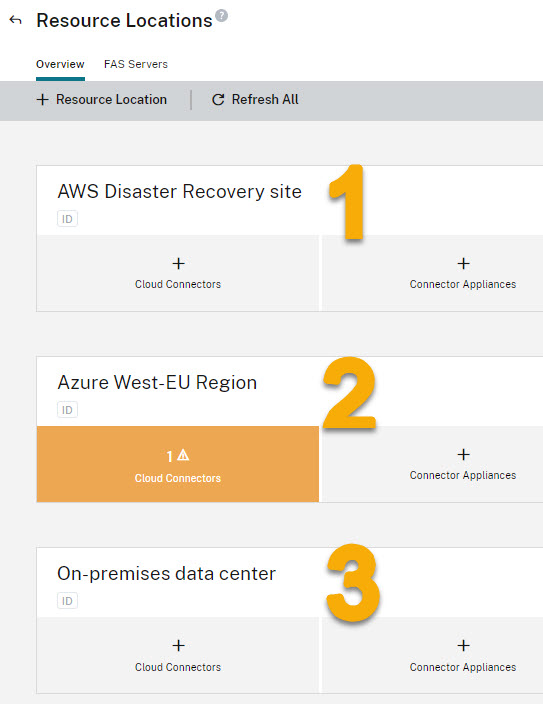
A resource location is created in Citrix Cloud and not in Citrix DaaS. A resource location in Citrix Cloud is a logical representation of a data center. For each data center that hosts Citrix workers, a separate resource location is required. If your organization has three data centers then you will need three resource locations, for example:
- AWS -> resource location “AWS Disaster Recovery site”
- Azure -> resource location “Azure West-EU Region”
- On-prem -> resource location “On-premises data center”
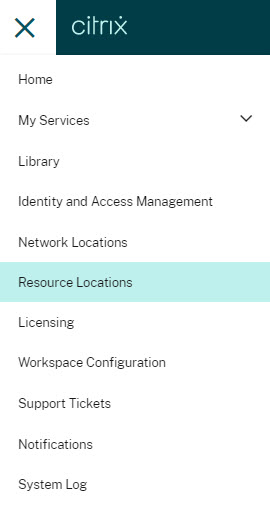
Log in to your Citrix Cloud account. In the hamburger menu in the top left corner, select Resource Locations.
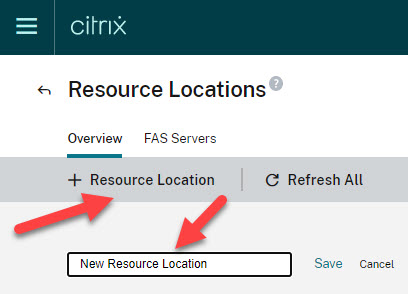
Add a new resource location by clicking + Resource Location. Give the resource location a name and click Save.
This will create a new, empty, resource location in a couple of seconds.
Install one or more Cloud Connectors in the resource location
Now that we have created a new and empty resource location we have to add at least one Cloud Connector. For this, you need to install a virtual machine with Windows Server (e.g. version 2019 or 2022) in the data center that the resource location represents. On this virtual machine, the Cloud Connector component is installed.
How to install a Citrix Cloud Connector is outside the scope of this article. For more information see the following article:
To automate the installation of a Cloud Connector, see the following article:
https://www.citrix.com/blogs/2017/03/15/automating-the-cloud-connector-installation/
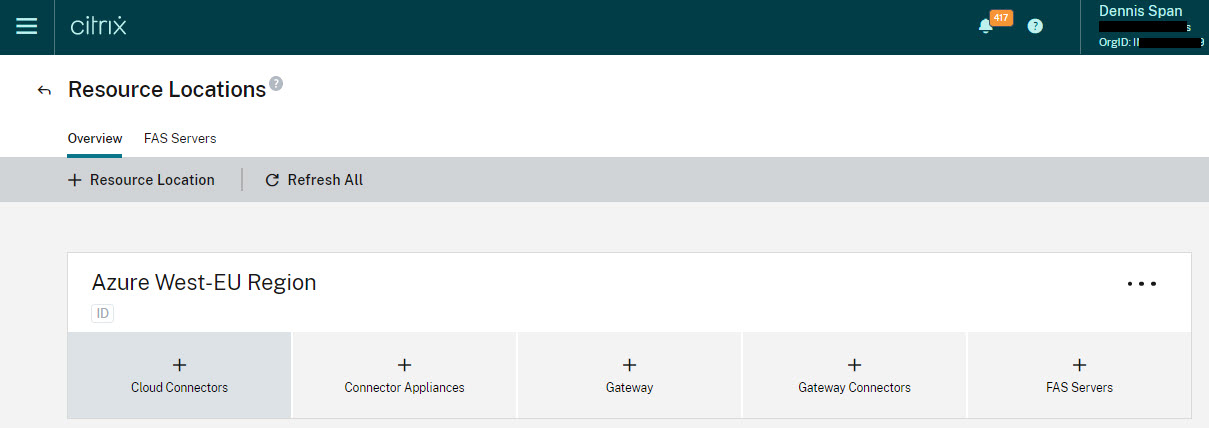
In the screenshot below you see that I have created three resource locations, but a cloud connector has only been installed in Azure.
A resource location created in Citrix Cloud is shown as a zone in Citrix DaaS. However, you need to install at least one cloud connector in the resource location before it is added as a zone in Citrix DaaS. Let me demonstrate this.
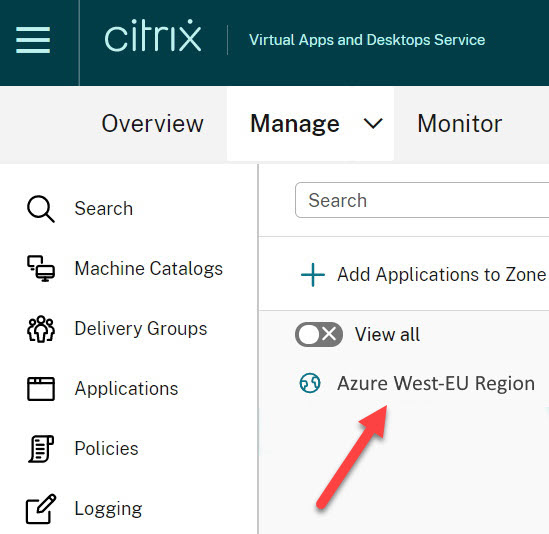
In the screenshot below you see the current zones in Citrix DaaS. For now, only one zone is listed, because only in the zone Azure West-EU Region a cloud connector is present.
As soon as you install a cloud connector in one of the other resource locations they will be listed in the Zones section in Citrix DaaS as well.
Creating a hosting connection in Citrix Web Studio in Citrix DaaS
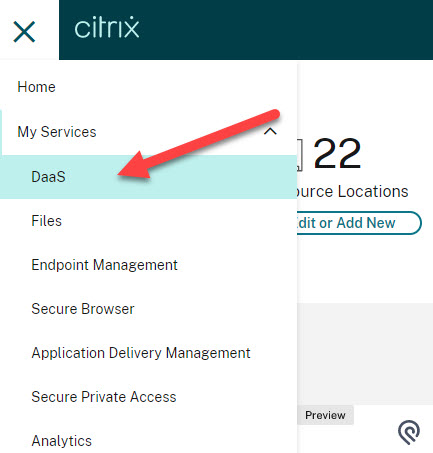
Log in to your account in Citrix Cloud and open the Citrix DaaS service.
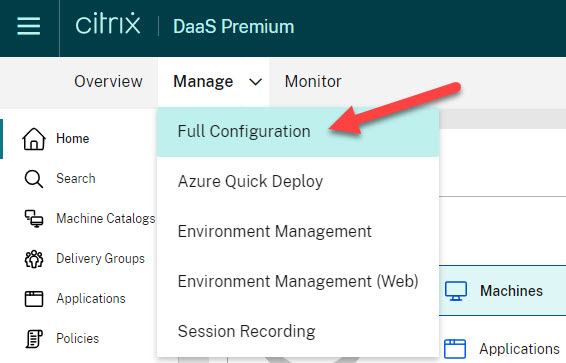
Enter the Full Configuration Web Studio.
There are two ways to create a hosting connection; automatically and manually:
- Option 1:
- Option 2:
Option 1: automatically create a hosting connection (including the app registration in Azure)
| Note: The automatic creation of an Azure hosting connection requires the logged Citrix administrator to have global administrator rights in the Azure tenant. |
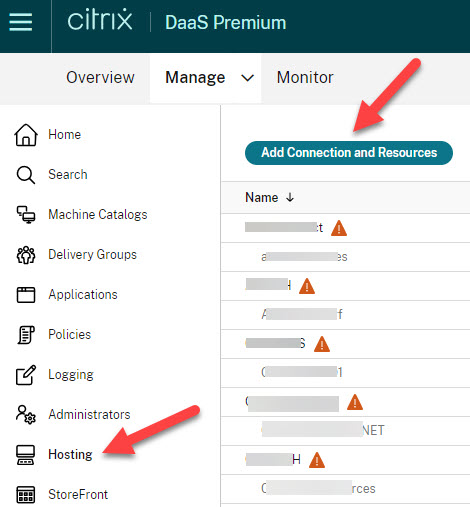
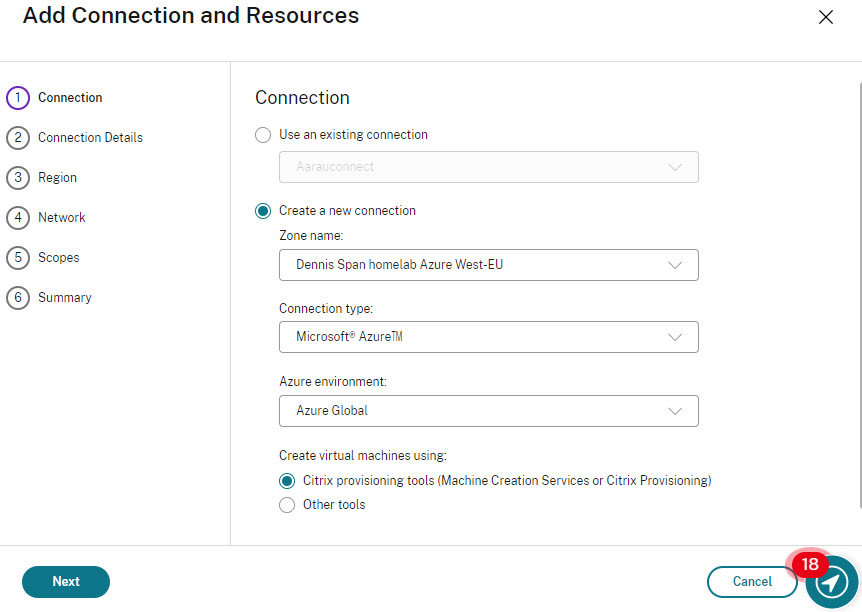
Navigate to the menu item Hosting in the left window pane and select Add Connection and Resources.
We want to create a new connection. The zone name is the Citrix Cloud resource location where you installed your Azure-based Cloud Connectors. Make sure to select the correct zone. The connection type is Microsoft Azure and the Azure environment has to be set to Azure Global (in most cases). The option Citrix provisioning tools is selected as the default provisioning method. Click Next.
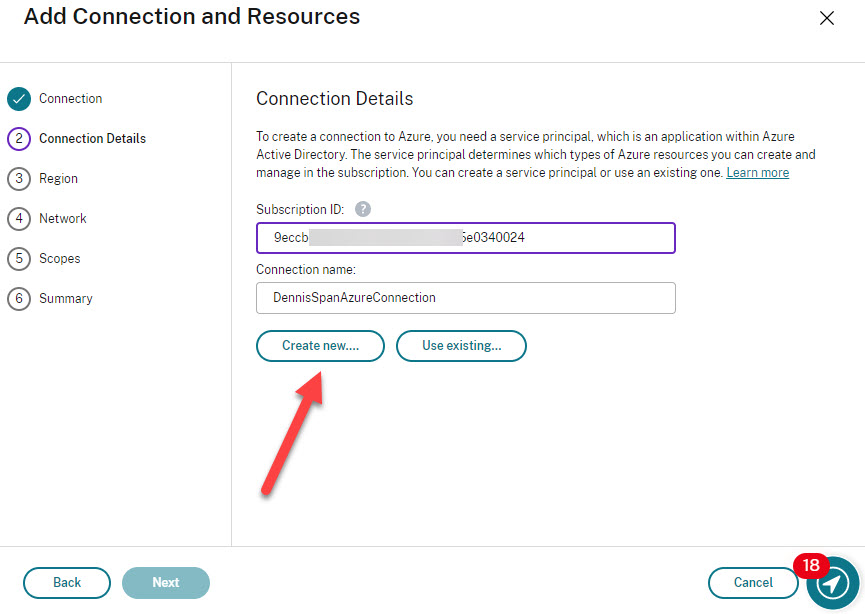
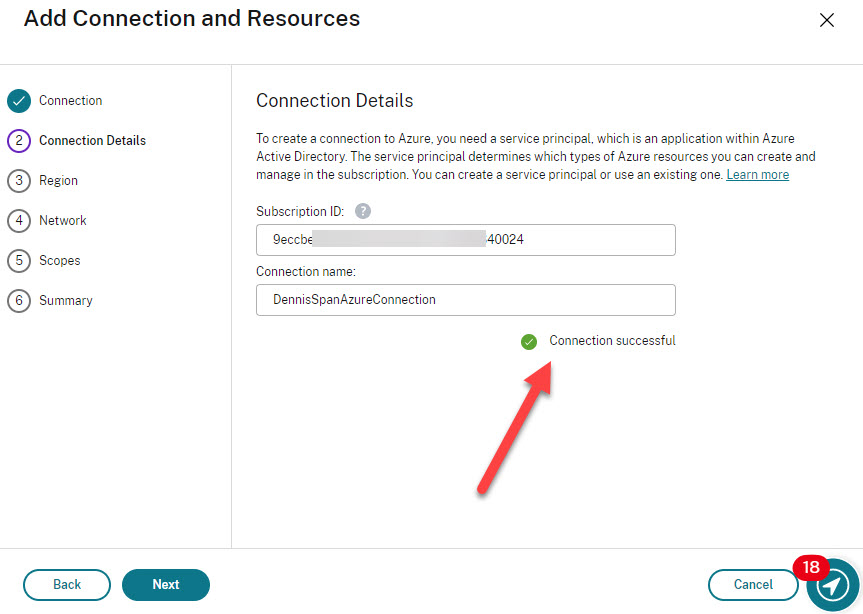
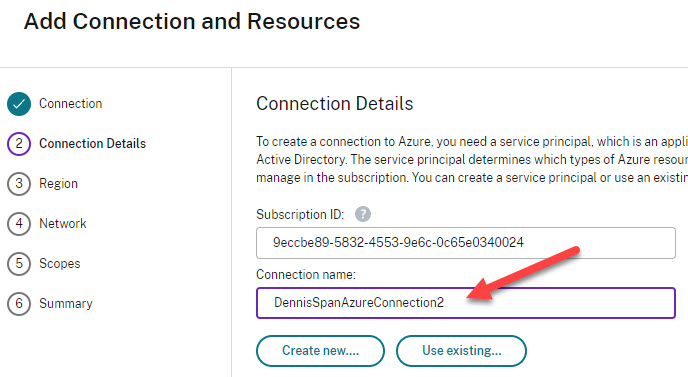
Now you have to fill out your subscription ID and you have to decide on a name for the connection. Make sure that the name is descriptive and, if so required, created based on a naming convention. This is especially important if you plan to create multiple Azure hosting connections. Click Create new.
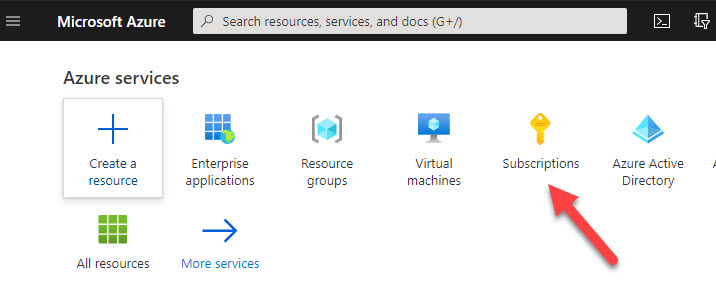
Please note that the subscription ID is not the same as your directory ID (also called tenant ID). Remember that hosting connections are not created on the Azure tenant level; they are created on the Azure subscription level. One Azure tenant can have multiple subscriptions. You can find your subscription ID here:
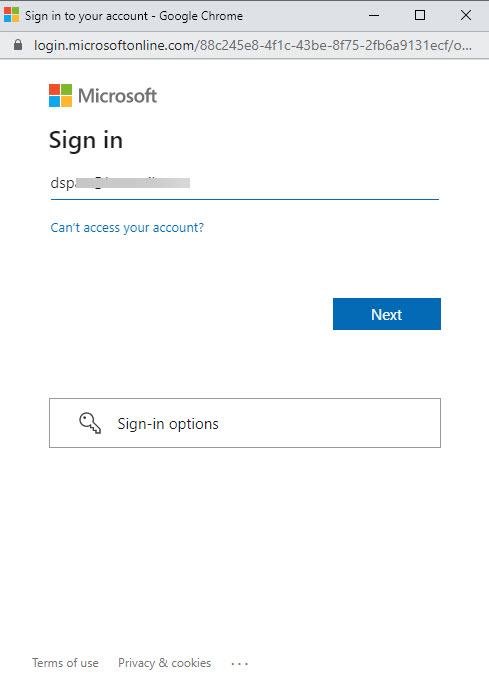
You will now have to sign in to your Azure tenant. Please be aware that your user needs to have Owner rights on the subscription. Only a user with Owner rights can create a security principal with Contributor rights.
Enter your e-mail address to log in to Azure and click Next.
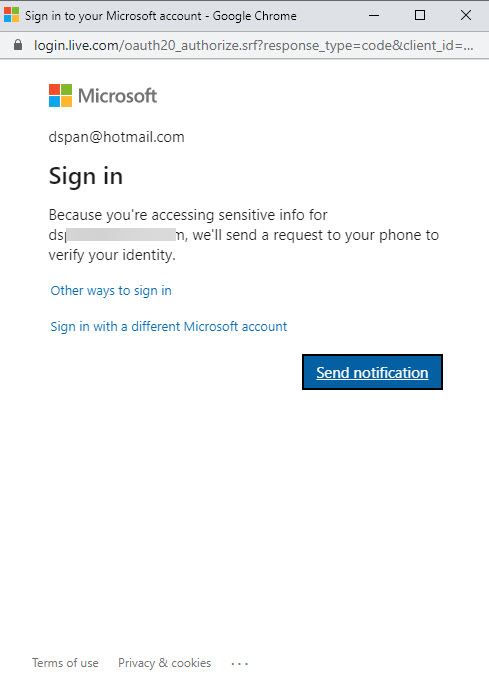
Follow the authentication steps.
In some environments, you may see the following notification.
The cause for this error is most likely that the global administrator has disabled the option Users can register applications under Users, User settings. 
By default, non-administrative users have the option to register custom-developed applications. Be aware the role of global administrator is not an RBAC role, but an Azure Active Directory role. The solution, in this case, is to create the app registration manually in Azure before creating the hosting connection in Citrix Web Studio (as explained in the section Option 2: manually create the app registration in Azure).
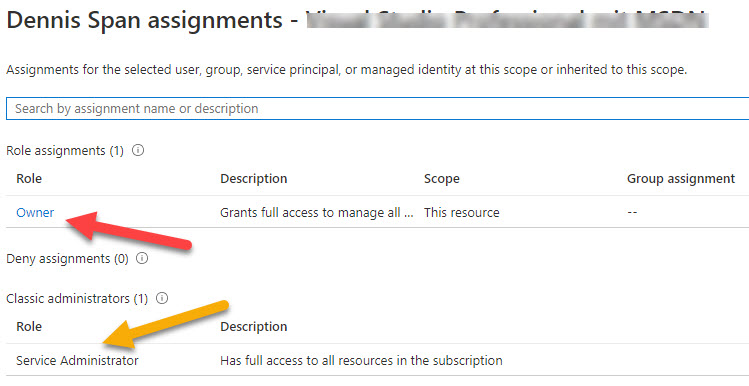
You can check your access rights in the corresponding subscription. Open the subscription and go to Access control (IAM) in the left menu pane. Select View my access. Please remember that there can be multiple subscriptions within an Azure tenant so make sure to select the correct one.
A new pane opens on the right side displaying the results.
In case you do not see the Owner role, but you do have full administrative rights, your Azure tenant may have been created before RBAC was introduced in Azure. Before RBAC, Azure was managed with just three administrative roles. The Service Administrator has the equivalent access of a user who is assigned the Owner role.
The app registration will be granted Contributor rights on the subscription and therefore has access rights on lower-level scopes such as resource groups, virtual machines, and virtual network components.
If you are still reading this section that means that you have sufficient permissions in Azure to create the hosting connection automatically. So let’s continue.
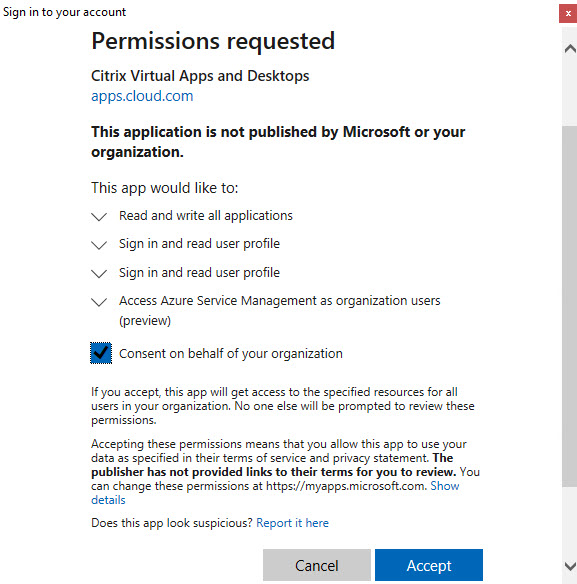
In case the following window appears, accept the permissions request from Azure.
Click Accept.
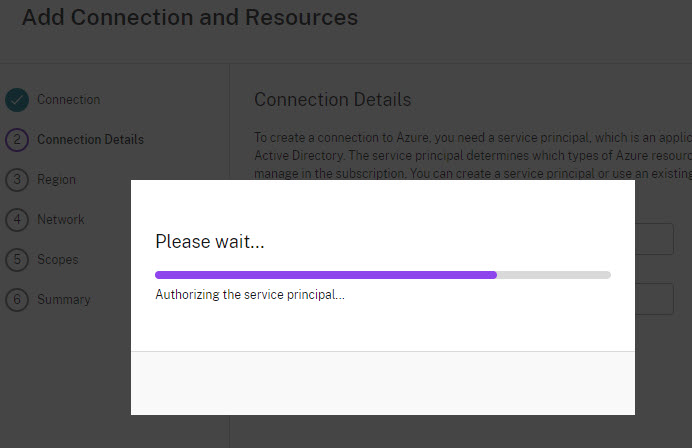
Now the app registration will be created.
When the service principal, the app registration, has been created, you will see a confirmation that the connection has been established.
Click Next.
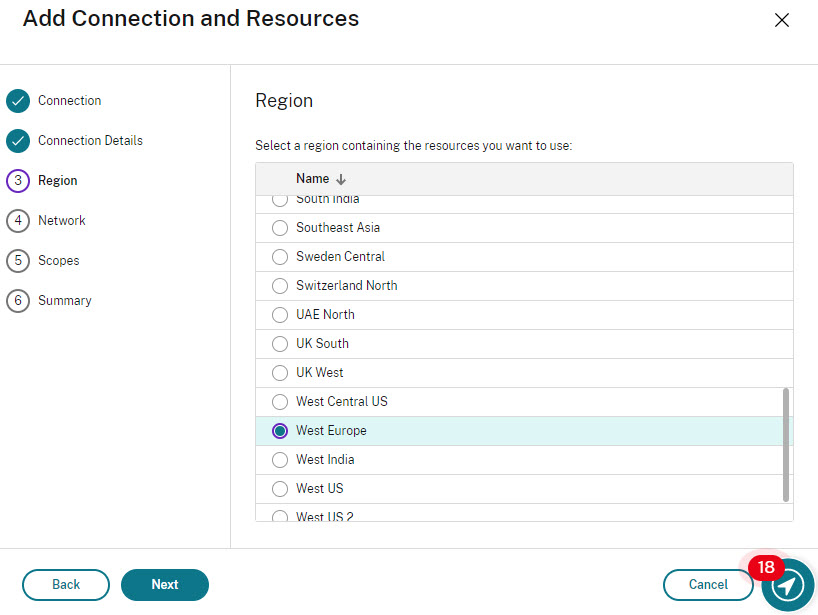
Select the Azure region where your virtual machines, your Citrix workers, will be created.
Click Next.
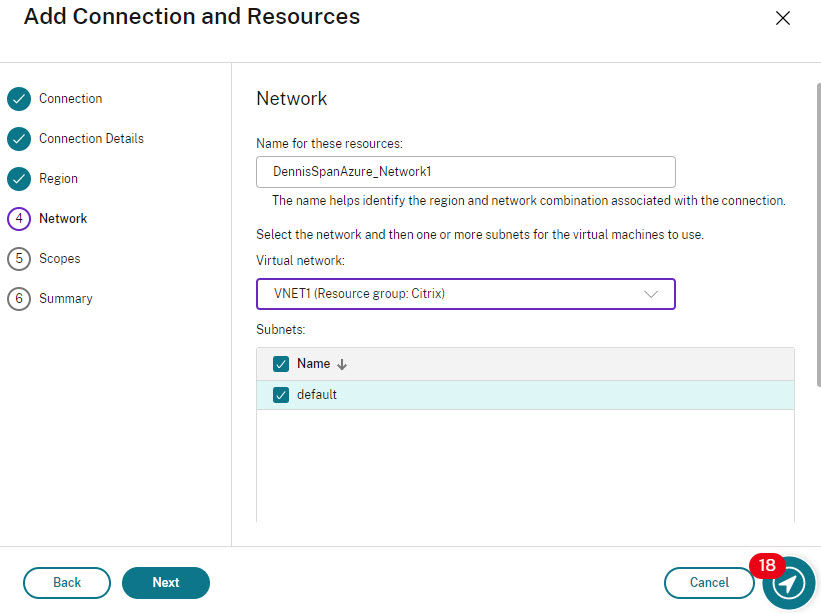
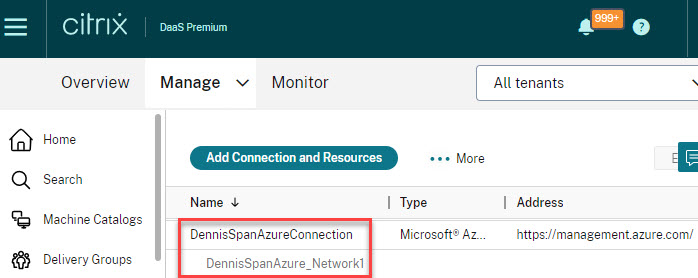
Enter a name for the network resource and select the virtual network and subnet(s) that will be used for your virtual machines.
| Note: Pay close attention to the virtual network drop-down list. The name of the resource group in which the virtual network is stored is added to the hosting connection. If you ever move this virtual network to a different resource group you will have to update your hosting connection. Otherwise, an error is thrown when creating virtual machines in the machine catalog (the error states that it cannot find the subnet/virtual network). |
Click Next.
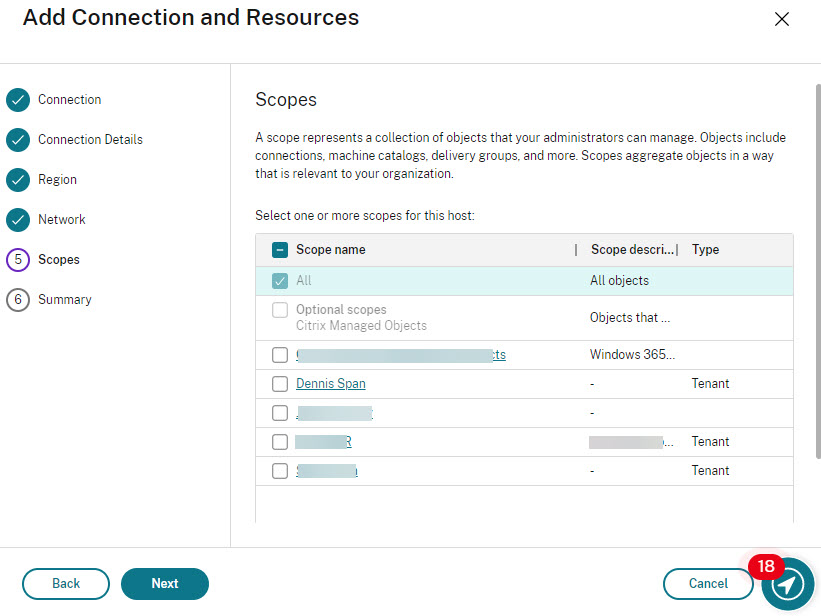
Select a scope. By default, this is set to All, but you can choose a more granular scope if required.
Click Next.
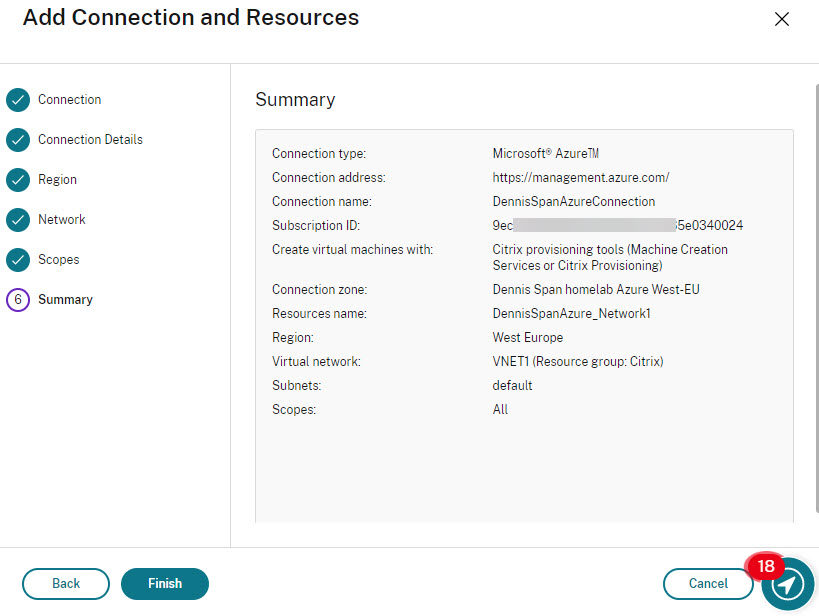
Check and validate the information in the summary and click Finish.
The Azure hosting registration is now completed, both in Citrix Web Studio and in Azure.
Additional information: what happens in Azure when creating a hosting connection?
So what happens in Azure during this automated process? First of all, the app registration is created. The name of the app registration starts with citrix-xd followed by a unique identifier (it is possible to change the name).
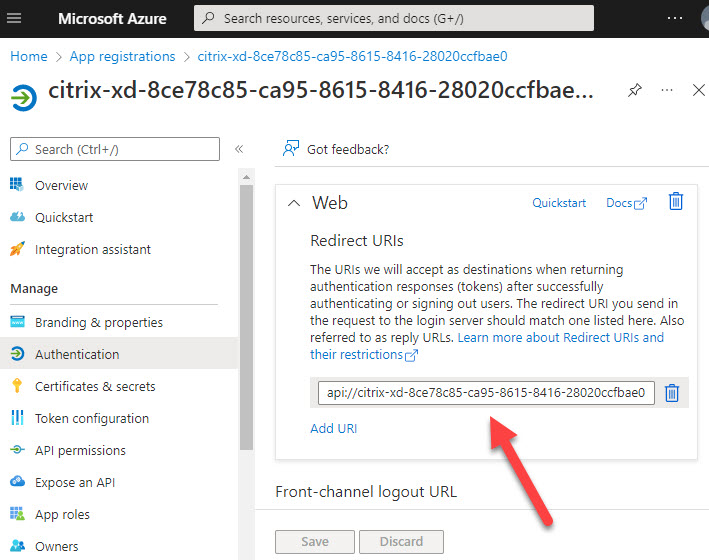
A redirect URL is configured for the app registration. The naming convention is API:// followed by the app registration’s display name, for example, api://citrix-xd-8ce78c85-ca95-8615-8416-28020ccfbae0.
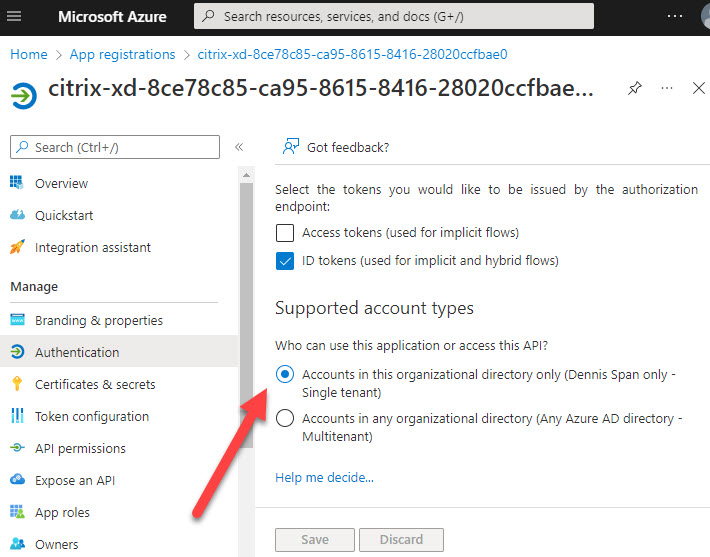
The app registration is configured for a single tenant.
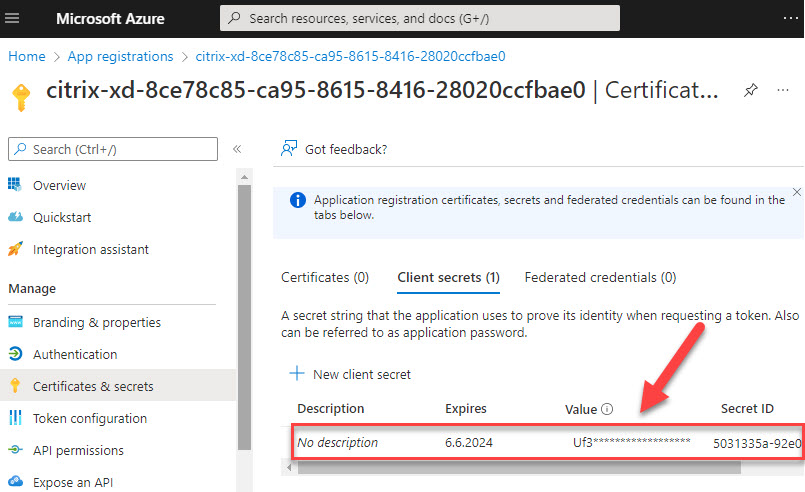
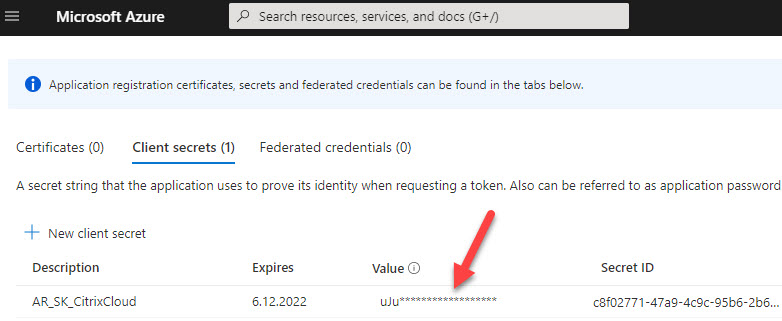
Two authentication methods are available for service principals: password-based authentication (the application secret) and certificate-based authentication. The app registration for Citrix DaaS uses an application secret. The application secret is only displayed at the time of creation; afterward, it is no longer visible and cannot be retrieved. When the app registration is created manually you have one chance to copy the application secret before it is masked (hidden).
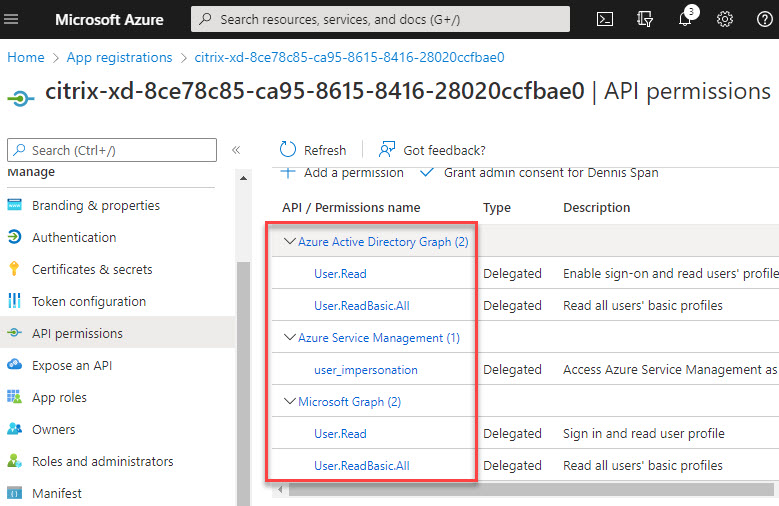
The API permissions are configured as follows:
- Azure Active Directory Graph
- User.Read
- User.ReadBasic.All
- Azure Service Management
- user_impersonation
- Microsoft Graph
- User.Read
- User.ReadBasic.All
The app registration is granted Contributor permissions on the subscription. To see the assigned permissions, open your subscription.
In the left pane go to Access control (IAM). Select Role assignments in the right pane. The app registration will be listed here. Other security principals with access rights on the subscription, such as administrative users, are listed here as well.
The role assignment of the app registration will be inherited by lower-level (child) scopes. In the screenshot below, you see that the app permission has Contributor rights on the resource group Citrix and that this permission was inherited (from the subscription scope).
In the following section, we will create the app registration in Azure manually. We will then add the hosting connection in Web Studio in Citrix DaaS using this manually created app registration.
Option 2: manually create the app registration in Azure
A Citrix administrator may not always have Owner permissions on the subscription in Azure. In this case, the app registration has to be created by an Azure administrator.
The content of this section is based on the section Create a connection using an existing service principal in the Citrix article Connection to Microsoft Azure.
The Azure administrator has to execute the following steps.
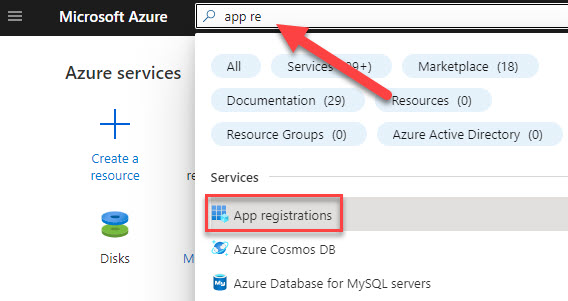
Go to the section App registrations.
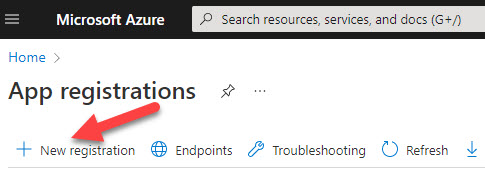
Select New registration.
Do the following:
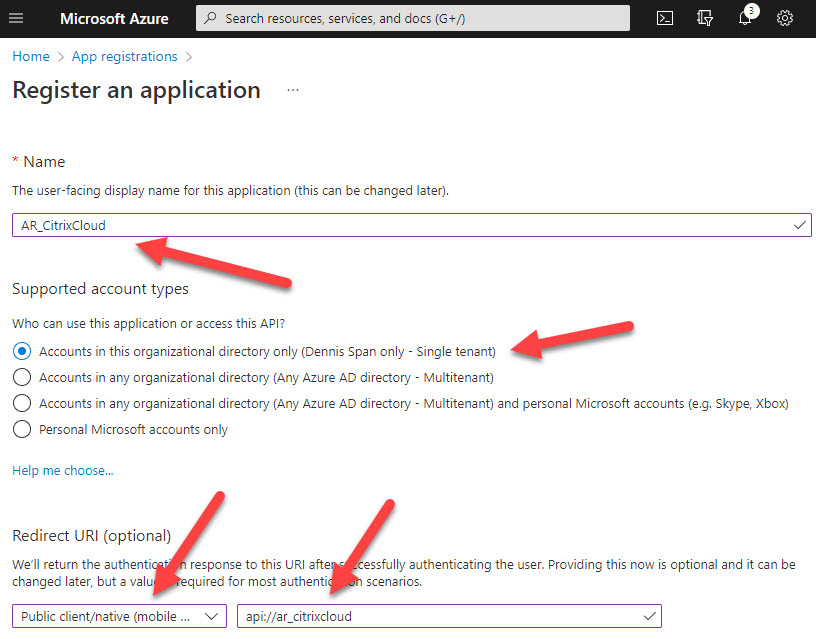
- Enter a (display) name for the app registration. In large environments, it is recommended to use a name based on a predefined naming convention. For example, using the prefix AR_ to indicate that this is an app registration. In the example below I use the name “AR_CitrixCloud”.
- Choose “single tenant” for the account types. This will suffice in most environments.
- Set the Redirect URI to type Public client […] and use the URL api:// followed by the display name of the app registration. For example, api://ar_citrixcloud. The URL does not matter here. No redirection will take place, but the value cannot be empty.
Click Register.
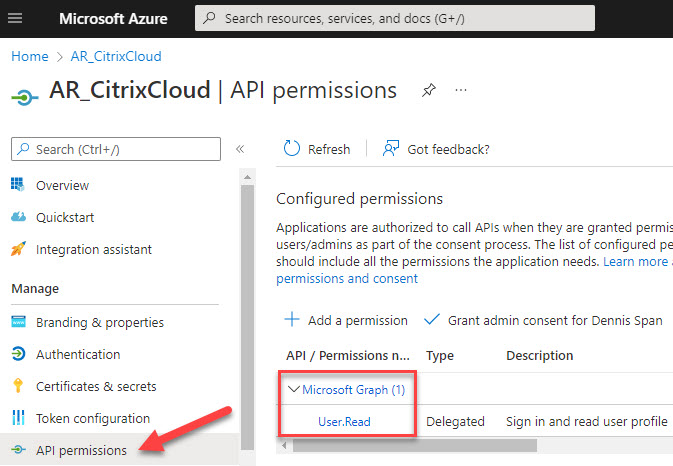
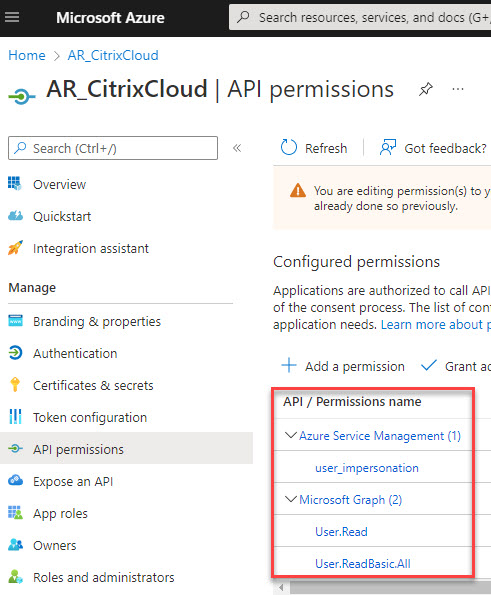
Now we have to configure the app registration. We start with the API permissions. Go to API permissions in the left pane. The permission User.Read on the Microsoft Graph API has already been configured by default.
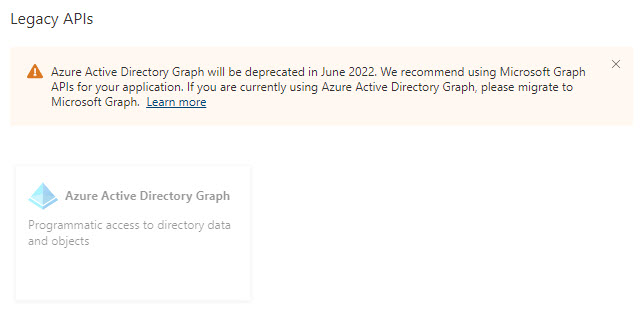
On a side note, I would like to point out that the Azure Active Directory Graph is a legacy API that was deprecated in June 2022. This permission may still be seen in your existing (Citrix Cloud) app registrations. For future app registrations, the Azure Active Directory Graph permissions will no longer be used and will be replaced by the newer Microsoft Graph API.
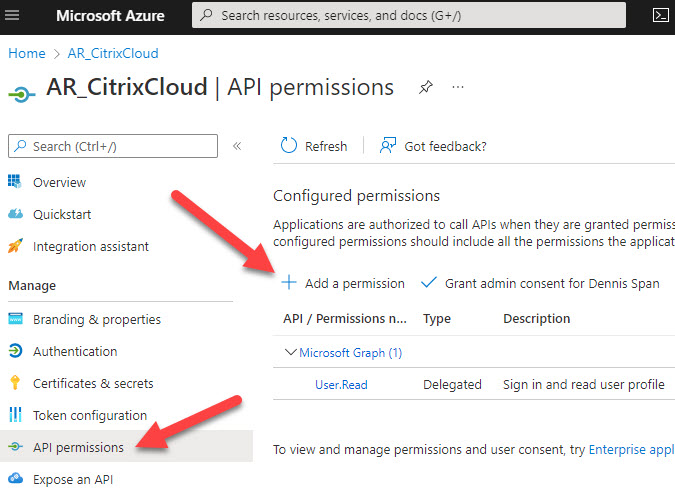
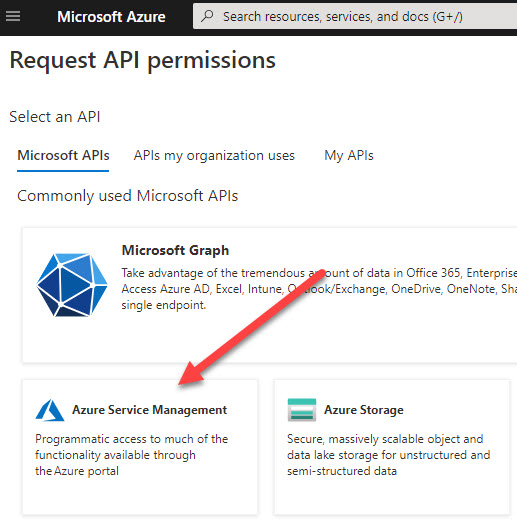
We now need to add the missing permissions. Click Add a permission. We have to configure the following permissions:
- Azure Service Management
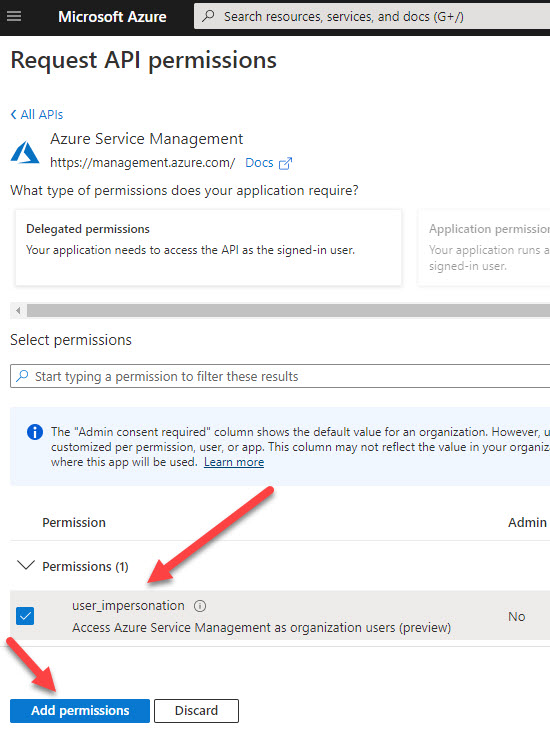
- user_impersonation
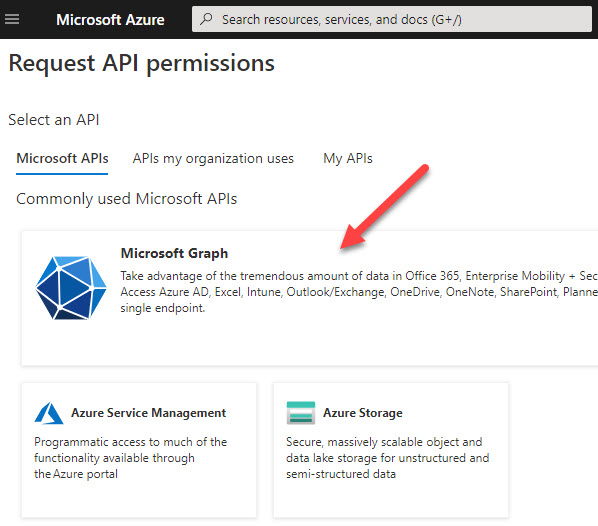
- Microsoft Graph
- User.Read -> already configured by default
- User.ReadBasic.All
Select the API Azure Service Management.
Azure Service Management permissions are always delegated permissions. Select user_impersonation and click Add permissions.
Click Add a permission once again to add the missing permission for the Microsoft Graph API.
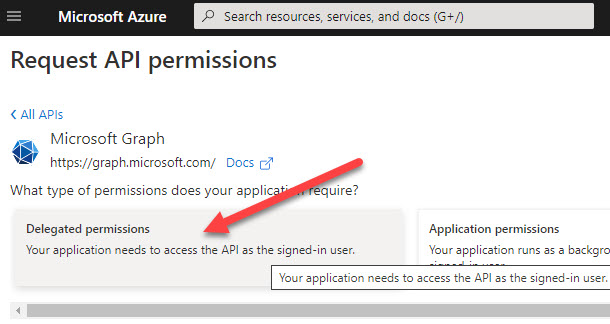
Choose Delegated permissions.
To find the permission faster, search for part of the permission name (e.g. user.read), select the missing permission User.ReadBasic.All, and click Add permissions.
All necessary permissions are now configured.
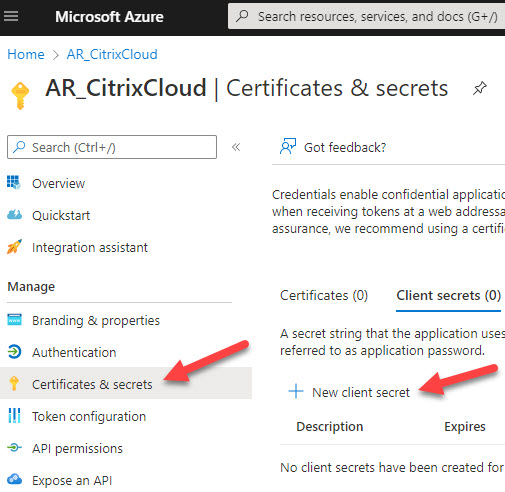
The app registration for Citrix DaaS uses an application secret (instead of a certificate). Click New client secret to create the application secret.
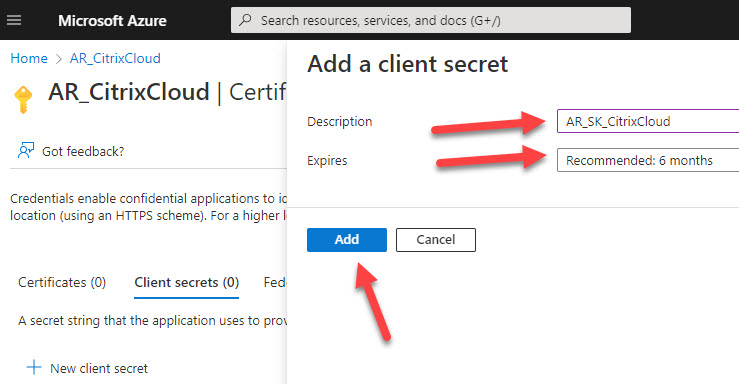
Give the application secret a name and select when it will expire. In case you do not select Never, you will have to create a new application secret and update the hosting connection before it expires. Click Add.
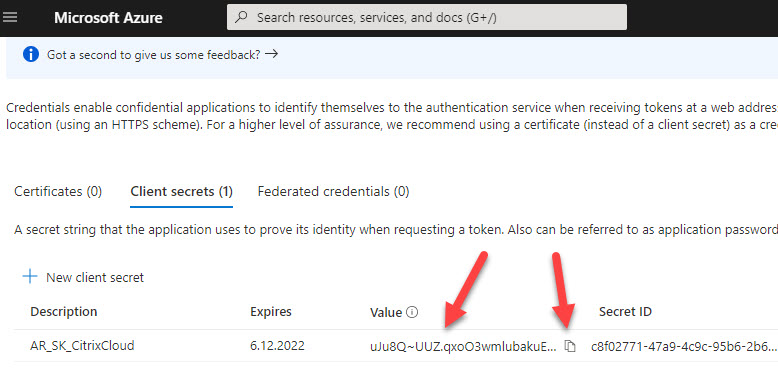
Make a copy of the application secret.
| Note: The application secret is only displayed when the app registration is created! This is the only time when the application secret is visible and can be copied to a password vault. However, it is quite simple to create a new application secret and to update the existing Azure hosting connection. |
After you close the app registration and open it again the application secret is no longer visible.
The app registration has now been created and configured. Now it has to be assigned the required access rights on the subscription scope (this is best practice) or more granularly, on selected resources.
Manually assign RBAC permissions to the app registration
As explained at the beginning of this article, it is recommended to grant the app registration Contributor rights on the subscription scope.
| Note: In case you want to use Narrow Scope Service Principals (= more granular permissions on Azure resources) instead of Subscription Scope Service Principals see the section Custom RBAC access rights (Narrow Scope Service Principal) in this article. |
Open your subscription and in the left pane select Access control (IAM). In the right pane select Role assignments.
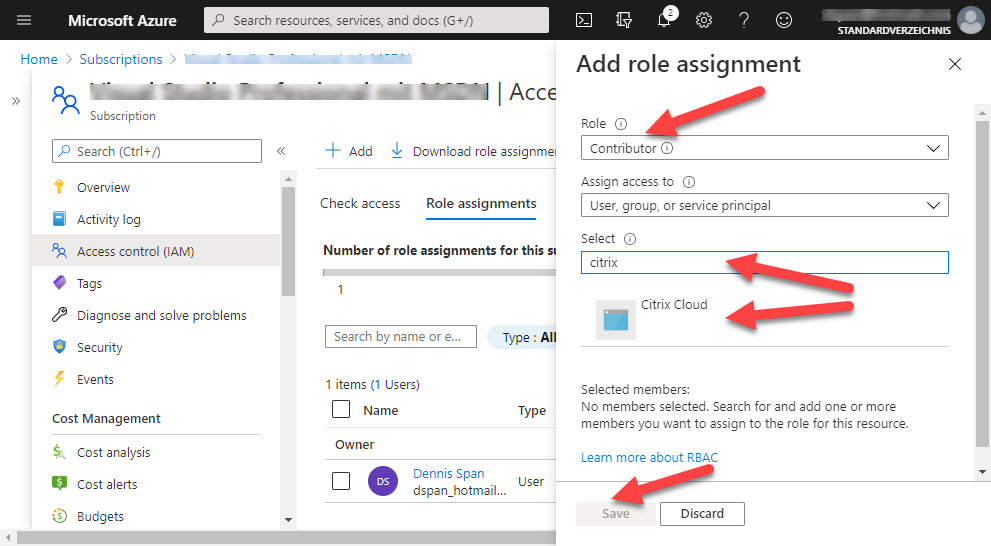
Click Add and select Add role assignment.
Under Role select Contributor. In the Select text field, enter part of the name of the app registration and press Enter. App registrations are not listed; you have to explicitly search for them. After your app registration is listed select it and then click Save.
The app registration now has Contributor rights on the subscription.
This was the last to-do for the Azure administrator. The app registration and required access rights are now in place. The last action of the Azure administrator is to provide the Citrix administrator with the necessary information to be able to create the hosting connection in Citrix Web Studio.
Collect the necessary information for Citrix Web Studio
The Citrix administrator needs the following information to be able to create a hosting connection for Azure:
- Subscription ID
- Application ID
- Directory ID
- Application secret
The subscription ID can be found here:
The application ID and also the directory ID (also called tenant ID) can be found here:
The application secret was copied during the app registration creation process.
The Citrix administrator can now create the hosting connection.
Manually create a hosting connection using an existing app registration
Now that we have created the app registration in Azure and have granted it the Contributor role on our subscription, we can create the hosting connection in Citrix Web Studio.
In the left pane go to Hosting. In the right pane, select Add Connection and Resources.
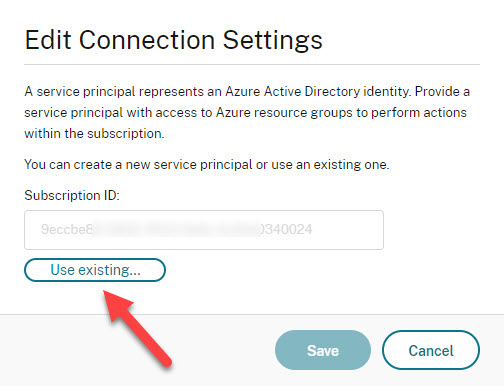
Select Use existing.
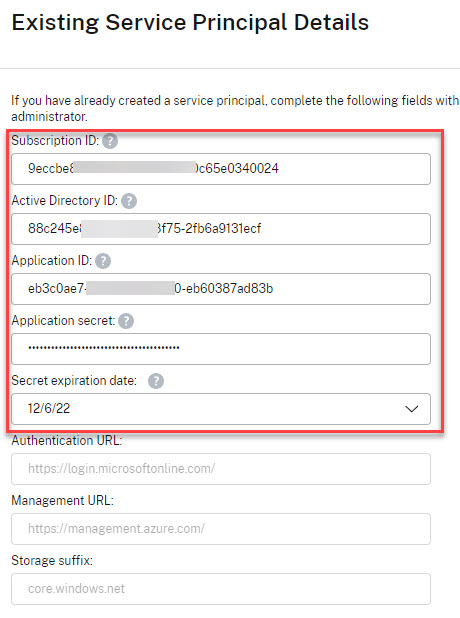
In the next window, enter a name for the connection and add the subscription ID, the directory (or tenant) ID, the application ID of the app registration, and the application secret of the app registration. This information should have been provided by the Azure administrator.
| Note: Before you continue, make sure that at least one cloud connector is running! If no cloud connector is running, after entering the connection details and clicking Next, the wizard will run in a loop for 10 minutes and then time out. I know this because I once forgot to start my cloud connector… |
| Note: The expiration date is the date when the secret key on the app registrations expires. Entering the correct date allows Citrix Web Studio to warn the administrator of an upcoming expiration. When the secret key expires, the hosting connection to Azure no longer functions. You will have to create a new application secret and update the hosting connection. |
Click Save.
You have now returned to the first page of the wizard. The subscription ID has been filled out. Enter a name for the connection and click Next.
In case an error is returned, you may have entered incorrect information or you may have forgotten to assign the appropriate RBAC permissions.
When all configurations were done correctly. you can now select the Azure region where the Citrix workers, the virtual machines, will be created.
Click Next.
Enter a name for the resource connection and select a virtual network and subnet.
Click Next.
Select a scope. By default, this is set to All, but you can choose a more granular scope if required.
Click Next.
Check and validate the information in the summary.
Click Finish.
The Azure hosting registration is now completed, both in Citrix Web Studio and in Azure.
Advanced configurations
This section deals with several advanced configurations.
- Optimize performance of MCS operation times (optimized API calls)
- Custom RBAC access rights (Narrow Scope Service Principal)
- Rename an app registration
- Renew the application secret of an Azure app registration
Optimize performance of MCS operation times (optimized API calls)
In May 2020, in the article Improving Azure performance with Machine Creation Services, Kate Gould describes how Machine Creation Services (MCS) has been enhanced to make use of the higher number of API calls that can be made within Azure.
The numbers are quite staggering, so make sure that your environment also makes use of these improvements. This only requires a small change to the configuration of your Azure hosting connection.
In Citrix Web Studio, in the left pane, go to Hosting. Select your hosting connection in the right pane and go to Edit Connection in the menu.
Modify the following two settings:
- Set the absolute value for simultaneous actions to 500
- Set the absolute value for maximum new actions per minute to 2000
Click Apply and then OK.
And that’s it! MCS operation times have now been dramatically improved.
Custom RBAC access rights (Narrow Scope Service Principal)
In some environments, it may not be possible to grant the app registration Contributor rights on the subscription scope. The alternative is to use a so-called Narrow Scope Service Principal, which is a difficult way of saying that you want to assign custom access rights to the app registration on only those resources that Citrix DaaS needs access to (and nothing more).
Let’s take this one step at a time. If the app registration is not granted Contributor access rights on the subscription scope, which access rights do you need to set and on which resources?
The exact list of granular access requirements can be found in the section Creating a Narrow Scope Service Principal using Custom Roles in the article How to Grant XenApp and XenDesktop Access to Your Azure Subscription. This list is very detailed and subject to change. It is also possible to use existing RBAC roles for your app registration and assign these to the resources you need. This is what I will demonstrate in this section. So let’s begin.
First, we will manually create one Azure resource group for each machine catalog in Citrix Web Studio. These resource groups will contain virtual machines, virtual hard disks, virtual network cards, and storage accounts that will be created in your machine catalog in Citrix Web Studio.
A resource group can contain an unlimited number of virtual disks and virtual machines, so one resource group per machine catalog is sufficient. In the past, only a maximum of 240 machines could be created per machine catalog, but this limitation was removed in 2020. Please remember though that there is a limit of 1200 VDAs per subscription! If you need more than 1200 virtual machines you will have to create more subscriptions.
In my lab environment, I created only one resource group called Citrix_Workers_W10_multi. This is the resource group I want to use for my Windows 10 multi-session virtual machines. My app registration is named Citrix Cloud and I granted it Contributor access rights directly on this resource group because it needs to be able to create, delete, and manage the virtual machines.
The next step is to grant the app registration access to the master image and the virtual network, the VNET. In my environment, both the VNET and the master image are located in the same resource group called Citrix.
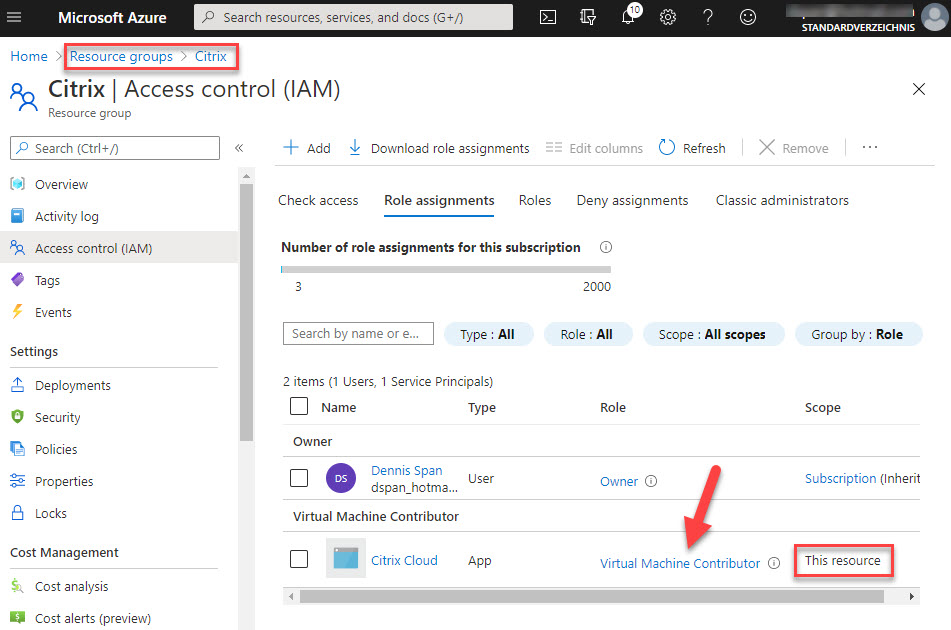
I therefore only have to grant access rights to this resource group. I assigned the role Virtual Machine Contributor to the app registration on the resource group Citrix.
Since the VNET (and the master image) are members of the resource group the permission is inherited.
You can still set the permissions more granular if you want to. This was just an example showing how permissions can be set without granting Contributor access to the subscription scope.
Rename an app registration
It is possible to rename the display name of an app registration.
Renaming can be done as follows. Go to App registrations and open the corresponding app registration. In the left pane, go to the section Branding. Here you can change the display name. Remember, Citrix DaaS uses the application ID of the app registration for the hosting connection and not the display name.
Renew the application secret of an Azure app registration
Citrix DaaS requires an app registration to access resources in Azure. The authentication method used is an application secret. Azure offers three options when it comes to the expiration date of an application secret:
- 1 year
- 2 years
- Never
If you choose 1 or 2 years, you will have to create a new application secret before it expires and you will have to update the Azure hosting connection in Citrix Web Studio.
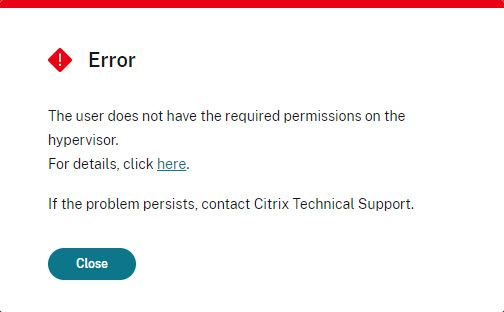
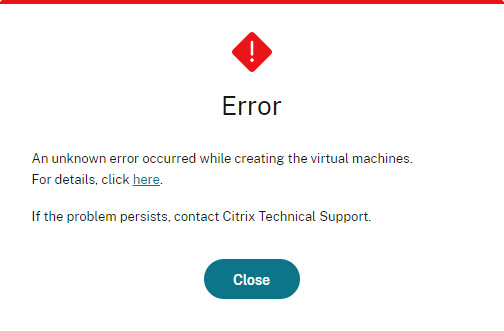
Otherwise, you may expect the following error when, for example, trying to create new virtual machines:
Also, the template properties are no longer accessible, again, because the path cannot be found.
This issue is quickly fixed though.
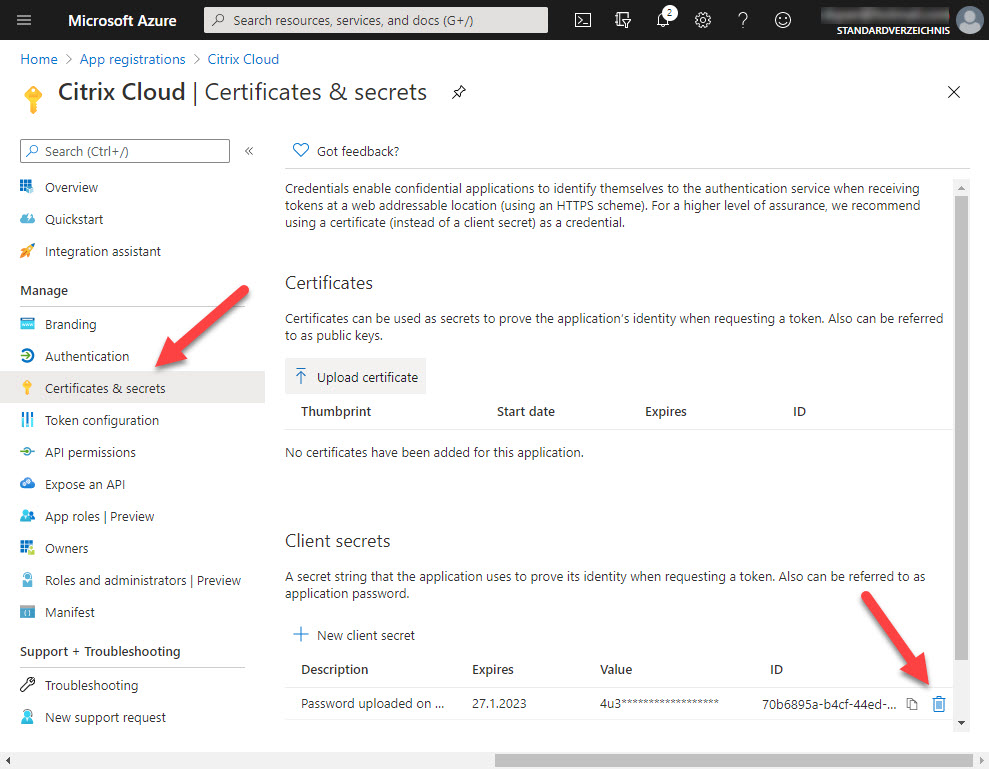
In Azure, open the app registration. In the left pane, go to Certificates & secrets and delete the existing (expired) application secret.
Confirm that you want to delete the application secret.
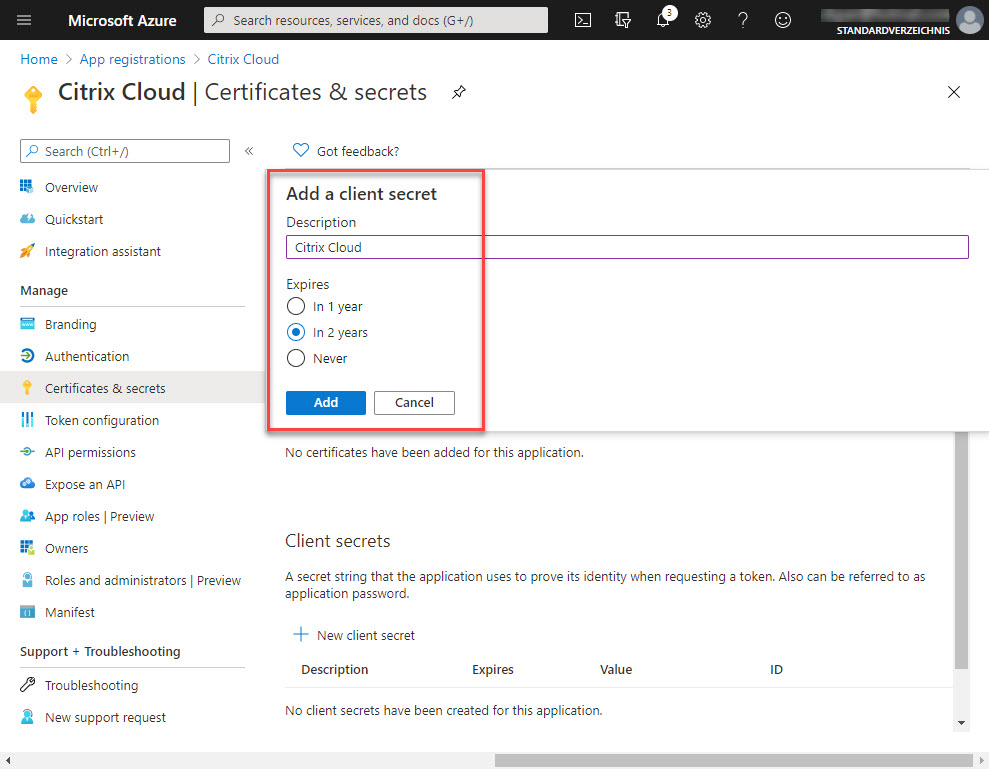
Create a new application secret.
Give the application secret a name and select the expiration date.
Click Add.
Make sure to copy the application secret before it is masked. Store it in a password vault.
Open Citrix Web Studio. In the left pane, go to Hosting. In the right pane, select your Azure hosting connection, and in the menu on the right select Edit Connection.
Scroll down and copy the new application secret.
Click Save. Another window opens, click Save again. In the last window click OK.
Now you will be able to create new virtual machines without any issues.
Congratulations dear reader! You’ve made it to the end! As with many of my articles, it turned out way longer than I initially intended. I plan to use this article as a reference with my customers and I hope you will too. If you have any questions, please leave a comment below.
Dennis Span works as a Principal Account Technology Strategist at Cloud Software Group in Vienna, Austria. He holds multiple Citrix certifications (CCE-V). Dennis has been a Citrix Technology Advocate (CTA) since 2017 (+ one year as Citrix Technology Professional, CTP). Besides his interest in virtualization technologies and blogging, he loves spending time with his family as well as snowboarding, playing basketball, and rowing. He is fluent in Dutch, English, German, and Slovak and speaks some Spanish.






















Hi Dennis, great article which I will hijack and reuse as well. Best regards and stay safe
Thanks Karsten! Hijack away my friend! 🙂
Hi Dennis, very helpful article. Very good to read and interesting.
regards
Thomas
Thanks a lot, Thomas! I appreciate your kind feedback!
Hey Dennis,
Great article, thanks a ton, I did try to deploy a VDI using MCS, it deploys it successfully, but for some reason it refuses to register, is there any settings we need to specifically define for Azure NSG.
Any help would be appreciated. Thanks
Hi Kunal,
Thanks! For VDA registration issues concerning Citrix Cloud and Azure I recommend that you run the Cloud Health tool on a domain-joined machine in Azure (https://docs.citrix.com/en-us/citrix-virtual-apps-desktops-service/manage-deployment/cloud-health-check.html).
Great article, I have just started with Citrix cloud and this was a great help. I am doing things using the wizards and so far so good.
Can you do another article on profiles and application settings stored on AzureFile shares and how to configure those best? This seems to be where I am struggling the most.
I am happy you like the article! Concerning Windows profiles on Azure Files I think that the following official Citrix article explains the process of creating an SMB file share on Azure quite well: https://docs.citrix.com/en-us/tech-zone/build/deployment-guides/citrix-azure-files.html. There are of course other ways of handling profiles. On the one hand, there are multiple technologies to choose from such as Citrix User Profile Manager (which is based on roaming profiles + folder redirection) and Microsoft FSLogix (which is a container-based solutions). Secondly, there are different storage possibilities as well, such as Azure Files and Azure NetApp Files (see this Mircosoft article for more information about the two options: https://docs.microsoft.com/en-us/azure/storage/files/storage-files-netapp-comparison). It all depends on the requirements of your organization.
Hi –
This is indeed a quite elaborate and precise document to be followed.
I have one concern regarding secret we use for hosting connection. The life for that secret remain 2 years since creation. What do you think the best way to input that secret in citrix cloud using powershell..reference cmdlet i am wondering
Hi DK. Are you asking me what is the best way how to configure the secret key using PowerShell whilst not displaying the key in plain text? If this is the case then I suggest that you read the following article: Encrypting passwords in a PowerShell script. Furthermore, the secret key, once entered in the hosting connection in Citrix Daas (Studio), cannot be retrieved anymore. The same goes for Azure: a secret key is only visible when creating it. Afterward you will have to create a new secret key if you lose the original one. I hope I was able to answer your question.