
Did you ever want to fully automate your XenApp 6.5 farm? Did you manage an automated unattended installation or image, but you are struggling to automate farm configurations? Would you like to learn how to create and configure policies for XenApp 6.5 with PowerShell? In this case, this article is just for you.
Automating Citrix consists of various components. You need to configure:
- Citrix administrators
- Citrix worker groups
- Citrix user and computer policies (explained in this article)
- Citrix load evaluators
| Note: see the article PowerShell Fundamentals if you are new to PowerShell or if you just want to refresh your memory. Especially important is the part about loading snap-ins and modules. Remember, the appropriate extensions need to be loaded before Citrix commands can be executed! |
Creating and configuring Citrix policies using PowerShell
Creating and configuring Citrix policies is one of the more complex items to script. It is complex because there are multiple steps involved and sometimes there is more than one option within a single step:
- Citrix policies can be created within a local Microsoft group policy, a Microsoft group policy in Active Directory or within an IMA based policy stored in the farm data store;
- Citrix policies need to be created, configured and applied to an object (such as an Active Directory security group);
- Policies need to be prioritized. If not, the policy which was created last will automatically be applied first (which may not be the correct order);
- Last but not least a policy contains many settings. Knowing the names of your settings can be quite a challenge.
Creating policies involves the following steps:
- Creating the corresponding drive (for Active Directory connections only)
- Creating the policy
- Configuring the policy
- Adding filter(s) to the policy
- Prioritizing the policy
The following script creates an IMA-based group policy. The policy name is “Main user policy” and the description is “Allow client drive and printer redirection”. The script configures the following user settings:
- Allow client drive redirection
- Allow client fixed drives
- Deny client floppy drives
- Allow client printer redirection
- Do not adjust the user’s default printer
The policy is filtered on the user group “%domain%\CitrixUsers” and clients starting with the name “WI*”. After configuring the policy the priority is set to 1. This makes it the highest policy so it is executed last.
|
1 2 3 4 5 6 7 8 9 10 11 12 13 14 15 16 17 18 19 20 21 22 23 24 25 26 27 28 29 30 31 32 33 34 35 36 37 38 39 40 41 42 43 44 45 46 47 48 49 50 51 52 53 54 55 56 57 58 59 60 61 62 63 64 65 66 67 68 69 70 71 72 73 74 75 76 77 78 79 80 81 82 83 84 85 86 87 88 89 90 91 92 93 94 95 96 97 98 99 100 101 102 103 104 105 106 107 108 109 110 111 112 113 114 115 116 117 118 119 120 121 122 123 124 125 126 127 128 129 130 131 132 133 134 135 136 137 138 139 140 141 142 143 144 145 146 147 148 149 150 151 152 153 154 155 156 157 158 159 160 161 162 163 164 165 166 167 168 169 170 171 172 173 174 175 176 177 178 179 180 181 182 183 184 185 186 187 188 189 190 191 192 193 194 195 196 197 198 199 200 201 202 203 204 205 206 207 208 209 210 211 212 213 214 215 216 217 218 219 220 221 222 223 224 225 226 227 228 229 230 231 232 233 234 235 236 237 |
#========================================================================== # CREATE, CONFIGURE AND PRIORITIZE CITRIX POLICIES # # AUTHOR: Dennis Span (https://dennisspan.com) # DATE : 20.11.2013 # Scripting language: PowerShell (v.2.0) # # COMMENT: This script creates, configures and priorizies a Citrix policy #========================================================================== # Logging: # "-" = comment # "I" = information # "S" = success (action successful) # "E" = error (action unsuccessful) # Set the error action preference to "stop" to ensure that the try and catch statements work for non-terminal errors $ErrorActionPreference = "Stop" # ================================================= # Configure variables - DO NOT CHANGE $Domain = $env:UserDomain # Define the environment variable UserDomain $ErrorCount = 0 # Define the variable ErrorCount # Configure variables - CHANGE TO MATCH YOUR COMPANY'S VALUES $PolicyDrive = "LocalFarmGPO" # Connect to a local farm policy, local Microsoft group policy or Active Directory Microsoft group policy # Possible values are "LocalFarmGPO" (default), "LocalGPO" or "ADGPO" $PolicyName = "Main user policy" # The name of the policy (if the policy is stored in Active Directory make sure it exists before running this script) $PolicyType = "User" # Set the policy type. Possible values are User or Computer. $PolicyDescription = "Allow client drive and printer redirection" # Describe the function of the policy $PolicyPriority = 1 # Set the priority of the policy (1 = highest; is executed last) # ================================================= # ================================================= # Load all Citrix cmdlets and PSM modules # ================================================= Add-PSSnapin citrix* Import-Module Citrix.GroupPolicy.Commands # ================================================= # Function: ConfigurePolicy # ================================================= # Configure the policy. Multiple items can be configured. # Explanation/example: # $ConfigurationItem = "ShadowUserNotification" # Define the item which needs to be configured # $ConfigurationType = "State" # Set the configuration type. Possible values are State and Value # $ConfigurationValue = "Enabled" # Set the configuration value. Example: # -When configuration type is State the following values are allowed: # Enabled, Disabled, NotConfigured, Allowed, Prohibited and UseDefault # # -When the configuration type is Values the value can be anything: # "LogOn", "500" or even XML type value in a PowerShell HereString: # $AllowShadowing = @” # {0x05/NT/%Domain%\%GroupName%/S-1-5-21-2149389083-42001601 # 94-2340756904-1136, 0x05/NT/%Domain%\%GroupName%/S-1-5-2 # 1-2149389083-4200160194-2340756904-1137, 0x05/NT/%Domain%\%GroupName% # /S-1-5-21-2149389083-4200160194-2340756904-1140} # “@ Function ConfigurePolicy($ConfigurationItem, $ConfigurationType, $ConfigurationValue) { Write-Host ("I - Set the $ConfigurationType of the policy item $($ConfigurationItem.ToUpper()) to $($ConfigurationValue.ToUpper())") try { If ($ConfigurationType -eq "State") { Set-CtxGroupPolicyConfiguration -PolicyName $PolicyName -Type $PolicyType -ConfigurationName $ConfigurationItem -State $ConfigurationValue -DriveName $PolicyDrive | Out-Null } Else { Set-CtxGroupPolicyConfiguration -PolicyName $PolicyName -Type $PolicyType -ConfigurationName $ConfigurationItem -Value $ConfigurationValue -DriveName $PolicyDrive | Out-Null } Write-Host ("S - The policy item $($ConfigurationItem.ToUpper()) has been configured successfully") } catch { Write-Host ("E - Configuring the policy $($ConfigurationItem.ToUpper()) ended in an error") $ErrorCount++ } } # ================================================= # Function: AddPolicyFilter # ================================================= # Add the filter(s) to the policy. Multiple filters can be configured. # Explanation/example: # $FilterName = automatically created # Every filter needs a unique filter name. This name is generated automatically by this function. # $FilterType = "User" # Set the filter type. Possible values are User, WorkerGroup, OU, ClientName, ClientIP, BranchRepeater or AccessControl # $FilterMode = "Allow" # Set the filter mode. Possible values are Allow or Deny (the default is Allow) # $FilterValue = "%Domain%\%GroupName%" # Set the filter value. Example values are: # -FilterType User: %Domain%\%GroupName% # -FilterType WorkerGroup: PRODUCTION # -FilterType OU: # -e.g. "CitrixServers" # -Do not enter a OU path such as "Servers\CitrixServers" # -Do not enter LDAP values such as "OU=Servers,OU=CitrixServers,DC=local,DC=com" # -FilterType ClientName: e.g. Workstation1 # -FilterType ClientIP: e.g. 192.168.1.1-192.168.1.5 # -FilterType BranchRepeater: unknown (I have not checked this out yet) # -FilterType AccessControl: unknown (I have not checked this out yet) Function AddPolicyFilter($FilterType, $FilterMode, $FilterValue) { # Generate the unique filter name (e.g. 11122013091958903241264) [string]$Random = Get-Random $FilterName = ("$(Get-Date -format ddMMyyyyHHmmss)$($Random)") Write-Host ("I - Generate the unique filter name. Result: $($FilterName.ToUpper())") # Add the policy filter Write-Host ("I - Add the filter $($FilterName.ToUpper()) to the policy $($PolicyName.ToUpper())") Write-Host ("I - -Filter type: $($FilterType.ToUpper())") Write-Host ("I - -Filter mode: $($FilterMode.ToUpper())") Write-Host ("I - -Filter value: $($FilterValue.ToUpper())") if ($FilterType.ToUpper() -eq "USER") { Write-Host ("I - - Make sure that the user group exists otherwise an error follows") } try { Add-CtxGroupPolicyFilter -PolicyName $PolicyName -Type $PolicyType -FilterType $FilterType -FilterName $FilterName -Mode $FilterMode -FilterValue $FilterValue -DriveName $PolicyDrive | Out-Null Write-Host ("S - The filter policy has been added successfully") } catch { Write-Host ("E - Adding the filter to the policy $($ConfigurationItem.ToUpper()) ended in an error") $ErrorCount++ } Write-Host ("") } # ================================================= # Task 1 of 5: Connect to the corresponding Citrix drive # ================================================= Write-Host ("I - 1/5 CONNECT TO DRIVE") Write-Host ("I - ====================") Write-Host ("I - Create the corresponding PowerShell drive (for connections to AD only)") if ($PolicyDrive.ToUpper() -eq "ADGPO") { # Note: The new PowerShell drive is a non-persistent drive that is used only within the session try { # Check if the drive exists Get-PSDrive -Name "ADGPO" | Out-Null Write-Host ("I - The drive ADGPO already exists") } catch { try { # Create the drive New-PSDrive -Name "ADGPO" -PSProvider CitrixGroupPolicy -Root \ -DomainGpo $PolicyName | Out-Null Write-Host ("S - The drive ADGPO has been created successfully") } catch { Write-Host ("E - Creating the drive ADGPO ended in an error") Write-Host ("E - Make sure that the policy $($PolicyName.ToUpper()) exists in Active Directory") Write-Host ("E - This script will now exit") return 1 | Out-Null } } } else { Write-Host ("I - The drive $($PolicyDrive.ToUpper()) does not need to be created") } Write-Host ("") # ================================================= # Task 2 of 5: Create the Citrix policy # ================================================= Write-Host ("I - 2/5 CREATE POLICY") Write-Host ("I - =================") Write-Host ("I - Create the Citrix policy $($PolicyName.ToUpper()) (if not exists)") if (Get-CTXGroupPolicy -PolicyName $PolicyName -Type $PolicyType -DriveName $PolicyDrive) { Write-Host ("I - The policy already exists") } Else { try { # Create the policy New-CtxGroupPolicy -PolicyName $PolicyName -Type $PolicyType -Description $PolicyDescription -DriveName $PolicyDrive | Out-Null Write-Host ("S - The policy $($PolicyName.ToUpper()) has been created successfully") } catch { Write-Host ("E - Creating the policy $($PolicyName.ToUpper()) ended in an error") $ErrorCount++ } } Write-Host ("") # ================================================= # Task 3 of 5: Configure the Citrix policy # ================================================= Write-Host ("I - 3/5 CONFIGURE POLICY") Write-Host ("I - ====================") Write-Host ("I - Configure the Citrix policy $($PolicyName.ToUpper())") # Allow client drive redirection ConfigurePolicy "ClientDriveRedirection" "State" "Allowed" # Allow client fixed drives ConfigurePolicy "ClientFixedDrives" "State" "Allowed" # Deny client floppy drives ConfigurePolicy "ClientFloppyDrives" "State" "Prohibited" # Allow client printer redirection ConfigurePolicy "ClientPrinterRedirection" "State" "Allowed" # Do not adjust the user's default printer ConfigurePolicy "DefaultClientPrinter" "Value" "DoNotAdjust" Write-Host ("") # ================================================= # Task 4 of 5: Add filter(s) to the Citrix policy # ================================================= Write-Host ("I - 4/5 FILTER POLICY") Write-Host ("I - =================") Write-Host ("I - Add filter(s) to the Citrix policy $($PolicyName.ToUpper())") # Apply this policy to users in the group "" AddPolicyFilter "ClientName" "Allow" "WI*" # Apply this policy to clients starting with the name WT* AddPolicyFilter "User" "Allow" "$Domain\CitrixUsers" Write-Host ("") # ================================================= # Task 5 of 5: Prioritize the Citrix policy # ================================================= Write-Host ("I - 5/5 PRIORITIZE POLICY") Write-Host ("I - =====================") Write-Host ("I - Prioritize the Citrix policy $($PolicyName.ToUpper())") try { # Prioritize the policy Set-CtxGroupPolicy -PolicyName $PolicyName -Type $PolicyType -Priority $PolicyPriority -DriveName $PolicyDrive | Out-Null Write-Host ("S - The policy $($PolicyName.ToUpper()) has been prioritized successfully") } catch { Write-Host ("E - Prioritizing the policy $($PolicyName.ToUpper()) ended in an error") $ErrorCount++ } Write-Host ("") Write-Host ("I - End of script (errors: $ErrorCount)") |
The rest of this article analyzes the script in detail.
General
The script can run as-is in any environment. Simply copy the script into Notepad or any other (more sophisticated) tool and save it as a *.PS1 file. Change the following values according to your specifications:
- $PolicyDrive -> possible values are LocalFarmGPO (default), LocalGPO or ADGPO*
- $PolicyName -> choose a name for the policy (the name can contain spaces)
- $PolicyType -> possible values are User or Computer
- $PolicyDescription -> write a description for the policy (optional)
- $PolicyPriority -> enter a number (1 or higher) to determine the priority level**
*The value LocalFarmGPO stores the policy in the Citrix data store, LocalGPO stores the policy in a local group policy object and ADGPO stores the Citrix policy in an Active Directory policy. Make sure that the Active Directory policy exists before executing the script.
**Priority 1 is the highest, which means that the policy is executed last.
Also, the actual policy configurations and filter need to be configured according to your preferences as well.
For more information go to the section Configuring the policy.
For more information go to the section Adding filter(s) to the policy.
Part 1 of 5: creating the corresponding drive
Before you create a Citrix policy you have to decide if you want to store it in the farm data store, in a local Microsoft policy or in Active Directory. This is done by entering the corresponding value in the variable $PolicyDrive (see previous paragraph).
After loading the Citrix snapins the PowerShell drives “LocalFarmGPO” and “LocalGPO” are created by default.
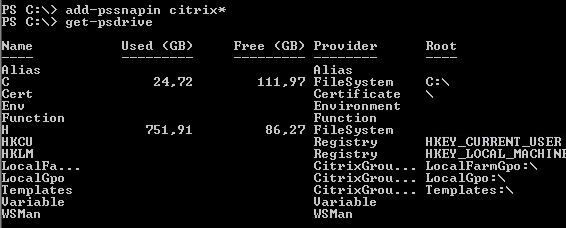
Only a connection (drive) to Active Directory needs to be created. The script checks the value in the variable $PolicyDrive; if “ADGPO” is entered a new PowerShell drive connecting to Active Directory is created. The new PowerShell drive is a non-persistent drive used only within the session.
Note:
I recommend always placing your policies in the data store. My reasons are the following:
- Citrix policies cannot be managed on every Windows server in your domain and I want always to be able to manage my Microsoft policies from whichever server I choose.
Explanation: Citrix policies are associated with Group Policy Objects (GPOs) using console extensions. You need the Citrix group policy engine to manage settings and this engine is only part of the Citrix console. The policies are archived in Sysvol, but no ADM files are used to configure these policies and there is no Active Directory schema extension. Sysvol is merely used as a distribution mechanism. - I do not like the whole look and feel of the Citrix extension within a Microsoft policy. I find it confusing that you can create multiple Citrix policies in one Microsoft policy. I am worried you may lose track of which setting is configured where. Also, I am not happy with the fact that I have to use a Citrix tool to manage settings in a Microsoft policy.
- The fact that the Citrix policies are a client extension they cannot be managed with third-party tools (such as NetIQ for example).
- And last but not least, why bother placing Citrix policies in Active Directory at all? What is the benefit? The policies are only used on Citrix XenApp servers in the first place. Active Directory (Sysvol) is only used as a distribution mechanism, so why not store these settings in the data store? The data store also automatically replicates the policies to all (XenApp) servers.
I simply see no benefits, only disadvantages.
Links:
- FAQ: Citrix Policies in XenApp 6.0 or later Cannot be Configured Using ADM Templates
http://support.citrix.com/article/CTX125141(article no longer exists) - Citrix Group Policy Engine Facts in XenApp Version 6.x
http://support.citrix.com/article/CTX125152
Part 2 of 5: creating the policy
After connecting to the correct drive the policy is created. This is done via the command:
|
1 |
New-CtxGroupPolicy -PolicyName $PolicyName -Type $PolicyType -Description $PolicyDescription -DriveName $PolicyDrive |
The command takes its input from the variables $PolicyName, $PolicyType, $PolicyDescription and $PolicyDrive as defined in the beginning of the script.
A newly created policy it is empty: there are no settings configured by default. If the policy already exists the script simply continues with part 3 “Configuring the policy”.
Part 3 of 5: configuring the policy
Two types of policies can be configured; either computer and user. Unlike Microsoft policies, there are no settings that can be configured in both policies.
Policies can contain various types of settings:
- State
- Value
- Other, such as data in XML (e.g. settings for Health Monitoring)*
Many policies contain both a state and a value. When configuring a value the setting itself is enabled automatically. Therefore, it is unnecessary to set a value and explicitly enable the policy.
The script contains the function ConfigurePolicy which can configure either a state or a value. For example, to allow client drive redirection call the function as follows:
|
1 |
ConfigurePolicy "ClientDriveRedirection" "State" "Allowed" |
The function ConfigurePolicy needs to be called with three parameters: the name of the policy item, the type (“state” or “value”), and the actual state or value.
If you want to know which settings can be configured install the Citrix PowerShell SDK and check the Citrix XenApp 6.5 Server SDK Help file in the section Group Policy Settings. The XenApp 6.5 SDK can be downloaded here:
https://www.citrix.com/downloads/xenapp/sdks/powershell-sdk.html
Part 4 of 5: adding filter(s) to the policy
After creating and configuring the policy needs to be applied to either a:
- Access Control
- Branch Repeater
- Client IP Address
- Client Name
- Organizational Unit
- User or Group
- Worker Group
Before being able to create a filter there is one additional step that needs to be performed. A filter name needs to be created before a filter can be applied. The filter name is never used or seen in any console, so the name is not important. The name has to be unique though. I therefore always use the current date and time (including the seconds) and the Get-Random cmdlet to generate the name.
|
1 2 3 4 |
# Generate the unique filter name (e.g. 11122013091958903241264) [string]$Random = Get-Random $FilterName = ("$(Get-Date -format ddMMyyyyHHmmss)$($Random)") Write-Host ("I - Generate the unique filter name. Result: $($FilterName.ToUpper())") |
After creating the filter name the actual filter can be applied. As mentioned several different filter types exist. The function AddPolicyFilter is responsible for applying the filter. Here are some examples:
Apply an ALLOW filter based on an IP range:
|
1 |
AddPolicyFilter "ClientIP" "Allow" "192.168.1.1-192.168.1.5" |
Apply an ALLOW filter based on the client name starting with WI (followed by a wildcard):
|
1 |
AddPolicyFilter "ClientName" "Allow" "WI*" |
Apply an ALLOW filter based on the OU CitrixServers*:
|
1 |
AddPolicyFilter "OU" "Allow" "CitrixServers" |
*Write the actual name of the (child) OU. Do not enter a path such as “Servers\CitrixServers” and do not enter an LDAP value such as “OU=Servers,OU=CitrixServers,DC=local,DC=com”.
Apply an ALLOW filter based on the domain group CitrixUsers:
|
1 |
AddPolicyFilter "User" "Allow" "$Domain\CitrixUsers" |
Apply a DENY filter based on the worker group PRODUCTION:
|
1 |
AddPolicyFilter "WorkerGroup" "Deny" "PRODUCTION" |
Part 5 of 5: prioritizing the policy
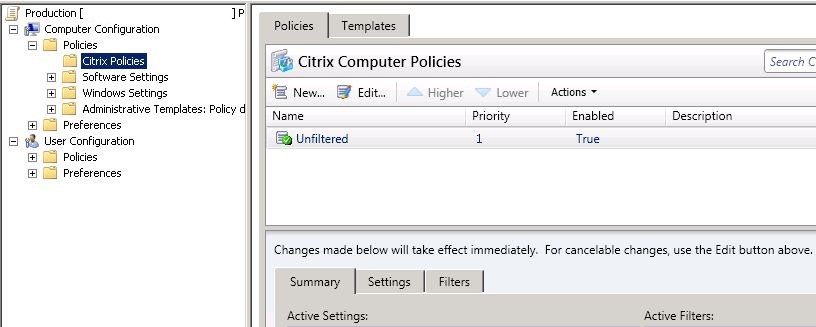
After creating a policy it needs to be prioritized. This is the last step in the policy creation process. The policies should be applied in the order of your choosing. Policy ranking is not always important if there are no conflicting settings. The unfiltered policy however should always be applied first since it cannot be filtered on specific computers or users. This means that the unfiltered policy should always have the lowest rank which means that it has the highest number of all policies.
|
1 |
Set-CtxGroupPolicy -PolicyName $PolicyName -Type $PolicyType -Priority $PolicyPriority -DriveName $PolicyDrive |
The command takes its input from the variables $PolicyName, $PolicyType, $PolicyPriority and $PolicyDrive as defined in the beginning of the script.
Related articles:
- Automating XenApp 6.5 Part 1 of 4 – Citrix Administrators
- Automating XenApp 6.5 Part 2 of 4 – Citrix Worker Groups
- Automating XenApp 6.5 Part 4 of 4 – Citrix Load Evaluators
- PowerShell “one-liners” for Citrix XenApp 6.x
Dennis Span works as a Principal Account Technology Strategist at Cloud Software Group in Vienna, Austria. He holds multiple Citrix certifications (CCE-V). Dennis has been a Citrix Technology Advocate (CTA) since 2017 (+ one year as Citrix Technology Professional, CTP). Besides his interest in virtualization technologies and blogging, he loves spending time with his family as well as snowboarding, playing basketball, and rowing. He is fluent in Dutch, English, German, and Slovak and speaks some Spanish.