Last week I was confronted with an interesting issue where QoS (DSCP) settings are not applying on Citrix or RDS servers. This is caused by Microsoft’s Dynamic Network Fair Share feature. Let me explain.
Contributors: Werner Millich and Lukasz Baszczowski
QoS settings can be configured using a Microsoft group policy. In the example below I set the DSCP value 46 for the executable phonesystem.exe. This setting should be applied to a Citrix worker running on Windows Server 2019.
However, on a Citrix multi-session worker (and also on a native RDS server), QoS settings are automatically overwritten by the system and assigned the value 0.
You can check the currently effective QoS policies with the following PowerShell command:
|
1 |
Get-NetQosPolicy -PolicyStore "ActiveStore" |
Although it is difficult to identify, the result in the screenshot below tells you that there is a problem.
This becomes clear when you see the result on a machine where the QoS settings are applied correctly:
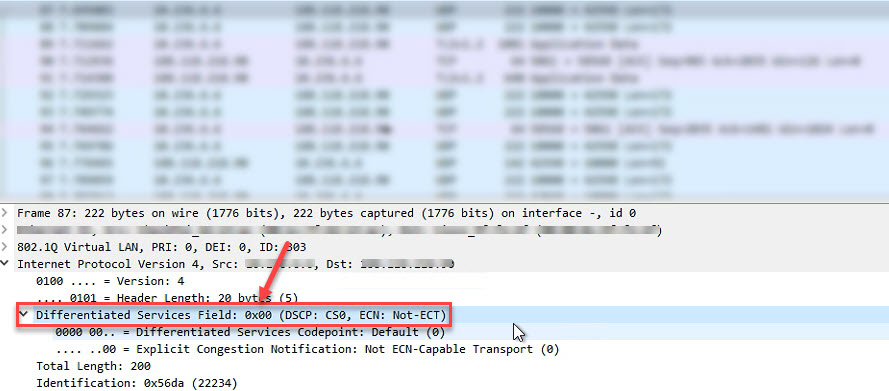
A Wireshark trace will show more clearly that the DSCP values are overwritten and set to 0:
What is behind all this is that QoS settings are overwritten on any Windows operating system that has the Dynamic Network Fair Share feature enabled. And, on a machine that has the Remote Desktop Services role installed, Microsoft’s Fair Share technologies are enabled automatically!
Microsoft’s Fair Share technologies were introduced in Windows Server 2008 R2:
- Fair Share CPU Scheduling
Dynamically distributes processor time across all Remote Desktop Services sessions on the same RD Session Host server, based on the number of sessions and the demand for processor time within each session. - Dynamic Disk Fair Share
Balances disk access among the different sessions by balancing disk IO and throttling excess disk usage. - Dynamic Network Fair Share
Equalizes network consumption among the different sessions using a round-robin approach to allocate bandwidth for each session.
The Fair Share CPU Scheduling feature is probably most known to Citrix administrators since it can be managed using a Microsoft group policy and because Citrix offers its own CPU management capabilities in Workspace Environment Manager.
The other two features can be enabled/disabled by setting a registry value (which can be deployed using a Microsoft group policy preference for example).
To solve our problem we need to disable the Dynamic Network Fair Share feature by setting the registry value EnableFairShare in the registry key HKLM\SYSTEM\CurrentControlSet\Services\TSFairShare\NetFS to 0 (DWORD). I recommend using a group policy preference for this:
- Action: replace
- Hive: HKEY_LOCAL_MACHINE
- Key path: SYSTEM\CurrentControlSet\Services\TSFairShare\NetFS
- Value name: EnableFairShare
- Value type: DWORD
- Value data: 0
Now the QoS settings are applied correctly. Of course, you have to take into account that disabling Dynamic Network Fair Share means that network traffic is no longer distributed evenly among all sessions on that particular machine.
I hope the information in this article was of some help to you.
Dennis Span works as a Principal Account Technology Strategist at Cloud Software Group in Vienna, Austria. He holds multiple Citrix certifications (CCE-V). Dennis has been a Citrix Technology Advocate (CTA) since 2017 (+ one year as Citrix Technology Professional, CTP). Besides his interest in virtualization technologies and blogging, he loves spending time with his family as well as snowboarding, playing basketball, and rowing. He is fluent in Dutch, English, German, and Slovak and speaks some Spanish.


