This article offers an image optimization tools comparison matrix and shows you where these tools overlap each other and what separates them.
A big thank you to Wolfgang Thürr (X, Twitter) for his assistance in writing this article.
| Change Log 20.09.2018: updated article to latest versions of all tools 01.05.2019: updated article to latest versions of all tools (e.g. v.2.1.1.23 of Citrix Optimizer) |
Table of Contents |
Optimization tools comparison matrix
Optimizing your golden master image can give you quite a performance boost, but without comparing the available image optimization tools, how do you know which one or ones to choose?
Below you find a detailed comparison matrix of the main image optimization tools. The output format is Excel. This was the best option to break down to the desired level of detail. Also, a big thank you to Citrite (and fellow CTA) Daniel Feller for his comprehensive overview of Windows Default Apps across multiple Windows 10 versions.
| Note: please be aware that in the Excel sheet below only true optimizations are compared (with some minor exceptions to this rule). Mainly, only those optimizations that improve the performance of the VM (higher user density), lead to faster user logon times, or improve the user experience are listed. Customizations such as changes to the sound or color scheme and changes that lead to weaker security (e.g. disabling UAC, Windows Firewall) have been deliberately left out, except for Data Execution Prevention (DEP). Also, customizations based on the HKCU registry hive (= current user) have been left out. This relates especially to the VMWare OS Optimization Tool. I do recommend you go through the current user settings as defined in the VMWare OSOT tool and select the ones you would like to configure in your environment. However, I recommend using a Microsoft Group Policy to deploy these settings and not to include them in the image itself. Last but not least, most optimizations concern non-persistent machines, so make sure that you understand which settings could have a negative impact when it comes to persistent devices (e.g. disable Windows Update, minimize event log, disable last access time stamp, remove recycle bin, etc.). |
A closer look at the optimization tools compared in this article
The following paragraphs describe each of the optimization tools compared in this article. Also included is a subjective opinion on the ‘likes and dislikes’ of each tool. You are very welcome to challenge or add to these opinions! Simply leave a comment at the end of this article and your voice will be heard.
Citrix Optimizer
|
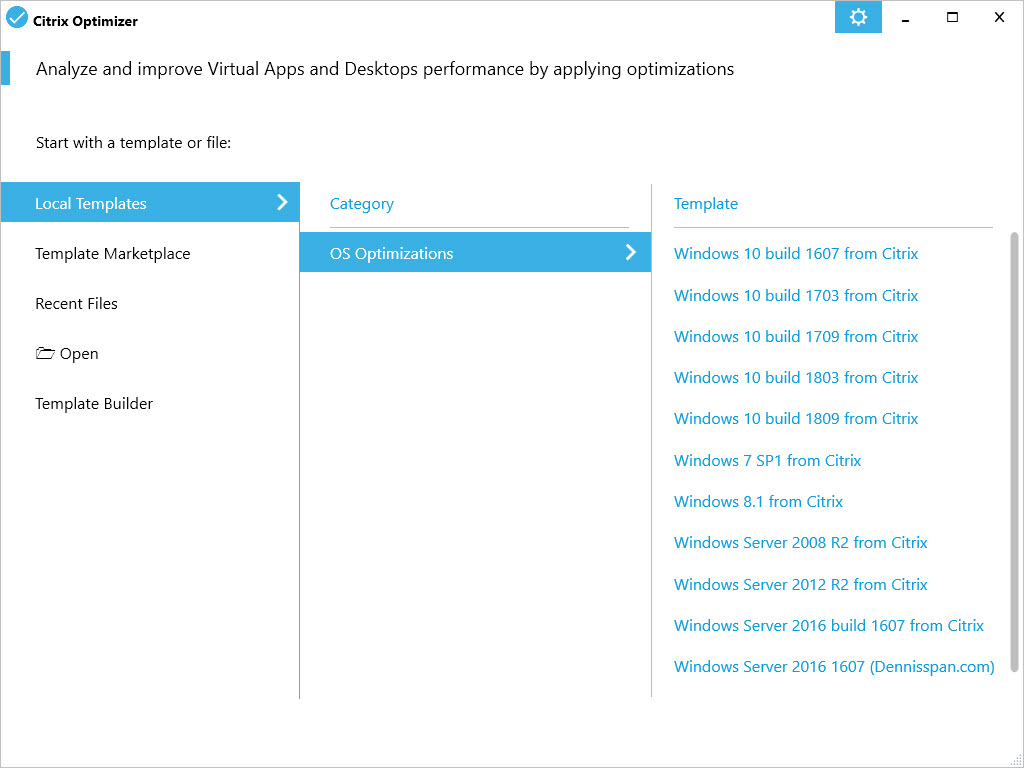
Citrix Optimizer contains 11 different configuration templates (XML files). The latest version of the tool offers the following templates:
- Windows 7
- Windows 8.1
- Windows 10 version 1607
- Windows 10 version 1703
- Windows 10 version 1709
- Windows 10 version 1803
- Windows 10 version 1809
- Windows Server 2008 R2
- Windows Server 2012 R2
- Windows Server 2016 version 1607
- Windows Server 2019 version 1809
The tool offers both a GUI and a command line option (PowerShell).
There are multiple ways to execute this tool on the command line. For an overview of all command line switches open (edit) the PowerShell file CtxOptimizerEngine.ps1. Here you find several examples.

Below you see an example showing you how to execute Citrix Optimizer when using PowerShell.
|
1 |
powershell -executionpolicy bypass -file C:\Temp\CitrixOptimizer\CtxOptimizerEngine.ps1 -Source C:\Temp\CitrixOptimizer\Templates\Citrix_Windows_Server_2016_1607.xml -Mode Execute |
Citrix Optimizer is a great tool. It is very easy to use and the GUI is modern and slick. There are still some optimizations that could be added though, for example:
- Various miscellaneous options (which are not always pure optimizations) such as:
- Cleanup local profiles
- Cleanup temporary files
- Delete Windows event logs
- Disable Cortana (registry) with enabled Windows Search service
- Disable Customer Experience Improvement Program (completely)
- Disable hibernation
- Disable TCP/IP Task Offload (especially important for Provisioning Server)
- Options that are configured by the Provisioning Services (PVS) Target Device Optimization Tool could be included as well, such as:
- Clear page file at shutdown
- Reduce event log size (this is not required when the event log is redirected to a persistent hard disk such as the PVS write-cache disk)
A little bird told me that many of the above settings will be included in one of the upcoming releases of Citrix Optimizer in 2019.
Optimizations that may require different configurations depending on the environment will most likely never be included in Citrix Optimizer. Citrix can only add optimizations that can be configured in any environment. Here are some examples of such settings:
- Disable Active Setup
- Delete Ghost devices
- Disable IPv6
For this reason, I created my own custom template for Windows Server 2016 that includes some of the settings that Citrix simply cannot add to their own templates. For more information, see the article Citrix Optimizer custom template for Windows Server 2016 on this website.
All-in-all Citrix Optimizer is a great tool and I highly recommend you to use it in your environment. And since this tool is under constant development it will only get better and better in the future. One of the coolest newest features is the Template Builder making it easier to create custom templates. The feature Marketplace allows easy integration of custom (third-party) templates.
 |
 |
|
|
VMWare OS Optimization Tool
|
Before you continue, please be aware that this tool has been created to be used with VMWare products. This tool was not created with Citrix in mind, so do not expect all Citrix best practices to be in place. This is especially true concerning Citrix deployment technologies such as Machine Creation Services (MCS) and Provisioning Server (PVS).
The VMWare OS Optimization Tool contains 13 different configuration templates (XML files). The latest version of the tool offers the following templates:
- App Volumes Packaging Machine
- Windows 7
- Windows 8
- Windows 8.1
- Windows 10 – LoginVSI.com
- Windows 10
- Windows 10 (Horizon Cloud)
- Windows Server 2008-2012
- Windows 2016 – LoginVSI.com
- Windows Server 2016 – Desktop
- Windows Server 2016 – RDSH
- Windows Server 2016 – Server
The tool offers both a GUI and a command line option.

There are multiple ways to execute this tool on the command line. For an overview of all available switches and parameters, execute the command VMwareOSOptimizationTool.exe /?.
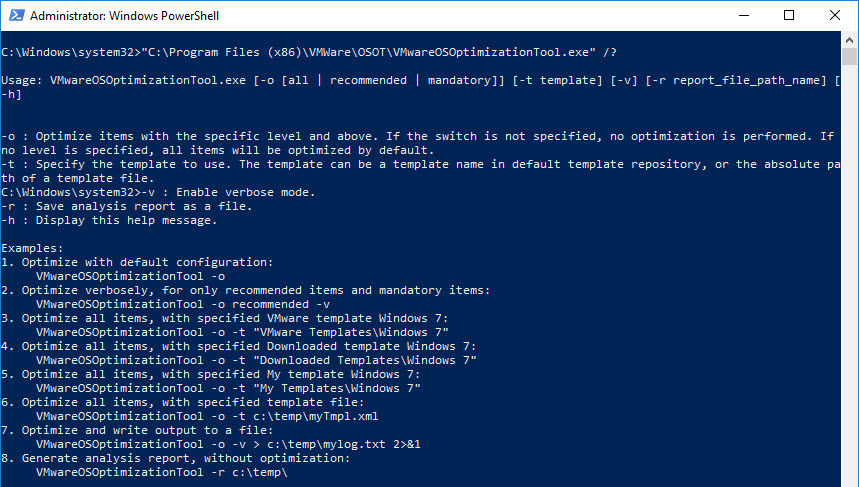
Please realize that this software is currently only available as Technology Preview Software (beta). According to the license agreement, the beta version of the software can be freely used for testing and evaluation purposes. It may happen that the future commercial version is not for free!
“(a) Limited License. Subject to the terms and conditions of this Agreement, VMware grants to Licensee a non-exclusive, non-transferable license (without the right to sublicense) (i) to use the Technology Preview Software in accordance with the Documentation solely for purposes of internal testing and evaluation on whether or not to license commercial versions of the Technology Preview Software if such commercial versions ever become available.”
The license agreement also clearly states that “VMware is under no obligation to support the Technology Preview Software in any way“. So use this software at your own risk, especially when you are considering using it for your images in production.
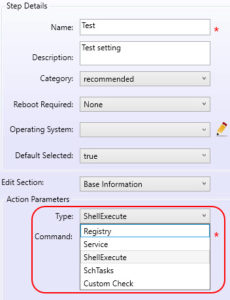
All-in-all the VMWare Optimization Tool is a good and powerful tool. It is more complex than Citrix Optimizer, but it also offers many more settings and options. Each template can be exported and customized in any way you see fit. You can even create your own custom groups and steps through the GUI. In the screenshot below, you can see that you can configure a service, a registry item, or a scheduled task. You are even able to select the option ShellExecute, which allows you to execute a command. That is really quite amazing for a free tool!
However, there are a few things I am not too happy about:
- Many settings in my opinion are customizations and not optimizations (e.g. default printer and sound scheme). Each template contains a large number of settings. Understanding these settings and their effect can be complicated enough, without there being non-essential items.
- Some optimizations are too aggressive, for example disabling the Hyper-V services in the Windows 10 template. Of course, this particular example only applies when using the VMWare OS Optimization Tool on Hyper-V. It is interesting though when you think about it, VMWare disabling Hyper-V services….
- Some optimizations (in some of the templates) go against Citrix best practices, such as disabling the Volume Shadow Copy Service when using Citrix Provisioning Server (see Using the Imaging Wizard to create a new vDisk). The Provisioning Server Imaging Wizard requires this service.
- Some optimizations lower the level of security, such as disabling the Windows firewall, User Account Control (UAC), and Data Execution Prevention (DEP). In some templates, some of these settings are even listed as recommended. It is advisable not to disable these security-related components.
- According to the license agreement, the tool cannot be used in production. Also, it is currently unknown if the tool will be freeware in the future and available to everyone (even if you want to use it to optimize an image to be used with Citrix XenDesktop and not VMWare Horizon View).
- It is sometimes difficult to understand the differences between the templates and when to use which template. For example, in the template Windows 10, the setting Disable TCP/IP Task Offload is set to enabled (value 0). This is the correct value for a physical client. In case you want to use Windows 10 for VDI, you should use a template such as Windows 10 – LoginVSI.com. In this template, the setting Disable TCP/IP Task Offload is set to disabled (value 1). In some templates, settings are not set according to their description (e.g. something is stated to be disabled when it is actually enabled). My point is, that you have to watch out and check the individual settings per template before using it.
My advice to you is this: if you want to use the VMWare OS Optimization Tool in your environment, create a new template by making a copy of the template that best fits your requirements. Then go through each setting and make corrections where necessary. Also, remove settings you do not want and add missing configurations.
 |
 |
|
|
Provisioning Services (PVS) Target Device Optimization Tool (TargetOSOptimizer.exe)
|
The Provisioning Services (PVS) Target Device Optimization Tool is a smaller tool compared to Citrix Optimizer and the VMWare OS Optimization Tool. This tool is included in both the Provisioning Server Target Device software and the Virtual Delivery Agent (VDA) and includes the settings as shown in the screenshot below.
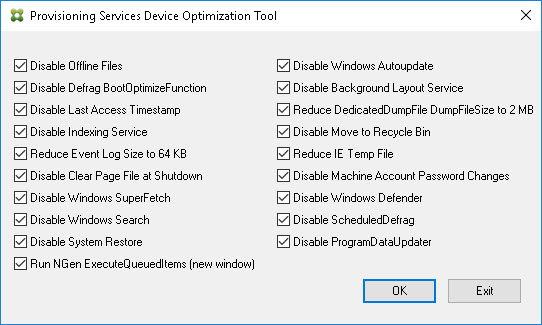
The article How to Optimize XenDesktop Machines describes each of these settings in detail.
| Note: the setting Disable Machine Account Password Changes is NOT configured when the tool is executed silently (TargetOSOptimizer.exe /q). In this case, use the Microsoft Group Policy setting instead. |
After installing the Provisioning Server Target Device software, the optimization tool, by default, is located here:
C:\Program Files\Citrix\Provisioning Services\TargetOSOptimizer.exe
The Provisioning Services (PVS) Target Device Optimization Tool is started by the Provisioning Server Imaging Wizard. This wizard is used to create a vDisk or image file (VHDX) from the master target device. If you select Optimize the hard disk again […], the executable TargetOSOptimizer.exe is launched.

After installing the Virtual Delivery Agent (VDA) software the optimization tool, by default, is located here:
C:\Program Files\Citrix\PvsVm\TargetOSOptimizer\TargetOSOptimizer.exe
In the case of the Virtual Delivery Agent (VDA), the Provisioning Services (PVS) Target Device Optimization Tool is started during installation (if selected).
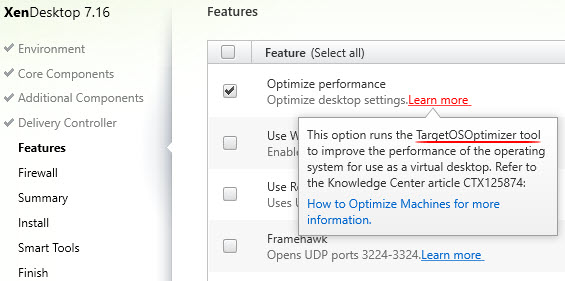
There is no disadvantage to using this tool. The only thing to remember is that it is far from complete, so it is advisable to use another optimization tool as well (e.g. Citrix Optimizer or the VMWare OS Optimization Tool). My recommendation though is to forget about this tool (simply skip it) and only use Citrix Optimizer at the end of your image creation process.
 |
 |
|
|
Base Image Script Framework (BIS-F)
|
BIS-F is an image cleaning, optimization, and sealing framework. The abbreviation stands for Base Image Script Framework and is one of our community’s great free tools. The company behind the tool is Login Consultants and its main developer is Matthias Schlimm. The framework supports Citrix XenApp/XenDesktop with MCS and PVS, VMware View, and Microsoft RDS.
BIS-F is different compared to Citrix Optimizer and the VMWare OS Optimization Tool. BIS-F includes optimizations to improve user density and user logon times (see the Comparison Matrix for more information), but it does so much more than that, such as:
- Cleaning image:
- Cleanup local profiles
- Cleanup temporary files
- Delete Windows event logs
- Delete Ghost devices
- And more…
- Integration and execution of third-party tools:
- Citrix Optimizer
- VMWare OS Optimization Tool
- CCleaner
- DelProf
- SDelete
- And more…
- Configuring/Optimizing third-party products:
- Ivanti RES
- Ivanti AppSense
- SCCM
- Anti-Virus (8 vendors supported)
- And more…
- Sealing/preparing image:
- Redirect files and folders to PVS Write Cache Disk
- Optimizations for Citrix App Layering
- Create a VHDX file to be used with PVS on a network share
These are just a few of the many things BIS-F does for you.
As listed above, BIS-F can execute Citrix Optimizer and the VMware OS Optimization Tool directly. You get the best results by running BIS-F in combination with one of these third-party optimization tools.
BIS-F works in conjunction with Microsoft Group Policies. The tool is mainly GUI-driven, but you can also completely automate it. For more information on how to automate BIS-F, please see the article How to configure and run BIS-F in an SCCM task sequence.
 |
 |
|
|
Optimization guides and community articles
There are several great articles out there concerning image optimization tools and their impact on performance. It would be remiss not to mention these great community contributions. So here it goes.
- OPTIMIZERS: VMware VS Citrix! by Chris Twiest. In his article, Chris compares Citrix Optimizer and the VMWare OS Optimization Tool and tests user login time and user density under different circumstances.
- Image Optimization Analysis – Citrix XenApp by James Kindon. In this article, James, among other things, takes a look at the impact the various optimization tools have on user logon time.
- Reduce Citrix logon times by up to 75% by fellow CTA George Spiers. In this article, George deals with multiple login optimizations which massively reduce the user’s logon times. He also offers his own Windows Server 2016 Optimisation Script.
A Look at the New Citrix Optimizer by fellow CTA Mark Plettenberg. In this article, he uses the software Login VSI to quantify the performance boost after optimizing the operating system.
In case I forgot to mention any other great articles out there, please accept my apologies. Simply send me a link and I will add the article to the list.
Also, see some of my other articles concerning Citrix Optimizer:
- Creating a custom template for Citrix Optimizer
- Citrix Optimizer custom template for Windows Server 2016
Another great source of information are the following Citrix and Microsoft optimization guides:
- Citrix
- Windows 10 Optimization Guide
Windows 8 and 8.1 Virtual Desktop Optimization Guide(link expired)XenApp 6.x (Windows 2008 R2) – Optimization Guide(link expired)- Windows 7 Optimization Guide
- WINDOWS SERVER 2016 OPTIMIZATIONS FOR CITRIX XENAPP (by Citrite Daniel Feller).
- Microsoft:
Conclusion
After reading this article you will have a better understanding of the various optimization tools out there. But still, the question remains, which tool or combination of tools to use? It is not possible to give you a definitive answer, because too much depends on your environment and your organization’s requirements. However, I can share with you my thoughts on this matter:
- None of the tools listed in this article are 100% complete or optimize your environment perfectly. You will still have to put in some work to see which settings work for you (and which do not!). Also, do not forget that other products may need to be optimized as well, for example, your anti-virus product.
- It takes some time and effort to build an image that has the right balance between (vendor) best practices and your organization’s requirements, even with the help of optimization tools.
- You can use a combination of the tools listed in this article.
- Before optimizing anything, make sure to measure the following in your environment:
- Your current average logon times
- Your current user density (= maximum concurrent users on one VM)
- As stated in the introduction of this article, many of the optimizations concern non-persistent target devices. In case you want to optimize a persistent device, make sure to only enable those settings that make sense (e.g. do not disable Windows Update, do not minimize event log, do not disable last access time stamp, do not remove recycle bin, etc.).
- Some optimizations may reduce user experience. For example, removing the logon background window takes away some of the “coolness” of Windows 10. With some of these settings, you will have to choose between better performance or better user experience.
- When installing the Virtual Delivery Agent (VDA) and the Provisioning Server Target Device software, skip the optimization tool included in the software and run Citrix Optimizer at the end of your image creation process.
- When you create an image that is to be used in a Citrix environment, use Citrix Optimizer. This tool will be the best fit. It is custom-made for hosted-shared and VDI image optimization, but it will also be correctly configured for Citrix deployment technologies such as Machine Creation Services (MCS) and Provisioning Server (PVS).
- The same goes for VMWare. When creating an image for Horizon View, use the VMWare OS Optimization Tool.
- When using the VMWare OS Optimization Tool in a Citrix environment, use the tool with care. As stated before, this tool has not been created with Citrix in mind. Copy one of the existing templates (the one that suits your environment best), go through each setting, and make the necessary adjustments.
- Use BIS-F to optimize, clean, and seal your image. BIS-F will take care of many customizations and you can run Citrix Optimizer from BIS-F directly. There is no “either/or” scenario; BIS-F and Citrix Optimizer work together; they do not cancel each other out. BIS-F also helps you with the configuration and optimization of third-party products.
- Other ways to further customize your image is to use Citrix and Microsoft Group Policies.
When you proceed as described above your image will be highly optimized. Optimizing your image correctly ensures that you use your hardware as efficiently as possible and that your users get the best possible user experience.
I hope that this article was of some help to you.
Dennis Span works as a Principal Account Technology Strategist at Cloud Software Group in Vienna, Austria. He holds multiple Citrix certifications (CCE-V). Dennis has been a Citrix Technology Advocate (CTA) since 2017 (+ one year as Citrix Technology Professional, CTP). Besides his interest in virtualization technologies and blogging, he loves spending time with his family as well as snowboarding, playing basketball, and rowing. He is fluent in Dutch, English, German, and Slovak and speaks some Spanish.


Great Article 🙂
Thanks a lot Danny (bedankt)!
v good info here, thanks Dennis
Thanks a lot John! Happy to help!
Great article Dennis. I’m a massive fan of BIS-F, as you guys know:-) The Vendors would be better off providing value by assisting with this community tool instead of wasting their time on their own.
Thanks a lot Jeremy! I am happy you like the article. I hear what you are saying. There is one advantage though of BIS-F being a vendor independent tool; there’s way more flexibility to add new features and no “red tape”. 😉
Pingback: My first time: Citrix Machine Creation Services (MCS) | Meine kleine Farm - A Citrix Blog
Valuable blog article, it was quite interesting nice work. I want to thank you for this informative read, I really appreciate sharing your post. This is my great pleasure to visit your website and to enjoy your excellent post here.
Thanks a lot M8trix Communications!