
In Citrix StoreFront, finding the PowerShell command that corresponds with an item in the console can be a daunting task. The purpose of this article is to translate the Citrix StoreFront console to PowerShell on a per-item basis.
The contents of this article, including the screenshots, are based on Citrix StoreFront 3.14 (released in Q1 2018).
| Important information for mobile users: This article contains various clickable images (image maps with hot spots). These may not always work well on mobile phones. It is recommended to use a desktop or laptop when viewing this article, or at the very least a screen larger than that of a mobile phone. |
| Table of Contents
Scroll down to the introduction or click on one of the hotspots below to jump to the corresponding section in this article.


|
Introduction
In the article Citrix StoreFront unattended installation with PowerShell I explain how to automate the installation and initial configuration of your first deployment, stores, farms, and Receiver for Web and PNAgent services. However, besides the initial configuration, there are plenty of other settings that can and may need to be configured in your environment.
StoreFront 3.14 is shipped with a total of 206 cmdlets and the console contains a large number of settings. So the question is, how do you know which cmdlet to use with which setting in the StoreFront console?
And that is where this article comes in. In the paragraphs below, using clickable images, you find a translation of the various console items with the corresponding PowerShell cmdlet. This will help you to quickly build your configuration script. The structure of this article follows the settings listed in the right pane of the StoreFront console.
I want to thank Mark Dear, Customer Quality Engineer at Citrix, for his help, his patience, and his quick response whenever I had questions.
Once you have identified your PowerShell code snippets in the sections below, you can add them to one consolidated script. Below I offer you an example of such a consolidated script including logging and error handling. This will allow you to configure your StoreFront server to your requirements. I invite you to use this script and modify it to your needs.
Writing this article, I frequently referred to the StoreFront SDK.
I did all my tests on a Windows Server 2016 version 1607 virtual machine with StoreFront 3.14 installed. I did not need to load any PowerShell modules to be able to execute the cmdlets. In the example script below, I load all available StoreFront modules just to make sure all PowerShell commands work.
|
1 2 3 4 5 6 7 8 9 10 11 12 13 14 15 16 17 18 19 20 21 22 23 24 25 26 27 28 29 30 31 32 33 34 35 36 37 38 39 40 41 42 43 44 45 46 47 48 49 50 51 52 53 54 55 56 57 58 59 60 61 62 63 64 65 66 67 68 69 70 71 72 73 74 75 76 77 78 79 80 81 82 83 84 85 86 87 88 89 90 91 92 93 94 95 96 97 98 99 100 101 102 103 104 105 106 107 108 109 110 111 112 113 114 115 116 117 118 119 120 121 122 123 124 125 126 127 128 129 130 131 132 133 134 135 136 137 138 139 140 141 142 143 144 145 146 147 148 149 150 151 152 153 154 155 156 157 |
#========================================================================== # # Citrix StoreFront custom configuration script # # AUTHOR: Dennis Span (https://dennisspan.com) # DATE : 05.03.2018 # # COMMENT: # This script has been prepared for Windows Server 2008 R2, 2012 R2 and 2016. # This script has been tested on Windows Server 2016 version 1607. # # The version of StoreFront used in this script is 3.14 (released in Q1 2018), but will most likely # work on older versions as well (at least from StoreFront 3.8/3.9 and newer). # # This script configures the local Citrix StoreFront server. # #========================================================================== # define Error handling # note: do not change these values $global:ErrorActionPreference = "Stop" if($verbose){ $global:VerbosePreference = "Continue" } # FUNCTION DS_WriteLog #========================================================================== Function DS_WriteLog { <# .SYNOPSIS Write text to this script's log file .DESCRIPTION Write text to this script's log file .PARAMETER InformationType This parameter contains the information type prefix. Possible prefixes and information types are: I = Information S = Success W = Warning E = Error - = No status .PARAMETER Text This parameter contains the text (the line) you want to write to the log file. If text in the parameter is omitted, an empty line is written. .PARAMETER LogFile This parameter contains the full path, the file name and file extension to the log file (e.g. C:\Logs\MyApps\MylogFile.log) .EXAMPLE DS_WriteLog -InformationType "I" -Text "Copy files to C:\Temp" -LogFile "C:\Logs\MylogFile.log" Writes a line containing information to the log file .Example DS_WriteLog -InformationType "E" -Text "An error occurred trying to copy files to C:\Temp (error: $($Error[0]))" -LogFile "C:\Logs\MylogFile.log" Writes a line containing error information to the log file .Example DS_WriteLog -InformationType "-" -Text "" -LogFile "C:\Logs\MylogFile.log" Writes an empty line to the log file #> [CmdletBinding()] Param( [Parameter(Mandatory=$true, Position = 0)][ValidateSet("I","S","W","E","-",IgnoreCase = $True)][String]$InformationType, [Parameter(Mandatory=$true, Position = 1)][AllowEmptyString()][String]$Text, [Parameter(Mandatory=$true, Position = 2)][AllowEmptyString()][String]$LogFile ) begin { } process { $DateTime = (Get-Date -format dd-MM-yyyy) + " " + (Get-Date -format HH:mm:ss) if ( $Text -eq "" ) { Add-Content $LogFile -value ("") # Write an empty line } Else { Add-Content $LogFile -value ($DateTime + " " + $InformationType.ToUpper() + " - " + $Text) } } end { } } #========================================================================== ################ # Main section # ################ # Custom variables [edit] $BaseLogDir = "C:\Logs" # [edit] add the location of your log directory here $PackageName = "Citrix StoreFront (advanced configuration)" # [edit] enter the display name of the software (e.g. 'Arcobat Reader' or 'Microsoft Office') # Global variables $StartDir = $PSScriptRoot # the directory path of the script currently being executed $LogDir = (Join-Path $BaseLogDir $PackageName).Replace(" ","_") $LogFileName = ("$($PackageName).log").Replace(" ","_") $LogFile = Join-path $LogDir $LogFileName # Create the log directory if it does not exist if (!(Test-Path $LogDir)) { New-Item -Path $LogDir -ItemType directory | Out-Null } # Create new log file (overwrite existing one) New-Item $LogFile -ItemType "file" -force | Out-Null DS_WriteLog "I" "START SCRIPT - $PackageName" $LogFile DS_WriteLog "-" "" $LogFile # Import all Citrix StoreFront modules # Note: from PowerShell version 3 and higher, by default, all modules are automatically loaded when called, so technically pre-loading all StoreFront modules is not absolutely necessary $AllStoreFrontModules = Get-Module -ListAvailable | where-object {$_.Name -like "*Citrix.StoreFront*"} DS_WriteLog "I" "Import all $($AllStoreFrontModules.Count) StoreFront modules" $LogFile Foreach ( $Module in $AllStoreFrontModules ) { try { Import-Module $Module DS_WriteLog "S" "-Successfully imported the module $Module" $LogFile } catch { DS_WriteLog "E" "-An error occurred trying to import the module $Module (error: $($Error[0]))" $LogFile } } DS_WriteLog "-" "" $LogFile # --------------------------------------------------------------------------------------------------------------------------- # ADD YOUR CONFIGURATIONS FROM THIS POINT ON # --------------------------------------------------------------------------------------------------------------------------- # Configuration example 1: blablablabla DS_WriteLog "I" "blablabla" $LogFile try { <command> DS_WriteLog "S" "Successfully blablablabla" $LogFile } catch { DS_WriteLog "E" "An error occurred trying to blablablabla (error: $($Error[0]))" $LogFile } DS_WriteLog "-" "" $LogFile # Configuration example 2: blablablabla DS_WriteLog "I" "blablabla" $LogFile try { <command> DS_WriteLog "S" "Successfully blablablabla" $LogFile } catch { DS_WriteLog "E" "An error occurred trying to blablablabla (error: $($Error[0]))" $LogFile } DS_WriteLog "-" "" $LogFile # Configuration example 3: blablablabla DS_WriteLog "I" "blablabla" $LogFile try { <command> DS_WriteLog "S" "Successfully blablablabla" $LogFile } catch { DS_WriteLog "E" "An error occurred trying to blablablabla (error: $($Error[0]))" $LogFile } # --------------------------------------------------------------------------------------------------------------------------- # END # --------------------------------------------------------------------------------------------------------------------------- DS_WriteLog "-" "" $LogFile DS_WriteLog "I" "End of script" $LogFile |
Stores
The following paragraphs deal with the settings in the Stores section in the StoreFront console’s Actions pane.
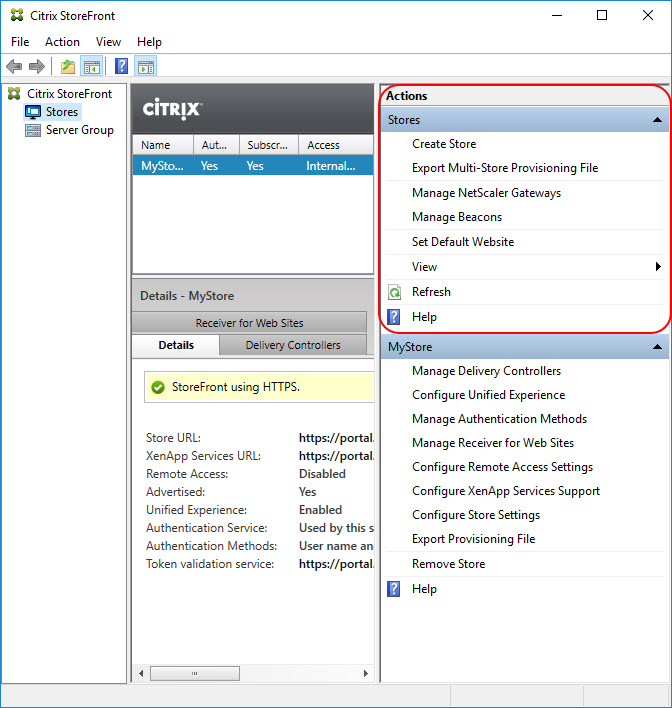
Create Store
In the article Citrix StoreFront unattended installation with PowerShell, in the section Create the StoreFront deployments, stores and farms, I explain in detail how to create a StoreFront store using PowerShell.
Manage NetScaler Gateways
This paragraph deals with the NetScaler Gateway configuration settings. 
Please do not let the text confuse you; what you are adding (configuring) here are the virtual servers configured on your NetScaler appliance, not the actual appliance itself (SNIP). For more information, please see the section StoreFront Configuration for NetScaler Gateway in Carl Stalhood’s article StoreFront 3.5 through 3.14 – Configuration for NetScaler Gateway.
In the StoreFront console, adding a virtual server means configuring settings in three separate windows. Configuring the same settings using PowerShell only requires one cmdlet with several parameters. For example:
|
1 |
Add-STFRoamingGateway -Name "MyVirtualServer" -LogonType Domain -Version Version10_0_69_4 -GatewayUrl "https://virtualserver.mydomain.com" -CallbackUrl "https://virtualserver.mydomain.com/callback" -StasUseLoadBalancing -SessionReliability -RequestTicketTwoSTAs -SubnetIPAddress "10.10.10.10" -SecureTicketAuthorityUrls "https://DeliveryController1.mydomain.com","https://DeliveryController2.mydomain.com" |
In case your StoreFront server has multiple StoreFront deployments (= IIS sites), make sure to set the roaming service to the correct site ID, like this:
|
1 2 |
$RoamingService = Get-STFRoamingService -SiteID 1 Add-STFRoamingGateway -RoamingService $RoamingService -Name "MyVirtualServer" -LogonType Domain -Version Version10_0_69_4 -GatewayUrl "https://virtualserver.mydomain.com" -CallbackUrl "https://virtualserver.mydomain.com/callback" -StasUseLoadBalancing -SessionReliability -RequestTicketTwoSTAs -SubnetIPAddress "10.10.10.10" -SecureTicketAuthorityUrls "https://DeliveryController1.mydomain.com","https://DeliveryController2.mydomain.com" |
Let’s break down each of the parameters:
- -Name (data type: string): this is the unique name for the NetScaler configuration.
- -LogonType: this is the authentication method you configured on the virtual server. Possible values are: UsedForHDXOnly | Domain | RSA | DomainAndRSA | SMS | GatewayKnows | SmartCard | None.
- -SmartCardFallbackLogonType. Possible values are: UsedForHDXOnly | Domain | RSA | DomainAndRSA | SMS | GatewayKnows | SmartCard | None.
- -Version: the version of your NetScaler Gateway. Possible values are: Version10_0_69_4 | Version9x. Use the value Version10_0_69_4 for NetScaler appliances from version 10_0_69_4 and higher and the value Version9x for NetScaler appliances version 9 (all builds).
- -GatewayUrl (data type: uri): the URL to the virtual server, for example, https://virtualserver.mydomain.com. In the case of SSL, enter the fully qualified domain name (FQDN).
- -CallbackUrl (data type: uri): this is the internally accessible URL of the NetScaler Gateway, for example, https://virtualserver.mydomain.com/callback. In the case of SSL, enter the fully qualified domain name (FQDN).
- -StasUseLoadBalancing (data type: switch parameter): add this parameter without any value to enable session reliability. If you prefer, you can also enter the parameter like this: -StasUseLoadBalancing:$True).
- -SessionReliability (data type: switch parameter): add this parameter without any value to enable session reliability. If you prefer, you can also enter the parameter like this: -SessionReliability:$True).
- -RequestTicketTwoSTAs (data type: switch parameter): add this parameter without any value to request STA tickets from two STA servers. If you prefer, you can also enter the parameter like this: -RequestTicketTwoSTAs:$True).
- -SubnetIPAddress (data type: string): this is the IP address of the virtual server (e.g. 10.10.10.10).
- -SecureTicketAuthorityUrls (data type: uri array): enter the URL of one or more STA servers (= delivery controller). For example: “https://controller1.mydomain.com”,”https://controller2.mydomain.com”. In the case of SSL, enter the fully qualified domain name (FQDN). Please keep in mind that whatever Secure Ticket Authorities you add here must also be added to the NetScaler Gateway Virtual Server on the NetScaler appliance.
- -StasBypassDuration (data type: timespan): enter the time period for bypassing a failed STA server, for example 01:30:00 (1 hour, 30 minutes and 0 seconds).
- -GslbUrl (data type: uri): enter an optional URL which corresponds to the GSLB domain used by multiple gateways, for example https://myglbs.mydomain.com. This parameter is not available in the StoreFront console as far as I can tell. In case of SSL, enter the fully qualified domain name (FQDN).
Manage Beacons
This paragraph deals with the beacons configuration settings. You can set either internal beacons or external beacons (or both).
![]()
The PowerShell command to configure both the internal and external beacons is as follows:
|
1 2 |
Set-STFRoamingBeacon -internal "http://myinternaldomain.com" -external "http://myexternaldomain1.com","http:/ /myexternaldomain2.com" |
There seems to be a bug though; it is only possible to configure the external beacons when also configuring the internal one. This bug has been reported to Citrix and will hopefully be fixed in one of the following StoreFront releases.
Set Default Website
Setting the default website means configuring a redirection to a default store when a user enters the host base URL in the browser (without entering a virtual subdirectory).
For example:
- The host base URL is https://portal.mydomain.com;
- The user is automatically redirected to https://portal.mydomain.com/Citrix/MyStoreWeb/.

There can only be one default web site per StoreFront deployment (= per IIS site). This is also clearly visible in the IIS management console.

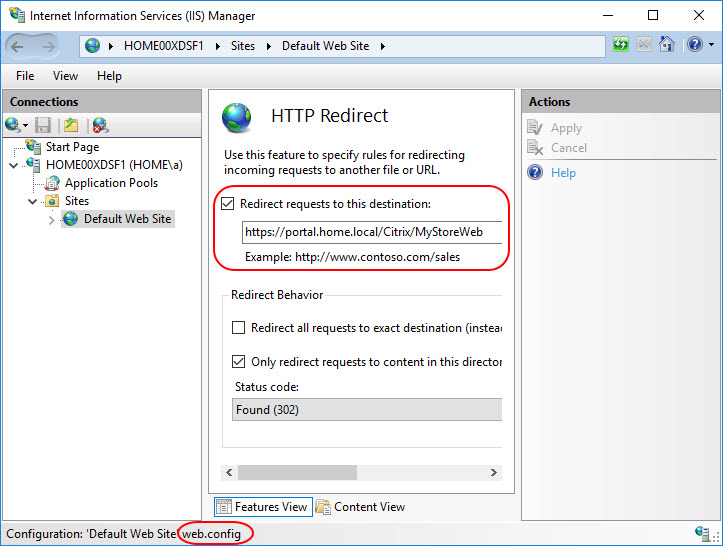
When a default website is set, a file called web.config is created in the IIS root directory of that specific StoreFront deployment. By default, this is the directory C:\inetpub\wwwroot.
This is how you configure it:
|
1 2 |
$Rfw = Get-STFWebReceiverService -SiteId 1 -VirtualPath "/Citrix/MyStoreWeb" Set-STFWebReceiverService -WebReceiverService $Rfw -DefaultIISSite:$True |
In case you need a more complex redirection file, you can easily create the web.config file yourself using the code below. Please be aware that the example below does not include any logging and almost no error handling. Please modify the variables $HostBaseURL, $ReceiverForWebSite and $IISSiteDirectory in lines 2 to 4 to your requirements.
|
1 2 3 4 5 6 7 8 9 10 11 12 13 14 15 16 17 18 19 20 21 22 23 24 25 26 27 28 29 30 31 32 33 34 35 36 37 38 39 |
# Variables [edit] [string]$HostBaseURL = "https://portal.mydomain.com/" [string]$ReceiverForWebSite = "/Citrix/MyStoreWeb/" [string]$IISSiteDirectory = "$env:SystemDrive\inetpub\wwwroot" # Create the XMl file [do not edit the lines below] # Remove some starting and trailing forward slashes to prevent potential double slashes (e.g. "https://portal.mydomain.com//Citrix/MyStoreWeb") if ( $HostBaseURL.EndsWith("/") ) { $HostBaseURL = $HostBaseURL.Substring(0,($HostBaseURL.Length)-1) } # If the last character is a forward slash, remove it if ( $ReceiverForWebSite.StartsWith("/") ) { $ReceiverForWebSite = $ReceiverForWebSite.Substring(1,($ReceiverForWebSite.Length)-1) } # If the first character is a forward slash, remove it if ( $ReceiverForWebSite.EndsWith("/") ) { $ReceiverForWebSite = $ReceiverForWebSite.Substring(0,($ReceiverForWebSite.Length)-1) } # If the last character is a forward slash, remove it # Concatinate the variables '$HostBaseURL' and '$ReceiverForWebSite' to a new one called $Destination [string]$Destination = ("$($HostBaseURL)/$($ReceiverForWebSite)") # Set the directory and file name of the new XML file $xmlFile = Join-Path $IISSiteDirectory "web.config" # Declare the new XMl object [xml]$xml = New-Object System.Xml.XmlDocument # Write the declaration of the XML file (the first line) $declaration = $xml.CreateXmlDeclaration("1.0","UTF-8",$null) # Note: creating the XML file is all done in memory. Only in the last line the XML file is actually generated. # Add the declaration to the XML document $xml.AppendChild($declaration) # Create the root node 'configuration' $rootNode = $xml.CreateNode("element","configuration",$null) # Create the node 'system.webServer' under the root node $systemWebServerNode = $xml.CreateNode("element","system.webServer",$null) # Create the node 'httpRedirect' under the root node $httpRedirectNode = $xml.CreateNode("element","httpRedirect",$null) # Add three elements to the node 'httpRedirect' $httpRedirectNode.SetAttribute("enabled","true"); # Add a new key/value $httpRedirectNode.SetAttribute("destination",$Destination); # Add a new key/value $httpRedirectNode.SetAttribute("childOnly","true"); # Add a new key/value # Append the node 'httpRedirect' to its parent node 'system.webServer' $systemWebServerNode.AppendChild($httpRedirectNode) # Append the node 'system.webServer' to its parent node 'configuration' (which is the root node in this case) $rootNode.AppendChild($systemWebServerNode) # Add the root node 'configuration' to the XML document $xml.AppendChild($rootNode) # Save the XML document $xml.save($xmlFile) |
Of course, if you want to, you can also prepare the web.config file in advance and copy/paste it to the corresponding IIS directory.
<Your Store>
The following paragraphs deal with the settings of a particular store. In this article, as visible in the screenshot below, I only have one store configured called MyStore. In case you have more than one store, you may have to repeat some of the procedures described below for each of your stores.
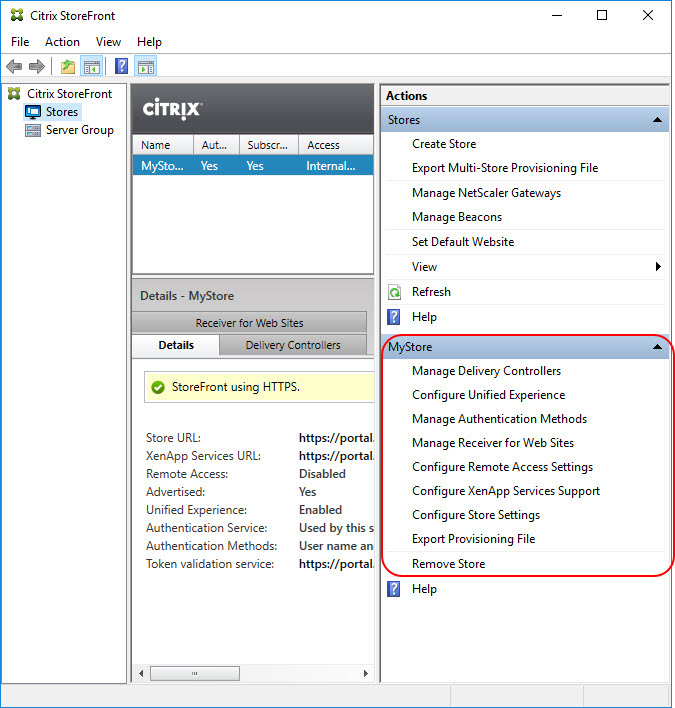
Manage Delivery Controllers
The article Citrix StoreFront unattended installation with PowerShell explains in detail how to create multiple farms a StoreFront store. Especially see the section Create the StoreFront deployments, stores and farms. However, there is more customizing to be done, which is not included in the aforementioned article, namely:
Configure Advanced Settings
This paragraph deals with the configuration of advanced settings of a site.
| Note: I find it a bit peculiar that the parameter -Server is required when calling the cmdlet Set-STFStoreFarm. Without it, the command ends in an error. It is peculiar to me, because the variable $farm includes all farm related information including the farm servers. Why the cmdlet Set-STFStoreFarm is not able to retrieve this information itself I do not understand. Anyway, the workaround is to retrieve the farm servers ourselves using the command $FarmServers = $farm.Servers. |
It is possible to combine the various code snippets as show in the image above, for example:
|
1 2 3 4 5 6 7 8 9 10 11 12 13 |
# Variables [edit] [int]$SiteID = 1 [string]$StorePath = "/Citrix/MyStore" [string]$FarmName = "MyFarm" [int]$AllFailedBypassDuration = 2 # Value in minutes [int]$BypassDuration = 2 # Value in minutes [string[]]$Zones = "zone2","zone3" # Value in minutes # Configure farm [do not edit the following lines] $store = Get-STFStoreService -siteID $SiteID -VirtualPath $StorePath $farm = Get-STFStoreFarm -StoreService $store | where FarmName -eq $FarmName $FarmServers = $farm.Servers Set-STFStoreFarm -Farm $farm -AllFailedBypassDuration $AllFailedBypassDuration -BypassDuration $BypassDuration -Zones $Zones -Servers $FarmServers |
Multi-Site Aggregation Configuration and User Mapping
When a user connects to a store configured with multiple farms, by default, all resources from all farms are enumerated and displayed to the user. This default behavior can be changed by configuring the multi-site aggregation settings and mapping specific Active Directory groups to these settings. The StoreFront console cannot be used for advanced configurations; you have to use PowerShell.
For detailed information on how to configure multi-site aggregation, please see the article Citrix StoreFront Multi-Site Aggregation with PowerShell on the Citrix User Group Community (CUGC) website.
Configure Unified Experience
This paragraph deals with the Unified Experience configuration settings.

The following PowerShell code snippet enables unified Receiver experience for a specific store and the default Receiver for Web site:
|
1 2 3 |
$Store = Get-STFStoreService -siteID 1 -VirtualPath "/Citrix/MyStore" $Rfw = Get-STFWebReceiverService -SiteId 1 -VirtualPath "/Citrix/MyStoreWeb" Set-STFStoreService -StoreService $Store -UnifiedReceiver $Rfw -Confirm:$False |
You need to connect to both the store service ($Store) and the Receiver for Web site ($Rfw) service in order to configure unified Receiver experience.
Manage Authentication Methods
This paragraph deals with the Authentication Method configuration settings.
The available authentication methods translate as follows:
- User name and password = ExplicitForms
- SAML Authentication = Forms-Saml
- Domain pass-through = IntegratedWindows
- Smart card = Certificate
- HTTP Basic = HttpBasic
- Pass-through from NetScaler Gateway = CitrixAGBasic
User name and password
The user name and password authentication includes four additional sub-configurations:
- Configure Trusted Domains
- Configure Account Self-Service
- Manage Password Options
- Configure Password Validation
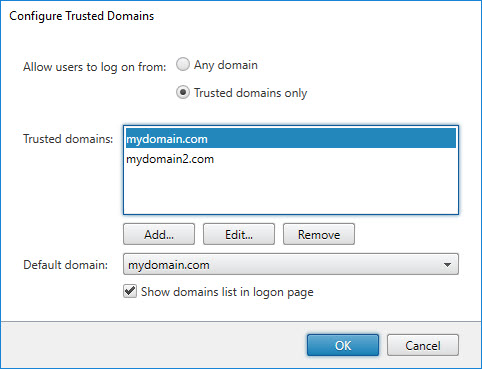
Configure Trusted Domains
Configure trusted domains on the StoreFront logon page.
| Note: these settings apply to both the User Name and Password authentication method as well as the Pass-through from NetScaler Gateway authentication method. |
The PowerShell command to configure all settings is as follows:
|
1 2 |
$AuthService = Get-STFAuthenticationService -SiteID 1 -VirtualPath "/Citrix/MyStoreAuth" Set-STFExplicitCommonOptions -AuthenticationService $AuthService -Domains "mydomain.com","mydomain2.com" -DefaultDomain "mydomain.com" HideDomainField $False |
Let’s break down each of the parameters:
- -Domains (data type: string array): this array contains the name or names of the trusted domain(s), for example “mydomain.com” (for one domain) or “mydomain1.com”,”mydomain2.com” (when specifying multiple domains). This parameter relates to the section Trusted domains in the screenshot above.
- -DefaultDomain (data type: string): set the default domain. This parameter relates to the section Default domain in the screenshot above.
- -HideDomainField (data type: boolean): display the domain field on the StoreFront logon page (or not). Possible values are: $True | $False. This parameter relates to the tick box Show domains list in logon page in the screenshot above.
Configure Account Self-Service (SSPR)
Configure the account self-service URL and allow users to unlock their account and reset their password.

To configure these account self-service settings, two cmdlets are required:
- Set-STFPasswordManagerAccountSelfService
- Set-STFAccountSelfService
|
1 2 3 |
$AuthService = Get-STFAuthenticationService -SiteID 1 -VirtualPath "/Citrix/MyStoreAuth" Set-STFPasswordManagerAccountSelfService -AuthenticationService $AuthService -PasswordManagerServiceUrl "https://myserver.mydomain.com/MPMService" Set-STFAccountSelfService -AuthenticationService $AuthService -AllowResetPassword $True -AllowUnlockAccount $True |
Let’s break down each of the parameters:
- Set-STFPasswordManagerAccountSelfService
- -PasswordManagerServiceUrl (data type: uri): this parameter contains the URL of the account self-service service.
- Set-STFAccountSelfService
- -AllowResetPassword (data type: boolean): allow users to reset their password or not. Possible values are: $True | $False.
- -AllowUnlockAccount (data type: boolean): allow users to unlock their account or not. Possible values are: $True | $False.
Manage Password Options
Configure the user’s password options.
| Note: these settings, or at least the actual Apply users to change passwords settings, apply to both the User Name and Password authentication method as well as the Pass-through from NetScaler Gateway authentication method. |
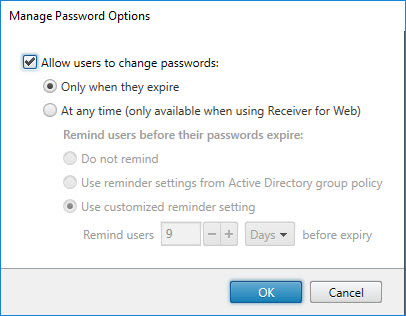
The PowerShell command to configure all settings is as follows:
|
1 2 |
$AuthService = Get-STFAuthenticationService -SiteID 1 -VirtualPath "/Citrix/MyStoreAuth" Set-STFExplicitCommonOptions -AuthenticationService $AuthService -AllowUserPasswordChange Always -ShowPasswordExpiryWarning Windows -PasswordExpiryWarningPeriod 7 -AllowZeroLengthPassword $False |
Please be aware that the above cmdlet, Set-STFExplicitCommonOptions, is the same one as used for configuring the Trusted Domains. This means that you can combine all settings into one line to configure both the trusted domains and the password options.
Let’s break down each of the parameters:
- -AllowUserPasswordChange: configure when a user can change a password (if at all). Possible values are: Always | ExpiredOnly | Never.
- -ShowPasswordExpiryWarning: remind users before their password expires. Possible values are: Never | Windows | Custom.
- -PasswordExpiryWarningPeriod (data type: int32): the period of time in days before the expiry warning should be shown, for example 7.
- -AllowZeroLengthPassword (data type: boolean): allow a zero length password or not. Possible values are: $True | $False.
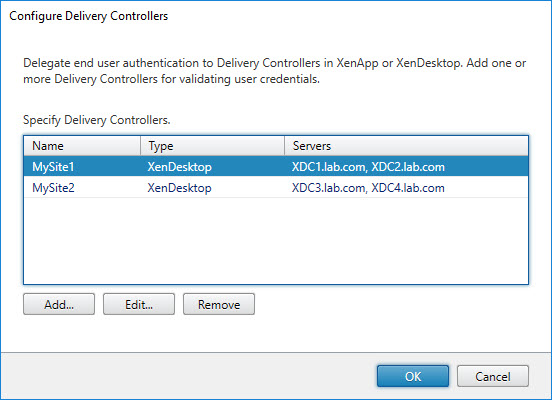
Configure Password Validation
Configure how passwords are validated. The default method is Active Directory, but password validation can be delegated to the XML service of the delivery controller(s).
| Note: these settings apply to both the User Name and Password authentication method as well as the Pass-through from NetScaler Gateway authentication method. |

The easiest way to configure these settings, is by copying the information from the already created farm configuration in the store (see the section Manage Delivery Controllers). This is the code we need:
|
1 2 3 4 |
$Store = Get-STFStoreService -siteID 1 -VirtualPath "/Citrix/MyStore" $AuthService = Get-STFAuthenticationService -SiteID 1 -VirtualPath "/Citrix/MyStoreAuth" $Farm = Get-STFStoreFarm -StoreService $Store -FarmName "MySite1" Enable-STFXmlServiceAuthentication -AuthenticationService $AuthService -Farm $Farm |
Let’s take a closer look at the code:
- In the first line we connect to the store service of the specific store from which we want to copy the farm information.
- In the second line we connect to the authentication service which will be configured to validate passwords using the delivery controller’s XML service instead of Active Directory.
- In the third line we read the farm information from the store service. In our example, we read the information from the farm called “MySite1”. Modify this name to your requirements.
- In the last line we configure the authentication service to validate passwords using the delivery controllers configured in the farm “MySite1”.
In case you want to add all configured farms from the store, use the following code:
|
1 2 3 4 |
$Store = Get-STFStoreService -siteID 1 -VirtualPath "/Citrix/MyStore" $AuthService = Get-STFAuthenticationService -SiteID 1 -VirtualPath "/Citrix/MyStoreAuth" $Farm = Get-STFStoreFarm -StoreService $Store Enable-STFXmlServiceAuthentication -AuthenticationService $AuthService -Farm $Farm |
The only difference compared to the first code snippet is that we do not specify a specific store in line 3 (-FarmName “MySite1”). The data type of parameter -Farm in line four is Citrix.StoreFront.Model.Store.Farm[], which is an array. This enables us to configure multiple farms at the same time.
SAML Authentication
This authentication method is used for native SAML without NetScaler. The configuration consists of the following two parts:
Identity Provider
Unfortunately, I was not able to find a solution how to automate this configures. There are a few PowerShell cmdlets for SAML available for importing and exporting certificates, but a general Set-STFSamlConfiguration or something similar does not exist. Also, I was not able to configure the settings “in-memory” using the structure in the web.config file.
Service Provider
Unfortunately, I was not able to find a solution how to automate this configures. There are a few PowerShell cmdlets for SAML available for importing and exporting certificates, but a general Set-STFSamlConfiguration or something similar does not exist. Also, I was not able to configure the settings “in-memory” using the structure in the web.config file.
Pass-through from NetScaler Gateway
The Pass-through from NetScaler Gateway authentication includes four additional sub-configurations:
- Configure Trusted Domains
This configuration also applies to the Configure Password Validation settings for the User Name and Password authentication method. - Configure Delegated Authentication
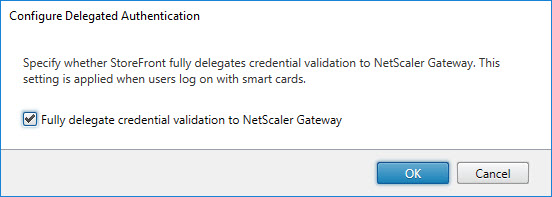 Enable Fully delegate credential validation to NetScaler Gateway:
123$AuthService = Get-STFAuthenticationService -SiteID 1 -VirtualPath "/Citrix/MyStoreAuth"Set-STFCitrixAGBasicOptions -AuthenticationService $AuthService -CredentialValidationMode Kerberos
Disable Fully delegate credential validation to NetScaler Gateway:
12$AuthService = Get-STFAuthenticationService -SiteID 1 -VirtualPath "/Citrix/MyStoreAuth"Set-STFCitrixAGBasicOptions -AuthenticationService $AuthService -CredentialValidationMode Password - Manage Password Options
This configuration also applies to the Configure Password Validation settings for the User Name and Password authentication method. - Configure Password Validation
This configuration also applies to the Configure Password Validation settings for the User Name and Password authentication method.
Manage Receiver for Web Sites
This section covers the PowerShell commands to configure the Receiver for Web settings.
- Receiver Experience
- Customize Appearance
- Featured App Groups
- Authentication Methods
- Website Shortcut
- Deploy Citrix Receiver
- Session Settings
- Workspace Control
- Client Interface Settings
- Advanced Settings
Receiver Experience
Customize Appearance
Using the StoreFront console, the appearance of the StoreFront Receiver for web page can be customized. A total of five items can be customized.
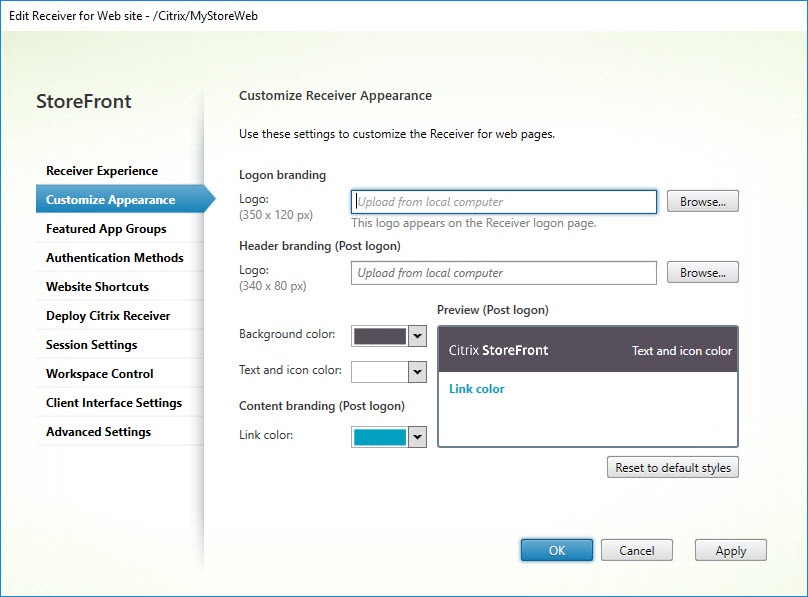
Using PowerShell, the code to modify the appearance is as follows:
|
1 2 |
$Rfw = Get-STFWebReceiverService -SiteId 1 -VirtualPath "/Citrix/MyStoreWeb" Set-STFWebReceiverSiteStyle -WebReceiverService $Rfw -HeaderLogoPath "C:\Temp\header.jpg" -LogonLogoPath "C:\Temp\logon.jpg" -HeaderBackgroundColor "#F9F9F9" -HeaderForegroundColor "#FF9900" -LinkColor "#FF9900" |
Let’s take a closer look at the code:
- In the first line we connect to the Receiver for Web sites service in a specific store.
- In the last line, we modify the appearance using the cmdlet Set-STFWebReceiverSiteStyle. The following parameters are defined:
- -LogonLogoPath (data type: string): the logo on the logon page.
- -HeaderLogoPath (data type: string): the header logo (shown after logon).
- -HeaderBackgroundColor (data type: string): the background color of the header (shown after logon).
- -HeaderForegroundColor (data type: string): the text and icon color (shown after logon).
- -LinkColor (data type: string): the link color (shown after logon).
There seems to be a bug; the modifications via PowerShell work fine, but changes to the logos are not displayed in the StoreFront console. The default StoreFront logos are no longer visible, but your custom logos are also not visible.
Please be aware that when you modify one value, all other values are reset to their default value. For example; if you have configured custom logos, and at a later time want to modify the link color, you have to configure both the custom logos and the link color. In case you only modify the link color, the custom logos will be reset to the standard StoreFront logos.
The cmdet Set-STFWebReceiverSiteStyle offers one additional parameter that is not available in the console: IgnoreNonExistentLogos (data type: boolean). This parameter determines whether to ignore non-existent logo files and continue to set the colors. Please be aware that this does not mean that the configured logo paths are saved in the configuration and you can simply add the files at a later time! The only thing this parameter does is to ignore/suppress the default error.
Featured App Groups
In the StoreFront console, click the button Create… to create a new featured app group.
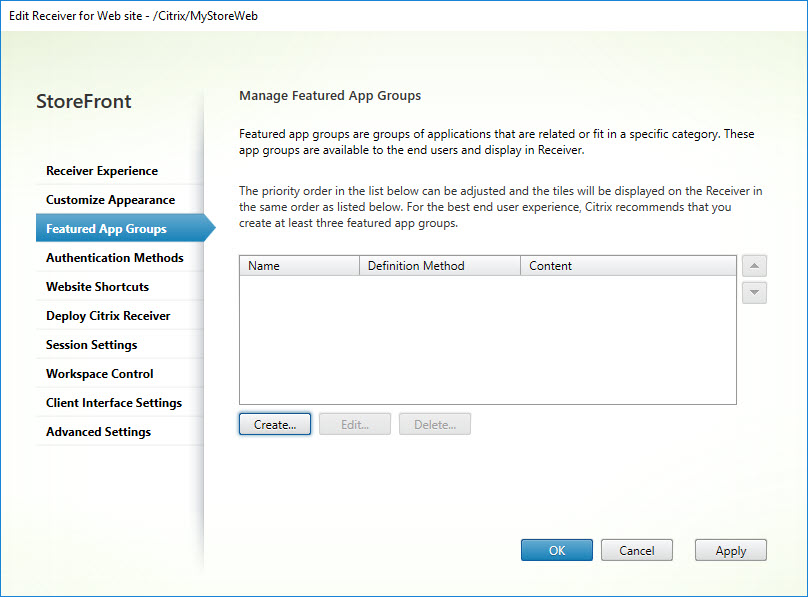
In the window that follows, you have to fill in multiple parameters.
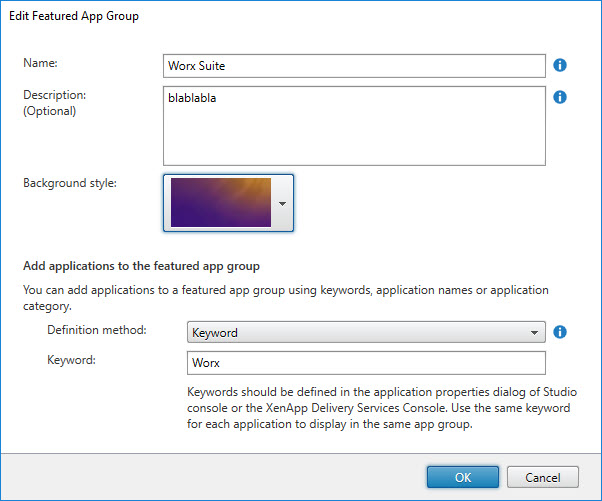
Using PowerShell, the featured app group in the screenshot above is created as follows:
|
1 2 3 4 5 6 7 8 |
$Rfw = Get-STFWebReceiverService -SiteId 1 -VirtualPath "/Citrix/MyStoreWeb" $FeaturedGroup = New-STFWebReceiverFeaturedAppGroup ` -Title "Worx Suite" ` -Description "blablabla" ` -TileId appBundle1 ` -ContentType Keyword ` -Contents Worx Set-STFWebReceiverFeaturedAppGroups -WebReceiverService $Rfw -FeaturedAppGroup $FeaturedGroup |
Let’s take a closer look at the code:
- In the first line we connect to the Receiver for Web sites service in a specific store.
- In the second line, which is displayed as if it were 6 lines for readability, we define the new feature app group using the cmdlet New-STFWebReceiverFeaturedAppGroup. The following parameters are defined:
- -Title (data type: string): this is the name of the featured app group.
- -Description (data type: string): this is the description of the featured app group.
- -TileId (data type: string): this is the unique identifier for the background style of the featured app group. There are 8 styles to choose from. Possible values are: appBundle1 | appBundle2 | appBundle3 | appBundle4 | appBundle5 | appBundle6 | appBundle7 | appBundle8. Simply count down the color pattern in the StoreFront console to determine the value starting from 1 (no, it does not start with 0 like an array). 😉
- -ContentType: this is the type of content provided in the -Contents parameter. Possible values are: Keyword | Category | AppName.
- -Contents (data type: string array): this parameter defines the content for the featured app group. The permissible values for this is based on the -ContentType parameter:
- 1. Keyword: the list must have only 1 value. All the apps which have keywords matching with the value in the list will appear as a featured app group.
- 2. Category: the list must have only 1 value. All the apps which have category defined as the value in the list will appear as a featured app group.
- 3. AppName: the list must have 1 or more unique values. All the apps which have names (for users) which partially or fully matches any of the values in this list will appear as a featured app group.
- In the last line, using the cmdlet Set-STFWebReceiverFeaturedAppGroups, we create the featured app group in the Receiver for Web sites service defined in line 1.
Authentication Methods
The available authentication methods translate as follows:
- User name and password = ExplicitForms
- SAML Authentication = Forms-Saml
- Domain pass-through = IntegratedWindows
- Smart card = Certificate
- Pass-through from NetScaler Gateway = CitrixAGBasic
In case you would like to add all available authentication methods, replace the authentication method with Get-STFWebReceiverAuthenticationMethodsAvailable.
|
1 |
$AuthenticationMethod = Get-STFWebReceiverAuthenticationMethodsAvailable |
The cmdlet Set-STFWebReceiverAuthenticationMethods offers one additional parameter that is not available in the console: TokenLifeTime (data type: TimeSpan). This parameter sets the lifetime of the authentication token before it expires.
Website Shortcut
Deploy Citrix Receiver
Source for Receivers – Windows source
Citrix website
|
1 2 |
$rfw = Get-STFWebReceiverService -SiteId 1 -VirtualPath "/Citrix/MyStoreWeb" Set-STFWebReceiverPluginAssistant -WebReceiverService $rfw -enabled $true -Win32Path "http://downloadplugins.citrix.com/Windows/CitrixReceiverWeb.exe" |
Local files on the StoreFront server
|
1 2 3 |
$FileNameReceiver = "CitrixReceiverWeb.exe" $rfw = Get-STFWebReceiverService -SiteId 1 -VirtualPath "/Citrix/MyStoreWeb" Set-STFWebReceiverPluginAssistant -WebReceiverService $rfw -enabled $true -Win32Path "clients/Windows/$($FileNameReceiver)" |
| Note: make sure to copy the CitrixReceiverWeb.exe file to the directory C:\Program Files\Citrix\Receiver StoreFront\Receiver Clients\Windows. If you rename the executable file, make sure to add the corresponding name to the variable $FileNameReceiver. |
Files on remote server (through URL)
|
1 2 3 |
$FileNameReceiver = "CitrixReceiverWeb.exe" $rfw = Get-STFWebReceiverService -SiteId 1 -VirtualPath "/Citrix/MyStoreWeb" Set-STFWebReceiverPluginAssistant -WebReceiverService $rfw -enabled $true -Win32Path "http://myserver/$($FileNameReceiver)" |
| Note: make sure to copy the CitrixReceiverWeb.exe file to the remote server. If you rename the executable file, make sure to add the corresponding name to the variable $FileNameReceiver. |
The cmdlet Set-STFWebReceiverPluginAssistant has more parameters. Use the Get-Help Set-STFWebReceiverPluginAssistant function to see all available parameters.
Source for Receivers – Mac source
Citrix website
|
1 2 |
$rfw = Get-STFWebReceiverService -SiteId 1 -VirtualPath "/Citrix/MyStoreWeb" Set-STFWebReceiverPluginAssistant -WebReceiverService $rfw -enabled $true -MacOSPath "http://downloadplugins.citrix.com/Mac/CitrixReceiverWeb.dmg" |
Local files on the StoreFront server
|
1 2 3 |
$FileNameReceiver = "CitrixReceiverWeb.dmg" $rfw = Get-STFWebReceiverService -SiteId 1 -VirtualPath "/Citrix/MyStoreWeb" Set-STFWebReceiverPluginAssistant -WebReceiverService $rfw -enabled $true -MacOSPath "clients/Mac/$($FileNameReceiver)" |
| Note: make sure to copy the CitrixReceiverWeb.dmg file to the directory C:\Program Files\Citrix\Receiver StoreFront\Receiver Clients\Mac. If you rename the DMG file, make sure to add the corresponding name to the variable $FileNameReceiver. |
Files on remote server (through URL)
|
1 2 3 |
$FileNameReceiver = "CitrixReceiverWeb.dmg" $rfw = Get-STFWebReceiverService -SiteId 1 -VirtualPath "/Citrix/MyStoreWeb" Set-STFWebReceiverPluginAssistant -WebReceiverService $rfw -enabled $true -MacOSPath "http://myserver/$($FileNameReceiver)" |
| Note: make sure to copy the CitrixReceiverWeb.dmg file to the remote server.. If you rename the DMG file, make sure to add the corresponding name to the variable $FileNameReceiver. |
The cmdlet Set-STFWebReceiverPluginAssistant has more parameters. Use the Get-Help Set-STFWebReceiverPluginAssistant function to see all available parameters.
Session Settings
Workspace Control
Client Interface Settings
Advanced Settings
Configure Remote Access Settings
This paragraph deals with the remote access configuration settings.
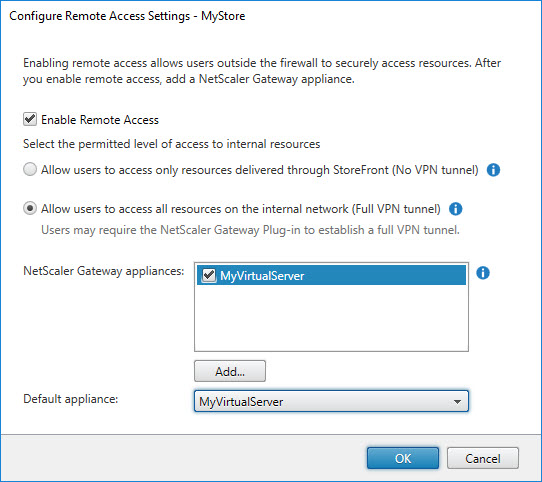
All settings in the screenshot above can be configured using one PowerShell cmdlet.
To enable remote access with VPN and a default appliance, use the following code:
|
1 2 3 |
$Gateway = Get-STFRoamingGateway -Name "MyVirtualServer" $Store = Get-STFStoreService -siteID 1 -VirtualPath "/Citrix/MyStore" Register-STFStoreGateway -Gateway $Gateway -StoreService $Store -DefaultGateway:$True -UseFullVpn:$True |
To enable remote access without VPN and do not set as a default appliance, use the following code:
|
1 2 3 |
$Gateway = Get-STFRoamingGateway -Name "MyVirtualServer" $Store = Get-STFStoreService -siteID 1 -VirtualPath "/Citrix/MyStore" Register-STFStoreGateway -Gateway $Gateway -StoreService $Store -DefaultGateway:$False -UseFullVpn:$False |
Please be aware that the parameter -UseFullVPN can only be configured once for all NetScaler Gateway appliances (= virtual servers). For example, if you add two appliances and you enable full VPN for the first appliance, but disable it for the second appliance, full VPN will be disabled for both appliances.
In case you would like to add all available, pre-configured, NetScaler appliances, use the following code:
|
1 2 3 |
$Store = Get-STFStoreService -siteID 1 -VirtualPath "/Citrix/MyStore" foreach ($Gateway in (Get-STFRoamingGateway)) { Register-STFStoreGateway -Gateway $Gateway -Stor eService $Store -UseFullVpn:$False } |
The Add… button starts the same wizard as the Manage NetScaler Gateways configuration.
Configure XenApp Services Support
This paragraph deals with the XenApp Services Support configuration settings.
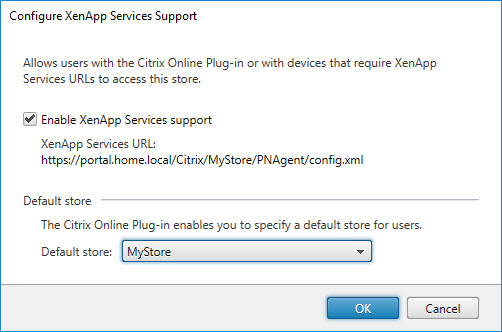
All settings in the screenshot above can be configured using one PowerShell cmdlet.
To enable XenApp Services support and set a default store for users, use the following code:
|
1 2 |
$Store = Get-STFStoreService -siteID 1 -VirtualPath "/Citrix/MyStore" Enable-STFStorePna -StoreService $store -DefaultPnaService:$True |
Change the value -DefaultPnaService:$True to -DefaultPnaService:$False if no default store should be configured.
It is important to be aware that the cmdlet Enable-STFStorePna includes two other parameters, which are not configurable in the StoreFront console:
- -AllowUserPasswordChange: allow the PNA clients to change password (or not). Possible values are -AllowUserPasswordChange:$True | -AllowUserPasswordChange:$False.
- -LogonMethod: the PNA logon method. A store supports only one method at a time. Possible values are: Anonymous | Prompt | SSON | Smartcard_SSON | Smartcard_Prompt.
Configure Store Settings
This paragraph deals with the Store configuration settings.
Optimal HDX Routing consist of multiple items and are listed in the image below.
The Advanced Settings consist of multiple items and are listed in the image below.
Remove Store
This paragraph deals with removing a store. This is accomplished using only two lines of PowerShell code.
|
1 2 |
$Store = Get-STFStoreService -siteID 1 -VirtualPath "/Citrix/MyStore" Remove-STFStoreService -StoreService $Store -Confirm:$false |
Removing a store removes the store service, any Receiver for Web sites related to the store and, if no other stores are using it, the associated authentication service.
Conclusion
All StoreFront settings can be automated. Even in those rare cases when there is no PowerShell cmdlet, it is always possible to change the value “in-memory”. This is possible thanks to the way StoreFront is build, using web.config files and .Net Framework.
Please realize that StoreFront ships with 206 cmdlets and that there are more settings that can be configured using PowerShell than listed in this article! The goal of this article is to translate the settings available in the StoreFront console, not to document all available PowerShell settings.
What helped me a lot writing this article, was to consolidate all “Get-Help” outputs from all cmdlets into one text file. Use the following code to generate the text file:
|
1 2 |
$AllStoreFrontModules = (Get-Command -all -commandtype cmdlet | where-object {$_.ModuleName -like "*StoreFront*"}).Name Foreach ( $cmdlet in $AllStoreFrontModules ) { Get-Help $cmdlet -full | Out-File -filepath "C:\Temp\AllStoreFrontModulesHelp.txt" -append } |
I hope that this article was of some help to you. Happy scripting!
Dennis Span works as a Lead Account Technology Strategist at Cloud Software Group in Vienna, Austria. He holds multiple Citrix certifications (CCE-V). Dennis has been a Citrix Technology Advocate (CTA) since 2017 (+ one year as Citrix Technology Professional, CTP). Besides his interest in virtualization technologies and blogging, he loves spending time with his family as well as snowboarding, playing basketball and rowing. He is fluent in Dutch, English, German and Slovak and speaks some Spanish.

Pingback: Citrix StoreFront unattended installation with PowerShell - Dennis Span
Buenísimo el artículo!
Muchas gracias Daniel! Soy contento que te guste.
Fantastic, thank you Dennis! One question about the Customize Appearance section. It looks like the “-HeaderLogoPath” and “-LogonLogoPath” are flipped compared to their descriptions in the console. A bit confusing, I just want to confirm this is correct. Thanks!
Hi Brian. Yep, you are absolutely correct. That was a mistake on my part. I just updated that particular section. Thanks for pointing it out to me!
Hi, i had a Problem with this line in Featured App Groups:
$Rfw = Get-STFWebReceiverService -SiteId 1 -VirtualPath “/Citrix/MyStoreWeb”
It works for only with a Shorter line:
$Rfw = Get-STFWebReceiverService
Hi, could it be that you did not enter the correct virtual path? The path I use is only an example (/Citrix/MyStoreWeb). In case you only have one StoreFront deployment (= IIS site) and only Receiver for Web service for that deployment, that shorter line will do the trick. In case you have multiple IIS sites and potentially multiple Receiver for Web services, the shorter line $Rfw = Get-STFWebReceiverService will not be sufficient. In that case you will have to specify your IIS site ID and the relative path to the service. I am happy the shorter line worked for you though. 🙂
Wonderful, great article
Thanks a lot!
Hi,
How can i bind the Netscaler Gateways from your Section “Manage NetScaler Gateways” to the Store “Configure Remote Access Settings”?
i find always
$gateway1 = DSGlobalGateway -GatewayId 1
$gateway2 = DSGlobalGateway -GatewayId 2
set-DSStoreGateways -SiteId “$Site” -VirtuelPath $VirtuelPath -Gateways @($gateway1,$gateway2)
regards Sascha
Hi Dennis,
i found the command:
$StoreObject = Get-STFStoreService -SiteId $SiteID -VirtualPath $VirtualPath
$GatewayObject = Get-STFRoamingGateway -Name $Name
Register-STFStoreGateway -StoreService $StoreObject -Gateway $GatewayObject -DefaultGateway
Regards Sascha
Thanks for your feedback Sascha (and especially for the PowerShell snippet). My apologies for not getting back to you sooner. I have been quite busy recently.
Pingback: Citrix Application Probe Agent unattended installation - Dennis Span
The best StoreFront PowerShell article, hands down! Thanks for putting this together! Amazing!
Thank you for this great compliment Ryan! It is greatly appreciated.
Truly amazing article Dennis….. you are really a life saver. Thank you so much for putting this together…
Thank you so much for your very kind feedback Syed! I am happy the article was of some help to you.
Still very usefull and makes work easier and more pleasant!
Thanks Swen!
Very very very nice, your article saved me so much time!
Just in case: I’m looking for the powershell command to add the FrontStore URL in Citrix Studio/Configuration/StoreFront and then add it to the delivery group
I’ve been googling for hours with no luck.
Hi, thanks a lot!! Unfortunately, I was not able to find that PowerShell command either. Sorry.
What are the PowerShell cmdlets to configure the The Advanced Settings
Could not see them in the document
Apologies. I did not realize the article is missing some settings. I do not plan to update this article, since my main focus is on Citrix Workspace right now and not Storefront on-prem installations.
Hi Dennis,
First of all, a big Thank You!, for all the guides and help. This Web page has been a life saver for all of us looking to automate our Citrix StoreFront installations.
There’s one thing that I’ve been stuck on and that’s running this via Ansible/WinRM:
Start-STFServerGroupJoin -IsAuthorizingServer -Confirm:$false
No matter how we try to run it, via win_shell, via Powershell script, it gives the same error:
Start-STFServerGroupJoin : There was no endpoint listening at net.pipe://localhost/Citrix/ClusterService that could accept the message. This is often caused by an incorrect address or SOAP action. See InnerException, if present, for more details.
Have you encountered such a case before?
Its been asked here, but there hasn’t been any reply or activity since.
https://discussions.citrix.com/topic/415857-unable-to-initiate-start-stfservergroupjoin-remotely/#comment-2089215
Hi Arpan,
First of all thanks for the kind words! Secondly, I never encountered this issue before. I checked our internal systems but could not find the cause of this issue. I suggest that you open a case for this. Sorry.
Hi Dennis,
Thanks for publishing this great article with so much detail.
I couldn’t find one section though and needed your input. What is the PS command to add a second server? This is helpful when the console is not working.
Regards,
Hi Richard,
The answer to your question can be found in the following article by Chris Jeucken: https://blogs.mycugc.org/2021/03/02/unattended-citrix-storefront-installation-and-configuration/. See the section “Script 3 – Join existing StoreFront instance” for the required PowerShell modules and commands.