
Do you optimize your image? If not, you should! Citrix Optimizer is THE optimization tool for Citrix workers, created by Citrix for Citrix customers. The default templates included in Citrix Optimizer are pretty solid, but creating a custom template for Citrix Optimizer is an option as well. This article explains how to create these.
| Change Log 22.03.2019: updated article for Citrix Optimizer version 2.0.0.109 released in December 2018. 19.03.2019: updated article for Citrix Optimizer version 2.1.1.23 released in March 2019. |
Table of Contents
|
Introduction
This article was initially written for Citrix Optimizer version 1.2.0.67, but has been updated for version 2.1.1.23 released in March 2019. Citrix Optimizer is updated every three to five months. I do my best to keep the information in this article as up-to-date as possible.
First of all, if you are not familiar with Citrix Optimizer, please check out the following links:
- Citrix Optimizer main page (download the source files here)
- Citrix Optimizer 2.0 – What’s New (this article is still relevant since version 2.1.1.23 contains mostly fixes “under the hood”)
You may wonder why there is a need to create custom templates. Doesn’t the Citrix Optimizer already include all necessary optimizations? The truth is that no optimization tool can ever include everything you may require in your organization. This would be an unfair expectation of any tool. What is a valid expectation though is to be able to create your own custom templates so you can add your own customizations. You can customize Citrix Optimizer by using the built-in feature Template Builder or by modifying the underlying XML files. In this article I explain in detail how you can create your own custom templates.
An overview of Citrix Optimizer
Release notes:
- Citrix Optimizer v1.2.0.67: the first release of Citrix Optimizer.
- Citrix Optimizer v2.0.109 (released in December 2018):
- Added templates for Windows 10 build 1809 and Windows Server 2019 build 1809
- Updated schema and names of all templates
- Added support for template auto-selection
- Added Template Builder (GUI)
- Added Template Marketplace
- Bug fixes
- Citrix Optimizer v2.1.1.23 (released in March 2019):
- Added option to remove marketplace
- Many improvements and bug fixes for Template Builder and Marketplace
- Added support for proxy configuration
- Enhanced HTML reports, added ability to redirect logs
Log files are written to the subdirectory Logs. This directory is created automatically when running Citrix Optimizer.
The screenshot below shows the Citrix Optimizer directory structure, highlighting the directory where the XML templates are stored.

When the GUI of the Citrix Optimizer (CitrixOptimizer.exe) is launched, it lists all available XML files found within the Templates directory:

Any custom XML you add to the local Templates directory is listed automatically by Citrix Optimizer.
Template Marketplace
In version 2.0.109, the new feature Template Marketplace was introduced. The default market place is the Citrix internal marketplace where you can get new or updated templates.

It is also possible to add new, external, marketplaces. I recommend that you add the Citrix Community Marketplace created by Citrix CTP Ryan Butler. To connect to this marketplace, go to Template Marketplace in the GUI, click on +Add New Marketplace and enter the following URL:
https://raw.githubusercontent.com/ryancbutler/Citrix_Optimizer_Community_Template_Marketplace/master/communitymarketplace.xml
| Note: my template for optimizing Windows Server 2016 is also included in the Citrix Community Marketplace. |

Of course, when you create templates of your own, please share them and add them to the marketplace. Your contribution will be appreciated!
Template Builder
In version 2.0.109, the new feature Template Builder was introduced. This is a powerful feature that allows you to:
Create new templates
To create a new template, go to the section Template Builder. Select an existing category or create a new one. After that, you can either create a new template from scratch or you can open an existing template, modify it and save it under a new name.
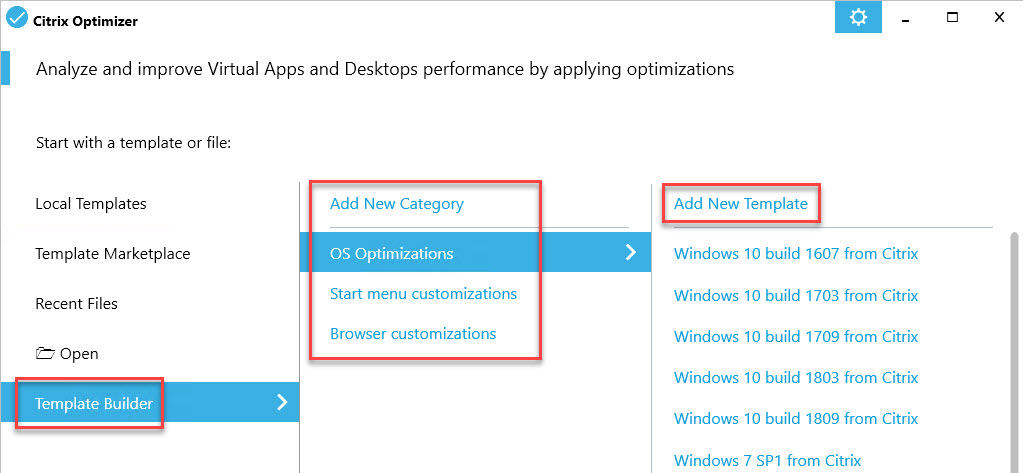
In case you select Add New Template, you will have to fill out the following information:
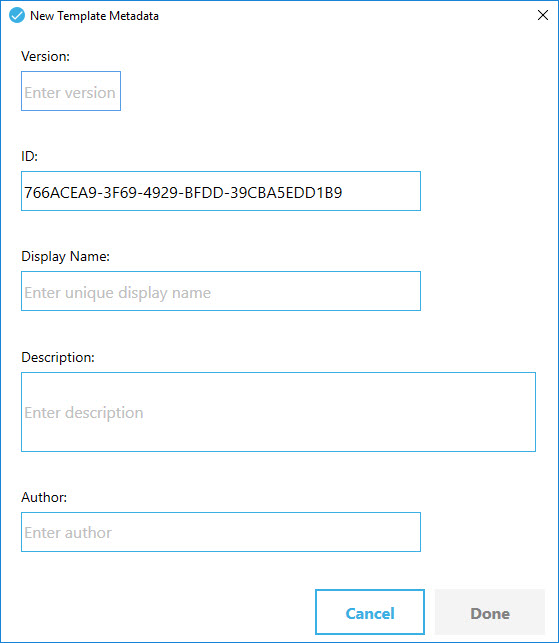
See the section Metadata in this article for more information.
Now you can start to create a new group.

A group should contain at least one item.

The item can be of various types:

Modify existing templates
To modify an existing template you go to Template Builder, select the category and than the template. This will open the template in edit mode. Here you can edit existing groups and existing items. You can also create new groups and items.
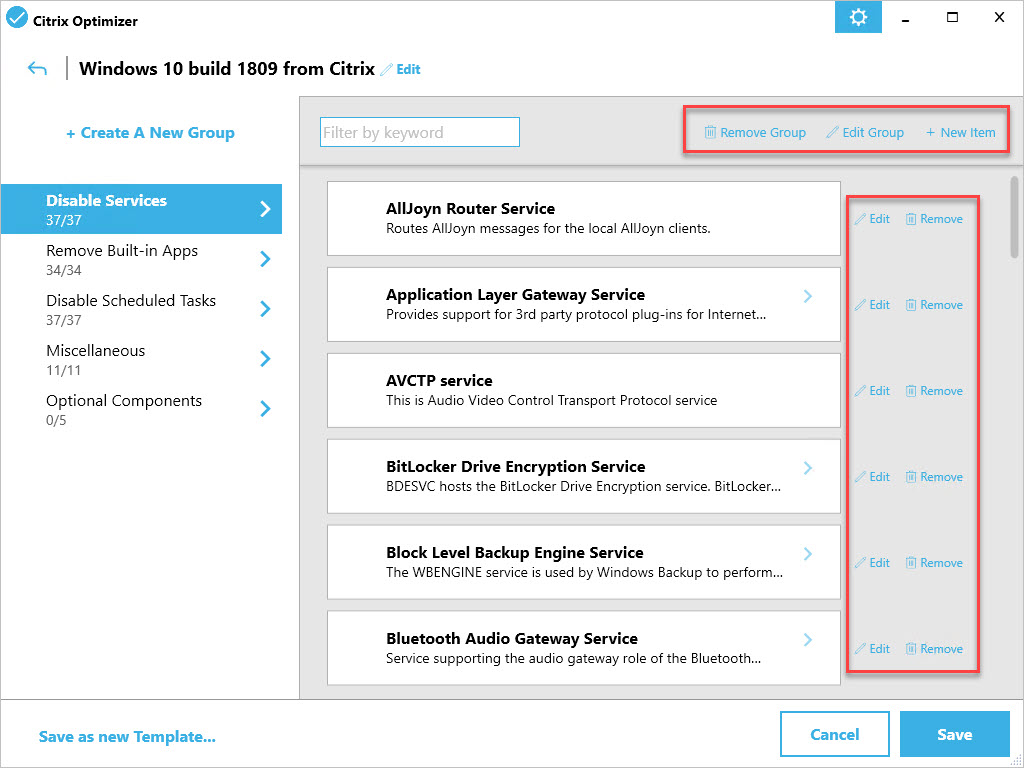
When you are ready you can either save the template (and overwrite the existing one) or save it as a new template.

When you save the template as a new template you have to fill out the metadata, the same as if you would create a new template from scratch.

See the section Metadata in this article for more information.
Create new categories
The categories that are shown in the GUI depend on the templates that are included in the templates directory. The GUI simply reads the metadata section of each template and displays both the list of templates and the list of categories accordingly.

The category in the official Citrix templates is OS Optimizations, so this is the only one you see by default.
You can create a new category in the section Template Builder.

After creating a new category you can start creating a new template.

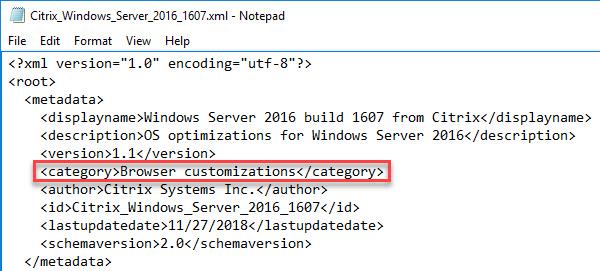
It is also possible to change the category at a later time by directly modifying the XML file (the template file).
Under the hood: a breakdown of a Citrix Optimizer template
From version 2.0.109, Citrix Optimizer includes a GUI that allows you to create and modify templates. It is no longer necessary to manually modify the XML files. The contents in this section was originally created for version 1.x of Citrix Optimizer, where the only way how to create a custom template was to manually build it. I have updated all information in this section to version 2.x of Citrix Optimizer.
Citrix Optimizer templates are XML files. One XML file = one template.

These files can be opened in any text editor, for example in Notepad. The XML structure is build-up as follows.
Metadata
The metadata section, among other items, includes the display name of the template (which is visible in the GUI):

Other information included in this section are:
- The description of the template (shown when hovering over the information icon)
- The version of the template: this is the internal version of the template which the author has to keep up-to-date. This has nothing to do with the version of Citrix Optimizer.
- The category: from version 2.0.109 you can create custom categories within the GUI (the standard category used by all official Citrix templates is OS Optimizations).
- The author of the template. This can be the name of an organization or an individual.
- The ID. The ID of each template has to be unique, otherwise an error is thrown in Citrix Optimizer.
- The date the template was last modified (lastupdatedate). The date format is written in the month/day/year format using the forward slash as a separator (e.g. 11/27/2018). Make sure to always modify this field when updating your custom templates (together with the version number), especially when you want to offer them in an external market place.

Groups
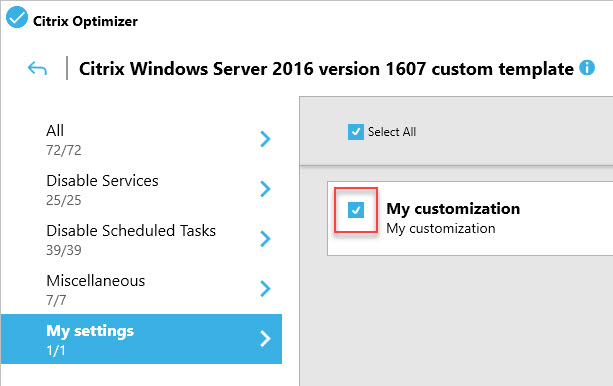
Groups represent the main categories in a template. The display name of a group is what you see in the left pane in the GUI.
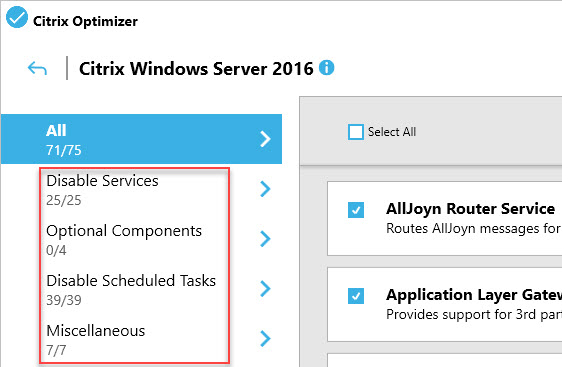

The group ID is the short name of the group. This short name is used when running Citrix Optimizer using PowerShell (as opposed to the GUI) and you only want to optimize settings included in specific groups, for example:
|
1 |
CtxOptimizerEngine.ps1 -Source "Citrix_Windows_Server_2016_1607_My_Custom_Template.xml" -Mode Execute -Groups "DisableServices","DisableScheduledTasks" |
The ID has to be unique within the template.
Entries (within a group)
Entries represent the individual optimizations within one group. One entry equals one optimization.


Multiple entry types exist. These are explained in detail in the section Create a custom entry in this article.
Creating your own template manually
| From version 2.x it is no longer necessary to manually create custom templates. You can use the Template Builder included in Citrix Optimizer. Although it is still possible to create your own custom template manually, I strongly recommend you to use the Template Builder. |
This section is intended for anyone who wants to understand the underlying XML structure of the Citrix Optimizer templates. Also, you sometimes may find yourself in the situation where you need to manually change something, such as the category (which currently cannot be changed using the GUI).
Customize the metadata
The first thing you want to do after you copied an existing template as your baseline is to customize the metadata:
It is important to understand the items in the metadata section well (see the section Metadata in this article for more information).
Create a custom group
I recommend to create one or more custom groups that will include your custom optimizations, for example:

A group is created using the tags <group> and </group>. A group also requires additional information such as the name of the group, a description and an ID:
- The display name is placed between the tags <displayname> and </displayname.
- The description is placed between the tags <description> and </description>.
- The ID is placed between the tags <id> and </id>. This has to be unique within the current template.

Create a custom entry
Each group requires at least one entry. An entry is where the action happens. This is where the optimization of one particular setting is configured. The easiest way how to create a new entry is by copying an existing one.
All entries have the following tags in common:
- The name for the entry: <name></name>.
- The description of the entry: <description></description>.
- The execution mode of the entry: <execute></execute>.
- The configuration/optimization: <action></action>.
- The Citrix Optimizer plugin: <plugin></plugin>. There are multiple plugins available. These are described in more detail below.
- The parameters in the section <params>. These are plugin specific parameters that are required to perform the action. You find more details concerning the various actions in the sections below.
The execution mode of an entry can either be 0 or 1. Zero means that the setting is optional: <execute>0</execute>.

One means that the setting is mandatory: <execute>1</execute>.
Multiple types of entries are available:
- Custom entry for Services
- Custom entry for Scheduled Tasks
- Custom entry for Registry
- Custom entry for PowerShell (also used to modify the registry and to run executables)
Custom entry for Services
The entry for services looks as follows:
|
1 2 3 4 5 6 7 8 9 10 11 12 |
<entry> <name>AllJoyn Router Service</name> <description>Routes AllJoyn messages for the local AllJoyn clients.</description> <execute>1</execute> <action> <plugin>Services</plugin> <params> <name>AJRouter</name> <value>Disabled</value> </params> </action> </entry> |
The example above is the first service that is disabled in the default template for Windows Server 2016 version 1607 (Citrix_Windows_Server_2016_1607.xml).
Enter the following variables to create this entry:
- The name of the service (between the tags <name> and </name>). This can be any name you want. I recommend to use the display name of the server (e.g. AllJoyn Router Service as opposed to the service name AJRouter). The name can contain spaces.
- The description of the service (between the tags <description> and </description>).
- The execution value 1 (mandatory) or 0 (optional) between the tags <execute> and </execute>.
- The name of the plugin to use (between the tags <plugin> and </plugin>). For services the name of the plugin is Services.
- The name of the service (in the section <params> between the tags <name> and </name>). This has to be the service name and not the display name (e.g. AJRouter as opposed to AllJoyn Router Service).
- The value of the action (= configuration of the service) in the section <params> between the tags <value> and </value>. Since we are working on optimizing the operating system the value should be Disabled.
This entry type automatically supports rollback when executed using PowerShell (as opposed to the GUI).
Custom entry for Scheduled Tasks
The entry for scheduled tasks looks as follows:
|
1 2 3 4 5 6 7 8 9 10 11 12 13 |
<entry> <name>AnalyzeSystem</name> <description>This job analyzes the system looking for conditions that may cause high energy use.</description> <execute>1</execute> <action> <plugin>SchTasks</plugin> <params> <name>AnalyzeSystem</name> <path>\Microsoft\Windows\Power Efficiency Diagnostics</path> <value>Disabled</value> </params> </action> </entry> |
The example above is the first scheduled task that is disabled in the default template for Windows Server 2016 version 1607 (Citrix_Windows_Server_2016_1607.xml).
Make sure to write down the name and location (= relative path in the scheduled task directory structure). You will need this later.

Enter the following variables to create this entry:
- The name of the scheduled task (between the tags <name> and </name>). This can be any name you want. I recommend to use the actual name of the scheduled task though. The name can contain spaces.
- The description of the scheduled task (between the tags <description> and </description>).
- The execution value 1 (mandatory) or 0 (optional) between the tags <execute> and </execute>.
- The name of the plugin to use (between the tags <plugin> and </plugin>). For scheduled tasks the name of the plugin is SchTasks.
- The name of the scheduled task (in the section <params> between the tags <name> and </name>). This is the name of the scheduled task as shown in the screen shot above.
- The relative path of the scheduled task (in the section <params> between the tags <path> and </path>). This is the location of the scheduled task as shown in the screen shot above. Any yes, the back slash at the beginning of the path should be included as well.
- The value of the action (= configuration of the scheduled task) in the section <param> between the tags <value> and </value>. Since we are working on optimizing the operating system the value should be Disabled.
This entry type automatically supports rollback when executed using PowerShell (as opposed to the GUI).
Custom entry for Registry
The structure of a default registry entry is as follows:
|
1 2 3 4 5 6 7 8 9 10 11 12 13 14 |
<entry> <name>Disable Move to Recycle Bin</name> <description>Disable Move to Recycle Bin</description> <execute>1</execute> <action> <plugin>Registry</plugin> <params> <name>NoRecycleFiles</name> <path>HKLM\Software\Microsoft\Windows\CurrentVersion\Policies\Explorer</path> <value>1</value> <valuetype>DWORD</valuetype> </params> </action> </entry> |
In case you want to remove a registry value completely you can use the value CTXOE_NoValue, like this:
|
1 2 3 4 5 6 7 8 9 10 11 12 13 14 |
<entry> <name>Disable Move to Recycle Bin</name> <description>Disable Move to Recycle Bin</description> <execute>1</execute> <action> <plugin>Registry</plugin> <params> <name>NoRecycleFiles</name> <path>HKLM\Software\Microsoft\Windows\CurrentVersion\Policies\Explorer</path> <value>CTXOE_NoValue</value> <valuetype>DWORD</valuetype> </params> </action> </entry> |
This entry type automatically supports rollback when executed using PowerShell (as opposed to the GUI).
Custom entry for PowerShell (also used to modify the registry and to run executables)
The PowerShell plugin allows you to be very flexible in your customization. Let me explain how to use this plugin using some examples.
- PowerShell: set a registry value (e.g. disable Cortana)
- PowerShell: rename a registry value (e.g. disable Active Setup)
- PowerShell: run an executable (e.g. disable DEP using “bcdedit.exe”)
Please be aware that for custom PowerShell functions you need to create your own rollback procedure.
You can of course create any routine using PowerShell you require. I invite you to use the examples below to create your own customizations. If possible, it would be great if you could share these with the community.
PowerShell: set a registry value (e.g. disable Cortana)
In this example, we will disable Cortana by changing the corresponding registry value using PowerShell. You can of course also use the registry plugin for this.
Add the following code to your custom Citrix Optimizer template if you want to optimize (disable) Cortana:
|
1 2 3 4 5 6 7 8 9 10 11 12 13 14 15 16 17 18 19 20 21 22 23 24 25 26 27 28 29 30 31 32 33 34 35 36 37 38 39 40 41 42 43 44 45 46 47 48 49 50 51 52 53 54 55 56 57 58 59 60 61 62 |
<entry> <name>Disable Cortana</name> <description>Disable Cortana (HKLM\SOFTWARE\Policies\Microsoft\Windows\Windows Search -> AllowCortana -> 0 -> DWORD). Does not support rollback.</description> <execute>1</execute> <action> <plugin>PowerShell</plugin> <executeparams> <value> $ExitCode = 0 $RegKeyPath = "hklm:\SOFTWARE\Policies\Microsoft\Windows\Windows Search" $RegValueName = "AllowCortana" $RegValue = 0 $Type = "DWORD" # Create the registry key in case it does not exist if (! ( Test-Path $RegKeyPath )) { try { New-Item -Path $RegkeyPath -Force -ea SilentlyContinue | Out-Null } catch { $ExitCode++ $Global:CTXOE_Result = $False $Global:CTXOE_Details = "An error occurred trying to create the registry key $RegKeyPath" } } # Modify or set the registry value if ( $ExitCode -eq 0 ) { try { if ( ( "String", "ExpandString", "DWord", "QWord" ) -contains $Type ) { New-ItemProperty -Path $RegKeyPath -Name $RegValueName -Value $RegValue[0] -PropertyType $Type -Force -ea SilentlyContinue | Out-Null } else { New-ItemProperty -Path $RegKeyPath -Name $RegValueName -Value $RegValue -PropertyType $Type -Force -ea SilentlyContinue | Out-Null } $Global:CTXOE_Result = $True $Global:CTXOE_Details = "Cortana was successfully disabled" } catch { $Global:CTXOE_Result = $False $Global:CTXOE_Details = "An error occurred trying to set registry value $RegValueName" } } </value> </executeparams> <params> <value> $RegKeyPath = "hklm:\SOFTWARE\Policies\Microsoft\Windows\Windows Search" $RegValueName = "AllowCortana" $RegValue = 0 # Retrieve the current configuration try { [string]$RegResult = (Get-ItemProperty -Path $RegKeyPath -Name $RegValueName -ea SilentlyContinue).$RegValueName } catch { $Global:CTXOE_Result = $False $Global:CTXOE_Details = "The registry value does not exist." } if ( $RegResult -eq $RegValue ) { $Global:CTXOE_Result = $True } else { $Global:CTXOE_Result = $False } if ( $RegResult -eq $RegValue ) { $Global:CTXOE_Details = "The registry value is optimized (= correctly configured). Current value: $RegResult. Rollback is currently not supported." } else { $Global:CTXOE_Details = "The registry value is NOT optimized (= NOT correctly configured). Current value: $RegResult. Rollback is currently not supported." } Return </value> </params> </action> </entry> |
Most of the tags are the same as explained in the previous sections in this article, such as <name>, <description> <execute>, <action> and more. To be able to execute PowerShell code you have to use the plugin PowerShell. Add this between the tags <plugin> and </plugin>.
The section <executeparams> contains the code that will configure your optimization. Let’s take a closer look at the PowerShell code.
In the first couple of lines we define some variables such as the registry key path, the registry value name, the registry value and the value type (e.g. DWORD or STRING).
|
1 2 3 4 5 |
$ExitCode = 0 $RegKeyPath = "hklm:\SOFTWARE\Policies\Microsoft\Windows\Windows Search" $RegValueName = "AllowCortana" $RegValue = 0 $Type = "DWORD" |
Then we check whether or not the registry key exists. If not, it is created (New-Item). In case of an error, the error level is raised ($ExitCode++) and the Optimizer internal variable $Global:CTXOE_Result is set to $False to indicate the setting has not been optimized.
|
1 2 3 4 5 6 7 8 9 10 |
# Create the registry key in case it does not exist if (! ( Test-Path $RegKeyPath )) { try { New-Item -Path $RegkeyPath -Force -ea SilentlyContinue | Out-Null } catch { $ExitCode++ $Global:CTXOE_Result = $False $Global:CTXOE_Details = "An error occurred trying to create the registry key $RegKeyPath" } } |
In the last section using the PowerShell cmdlet New-ItemProperty, the registry value is configured. In case there is no error, the Optimizer internal variable $Global:CTXOE_Result is set to $True to indicate that the setting has been optimized. Should an error occur the Optimizer internal variable $Global:CTXOE_Result is set to $False to indicate that the setting was not optimized.
|
1 2 3 4 5 6 7 8 9 10 11 12 13 14 15 |
# Modify or set the registry value if ( $ExitCode -eq 0 ) { try { if ( ( "String", "ExpandString", "DWord", "QWord" ) -contains $Type ) { New-ItemProperty -Path $RegKeyPath -Name $RegValueName -Value $RegValue[0] -PropertyType $Type -Force -ea SilentlyContinue | Out-Null } else { New-ItemProperty -Path $RegKeyPath -Name $RegValueName -Value $RegValue -PropertyType $Type -Force -ea SilentlyContinue | Out-Null } $Global:CTXOE_Result = $True $Global:CTXOE_Details = "Cortana was successfully disabled" } catch { $Global:CTXOE_Result = $False $Global:CTXOE_Details = "An error occurred trying to set registry value $RegValueName" } } |
The section <params> contains the code that checks the current configuration and determines whether or not the current configuration is already optimized or not. Let’s take a closer look at the PowerShell code.
First we define the registry path, value name and required value.
|
1 2 3 |
$RegKeyPath = "hklm:\SOFTWARE\Policies\Microsoft\Windows\Windows Search" $RegValueName = "AllowCortana" $RegValue = 0 |
Then, using a try / catch statement we retrieve the current value and store it in the variable $RegResult. In case the registry value does not exist the Optimizer internal variable $Global:CTXOE_Result is set to $False.
In case the value in $RegResult is equal to the value in the variable $RegValue, the setting is optimized ($Global:CTXOE_Result = $True). Otherwise, the setting has not yet been optimized and $Global:CTXOE_Result is set to $False).
|
1 2 3 4 5 6 7 8 9 |
# Retrieve the current configuration try { [string]$RegResult = (Get-ItemProperty -Path $RegKeyPath -Name $RegValueName -ea SilentlyContinue).$RegValueName } catch { $Global:CTXOE_Result = $False $Global:CTXOE_Details = "The registry value does not exist." } if ( $RegResult -eq $RegValue ) { $Global:CTXOE_Result = $True } else { $Global:CTXOE_Result = $False } if ( $RegResult -eq $RegValue ) { $Global:CTXOE_Details = "The registry value is optimized (= correctly configured). Current value: $RegResult. Rollback is currently not supported." } else { $Global:CTXOE_Details = "The registry value is NOT optimized (= NOT correctly configured). Current value: $RegResult. Rollback is currently not supported." } |
PowerShell: rename a registry value (e.g. disable Active Setup)
Active setup runs at first user logon, but only within a published desktop. When starting a published application, Active Setup does not run. This is why it is a best-practice to disable Active Setup entirely. See Citrix CTP Helge Klein’s article Active Setup Explained for more information.
The easiest way how to disable Active Setup is to rename both the 32-bit and 64-bit registry keys. Renaming the parent registry key automatically disables all individual Active Setup entries beneath it.
Original key names:
- HKEY_LOCAL_MACHINE\SOFTWARE\Microsoft\Active Setup\Installed Components
- HKEY_LOCAL_MACHINE\SOFTWARE\WOW6432Node\Microsoft\Active Setup\Installed Components
Key names after being renamed (and thus disabled):
- HKEY_LOCAL_MACHINE\SOFTWARE\Microsoft\Active Setup\_DISABLED Installed Components_2018-11-10_10-24-11
- HKEY_LOCAL_MACHINE\SOFTWARE\WOW6432Node\Microsoft\Active Setup\_DISABLED Installed Components_2018-11-10_10-24-11
Add the following code to your custom Citrix Optimizer template if you want to optimize (disable) Active Setup 32-bit:
|
1 2 3 4 5 6 7 8 9 10 11 12 13 14 15 16 17 18 19 20 21 22 23 24 25 26 27 28 29 30 31 32 33 34 35 36 |
<entry> <name>Disable Active Setup (32-bit)</name> <description>Disable all 32-bit Active Setup items to prevent them from running at first user logon. All Active Setup items are disable by renaming the registry key "HKLM\SOFTWARE\WOW6432Node\Microsoft\Active Setup\Installed Components". The key "Installed Components" will be renamed to "_DISABLED Installed Components_%Date%_%Time%". For example: "_DISABLED Installed Components_2018-10-31_02-42-10". Does not support rollback.</description> <execute>1</execute> <action> <plugin>PowerShell</plugin> <executeparams> <value> $DateTime = Get-Date -Format yyyy-MM-dd_hh-mm-ss $NewName = "_DISABLED Installed Components_$DateTime" $Path = "HKLM:\SOFTWARE\WOW6432Node\Microsoft\Active Setup\Installed Components" if ( Test-Path $Path ) { try { Rename-Item -path $Path -newname $NewName $Global:CTXOE_Result = $True $Global:CTXOE_Details = "All Active Setup items (32-bit) have been successfully disabled" } catch { $Global:CTXOE_Result = $False $Global:CTXOE_Details = "An error occurred trying to disable all Active Setup items (32-bit)" } } else { $Global:CTXOE_Result = $True $Global:CTXOE_Details = "All Active Setup items (32-bit) have already been disabled" } </value> </executeparams> <params> <value> $Path = "HKLM:\SOFTWARE\WOW6432Node\Microsoft\Active Setup\Installed Components" if ( Test-Path $Path ) { $Global:CTXOE_Result = $False } else { $Global:CTXOE_Result = $True } if ( Test-Path $Path ) { $Global:CTXOE_Details = "Active Setup is NOT optimized (= disabled)." } else { $Global:CTXOE_Details = "Active Setup is optimized (= disabled). Rollback is currently not supported." } Return </value> </params> </action> </entry> |
Add the following code to your custom Citrix Optimizer template if you want to optimize (disable) Active Setup 64-bit:
|
1 2 3 4 5 6 7 8 9 10 11 12 13 14 15 16 17 18 19 20 21 22 23 24 25 26 27 28 29 30 31 32 33 34 35 36 |
<entry> <name>Disable Active Setup (64-bit)</name> <description>Disable all 64-bit Active Setup items to prevent them from running at first user logon. All Active Setup items are disable by renaming the registry key "HKLM\SOFTWARE\Microsoft\Active Setup\Installed Components". The key "Installed Components" will be renamed to "_DISABLED Installed Components_%Date%_%Time%". For example: "_DISABLED Installed Components_2018-10-31_02-42-10". Does not support rollback.</description> <execute>1</execute> <action> <plugin>PowerShell</plugin> <executeparams> <value> $DateTime = Get-Date -Format yyyy-MM-dd_hh-mm-ss $NewName = "_DISABLED Installed Components_$DateTime" $Path = "HKLM:\SOFTWARE\Microsoft\Active Setup\Installed Components" if ( Test-Path $Path ) { try { Rename-Item -path $Path -newname $NewName $Global:CTXOE_Result = $True $Global:CTXOE_Details = "All Active Setup items (64-bit) have been successfully disabled" } catch { $Global:CTXOE_Result = $False $Global:CTXOE_Details = "An error occurred trying to disable all Active Setup items (64-bit)" } } else { $Global:CTXOE_Result = $True $Global:CTXOE_Details = "All Active Setup items (64-bit) have already been disabled" } </value> </executeparams> <params> <value> $Path = "HKLM:\SOFTWARE\Microsoft\Active Setup\Installed Components" if ( Test-Path $Path ) { $Global:CTXOE_Result = $False } else { $Global:CTXOE_Result = $True } if ( Test-Path $Path ) { $Global:CTXOE_Details = "Active Setup is NOT optimized (= disabled)." } else { $Global:CTXOE_Details = "Active Setup is optimized (= disabled). Rollback is currently not supported." } Return </value> </params> </action> </entry> |
Most of the tags are the same as explained in the previous sections in this article, such as <name>, <description> <execute>, <action> and more. To be able to execute PowerShell code you have to use the plugin PowerShell. Add this between the tags <plugin> and </plugin>.
The section <executeparams> contains the code that will configure your optimization. Let’s take a closer look at the PowerShell code.
In the first line we create a variable called $DateTime that includes the current date and time. We will use this later.
|
1 |
$DateTime = Get-Date -Format yyyy-MM-dd_hh-mm-ss |
Now we define the new name for the registry key:
|
1 |
$NewName = "_DISABLED Installed Components_$DateTime" |
The fully qualified path of the registry key is set:
|
1 |
$Path = "HKLM:\SOFTWARE\Microsoft\Active Setup\Installed Components" |
In the following part we test whether or not the original registry key exists. If not, this means that Active Setup has already been optimized (disabled). The Optimizer internal variable $Global:CTXOE_Result is set to $True, telling Citrix Optimizer that the setting has already been optimized.
In case the original Active Setup registry key exists, the key is renamed (Rename-Item). If this is successful, $Global:CTXOE_Result is set to $True. If for some reason renaming the key was not successful, $Global:CTXOE_Result is set to $False.
The Optimizer internal variable $Global:CTXOE_Details is used to report further details.
|
1 2 3 4 5 6 7 8 9 10 11 12 13 |
if ( Test-Path $Path ) { try { Rename-Item -path $Path -newname $NewName $Global:CTXOE_Result = $True $Global:CTXOE_Details = "All Active Setup items (64-bit) have been successfully disabled" } catch { $Global:CTXOE_Result = $False $Global:CTXOE_Details = "An error occurred trying to disable all Active Setup items (64-bit)" } } else { $Global:CTXOE_Result = $True $Global:CTXOE_Details = "All Active Setup items (64-bit) have already been disabled" } |
The section <params> contains the code that checks the current configuration and determines whether or not the current configuration is already optimized or not. Let’s take a closer look at the PowerShell code.
Here we simply check whether or not the original Active Setup key exists. If yes, than Active Setup is not optimized (not disabled) and the Optimizer internal variable $Global:CTXOE_Result is set to $False. If the registry key does not exist than Active Setup already has been optimized; the Optimizer internal variable $Global:CTXOE_Result is set to $True.
|
1 2 3 |
$Path = "HKLM:\SOFTWARE\Microsoft\Active Setup\Installed Components" if ( Test-Path $Path ) { $Global:CTXOE_Result = $False } else { $Global:CTXOE_Result = $True } if ( Test-Path $Path ) { $Global:CTXOE_Details = "Active Setup is NOT optimized (= disabled)." } else { $Global:CTXOE_Details = "Active Setup is optimized (= disabled). Rollback is currently not supported." } |
PowerShell: run an executable (e.g. disable DEP using “bcdedit.exe”)
It is a Citrix best-practice to disable Data Execution Prevention (DEP). See page 13 in the Citrix Windows 10 Optimization Guide.
You find DEP in the Control Panel under System \ Advanced \ Performance Settings \ Data Execution Prevention.

It is not possible to completely disable DEP in the GUI. This is only possible using the bcdedit.exe command.
Add the following code to your custom Citrix Optimizer template if you want to optimize (disable) DEP:
|
1 2 3 4 5 6 7 8 9 10 11 12 13 14 15 16 17 18 19 20 21 22 23 24 25 |
<entry> <name>Disable Data Execution Prevention (DEP)</name> <description>Turn off Data Execution Prevention (DEP) recommended by Citrix (https://support.citrix.com/article/CTX216252) using the command "bcdedit.exe /set nx AlwaysOff". Does not support rollback.</description> <execute>1</execute> <action> <plugin>PowerShell</plugin> <executeparams> <value> . $env:WinDir\System32\bcdedit.exe /set nx AlwaysOff; $Global:CTXOE_Result = $True; $Global:CTXOE_Details = "DEP was successfully disabled"; </value> </executeparams> <params> <value> # Retrieve the current configuration of Data Execution Prevention (DEP). Possible results are: OptIn | OptOut | AlwaysOff | AlwaysOff [string]$BCDValue = bcdedit.exe '/enum' '{default}' [array]$BCDArray = $BCDValue.Split(" ",[System.StringSplitOptions]::RemoveEmptyEntries) [string]$BCDResult = ($BCDArray[$BCDArray.IndexOf("nx")+1]).Trim() if ( $BCDResult -eq "AlwaysOff" ) { $Global:CTXOE_Result = $True } else { $Global:CTXOE_Result = $False } if ( $BCDResult -eq "AlwaysOff" ) { $Global:CTXOE_Details = "Data Execution Prevention (DEP) is optimized (= disabled). Current value: $BCDResult. Rollback is currently not supported." } else { $Global:CTXOE_Details = "Data Execution Prevention (DEP) is NOT optimized (= enabled). Current value: $BCDResult. Rollback is currently not supported." } Return </value> </params> </action> </entry> |
Most of the tags are the same as explained in the previous sections in this article, such as <name>, <description> <execute>, <action> and more. To be able to execute PowerShell code you have to use the plugin PowerShell. Add this between the tags <plugin> and </plugin>.
The section <executeparams> contains the code that will configure your optimization. Let’s take a closer look at the PowerShell code.
The first line executes BCDEdit with the parameters /set nx AlwaysOff to disable DEP. The dot (.) in the beginning is necessary if you want to use a combination of environment variables and literal path.
|
1 |
. $env:WinDir\System32\bcdedit.exe /set nx AlwaysOff; |
In the second and third line two custom Optimizer variables are used:
|
1 2 |
$Global:CTXOE_Result = $True; $Global:CTXOE_Details = "DEP was successfully disabled"; |
The variable $Global:CTXOE_Result returns the result back to Citrix Optimizer. A value of $True means that the optimization was successful; a value of $False means that the optimization failed. The variable $Global:CTXOE_Details returns more details to Citrix Optimizer.
The section <params> contains the code that checks the current configuration and determines whether or not the current configuration is already optimized or not. Let’s take a closer look at the PowerShell code.
First we need to enumerate the current BCDEdit configuration. The result is stored in the variable $BCDValue.
|
1 |
[string]$BCDValue = bcdedit.exe '/enum' '{default}' |
The information in the variable $BCDValue is not very readable so we need to split the result and store it in an array, removing any empty values.
|
1 |
[array]$BCDArray = $BCDValue.Split(" ",[System.StringSplitOptions]::RemoveEmptyEntries) |
Now we locate the value nx in the array and retrieve its array number. We know that the array item following nx is the actual value of nx, so we take the array number of nx and add 1 to get the array number of the value we are actually interested in.
Confused? Let me explain differently. Take a look at the screenshot below and locate the value nx. If the information below would be stored in an array and nx would be number 27 in that array, than the value OptOut would be number 28 in the array.

The value of array number 28 (OptOut in our example) is what we are after. This value gets stored in the variable $BCDResult. The variable $BCDResult can contain one of four possible values: OptIn, OptOut, , AlwaysOff or AlwaysOff.
|
1 |
[string]$BCDResult = ($BCDArray[$BCDArray.IndexOf("nx")+1]).Trim() |
In the last two lines we determine whether or not DEP is optimized or not. In case the value store in the variable $BCDResult is AlwaysOff, DEP already has been optimized (disabled). In case it is any of the other three possible values than DEP is not optimized.
|
1 2 |
if ( $BCDResult -eq "AlwaysOff" ) { $Global:CTXOE_Result = $True } else { $Global:CTXOE_Result = $False } if ( $BCDResult -eq "AlwaysOff" ) { $Global:CTXOE_Details = "Data Execution Prevention (DEP) is optimized (= disabled). Current value: $BCDResult. Rollback is currently not supported." } else { $Global:CTXOE_Details = "Data Execution Prevention (DEP) is NOT optimized (= enabled). Current value: $BCDResult. Rollback is currently not supported." } |
Conclusion
Creating your own custom template gives you more control over which settings are optimized. I invite you to share your experience with custom templates by leaving a comment below.
Dennis Span works as a Lead Account Technology Strategist at Cloud Software Group in Vienna, Austria. He holds multiple Citrix certifications (CCE-V). Dennis has been a Citrix Technology Advocate (CTA) since 2017 (+ one year as Citrix Technology Professional, CTP). Besides his interest in virtualization technologies and blogging, he loves spending time with his family as well as snowboarding, playing basketball and rowing. He is fluent in Dutch, English, German and Slovak and speaks some Spanish.

great work – as usually
Thanks Wolfgang!
Holy moly!
Thanks Boss! 😉
Pingback: Using Citrix Optimizer with BIS-F | BLOGS
Pingback: Supercharge Citrix Logins: Collection of Tips From the Field | BLOGS