
The installation and configuration of all Citrix products can be automated. This article covers the Citrix Provisioning Server unattended installation with PowerShell and SCCM. Also included is the unattended creation and configuration of the Provisioning Server farm and the local host.
| Change Log 31.08.2017: updated to Provisioning Server 7.15 (this article was originally written for Provisioning Server 7.13). 28.11.2017: updated complete script for Provisioning Server configuration. Improved reading the local IP address (lines 631 to 658). 06.12.2017: updated to Provisioning Server 7.16 (no major changes). |
Before continuing with this article please be aware of the following:
- In this article, Provisioning Server or Provisioning Services is sometimes abbreviated to PVS.
- The version of Citrix Provisioning Server in this article is 7.16, but all installations work from Provisioning Server 7.13 and upward.
- The software can be downloaded here:
https://www.citrix.com/downloads/xenapp-and-xendesktop/edition-software/enterprise-716.html - The installation and configuration scripts are designed for the following operating systems:
- Microsoft Windows Server 2008 R2 SP1
- Microsoft Windows Server 2012 R2
- Microsoft Windows Server 2016
- The installation and configuration scripts have been tested on the following operating systems:
- Microsoft Windows Server 2012 R2
- Microsoft Windows Server 2016
- The assumption is that you execute the example script in this article on a server which has been pre-installed with one of the aforementioned operating systems including all latest hotfixes and .Net Framework 4.6.x.
This article consists of three parts:
- Part 1 focuses on the installation of the Windows Roles and Features;
- Part 2 deals with the installation of the Citrix Provisioning Server;
- Part 3 describes the configuration of the Provisioning Server farm and the local host.
Part 1: Install Windows Roles and Features (optional)
Before we install the Citrix Provisioning Server software, I recommend to install some commonly used roles and features. These components are optional, except for .Net Framework 3.5.1 on Windows Server 2008 R2 SP1, which is a prerequisite for Citrix Provisioning Server 7.16.
In this example we will install the following features:
- .Net Framework 3.5.1 (for W2K8R2 only)
- .Net Framework 4.5.x (for W2K12 and W2K16 only)
- Desktop experience (for W2K8R2 and W2K12 only)
- Group Policy Management Console
- Remote Server Administration Tools (AD DS Snap-Ins)
- Remote Desktop Licensing Tools
- Telnet Client
- Windows Process Activation Service
You can remove or add any role or feature you need. Please be aware though that not all features can be installed at the same time. Some features need a reboot. After that, other features can be installed.
In PowerShell, roles and features are installed using the Add-WindowsFeature (Windows Server 2008 R2) or Install-WindowsFeature command (Windows Server 2012 and higher). For example:
Windows Server 2008 (R2):
|
1 |
Add-WindowsFeature NET-Framework-Core,Desktop-Experience,GPMC,RSAT-ADDS-Tools,RSAT-RDS-Licensing,WAS,Telnet-Client |
Windows Server 2012 (R2):
|
1 |
Install-WindowsFeature NET-Framework-45-Core,Desktop-Experience,GPMC,RSAT-ADDS-Tools,RDS-Licensing-UI,WAS,Telnet-Client |
Windows Server 2016:
|
1 |
Install-WindowsFeature NET-Framework-45-Core,GPMC,RSAT-ADDS-Tools,RDS-Licensing-UI,WAS,Telnet-Client |
The names of the individual roles and features differ between the various operating systems:
- .Net Framework:
- Windows Server 2008 R2 only offers version 3.5.1 (Add-WindowsFeature command NET-Framework-Core).
- Windows Server 2012 (R2) offers both the versions 3.5.1 and 4.5.x (Install-WindowsFeature command NET-Framework-Core and NET-Framework-45-Core), but I only install the 4.5.x version.
- Windows Server 2016 only offers version 4.5.x (Install-WindowsFeature command NET-Framework-45-Core).
- Desktop-Experience:
This feature no longer exists as a separate item in Windows Server 2016. Let me clarify; when you use the full version of Windows Server 2016 (not the core/nano version), desktop experience is included out-of-the-box. - Remote Desktop Licensing Tools:
In Windows Server 2008 (R2), the abbreviation of this feature is called RSAT-RDS-Licensing. In Windows Server 2012 and higher, this feature is called RDS-Licensing-UI.
To establish the version of the running operating system, I use the following PowerShell command:
|
1 |
[string]$WindowsVersion = ( Get-WmiObject -class Win32_OperatingSystem ).Version |
Complete script for installing Roles and Features
In case you use my installation template, this is what the complete script, including logging, looks like:
|
1 2 3 4 5 6 7 8 9 10 11 12 13 14 15 16 17 18 19 20 21 22 23 24 25 26 27 28 29 30 31 32 33 34 35 36 37 38 39 40 41 42 43 44 45 46 47 48 49 50 51 52 53 54 55 56 57 58 59 60 61 62 63 64 65 66 67 68 69 70 71 72 73 74 75 76 77 78 79 80 81 82 83 84 85 86 87 88 89 90 91 92 93 94 95 96 97 98 99 100 101 102 103 104 105 106 107 108 109 110 111 112 113 114 115 116 117 118 119 120 121 122 123 124 125 126 127 128 129 130 131 132 133 134 135 136 137 138 139 140 141 142 143 144 145 146 147 148 149 150 151 152 153 154 155 156 157 158 159 160 161 162 163 164 165 166 167 168 169 170 171 172 173 174 175 176 177 178 179 180 181 182 183 184 185 186 187 188 189 190 191 192 193 194 195 196 197 198 199 200 201 202 203 204 205 206 207 208 209 210 211 212 213 214 215 216 217 218 219 220 221 222 223 224 225 226 227 228 229 230 231 232 233 234 235 236 237 238 239 240 241 242 243 244 245 246 247 |
#========================================================================== # # Installation of Microsoft Roles and Features for Citrix Provisioning Server # # AUTHOR: Dennis Span (https://dennisspan.com) # DATE : 02.05.2017 # # COMMENT: # This script installs the following roles: # -.Net Framework 3.5 (W2K8R2 only) # -.Net Framework 4.6 (W2K12 + W2K16) # -Desktop experience (W2K8R2 + W2K12) # -Group Policy Management Console # -Remote Server Administration Tools (AD DS Snap-Ins) # -Remote Desktop Licensing Tools # -Telnet Client # -Windows Process Activation Service # # This script has been prepared for Windows Server 2008 R2, 2012 R2 and 2016. # #========================================================================== # Get the script parameters if there are any param ( # The only parameter which is really required is 'Uninstall' # If no parameters are present or if the parameter is not # 'uninstall', an installation process is triggered [string]$Installationtype ) # define Error handling # note: do not change these values $global:ErrorActionPreference = "Stop" if($verbose){ $global:VerbosePreference = "Continue" } # FUNCTION DS_WriteLog #========================================================================== Function DS_WriteLog { <# .SYNOPSIS Write text to this script's log file .DESCRIPTION Write text to this script's log file .PARAMETER InformationType This parameter contains the information type prefix. Possible prefixes and information types are: I = Information S = Success W = Warning E = Error - = No status .PARAMETER Text This parameter contains the text (the line) you want to write to the log file. If text in the parameter is omitted, an empty line is written. .PARAMETER LogFile This parameter contains the full path, the file name and file extension to the log file (e.g. C:\Logs\MyApps\MylogFile.log) .EXAMPLE DS_WriteLog -InformationType "I" -Text "Copy files to C:\Temp" -LogFile "C:\Logs\MylogFile.log" Writes a line containing information to the log file .Example DS_WriteLog -InformationType "E" -Text "An error occurred trying to copy files to C:\Temp (error: $($Error[0]))" -LogFile "C:\Logs\MylogFile.log" Writes a line containing error information to the log file .Example DS_WriteLog -InformationType "-" -Text "" -LogFile "C:\Logs\MylogFile.log" Writes an empty line to the log file #> [CmdletBinding()] Param( [Parameter(Mandatory=$true, Position = 0)][String]$InformationType, [Parameter(Mandatory=$true, Position = 1)][AllowEmptyString()][String]$Text, [Parameter(Mandatory=$true, Position = 2)][AllowEmptyString()][String]$LogFile ) $DateTime = (Get-Date -format dd-MM-yyyy) + " " + (Get-Date -format HH:mm:ss) if ( $Text -eq "" ) { Add-Content $LogFile -value ("") # Write an empty line } Else { Add-Content $LogFile -value ($DateTime + " " + $InformationType + " - " + $Text) } } #========================================================================== ################ # Main section # ################ # Disable File Security $env:SEE_MASK_NOZONECHECKS = 1 # Custom variables [edit] $BaseLogDir = "C:\Logs" # [edit] add the location of your log directory here $PackageName = "Citrix Provisioning Server Roles" # [edit] enter the display name of the software (e.g. 'Arcobat Reader' or 'Microsoft Office') # Global variables $StartDir = $PSScriptRoot # the directory path of the script currently being executed if (!($Installationtype -eq "Uninstall")) { $Installationtype = "Install" } $LogDir = (Join-Path $BaseLogDir $PackageName).Replace(" ","_") $LogFileName = "$($Installationtype)_$($PackageName).log" $LogFile = Join-path $LogDir $LogFileName # Create the log directory if it does not exist if (!(Test-Path $LogDir)) { New-Item -Path $LogDir -ItemType directory | Out-Null } # Create new log file (overwrite existing one) New-Item $LogFile -ItemType "file" -force | Out-Null DS_WriteLog "I" "START SCRIPT - $Installationtype $PackageName" $LogFile DS_WriteLog "-" "" $LogFile ################################################# # INSTALL MICROSOFT ROLES AND FEATURES # ################################################# DS_WriteLog "I" "Add Windows roles and features:" $LogFile DS_WriteLog "I" "-.Net Framework 3.5 (W2K8R2 only)" $LogFile DS_WriteLog "I" "-.Net Framework 4.6 (W2K12 + W2K16)" $LogFile DS_WriteLog "I" "-Desktop experience (W2K8R2 + W2K12)" $LogFile DS_WriteLog "I" "-Group Policy Management Console" $LogFile DS_WriteLog "I" "-Remote Server Administration Tools (AD DS Snap-Ins)" $LogFile DS_WriteLog "I" "-Remote Desktop Licensing Tools" $LogFile DS_WriteLog "I" "-Telnet Client" $LogFile DS_WriteLog "I" "-Windows Process Activation Service" $LogFile DS_WriteLog "-" "" $LogFile DS_WriteLog "I" "Retrieve the OS version and name" $LogFile # Check the windows version # URL: https://en.wikipedia.org/wiki/List_of_Microsoft_Windows_versions # -Windows Server 2016 -> NT 10.0 # -Windows Server 2012 R2 -> NT 6.3 # -Windows Server 2012 -> NT 6.2 # -Windows Server 2008 R2 -> NT 6.1 # -Windows Server 2008 -> NT 6.0 [string]$WindowsVersion = ( Get-WmiObject -class Win32_OperatingSystem ).Version switch -wildcard ($WindowsVersion) { "*10*" { $OSVER = "W2K16" $OSName = "Windows Server 2016" $LogFile2 = Join-Path $LogDir "Install_RolesAndFeatures.log" DS_WriteLog "I" "The current operating system is $($OSNAME) ($($OSVER))" $LogFile DS_WriteLog "-" "" $LogFile DS_WriteLog "I" "Roles and Features installation log file: $LogFile2" $LogFile DS_WriteLog "I" "Start the installation ..." $LogFile # Install Windows Features try { Install-WindowsFeature NET-Framework-45-Core,GPMC,RSAT-ADDS-Tools,RDS-Licensing-UI,WAS,Telnet-Client -logpath $LogFile2 DS_WriteLog "S" "The windows features were installed successfully!" $LogFile } catch { DS_WriteLog "E" "An error occurred while installing the windows features (error: $($error[0]))" $LogFile Exit 1 } } "*6.3*" { $OSVER = "W2K12R2" $OSName = "Windows Server 2012 R2" $LogFile2 = Join-Path $LogDir "Install_RolesAndFeatures.log" DS_WriteLog "I" "The current operating system is $($OSNAME) ($($OSVER))" $LogFile DS_WriteLog "-" "" $LogFile DS_WriteLog "I" "Roles and Features installation log file: $LogFile2" $LogFile DS_WriteLog "I" "Start the installation ..." $LogFile # Install Windows Features try { Install-WindowsFeature NET-Framework-45-Core,Desktop-Experience,GPMC,RSAT-ADDS-Tools,RDS-Licensing-UI,WAS,Telnet-Client -logpath $LogFile2 DS_WriteLog "S" "The windows features were installed successfully!" $LogFile } catch { DS_WriteLog "E" "An error occurred while installing the windows features (error: $($error[0]))" $LogFile Exit 1 } } "*6.2*" { $OSVER = "W2K12" $OSName = "Windows Server 2012" $LogFile2 = Join-Path $LogDir "Install_RolesAndFeatures.log" DS_WriteLog "I" "The current operating system is $($OSNAME) ($($OSVER))" $LogFile DS_WriteLog "-" "" $LogFile DS_WriteLog "I" "Roles and Features installation log file: $LogFile2" $LogFile DS_WriteLog "I" "Start the installation ..." $LogFile # Install Windows Features try { Install-WindowsFeature NET-Framework-45-Core,Desktop-Experience,GPMC,RSAT-ADDS-Tools,RDS-Licensing-UI,WAS,Telnet-Client -logpath $LogFile2 DS_WriteLog "S" "The windows features were installed successfully!" $LogFile } catch { DS_WriteLog "E" "An error occurred while installing the windows features (error: $($error[0]))" $LogFile Exit 1 } } "*6.1*" { $OSVER = "W2K8R2" $OSName = "Windows Server 2008 R2" $LogFile2 = Join-Path $LogDir "Install_RolesAndFeatures.log" DS_WriteLog "I" "The current operating system is $($OSNAME) ($($OSVER))" $LogFile DS_WriteLog "-" "" $LogFile DS_WriteLog "I" "Roles and Features installation log file: $LogFile2" $LogFile DS_WriteLog "I" "Start the installation ..." $LogFile # Install Windows Features try { Add-WindowsFeature NET-Framework-Core,Desktop-Experience,GPMC,RSAT-ADDS-Tools,RSAT-RDS-Licensing,WAS,Telnet-Client -logpath $LogFile2 DS_WriteLog "S" "The windows features were installed successfully!" $LogFile } catch { DS_WriteLog "E" "An error occurred while installing the windows features (error: $($error[0]))" $LogFile Exit 1 } } "*6.0*" { $OSVER = "W2K8" $OSName = "Windows Server 2008" $LogFile2 = Join-Path $LogDir "Install_RolesAndFeatures.log" DS_WriteLog "I" "The current operating system is $($OSNAME) ($($OSVER))" $LogFile DS_WriteLog "-" "" $LogFile DS_WriteLog "I" "Roles and Features installation log file: $LogFile2" $LogFile DS_WriteLog "I" "Start the installation ..." $LogFile # Install Windows Features try { Add-WindowsFeature NET-Framework-Core,Desktop-Experience,GPMC,RSAT-ADDS-Tools,RSAT-RDS-Licensing,WAS,Telnet-Client -logpath $LogFile2 DS_WriteLog "S" "The windows features were installed successfully!" $LogFile } catch { DS_WriteLog "E" "An error occurred while installing the windows features (error: $($error[0]))" $LogFile Exit 1 } } default { $OSName = ( Get-WmiObject -class Win32_OperatingSystem ).Caption DS_WriteLog "E" "The current operating system $($OSName) is unsupported" $LogFile DS_WriteLog "I" "This script will now be terminated" $LogFile DS_WriteLog "-" "" $LogFile Exit 1 } } # Enable File Security Remove-Item env:\SEE_MASK_NOZONECHECKS DS_WriteLog "-" "" $LogFile DS_WriteLog "I" "End of script" $LogFile |
Execute the script as follows:
powershell.exe -file %Directory%\Install_Citrix_PVS_Roles.ps1
In case you get a security warning, execute the script as follows:
powershell.exe -executionpolicy bypass -file %Directory%\Install_Citrix_PVS_Roles.ps1
Log files are created in the directory C:\Logs\Citrix_Provisioning_Server_Roles, but you can change this to any directory you want (see lines 91 and 92).
| Note: The installation of the roles and features may require a reboot. The reboot is NOT part of the example script. You can either add it to the script yourself, or if you use a deployment tool such as Microsoft SCCM, you can add a reboot task in the task sequence. |
If you want to go one step further and create an SCCM package as well, please follow the step-by-step explanation in the article Deep dive creating SCCM packages for Citrix.
Part 2: Install Citrix Provisioning Server
The second part of this article focuses on the installation of the Citrix Provisioning Server. Three components need to be installed: the Citrix Provisioning Server console, the Citrix Provisioning Server component and the Provisioning Server PowerShell snap-in. So how do you start?
- Create an installation directory on the local computer or on a file share (UNC path). For example: C:\Temp\Citrix\ProvisioningServer.
- Create a subdirectory called Files.
- Download and extract the Provisioning Server 7.16 ISO file to the folder Files in the installation directory. The contents of the directory Files should now look like this:
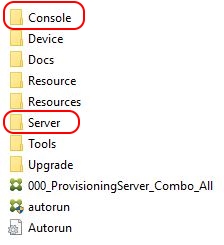
- The folders Console and Server contain the main source files (for the Provisioning Server console and Provisioning Server itself).
- Copy the complete PowerShell script at the end of this part to a new PS1 file (e.g. Install_CitrixProvisioningServer.ps1) and add this file to the root of your installation directory (not in the subdirectory Files).
- Execute the PowerShell script: powershell.exe -file C:\Temp\Citrix\ProvisioningServer\Install_CitrixProvisioningServer.ps1
The following paragraphs describe each of the three installation steps individually:
- Install the Provisioning Server console
- Install Provisioning Server
- Install the Provisioning Server snap-in
The complete PowerShell script at the end of this part includes all of these steps! When you use this script, you do not need to execute any of the individual steps described below.
Step 1: Install the Provisioning Server console
The first item to install is the Provisioning Server console.
The basic command line to install the Provisioning Server console is as follows:
|
1 |
FilesConsolePVS_Console_x64.exe /s /v"/qn /l C:\Logs\Install_PVS_Server.log" |
The complete PowerShell script at the end of this part includes the installation of the Provisioning Server console including detailed logging and error handling.
Step 2: Install Provisioning Server
The second item to install is Provisioning Server itself.
The basic installation command line to install the Provisioning Server itself is as follows:
|
1 |
FilesServerPVS_Server_x64.exe /s /v"/qn /l C:\Logs\Install_PVS_Server.log" |
The complete PowerShell script at the end of this part includes the installation of Provisioning Server including detailed logging and error handling.
Step 3: Install the Provisioning Server snap-in
For some unknown reason, the Provisioning Server snap-in is not installed during installation. The DLL is there, but it is not registered. To manually install the snap-in, execute the following command:
|
1 |
"%SystemRoot%\Microsoft.NET\Framework64\v4.0.30319\installutil.exe" /LogFile="C:\Logs\Install_PVS_Snapin.log" "%ProgramFiles%\Citrix\Provisioning Services Console\Citrix.PVS.SnapIn.dll" |
Please change the log directory to your preference.
After the snap-in has been installed, you are able to load the snap-in in a PowerShell command window or in a PowerShell script:
|
1 |
asnp citrix* |
The snap-in for Provisioning Server 7.16 offers a total of 178 cmdlets (the same as for Provisioning Server 7.13 to 7.15). To see which ones are available, you can use the following command:
|
1 2 3 |
asnp citrix* Get-Command -all -commandtype cmdlet | where-object {$_.ModuleName -like "*citrix.pvs*"} |
How can you count the total number of snap-ins? Like this:
|
1 2 3 |
asnp citrix* (Get-Command -all -commandtype cmdlet | where-object {$_.ModuleName -like "*citrix.pvs*"}).count |
In part 3 of this article I use some of the available cmdlets to configure the Provisioning Server farm and the local host.
For more documentation concerning the Provisioning Server snap-in, please see the official Citrix PowerShell with Objects Programmer’s Guide:
https://docs.citrix.com/content/dam/docs/en-us/provisioning-services/7-13/downloads/PvsSnapInCommands.pdf. I did not find a newer version of this document, but its contents also applies to Provisioning Server 7.14 to 7.16.
The complete PowerShell script at the end of this part includes the installation of the Provisioning Server snap-in.
Complete script for installing Citrix Provisioning Server
In case you use my installation template, this is what the complete script, including logging and error handling, looks like:
|
1 2 3 4 5 6 7 8 9 10 11 12 13 14 15 16 17 18 19 20 21 22 23 24 25 26 27 28 29 30 31 32 33 34 35 36 37 38 39 40 41 42 43 44 45 46 47 48 49 50 51 52 53 54 55 56 57 58 59 60 61 62 63 64 65 66 67 68 69 70 71 72 73 74 75 76 77 78 79 80 81 82 83 84 85 86 87 88 89 90 91 92 93 94 95 96 97 98 99 100 101 102 103 104 105 106 107 108 109 110 111 112 113 114 115 116 117 118 119 120 121 122 123 124 125 126 127 128 129 130 131 132 133 134 135 136 137 138 139 140 141 142 143 144 145 146 147 148 149 150 151 152 153 154 155 156 157 158 159 160 161 162 163 164 165 166 167 168 169 170 171 172 173 174 175 176 177 178 179 180 181 182 183 184 185 186 187 188 189 190 191 192 193 194 195 196 197 198 199 200 201 202 203 204 205 206 207 208 209 210 211 212 213 214 215 216 217 218 219 220 221 222 223 224 225 226 227 228 229 230 231 232 233 234 235 236 237 238 239 240 241 242 243 244 245 246 247 248 249 250 251 252 253 254 255 |
#========================================================================== # # Install Citrix Provisioning Server # # AUTHOR: Dennis Span (https://dennisspan.com) # DATE : 02.05.2017 # # COMMENT: # This script has been prepared for Windows Server 2008 R2, 2012 R2 and 2016. # # This script only installs the Citrix Provisioning Server software. It does not # create or join a Provisioning Server farm nor does it configure the local host. # The version of Provisioning Server used in this script is 7.16 (released in Q4 2017), # but it also works for Provisioning Server 7.13 to 7.15. # #========================================================================== # Get the script parameters if there are any param ( # The only parameter which is really required is 'Uninstall' # If no parameters are present or if the parameter is not # 'uninstall', an installation process is triggered [string]$Installationtype ) # define Error handling # note: do not change these values $global:ErrorActionPreference = "Stop" if($verbose){ $global:VerbosePreference = "Continue" } # FUNCTION DS_WriteLog #========================================================================== Function DS_WriteLog { <# .SYNOPSIS Write text to this script's log file .DESCRIPTION Write text to this script's log file .PARAMETER InformationType This parameter contains the information type prefix. Possible prefixes and information types are: I = Information S = Success W = Warning E = Error - = No status .PARAMETER Text This parameter contains the text (the line) you want to write to the log file. If text in the parameter is omitted, an empty line is written. .PARAMETER LogFile This parameter contains the full path, the file name and file extension to the log file (e.g. C:\Logs\MyApps\MylogFile.log) .EXAMPLE DS_WriteLog -InformationType "I" -Text "Copy files to C:\Temp" -LogFile "C:\Logs\MylogFile.log" Writes a line containing information to the log file .Example DS_WriteLog -InformationType "E" -Text "An error occurred trying to copy files to C:\Temp (error: $($Error[0]))" -LogFile "C:\Logs\MylogFile.log" Writes a line containing error information to the log file .Example DS_WriteLog -InformationType "-" -Text "" -LogFile "C:\Logs\MylogFile.log" Writes an empty line to the log file #> [CmdletBinding()] Param( [Parameter(Mandatory=$true, Position = 0)][String]$InformationType, [Parameter(Mandatory=$true, Position = 1)][AllowEmptyString()][String]$Text, [Parameter(Mandatory=$true, Position = 2)][AllowEmptyString()][String]$LogFile ) $DateTime = (Get-Date -format dd-MM-yyyy) + " " + (Get-Date -format HH:mm:ss) if ( $Text -eq "" ) { Add-Content $LogFile -value ("") # Write an empty line } Else { Add-Content $LogFile -value ($DateTime + " " + $InformationType + " - " + $Text) } } #========================================================================== # FUNCTION DS_InstallOrUninstallSoftware #========================================================================== Function DS_InstallOrUninstallSoftware { <# .SYNOPSIS Install or uninstall software (MSI or SETUP.exe) .DESCRIPTION Install or uninstall software (MSI or SETUP.exe) .PARAMETER File This parameter contains the file name including the path and file extension, for example C:\Temp\MyApp\Files\MyApp.msi or C:\Temp\MyApp\Files\MyApp.exe. .PARAMETER Installationtype This parameter contains the installation type, which is either 'Install' or 'Uninstall'. .PARAMETER Arguments This parameter contains the command line arguments. The arguments list can remain empty. In case of an MSI, the following parameters are automatically included in the function and do not have to be specified in the 'Arguments' parameter: /i (or /x) /qn /norestart /l*v "c:\Logs\MyLogFile.log" .EXAMPLE DS_InstallOrUninstallSoftware -File "C:\Temp\MyApp\Files\MyApp.msi" -InstallationType "Install" -Arguments "" Installs the MSI package 'MyApp.msi' with no arguments (the function already includes the following default arguments: /i /qn /norestart /l*v $LogFile) .Example DS_InstallOrUninstallSoftware -File "C:\Temp\MyApp\Files\MyApp.msi" -InstallationType "Uninstall" -Arguments "" Uninstalls the MSI package 'MyApp.msi' (the function already includes the following default arguments: /x /qn /norestart /l*v $LogFile) .Example DS_InstallOrUninstallSoftware -File "C:\Temp\MyApp\Files\MyApp.exe" -InstallationType "Install" -Arguments "/silent /logfile:C:\Logs\MyApp\log.log" Installs the SETUP file 'MyApp.exe' #> [CmdletBinding()] Param( [Parameter(Mandatory=$true, Position = 0)][String]$File, [Parameter(Mandatory=$true, Position = 1)][AllowEmptyString()][String]$Installationtype, [Parameter(Mandatory=$true, Position = 2)][AllowEmptyString()][String]$Arguments ) $FileName = ($File.Split("\"))[-1] $FileExt = $FileName.SubString(($FileName.Length)-3,3) # Prepare variables if ( !( $FileExt -eq "MSI") ) { $FileExt = "SETUP" } if ( $Installationtype -eq "Uninstall" ) { $Result1 = "uninstalled" $Result2 = "uninstallation" } else { $Result1 = "installed" $Result2 = "installation" } $LogFileAPP = Join-path $LogDir ( "$($Installationtype)_$($FileName.Substring(0,($FileName.Length)-4))_$($FileExt).log" ) # Logging DS_WriteLog "I" "File name: $FileName" $LogFile DS_WriteLog "I" "File full path: $File" $LogFile if ([string]::IsNullOrEmpty($Arguments)) { # check if custom arguments were defined DS_WriteLog "I" "File arguments: <no arguments defined>" $LogFile } Else { DS_WriteLog "I" "File arguments: $Arguments" $LogFile } # Install the MSI or SETUP.exe DS_WriteLog "-" "" $LogFile DS_WriteLog "I" "Start the $Result2" $LogFile if ( $FileExt -eq "MSI" ) { if ( $Installationtype -eq "Uninstall" ) { $FixedArguments = "/x ""$File"" /qn /norestart /l*v ""$LogFileAPP""" } else { $FixedArguments = "/i ""$File"" /qn /norestart /l*v ""$LogFileAPP""" } if ([string]::IsNullOrEmpty($Arguments)) { # check if custom arguments were defined $arguments = $FixedArguments DS_WriteLog "I" "Command line: Start-Process -FilePath 'msiexec.exe' -ArgumentList $arguments -Wait -PassThru" $LogFile $process = Start-Process -FilePath 'msiexec.exe' -ArgumentList $arguments -Wait -PassThru } Else { $arguments = $FixedArguments + " " + $arguments DS_WriteLog "I" "Command line: Start-Process -FilePath 'msiexec.exe' -ArgumentList $arguments -Wait -PassThru" $LogFile $process = Start-Process -FilePath 'msiexec.exe' -ArgumentList $arguments -Wait -PassThru } } Else { if ([string]::IsNullOrEmpty($Arguments)) { # check if custom arguments were defined DS_WriteLog "I" "Command line: Start-Process -FilePath ""$File"" -Wait -PassThru" $LogFile $process = Start-Process -FilePath "$File" -Wait -PassThru } Else { DS_WriteLog "I" "Command line: Start-Process -FilePath ""$File"" -ArgumentList $arguments -Wait -PassThru" $LogFile $process = Start-Process -FilePath "$File" -ArgumentList $arguments -Wait -PassThru } } # Check the result (the exit code) of the installation switch ($Process.ExitCode) { 0 { DS_WriteLog "S" "The software was $Result1 successfully (exit code: 0)" $LogFile } 3 { DS_WriteLog "S" "The software was $Result1 successfully (exit code: 3)" $LogFile } # Some Citrix products exit with 3 instead of 0 1603 { DS_WriteLog "E" "A fatal error occurred (exit code: 1603). Some applications throw this error when the software is already (correctly) installed! Please check." $LogFile } 1605 { DS_WriteLog "I" "The software is not currently installed on this machine (exit code: 1605)" $LogFile } 3010 { DS_WriteLog "W" "A reboot is required (exit code: 3010)!" $LogFile } default { [string]$ExitCode = $Process.ExitCode DS_WriteLog "E" "The $Result2 ended in an error (exit code: $ExitCode)!" $LogFile Exit 1 } } } #========================================================================== ################ # Main section # ################ # Disable File Security $env:SEE_MASK_NOZONECHECKS = 1 # Custom variables [edit] $BaseLogDir = "C:\Logs" # [edit] add the location of your log directory here $PackageName = "Citrix Provisioning Server (installation)" # [edit] enter the display name of the software (e.g. 'Arcobat Reader' or 'Microsoft Office') # Global variables $StartDir = $PSScriptRoot # the directory path of the script currently being executed if (!($Installationtype -eq "Uninstall")) { $Installationtype = "Install" } $LogDir = (Join-Path $BaseLogDir $PackageName).Replace(" ","_") $LogFileName = "$($Installationtype)_$($PackageName).log" $LogFile = Join-path $LogDir $LogFileName # Create the log directory if it does not exist if (!(Test-Path $LogDir)) { New-Item -Path $LogDir -ItemType directory | Out-Null } # Create new log file (overwrite existing one) New-Item $LogFile -ItemType "file" -force | Out-Null DS_WriteLog "I" "START SCRIPT - $Installationtype $PackageName" $LogFile DS_WriteLog "-" "" $LogFile # --------------------------------------------------------------------------------------------------------------------------- ################################################## # INSTALL THE CITRIX PROVISIONING SERVER CONSOLE # ################################################## DS_WriteLog "I" "Install the Citrix Provisioning Server console" $LogFile $File = Join-Path $StartDir "Files\Console\PVS_Console_x64.exe" $Arguments = "/s /v""/qn /l $LogDir\Install_PVS_Console.log""" DS_InstallOrUninstallSoftware -File $File -InstallationType "Install" -Arguments $Arguments DS_WriteLog "-" "" $LogFile ################################################## # INSTALL CITRIX PROVISIONING SERVER # ################################################## DS_WriteLog "I" "Install Citrix Provisioning Server" $LogFile $File = Join-Path $StartDir "Files\Server\PVS_Server_x64.exe" $Arguments = "/s /v""/qn /l $LogDir\Install_PVS_Server.log""" DS_InstallOrUninstallSoftware -File $File -InstallationType "Install" -Arguments $Arguments DS_WriteLog "-" "" $LogFile ############################################################# # INSTALL THE CITRIX PROVISIONING SERVER POWERSHELL SNAPINS # ############################################################# # For some reason, the Provisioning Server snapins are not installed by default. In order to use the command "Add-PSSnapin citrix*" (or abbreviated "asnp citrix*" ) to use these snapins, they first need to be installed. # Note: interestingly, the XenDesktop snapins are installed by default (needed for the XenDesktop Setup Wizard). # Reference: https://docs.citrix.com/content/dam/docs/en-us/provisioning-services/7-13/downloads/PvsSnapInCommands.pdf DS_WriteLog "I" "Install the Provisioning Server snapins" $LogFile try { &"$env:SystemRoot\Microsoft.NET\Framework64\v4.0.30319\installutil.exe" /LogFile="$LogDir\Install_PVS_Snapin.log" "$env:ProgramFiles\Citrix\Provisioning Services Console\Citrix.PVS.SnapIn.dll" DS_WriteLog "S" "The Provisioning Server snapins were installed successfully" $LogFile } catch { DS_WriteLog "E" "An error occurred trying to install the Provisioning Server snapins (error: $($Error[0]))" $LogFile Exit 1 } # --------------------------------------------------------------------------------------------------------------------------- # Enable File Security Remove-Item env:\SEE_MASK_NOZONECHECKS DS_WriteLog "-" "" $LogFile DS_WriteLog "I" "End of script" $LogFile |
Execute the script as follows, for example:
powershell.exe -file C:\Temp\Citrix\ProvisioningServer\Install_CitrixProvisioningServer.ps1
In case you get a security warning, set the execution policy to allow the script to run:
powershell.exe -executionpolicy bypass -file C:\Temp\Citrix\ProvisioningServer\Install_CitrixProvisioningServer.ps1
Log files are created in the directory C:\Logs\Citrix_Provisioning_Server_(installation), but you can change this to any directory you want (see lines 187 and 188).
Part 3: Create and configure the Provisioning Server farm and the local host
The third part of this article focuses on the creation and configuration of the Citrix Provisioning Server farm as well as the local host.
If you have created the installation directory as described in part 2, you can continue as follows:
- Make sure that your Citrix License Server is up-and-running (the latest version). The actual product licenses do not need to be installed yet. Please read the article Citrix License Server unattended installation with PowerShell and SCCM for more information on how to install and configure your Citrix License Server using PowerShell.
- Provisioning Server requires only one database. In order to create this database, you need a Windows (Active Directory) account with the appropriate SQL permissions (securityadmin or sysadmin). The script below assumes that the currently logged on administrator has sufficient permissions.
- In case you want to run the services Citrix PVS SOAP Server and the Citrix PVS Stream Service using an Active Directory account (instead of the default Local Service account), make sure you have created one. You will need this later.
- Copy the complete PowerShell script at the end of this part to a new PS1 file (e.g. Configure_CitrixProvisioningServer.ps1) and add this file to the root of your installation directory (not in the subdirectory Files).
- Execute the PowerShell script:
powershell.exe -file C:\Temp\Citrix\ProvisioningServer\Configure_CitrixProvisioningServer.ps1
The following paragraphs describe each step in the configuration of Provisioning Server individually. The complete PowerShell script at the end of this part includes all of these steps. When you use this script, you do not need to execute any of the individual steps described below!
Step 1: Configure the firewall (using GPO, NetSh or PoSH)
During installation, Citrix Provisioning Server unfortunately does not offer the possibility to automatically configure the local firewall (as is the case with the installation of a XenDesktop Delivery Controller for example). However, this is only a nuisance, but certainly not a problem.
The Citrix article Communication Ports Used by Citrix Technologies lists all communication ports used by Provisioning Server (and all other Citrix technologies). In summary, the following UDP and TCP ports are used (in ascending order):
- UDP: 67,69,2071,6910-6930,6969,4011,6890-6909
- TCP: 389,1433,54321-54323
There are three ways how to configure the local firewall:
- Using a Microsoft Group Policy object
- Using the NetSh command
- Using the PowerShell cmdlet Get-NetFirewallRule
| Note: I recommend using the same rule configurations for both inbound and outbound traffic. Most ports do not require a two-way communication, but it makes life easier and from a security point of view it does little harm (although strictly speaking you should open ports only when absolutely required). |
Option 1: Create the firewall rules using Group Policy
When using a Microsoft Group Policy object, follow these steps:
- Create a new or use an existing Group Policy object;
- Open the policy (edit) and go to Computer Configuration Policies Windows Settings Security Settings Windows Firewall with Advanced Security Windows Firewall with Advanced Security – LDAP://[…] Inbound/Outbound Rules;
- Add the following four rules:
- A new Inbound Rule:
- As a rule type use Port;
- On the second tab select TCP and enter the ports 389,1433,54321-54323 as the specific local ports;
- Click three times Next;
- On the final page of the wizard enter a name for the rule, for example Citrix PVS (Inbound,TCP).
- The second Inbound Rule:
- As a rule type use Port;
- On the second tab select UDP and enter the ports 67,69,2071,6910-6930,6969,4011,6890-6909 as the specific local ports;
- Click three times Next;
- On the final page of the wizard enter a name for the rule, for example Citrix PVS (Inbound,UDP).
- A new Outbound Rule:
- As a rule type use Port;
- On the second tab select TCP and enter the ports 389,1433,54321-54323 as the specific local ports;
- Click three times Next;
- On the final page of the wizard enter a name for the rule, for example Citrix PVS (Outbound,TCP).
- The second Outbound Rule:
- As a rule type use Port;
- On the second tab select UDP and enter the ports 67,69,2071,6910-6930,6969,4011,6890-6909 as the specific local ports;
- Click three times Next;
- On the final page of the wizard enter a name for the rule, for example Citrix PVS (Outbound,UDP).
- A new Inbound Rule:
Option 2: Create the firewall rules using NetSh
The NetSh command has to be used on Windows Server 2008 (R2). If you are using Windows Server 2012 and above, go to the following section to configure the firewall rules using PowerShell.
To configure the firewall rules using the NetSh command, please open a command window (as administrator) and execute the following four command lines:
|
1 |
netsh advfirewall firewall add rule name="Citrix PVS (Inbound,TCP)" description="Inbound rules for the TCP protocol for Citrix Provisioning Server ports" localport="389,1433,54321-54323" protocol="TCP" dir="Inbound" action="Allow" |
|
1 |
netsh advfirewall firewall add rule name="Citrix PVS (Inbound,UDP)" description="Inbound rules for the UDP protocol for Citrix Provisioning Server ports" localport="67,69,2071,6910-6930,6969,4011,6890-6909" protocol="UDP" dir="Inbound" action="Allow" |
|
1 |
netsh advfirewall firewall add rule name="Citrix PVS (Outbound,TCP)" description="Outbound rules for the TCP protocol for Citrix Provisioning Server ports" localport="389,1433,54321-54323" protocol="TCP" dir="Outbound" action="Allow" |
|
1 |
netsh advfirewall firewall add rule name="Citrix PVS (Outbound,UDP)" description="Outbound rules for the UDP protocol for Citrix Provisioning Server ports" localport="67,69,2071,6910-6930,6969,4011,6890-6909" protocol="UDP" dir="Outbound" action="Allow" |
The complete PowerShell script at the end of this part includes a function to configure the above firewall rules including detailed logging and error handling.
The function checks the version of the operating system. In case of Windows Server 2008 (R2), the function will use the NetSh command to configure the local firewall. If the operating system is Windows Server 2012 or higher, PowerShell is used (see option 3 right below).
Option 3: Create the firewall rules using PowerShell
From Windows Server 2012 and above, the native Microsoft PowerShell cmdlet New-NetFirewallRule can be used to configure the local firewall.
Note: the name and display name are two different things. The name of the firewall rule has to be unique, the display name does not. In my examples, I keep the name and display name the same.
To configure the firewall rules using PowerShell, please open a PowerShell command window (as administrator) and execute the following four command lines:
|
1 |
New-NetFirewallRule -Name "Citrix PVS (Inbound,TCP)" -DisplayName "Citrix PVS (Inbound,TCP)" -Description "Inbound rules for the TCP protocol for Citrix Provisioning Server ports" -LocalPort 389,1433,54321-54323 -Protocol "TCP" -Direction "Inbound" -Action "Allow" |
|
1 |
New-NetFirewallRule -Name "Citrix PVS (Inbound,UDP)" -DisplayName "Citrix PVS (Inbound,UDP)" -Description "Inbound rules for the UDP protocol for Citrix Provisioning Server ports" -LocalPort 67,69,2071,6910-6930,6969,4011,6890-6909 -Protocol "UDP" -Direction "Inbound" -Action "Allow" |
|
1 |
New-NetFirewallRule -Name "Citrix PVS (Outbound,TCP)" -DisplayName "Citrix PVS (Outbound,TCP)" -Description "Outbound rules for the TCP protocol for Citrix Provisioning Server ports" -LocalPort 389,1433,54321-54323 -Protocol "TCP" -Direction "Outbound" -Action "Allow" |
|
1 |
New-NetFirewallRule -Name "Citrix PVS (Outbound,UDP)" -DisplayName "Citrix PVS (Outbound,UDP)" -Description "Outbound rules for the UDP protocol for Citrix Provisioning Server ports" -LocalPort 67,69,2071,6910-6930,6969,4011,6890-6909 -Protocol "UDP" -Direction "Outbound" -Action "Allow" |
The complete PowerShell script at the end of this part includes a function to configure the above firewall rules including detailed logging and error handling.
The function checks the version of the operating system. In case of Windows Server 2008 (R2), the function will use the NetSh command to configure the local firewall. If the operating system is Windows Server 2012 or higher, PowerShell is used.
Step 2: Create or join farm (using the ConfigWizard)
A Provisioning Server farm can only be created using the ConfigWizard.exe (Running the configuration wizard silently) and an accompanying configuration file (*.ans). The same goes for joining an existing farm. It is not possible to create or join a farm using the Provisioning Server PowerShell snap-in.
| Note: Creating or joining a farm requires dbcreator and securityadmin permissions on the SQL server. |
Here are some facts concerning the ConfigWizard.exe:
- The default location is C:\Program Files\Citrix\Provisioning Services;
- The ConfigWizard.exe requires an answer file (with the extension *.ans) in order to create or join a farm;
- The ANS-file can be created in any editor (such as Notepad) and has to be saved in unicode format;
- The account executing the ConfigWizard.exe needs to have dbcreator and securityadmin rights on the SQL database;
- The command to execute the ConfigWizard.exe to either create or join a farm is: “%programfiles%\Citrix\Provisioning Services\ConfigWizard.exe” /a:C:\ConfigWizard.ans /o:C:\ConfigWizard.log. The parameters used in the ANS file determine whether you create a new or join to an existing farm;
- Besides the log file you create with the /o parameter, the ConfigWizard.exe also generates a second log file: C:\ProgramData\Citrix\Provisioning Services\ConfigWizard.txt. This log file is very detailed.
- The command “%ProgramFiles%\Citrix\Provisioning Services\ConfigWizard.exe” /C generates the output file C:\ProgramData\Citrix\Provisioning Services\ConfigWizard.out. This file contains all possible parameters of the ConfigWizard.exe. The output file can be opened in any editor (such as Notepad).
- The command “%ProgramFiles%\Citrix\Provisioning Services\ConfigWizard.exe” /S allows you to run the ConfigWizard.exe interactively. The /S parameter writes (records) all settings from the ConfigWizard to an ANS file (called ConfigWizard.ans). This ANS file can than later be used (after changing some parameters) on other Provisioning Servers. The ANS file is created in the following directory: C:\ProgramData\Citrix\Provisioning Services.
- The ConfigWizard.exe always ends with exit code 0. The only way to determine any error is by checking the log file. During testing, I have encountered the following ConfigWizard error types:
- Invalid Database Name: You must enter a database name:
Make sure to save the ANS file in unicode format (!) and make sure to enter a valid database name (DatabaseNew=MyDataBase). - Invalid Database Server: You must enter a database server:
Make sure to enter a valid database server name (DatabaseServer=MySQLServer.my.domain). - Invalid Default Path: Default Path not found:
The directory of the PVS store does not exist. Check the parameter DefaultPath (only used when creating a new farm). The directory entered in this parameter has to be created before you execute the ConfigWizard.exe. - Fatal Error: You need to enter at least one server:
Add the LS1 parameter, for example LS1=192.168.0.1,0.0.0.0,0.0.0.0,6910.
Make sure to enter the correct local IPv4 address and the first streaming port (= 6910 by default). - Invalid Site: You must enter a site:
Enter a valid site name. When creating a new farm the parameter is SiteNew=MySite. When joining an existing farm the parameter is ExistingSite=MySite. - Invalid Server: A network-related or instance-specific error occurred while establishing a connection to SQL Server […]:
- Make sure to enter a valid SQL server name (DatabaseServer=MySQLServer.my.domain).
- Make sure that you can connect to the SQL port (1433 by default). Use telnet to test the connection: telnet %hostname% 1433
- Connect to the SQL server. Check if a listener is active on port 1433. Use the netstat command to check this: netstat -an | find /i “listening”
If port 1433 is not listed anywhere, the SQL listener is not active. Make sure that the main SQL service SQL Server (MSSQLSERVER) is running.
- Invalid Database Name: You must enter a database name:
I am sure that more error types exist, but these are the ones I encountered.
The minimum set of parameters required for the ANS file for creating a farm are the following:
- FarmConfiguration=1
- BootstrapFile=C:\ProgramData\Citrix\Provisioning Services\Tftpboot\ARDBP32.BIN
- DatabaseServer=MySQLServer.my.domain
- DatabaseNew=MyDataBaseName
- FarmNew=MyFarmName
- SiteNew=MySiteName
- CollectionNew=MyDefaultCollection
- Store=MyDefaultStore
- DefaultPath=C:\PVSStore
- LicenseServer=MyLicenseServer.my.domain
- LicenseServerPort=27000
- LS1=192.168.0.1,0.0.0.0,0.0.0.0,6910
- StreamNetworkAdapterIP=192.168.0.1
- UserName=My.domain\MyAccount
- UserPass=MyPassword
Modify the values in bold to your requirements.
| Handling passwords in the ANS file There are two parameters that can be used to store the password in the ANS file: UserPass and UserName2. UserPass stores the password in plain text. This is not a problem if you make sure that the password is dynamically written to the ANS file and secondly, that the ANS file is deleted from the local server after creating or joining the farm. The complete PowerShell script at the end of this part dynamically creates the ANS file and deletes it afterwards. In the script, the password has to be entered as a variable in plain text. For production environments, I suggest to dynamically write the password to the ANS file by using one of the methods described in the article Encrypting passwords in a PowerShell script. UserName2 stores an “encrypted” version of the password. This “encryption” is a ConfigWizard specific solution. As mentioned in the beginning of this section, the command “%ProgramFiles%\Citrix\Provisioning Services\ConfigWizard.exe” /S writes (records) all settings from the ConfigWizard to an ANS file. To generate this “encrypted” password, you have to manually go through the wizard, but only once. Start the ConfigWizard with the /S parameter. After going through all the steps, open the dynamically created ANS file in the directory C:\ProgramData\Citrix\Provisioning Services. In this file you will find the parameter UserName2 with a strange looking value, for example: UserName2=kmighmkmkhopiemojqojfhdoggqspngsgfns. This is the “encrypted” version of your password. You can copy this line to the PowerShell script and use it. So instead of using the parameter UserPass to set the password, you use the parameter UserName2. If you follow this method, please change the parameter UserPass in lines 693 and 734 to UserName2 in the complete PowerShell script. I write “encrypted” in quotation marks, because the password is not really encrypted. I am sure that it is relatively simply to decrypt it back to a plain text password. But for most organization I believe this level of password security should be sufficient, especially if you have correctly configured NTFS permissions in place. |
The minimum set of parameters required for the ANS file for joining a farm are the following:
- FarmConfiguration=2
- DatabaseServer=MySQLServer.my.domain
- FarmExisting=MyFarmName
- ExistingSite=MySiteName
- ExistingStore=MyDefaultStore
- LS1=192.168.0.1,0.0.0.0,0.0.0.0,6910
- StreamNetworkAdapterIP=192.168.0.1
- UserName=My.domain\MyAccount
- UserPass=MyPassword
Modify the values in bold to your requirements.
The following optional parameters are available as well:
- IPServiceType
- 0 = Microsoft DHCP
- 2 = Provisioning Services BOOTP service
- 3 = BOOTP or DHCP service.
- Leave out this parameter if non of the above options apply
- PXE Service Type
- 0 =Microsoft DHCP
- 1 = Provisioning Services PXE
- Leave out this parameter if non of the above options apply (for example if you want to use a boot disk or boot partition (BDM).
- FailoverDatabaseServer=x (x is the name of the failover server)
- FailoverDatabaseInstance=x (x is the name of the failover instance)
- ADGroup=x (x is is the Active Directory group.). I did not get this to work though. Probably was my mistake, but I do not know what it was supposed to do.
- Group=x (x is is the Windows group)
- Network=1 (Network is used for the ‘Network service account’ choice). If you do not want to use an Active Directory account for the Citrix PVS SOAP Server service and the Citrix PVS Stream Service, set Network to 1. In this case, you can leave out the parameters UserName and UserPass/UserName2.
- PasswordManagementInterval=x (x is the number of days between password resets). The default is 7 days. You can change this value at a later time using PowerShell.
- ManagementNetworkAdapterIP=x (x is Management IP address. Uses the first available IP address if this parameter is not found in the ANS file)
- ManagementFirstPort=n (n is first port number. 6905 if not found)
- ManagementLastPort=n (n is the last port number. 6909 if not found)
- AdvancedVerbose=x (x is 1 when verbose mode is turned on)
- AdvancedInterruptSafeMode=x (x is 1 when interrupt safe mode is turned on)
- AdvancedMemorySupport=x (x is 1 when advanced memory support is turned on)
- AdvancedRebootFromHD=x (x is 1 when reboot from hard drive on fail)
- AdvancedRecoverSeconds=x (x is the number of seconds to reboot to hard drive after fail)
- AdvancedLoginPolling=x (x is the number of milliseconds for login polling timeout)
- AdvancedLoginGeneral=x (x is the number of milliseconds for login general timeout)
- SslPort=n (n is SSL Port number). Use this parameter is you plan to stream Linux workers using Provisioning Server.
- SSLCert=t (t is Certificate thumbprint). Use this parameter is you plan to stream Linux workers using Provisioning Server.
- CIS User Account
- CisUserName=x (x is a user account name)
- CisPassword=x (x is the password (encrypted) for the user account)
- NoStartServices=1 (Do not start services if exists)
Please note that some settings can be configured by both the ConfigWizard and the Provisioning Server PowerShell cmdlets.
| How does the ConfigWizard know which database to use when joining a server to an existing farm?
When using the ConfigWizard to join an existing farm, no parameter exists to add the database name. You have to add the name of the database server and the name of the SQL instance (in case your SQL server is configured with multiple instances), but not the name of the database. Even if you enter an incorrect and non-existing farm name, the local server gets joined to an existing farm nonetheless. So how does the ConfigWizard know which database contains the Provisioning Server farm? Well, according to the log file C:\ProgramData\Citrix\Provisioning Services\ConfigWizard.txt, it turns out that the ConfigWizard simply checks ALL available databases on the SQL server (instance):
Each available database is checked (if the user running the ConfigWizard has access to it). If the user has sysadmins rights, all databases are checked.
When the ConfigWizard finds a valid farm name in the database, it simply joins the local server to this database (even if the name specified in the parameter FarmExisting is different). In my opinion, this is quite an invasive method for discovering the name of the database and for joining a server to a farm. Also, when no Provisioning Server farm exists with the name entered in the parameter FarmExisting, I would like to see an error in the error log and not an auto-join into the wrong farm! |
The complete PowerShell script at the end of this part includes the ConfigWizard. The script creates a new farm or, if the script detects that the farm already exists, joins the local server to the existing farm.
Two ANS-files are dynamically created in the temp directory of the user running the script. One ANS file contains the parameters for creating the farm. The second one contains the parameters for joining an existing farm. After the ConfigWizard is finished, these files are automatically deleted.
Step 3: Configure the farm and the local host (using PowerShell)
| Note: Configuring the farm requires db_owner permissions on the Provisioning Server SQL database. |
In part 2 we installed the Provisioning Server snap-in. In this section, we will use some of the 178 available cmdlets to further configure the farm and the local host. Some configuration has already been done by the ConfigWizard in the previous section. Some configurations can be done both in the ConfigWizard ANS-file and with PowerShell.
Please take note that the following paragraphs describe each step in the configuration of Provisioning Server individually. The complete PowerShell script at the end of this part includes all of these steps. Therefore, when you use this script, you do not need to execute any of the individual steps described below!
All farm and host configurations run in parallel with Carl Stalhood’s configurations described in the following article: Provisioning Services – Console Config.
Create administrators (farm, site and collection)
In Provisioning Server, you first have to create an authorization group before you can assign access rights to this group. Access rights can be set on three levels: farm, site and collection.
The command to create an authorization group is:
|
1 2 3 |
asnp citrix* New-PvsAuthGroup -Name "MyDomain.com/MyOU/MyGroup" |
| Note: Please note that the standard notation for Active Directory security groups (MyDomain\MyGroup) does not work for creating PVS authorization groups. The correct group notation is LDAP-like. You have to specify the whole path of the Active Directory group, starting with the domain name, followed by the OU s and lastly the group name: MyDomain/MyOu/MyOu/MyGroup. For example: |
The command to create a farm administrator is:
|
1 2 3 |
asnp citrix* Grant-PvsAuthGroup -authGroupName "Home.local/Groups/CTXPvsFarmAdmins" |
When the cmdlet Grant-PvsAuthGroup is not followed by the parameters -SiteName or -CollectionName, the group is given farm authorization.
To create a site administrator execute the following command:
|
1 2 3 |
asnp citrix* Grant-PvsAuthGroup -authGroupName "Home.local/Groups/CTXPvsSiteAdmins" -SiteName "MySite" |
A collection administrator is created as follows:
|
1 2 3 |
asnp citrix* Grant-PvsAuthGroup -authGroupName "Home.local/Groups/CTXPvsCollectionAdmins" -SiteName "MySite" -CollectionName "MyCollection" |
In order to assign collection access rights, both the site name and the collection name are required.
The complete PowerShell script at the end of this part includes a function which creates all three administrator types. Detailed logging and error handling are included.
Enable auditing, offline database support and configure the license server
The cmdlet Set-PvsFarm allows an administrator to configure multiple farm settings.
For example, use the following command to enable auditing, enable offline database support and to configure the license server and license server port:
|
1 2 3 |
asnp citrix* Set-PvsFarm -AuditingEnabled -OfflineDatabaseSupportEnabled -LicenseServer "MyLicServer.Mydomain" -LicenseServerPort "27000" |
The complete PowerShell script at the end of this part includes these settings with logging and error handling.
For more options, please use the cmdlet help function:
|
1 2 3 |
asnp citrix* get-help Set-PvsFarm -full |
Enable the Customer Experience Improvements Program (CEIP)
The cmdlet Set-PvsFarm does NOT include the settings for Customer Experience Improvements Program (CEIP) as one may expect. There is a separate cmdlet for this called Set-PvsCeipData.
Use the following command to enable CEIP:
|
1 2 3 |
asnp citrix* Set-PvsCeipData -enabled 1 |
Use the following command to disable CEIP:
|
1 2 3 |
asnp citrix* Set-PvsCeipData -enabled 0 |
The complete PowerShell script at the end of this part includes enabling CEIP with logging and error handling.
For more options, please use the cmdlet help function:
|
1 2 3 |
asnp citrix* get-help Set-PvsCeipData -full |
Enable verbose mode in the bootstrap configuration
The cmdlet Set-PvsServerBootstrap allows the administrator to modify the bootstrap configuration.
Use the following command to enable verbose mode:
|
1 2 3 |
asnp citrix* Set-PvsServerBootstrap -Name "ARDBP32.bin" -ServerName $env:ComputerName -VerboseMode |
In case you use a different bootstrap file (instead of the default ARDBP32.BIN) you have to enter the correct name in the previous command.
To check all available bootstrap files on the local Provisioning Server host, enter the following command:
|
1 2 3 |
asnp citrix* Get-PvsServerBootstrapName -Servername $env:ComputerName |
The complete PowerShell script at the end of this part includes enabling verbose mode with logging and error handling.
For more options, please use the cmdlet help function:
|
1 2 3 |
asnp citrix* get-help Set-PvsServerBootstrap -full |
Configure streaming ports, threads per port, event log and set max password age
Reference: https://www.citrix.com/blogs/2023/08/22/the-new-citrix-provisioning-guidelines/
The cmdlet Set-PvsServer allows an administrator to configure a number of settings on the local Provisioning Server host. For example, use the following command to modify the streaming ports (6910 to 6968), the threads per port (equal to the number of vCPUs / virtual cores), the maximum password age (10 days) and to enable the logging of events in the Windows event log:
|
1 2 3 4 5 6 7 |
asnp citrix* # Number of vCPUs / cores (including hyperthreading) $NumberOfCores = (gwmi win32_ComputerSystem).numberoflogicalprocessors # Determine the number of vCPUs / virtual cores on the local machine if ( $NumberOfCores -lt 8 ) { $NumberOfCores = 8 } # Do not change the threads per port if it is lower than the default of 8 Set-PvsServer -ServerName $env:ComputerName -FirstPort 6910 -LastPort 6968 -ThreadsPerPort $NumberOfCores -AdMaxPasswordAge "10" -AdMaxPasswordAgeEnabled -EventLoggingEnabled |
The complete PowerShell script at the end of this part includes these settings with logging and error handling. The script automatically calculates the number of threads per port based on the number of available vCPUs or virtual cores (including hyper-threading). Change the maximum password age to your requirements. The default is 7.
For more options, please use the cmdlet help function:
|
1 2 3 |
asnp citrix* get-help Set-PvsServer -full |
Create a new store and add the local host to the store
The basic command to create a Provisioning Server store is:
|
1 2 3 |
asnp citrix* New-PvsStore -Name "MyUNCStore" -Path "MyServer\MyShare" -Description "Shared PVS store" |
|
1 2 3 |
asnp citrix* New-PvsStore -Name "MyLocalStore" -Path "C:\PVSStore" -Description "Local PVS store" |
The above two examples create a new local and remote farm-wide Provisioning Server store. If you want to create a Provisioning Server store for a particular site, you need to add the parameter “-SiteName “MySite”:
|
1 2 3 |
asnp citrix* New-PvsStore -Name "MyUNCStore" -Path "MyServer\MyShare" -SiteName "MySite" -Description "PVS store for MySite" |
To add the local server to the store use the following command:
|
1 2 3 |
asnp citrix* Set-PvsServerStore -ServerName $env:ComputerName -StoreName "MyUNCStore" |
|
1 2 3 |
asnp citrix* Set-PvsServerStore -ServerName $env:ComputerName -StoreName "MyLocalStore" |
The complete PowerShell script at the end of this part includes the creation of a farm-wide network (UNC) store. The local server is added to this store as well. Detailed logging and error handling are included.
| Note: Please note that the cmdlet New-PvsStore allows the Provisioning Server store to be created even if the network share or local directory do not exist at that time. This in contrast to the ConfigWizard, which requires the directory to be created beforehand. |
For more options, please use the cmdlet help function:
|
1 2 3 |
asnp citrix* get-help Set-PvsServerStore -full |
Reference: https://www.carlstalhood.com/provisioning-services-server-install/#bootmenu
Prevent being presented a boot menu when booting any version except Production.
- Path: HKLM\Software\Citrix\ProvisioningServices\StreamProcess
- Value name: SkipBootMenu
- Value: 1
This change requires a restart of the Citrix PVS Stream Service, but I recommend to simply restart the server after the many changes that have been made.
The complete PowerShell script at the end of this part includes the creation of this registry value. Detailed logging and error handling are included.
Fix error: No servers available for disk When Booting from vDisk
Reference: https://support.citrix.com/article/CTX200233
Prevent the following error: when configuring a vDisk for private mode, any device booting from that vDisk gets the “No servers available for disk” error.
- Path: HKLM\Software\Citrix\ProvisioningServices\StreamProcess
- Value name: SkipRIMSForPrivate
- Value: 1
This change requires a restart of the Citrix PVS Stream Service, but I recommend to simply restart the server after the many changes that have been made.
The complete PowerShell script at the end of this part includes the creation of this registry value. Detailed logging and error handling are included.
Complete script for configuring Provisioning Server and the local host
In case you use my installation template, this is what the complete script, including logging and error handling, looks like.
Please make sure to customize the variables from line 524 to line 546 to your requirements!
|
1 2 3 4 5 6 7 8 9 10 11 12 13 14 15 16 17 18 19 20 21 22 23 24 25 26 27 28 29 30 31 32 33 34 35 36 37 38 39 40 41 42 43 44 45 46 47 48 49 50 51 52 53 54 55 56 57 58 59 60 61 62 63 64 65 66 67 68 69 70 71 72 73 74 75 76 77 78 79 80 81 82 83 84 85 86 87 88 89 90 91 92 93 94 95 96 97 98 99 100 101 102 103 104 105 106 107 108 109 110 111 112 113 114 115 116 117 118 119 120 121 122 123 124 125 126 127 128 129 130 131 132 133 134 135 136 137 138 139 140 141 142 143 144 145 146 147 148 149 150 151 152 153 154 155 156 157 158 159 160 161 162 163 164 165 166 167 168 169 170 171 172 173 174 175 176 177 178 179 180 181 182 183 184 185 186 187 188 189 190 191 192 193 194 195 196 197 198 199 200 201 202 203 204 205 206 207 208 209 210 211 212 213 214 215 216 217 218 219 220 221 222 223 224 225 226 227 228 229 230 231 232 233 234 235 236 237 238 239 240 241 242 243 244 245 246 247 248 249 250 251 252 253 254 255 256 257 258 259 260 261 262 263 264 265 266 267 268 269 270 271 272 273 274 275 276 277 278 279 280 281 282 283 284 285 286 287 288 289 290 291 292 293 294 295 296 297 298 299 300 301 302 303 304 305 306 307 308 309 310 311 312 313 314 315 316 317 318 319 320 321 322 323 324 325 326 327 328 329 330 331 332 333 334 335 336 337 338 339 340 341 342 343 344 345 346 347 348 349 350 351 352 353 354 355 356 357 358 359 360 361 362 363 364 365 366 367 368 369 370 371 372 373 374 375 376 377 378 379 380 381 382 383 384 385 386 387 388 389 390 391 392 393 394 395 396 397 398 399 400 401 402 403 404 405 406 407 408 409 410 411 412 413 414 415 416 417 418 419 420 421 422 423 424 425 426 427 428 429 430 431 432 433 434 435 436 437 438 439 440 441 442 443 444 445 446 447 448 449 450 451 452 453 454 455 456 457 458 459 460 461 462 463 464 465 466 467 468 469 470 471 472 473 474 475 476 477 478 479 480 481 482 483 484 485 486 487 488 489 490 491 492 493 494 495 496 497 498 499 500 501 502 503 504 505 506 507 508 509 510 511 512 513 514 515 516 517 518 519 520 521 522 523 524 525 526 527 528 529 530 531 532 533 534 535 536 537 538 539 540 541 542 543 544 545 546 547 548 549 550 551 552 553 554 555 556 557 558 559 560 561 562 563 564 565 566 567 568 569 570 571 572 573 574 575 576 577 578 579 580 581 582 583 584 585 586 587 588 589 590 591 592 593 594 595 596 597 598 599 600 601 602 603 604 605 606 607 608 609 610 611 612 613 614 615 616 617 618 619 620 621 622 623 624 625 626 627 628 629 630 631 632 633 634 635 636 637 638 639 640 641 642 643 644 645 646 647 648 649 650 651 652 653 654 655 656 657 658 659 660 661 662 663 664 665 666 667 668 669 670 671 672 673 674 675 676 677 678 679 680 681 682 683 684 685 686 687 688 689 690 691 692 693 694 695 696 697 698 699 700 701 702 703 704 705 706 707 708 709 710 711 712 713 714 715 716 717 718 719 720 721 722 723 724 725 726 727 728 729 730 731 732 733 734 735 736 737 738 739 740 741 742 743 744 745 746 747 748 749 750 751 752 753 754 755 756 757 758 759 760 761 762 763 764 765 766 767 768 769 770 771 772 773 774 775 776 777 778 779 780 781 782 783 784 785 786 787 788 789 790 791 792 793 794 795 796 797 798 799 800 801 802 803 804 805 806 807 808 809 810 811 812 813 814 815 816 817 818 819 820 821 822 823 824 825 826 827 828 829 830 831 832 833 834 835 836 837 838 839 840 841 842 843 844 845 846 847 848 849 850 851 852 853 854 855 856 857 858 859 860 861 862 863 864 865 866 867 868 869 870 871 872 873 874 875 876 877 878 879 880 881 882 883 884 885 886 887 888 889 890 891 892 893 894 895 896 897 898 899 900 901 902 903 904 905 906 907 908 909 910 911 912 913 914 915 916 917 918 919 920 921 922 923 924 925 926 927 928 929 930 931 932 933 934 935 936 937 938 939 940 941 942 943 944 945 946 947 948 949 950 951 952 953 954 955 956 957 958 959 960 961 962 963 964 965 966 967 968 969 970 971 972 973 |
#========================================================================== # # Configure Citrix Provisioning Server # # AUTHOR: Dennis Span (https://dennisspan.com) # DATE : 06.05.2017 # # COMMENT: # This script has been prepared for Windows Server 2008 R2, 2012 R2 and 2016 # and Citrix Provisioning Server 7.13 and higher (will probably work for PVS 7.7 and higher). # # This script creates or joins the Provisioning Server farm, configures the farm and the local host. # #========================================================================== # Get the script parameters if there are any param ( # The only parameter which is really required is 'Uninstall' # If no parameters are present or if the parameter is not # 'uninstall', an installation process is triggered [string]$Installationtype ) # define Error handling # note: do not change these values $global:ErrorActionPreference = "Stop" if($verbose){ $global:VerbosePreference = "Continue" } # FUNCTION DS_WriteLog #========================================================================== Function DS_WriteLog { <# .SYNOPSIS Write text to this script's log file .DESCRIPTION Write text to this script's log file .PARAMETER InformationType This parameter contains the information type prefix. Possible prefixes and information types are: I = Information S = Success W = Warning E = Error - = No status .PARAMETER Text This parameter contains the text (the line) you want to write to the log file. If text in the parameter is omitted, an empty line is written. .PARAMETER LogFile This parameter contains the full path, the file name and file extension to the log file (e.g. C:\Logs\MyApps\MylogFile.log) .EXAMPLE DS_WriteLog -InformationType "I" -Text "Copy files to C:\Temp" -LogFile "C:\Logs\MylogFile.log" Writes a line containing information to the log file .Example DS_WriteLog -InformationType "E" -Text "An error occurred trying to copy files to C:\Temp (error: $($Error[0]))" -LogFile "C:\Logs\MylogFile.log" Writes a line containing error information to the log file .Example DS_WriteLog -InformationType "-" -Text "" -LogFile "C:\Logs\MylogFile.log" Writes an empty line to the log file #> [CmdletBinding()] Param( [Parameter(Mandatory=$true, Position = 0)][String]$InformationType, [Parameter(Mandatory=$true, Position = 1)][AllowEmptyString()][String]$Text, [Parameter(Mandatory=$true, Position = 2)][AllowEmptyString()][String]$LogFile ) $DateTime = (Get-Date -format dd-MM-yyyy) + " " + (Get-Date -format HH:mm:ss) if ( $Text -eq "" ) { Add-Content $LogFile -value ("") # Write an empty line } Else { Add-Content $LogFile -value ($DateTime + " " + $InformationType + " - " + $Text) } } #========================================================================== # FUNCTION DS_CreateRegistryKey #========================================================================== Function DS_CreateRegistryKey { <# .SYNOPSIS Create a registry key .DESCRIPTION Create a registry key .PARAMETER RegKeyPath This parameter contains the registry path, for example 'hklm:\Software\MyApp' .EXAMPLE DS_CreateRegistryKey -RegKeyPath "hklm:\Software\MyApp" Creates a new registry key called 'hklm:\Software\MyApp' #> [CmdletBinding()] Param( [Parameter(Mandatory=$true, Position = 0)][String]$RegKeyPath ) DS_WriteLog "I" "Create registry key $RegKeyPath" $LogFile if ( Test-Path $RegKeyPath ) { DS_WriteLog "I" "The registry key $RegKeyPath already exists. Nothing to do." $LogFile } else { try { New-Item -Path $RegkeyPath -Force | Out-Null DS_WriteLog "S" "The registry key $RegKeyPath was created successfully" $LogFile } catch{ DS_WriteLog "E" "An error occurred trying to create the registry key $RegKeyPath (exit code: $($Error[0])!" $LogFile DS_WriteLog "I" "Note: define the registry path as follows: hklm:\Software\MyApp" $LogFile Exit 1 } } } #========================================================================== # FUNCTION DS_SetRegistryValue #========================================================================== Function DS_SetRegistryValue { <# .SYNOPSIS Set a registry value .DESCRIPTION Set a registry value .PARAMETER RegKeyPath This parameter contains the registry path, for example 'hklm:\Software\MyApp' .PARAMETER RegValueName This parameter contains the name of the new registry value, for example 'MyValue' .PARAMETER RegValue This parameter contains the value of the new registry entry, for example '1' .PARAMETER Type This parameter contains the type (possible options are: String, Binary, DWORD, QWORD, MultiString, ExpandString) .EXAMPLE DS_SetRegistryValue -RegKeyPath "hklm:\Software\MyApp" -RegValueName "MyStringValue" -RegValue "Enabled" -Type "String" Creates a new string value called 'MyStringValue' with the value of 'Enabled' .Example DS_SetRegistryValue -RegKeyPath "hklm:\Software\MyApp" -RegValueName "MyBinaryValue" -RegValue "01" -Type "Binary" Creates a new binary value called 'MyBinaryValue' with the value of '01' .Example DS_SetRegistryValue -RegKeyPath "hklm:\Software\MyApp" -RegValueName "MyDWORDValue" -RegValue "1" -Type "DWORD" Creates a new DWORD value called 'MyDWORDValue' with the value of 1 .Example DS_SetRegistryValue -RegKeyPath "hklm:\Software\MyApp" -RegValueName "MyQWORDValue" -RegValue "1" -Type "QWORD" Creates a new QWORD value called 'MyQWORDValue' with the value of 1 .Example DS_SetRegistryValue -RegKeyPath "hklm:\Software\MyApp" -RegValueName "MyMultiStringValue" -RegValue "Value1,Value2,Value3" -Type "MultiString" Creates a new multistring value called 'MyMultiStringValue' with the value of 'Value1 Value2 Value3' .Example DS_SetRegistryValue -RegKeyPath "hklm:\Software\MyApp" -RegValueName "MyExpandStringValue" -RegValue "MyValue" -Type "ExpandString" Creates a new expandstring value called 'MyExpandStringValue' with the value of 'MyValue' #> [CmdletBinding()] Param( [Parameter(Mandatory=$true, Position = 0)][String]$RegKeyPath, [Parameter(Mandatory=$true, Position = 1)][String]$RegValueName, [Parameter(Mandatory=$false, Position = 2)][String[]]$RegValue = "", [Parameter(Mandatory=$true, Position = 3)][String]$Type ) DS_WriteLog "I" "Set registry value $RegValueName = $RegValue (type $Type) in $RegKeyPath" $LogFile # Create the registry key in case it does not exist if ( !( Test-Path $RegKeyPath ) ) { DS_CreateRegistryKey $RegKeyPath } # Create the registry value try { if ( ( "String", "ExpandString", "DWord", "QWord" ) -contains $Type ) { New-ItemProperty -Path $RegKeyPath -Name $RegValueName -Value $RegValue[0] -PropertyType $Type -Force | Out-Null } else { New-ItemProperty -Path $RegKeyPath -Name $RegValueName -Value $RegValue -PropertyType $Type -Force | Out-Null } DS_WriteLog "S" "The registry value $RegValueName = $RegValue (type $Type) in $RegKeyPath was set successfully" $LogFile } catch { DS_WriteLog "E" "An error occurred trying to set the registry value $RegValueName = $RegValue (type $Type) in $RegKeyPath" $LogFile DS_WriteLog "I" "Note: define the registry path as follows: hklm:\Software\MyApp" $LogFile Exit 1 } } #========================================================================== # FUNCTION DS_CreateDirectory #========================================================================== Function DS_CreateDirectory { <# .SYNOPSIS Create a new directory .DESCRIPTION Create a new directory .PARAMETER Directory This parameter contains the name of the new directory including the full path (for example C:\Temp\MyNewFolder). .EXAMPLE DS_CreateDirectory -Directory "C:\Temp\MyNewFolder" Creates the new directory "C:\Temp\MyNewFolder" #> [CmdletBinding()] Param( [Parameter(Mandatory=$true, Position = 0)][String]$Directory ) DS_WriteLog "I" "Create the directory $Directory" $LogFile if ( Test-Path $Directory ) { DS_WriteLog "I" "The directory $Directory already exists. Nothing to do." $LogFile } else { try { New-Item -ItemType Directory -Path $Directory -force | Out-Null DS_WriteLog "S" "Successfully created the directory $Directory" $LogFile } catch { DS_WriteLog "E" "An error occurred trying to create the directory $Directory (exit code: $($Error[0])!" $LogFile Exit 1 } } } #========================================================================== # FUNCTION DS_DeleteDirectory # Description: delete the entire directory #========================================================================== Function DS_DeleteDirectory { <# .SYNOPSIS Delete a directory .DESCRIPTION Delete a directory .PARAMETER Directory This parameter contains the full path to the directory which needs to be deleted (for example C:\Temp\MyOldFolder). .EXAMPLE DS_DeleteDirectory -Directory "C:\Temp\MyOldFolder" Delete the directory "C:\Temp\MyNewFolder" #> [CmdletBinding()] Param( [Parameter(Mandatory=$true, Position = 0)][String]$Directory ) DS_WriteLog "I" "Delete directory $Directory" $LogFile if ( Test-Path $Directory ) { try { Remove-Item $Directory -force -recurse | Out-Null DS_WriteLog "S" "Successfully deleted the directory $Directory" $LogFile } catch { DS_WriteLog "E" "An error occurred trying to delete the directory $Directory (exit code: $($Error[0])!" $LogFile Exit 1 } } else { DS_WriteLog "I" "The directory $Directory does not exist. Nothing to do." $LogFile } } #========================================================================== # FUNCTION DS_DeleteFile # Description: delete one specific file #========================================================================== Function DS_DeleteFile { <# .SYNOPSIS Delete a file .DESCRIPTION Delete a file .PARAMETER File This parameter contains the full path to the file (including the file name and file extension) that needs to be deleted (for example C:\Temp\MyOldFile.txt). .EXAMPLE DS_DeleteFile -File "C:\Temp\MyOldFile.txt" Delete the file "C:\Temp\MyOldFile.txt" #> [CmdletBinding()] Param( [Parameter(Mandatory=$true, Position = 0)][String]$File ) DS_WriteLog "I" "Delete the file $File" $LogFile if ( Test-Path $File ) { try { Remove-Item "$File" | Out-Null DS_WriteLog "S" "Successfully deleted the file $File" $LogFile } catch { DS_WriteLog "E" "An error occurred trying to delete the file $File (exit code: $($Error[0])!" $LogFile Exit 1 } } else { DS_WriteLog "I" "The file $File does not exist. Nothing to do." $LogFile } } #========================================================================== # FUNCTION DS_CreateFirewallRule #========================================================================== Function DS_CreateFirewallRule { <# .SYNOPSIS Create a local firewall rule on the local server .DESCRIPTION Create a local firewall rule on the local server. On Windows Server 2008 (R2) the NetSh command is used. For operating systems from Windows Server 2012 and later, the PowerShell cmdlet 'New-NetFirewallRule' is used. The firewall profile is automatically set to 'any'. .PARAMETER Name This parameter contains the name of the firewall rule (the name must be unique and cannot be 'All'). The parameter name is used for both the 'name' as well as the 'displayname'. .PARAMETER Description This parameter contains the description of the firewall rule. The description can be an empty string. .PARAMETER Ports This parameter contains the port or ports which should be allowed or denied. Possible notations are: Example 1: 80,81,82,90,93 Example 2: 80-82,90,93 .PARAMETER Protocol This parameter contains the name of the protocol. The most used options are 'TCP' or 'UDP', but more options are available. See the article https://technet.microsoft.com/en-us/library/dd734783(v=ws.10).aspx#BKMK_3_add .PARAMETER Direction This parameter contains the direction. Possible options are 'Inbound' or 'Outbound'. .PARAMETER Action This parameter contains the action. Possible options are 'Allow' or 'Block'. .EXAMPLE DS_CreateFirewallRule -Name "Citrix example firewall rules" -Description "Examples firewall rules for Citrix" -Ports "80-82,99" -Protocol "UDP" -Direction "Inbound" -Action "Allow" Create an inbound firewall rule for the UDP protocol #> [CmdletBinding()] Param( [Parameter(Mandatory=$true, Position = 0)][String]$Name, [Parameter(Mandatory=$true, Position = 1)][AllowEmptyString()][String]$Description, [Parameter(Mandatory=$true, Position = 2)][String]$Ports, [Parameter(Mandatory=$true, Position = 3)][String]$Protocol, [Parameter(Mandatory=$true, Position = 4)][ValidateSet("Inbound","Outbound",IgnoreCase = $True)][String]$Direction, [Parameter(Mandatory=$true, Position = 5)][ValidateSet("Allow","Block",IgnoreCase = $True)][String]$Action ) DS_WriteLog "I" "Create the firewall rule '$Name' ..." $LogFile DS_WriteLog "I" "Parameters:" $LogFile DS_WriteLog "I" "-Name: $Name" $LogFile DS_WriteLog "I" "-Description: $Description" $LogFile DS_WriteLog "I" "-Ports: $Ports" $LogFile DS_WriteLog "I" "-Protocol: $Protocol" $LogFile DS_WriteLog "I" "-Direction: $Direction" $LogFile DS_WriteLog "I" "-Action: $Action" $LogFile [string]$WindowsVersion = ( Get-WmiObject -class Win32_OperatingSystem ).Version if ( ($WindowsVersion -like "*6.1*") -Or ($WindowsVersion -like "*6.0*") ) { # Configure the local firewall using the NetSh command if the operating system is Windows Server 2008 (R2) if ( $Direction -eq "Inbound" ) { $DirectionNew = "In" } if ( $Direction -eq "Outbound" ) { $DirectionNew = "Out" } DS_WriteLog "I" "The operating system is Windows Server 2008 (R2). Use the Netsh command to configure the firewall." $LogFile DS_WriteLog "I" "Check if the firewall rule '$Name' already exists." $LogFile try { [string]$Rule = netsh advfirewall firewall show rule name=$Name if ( $Rule.Contains("No rules match") ) { DS_WriteLog "I" "The firewall rule '$Name' does not exist." $LogFile DS_WriteLog "I" "Create the firewall rule '$Name' ..." $LogFile try { netsh advfirewall firewall add rule name=$Name description=$Description localport=$Ports protocol=$Protocol dir=$DirectionNew action=$Action | Out-Null DS_WriteLog "S" "The firewall rule '$Name' was created successfully" $LogFile } catch { DS_WriteLog "E" "An error occurred trying to create the firewall rule '$Name' (error: $($Error[0]))" $LogFile Exit 1 } } else { DS_WriteLog "I" "The firewall rule '$Name' already exists. Nothing to do." $LogFile } } catch { DS_WriteLog "E" "An error occurred trying to check the firewall rule '$Name' (error: $($Error[0]))" $LogFile Exit 1 } } else { # Configure the local firewall using PowerShell if the operating system is Windows Server 2012 or higher DS_WriteLog "I" "The operating system is Windows Server 2012 or higher. Use PowerShell to configure the firewall." $LogFile DS_WriteLog "I" "Check if the firewall rule '$Name' already exists." $LogFile if ( (Get-NetFirewallRule -Name $Name -ErrorAction SilentlyContinue) -Or (Get-NetFirewallRule -DisplayName $Name -ErrorAction SilentlyContinue)) { DS_WriteLog "I" "The firewall rule '$Name' already exists. Nothing to do." $LogFile } else { DS_WriteLog "I" "The firewall rule '$Name' does not exist." $LogFile DS_WriteLog "I" "Create the firewall rule '$Name' ..." $LogFile [array]$Ports = $Ports.split(',') # Convert the string value $Ports to an array (required by the PowerShell cmdlet 'New-NetFirewallRule') try { New-NetFirewallRule -Name $Name -DisplayName $Name -Description $Description -LocalPort $Ports -Protocol $Protocol -Direction $Direction -Action $Action | Out-Null DS_WriteLog "S" "The firewall rule '$Name' was created successfully" $LogFile } catch { DS_WriteLog "E" "An error occurred trying to create the firewall rule '$Name' (error: $($Error[0]))" $LogFile Exit 1 } } } } #========================================================================== # Function DS_CreatePVSAuthGroup # Note: Create a new Provisioning Server authorization group #========================================================================== Function DS_CreatePVSAuthGroup { <# .SYNOPSIS Create a new Provisioning Server authorization group .DESCRIPTION Create a new Provisioning Server authorization group .PARAMETER GroupName This parameter contains the name of the Active Directory group which is to be added as an authorization group in the Provisioning Server farm. Please be aware that the notation "MyDomain\MyGroup" does not work! The string has be LDAP-like: MyDomain.com/MyOU/MyOU/MyGroup .EXAMPLE DS_CreatePVSAuthGroup -GroupName "company.com/AdminGroup/CTXFarmAdmins" Creates the authorization group 'company.com/AdminGroup/CTXFarmAdmins' #> [CmdletBinding()] Param( [Parameter(Mandatory=$true, Position = 0)][String]$GroupName ) DS_WriteLog "I" "Create a new authorization group" $LogFile DS_WriteLog "I" "Group name: $GroupName" $LogFile try { Get-PvsAuthGroup -Name $GroupName | Out-Null DS_WriteLog "I" "The authorization group '$GroupName' already exists. Nothing to do." $LogFile } catch { try { New-PvsAuthGroup -Name $GroupName | Out-Null DS_WriteLog "S" "The authorization group '$GroupName' has been created" $LogFile } catch { DS_WriteLog "E" "An error occurred trying to create the authorization group '$Groupname' (error: $($Error[0]))" $LogFile Exit 1 } } } #========================================================================== # Function DS_GrantPVSAuthGroupAdminRights # Note: Grant an existing Provisioning Server authorization group farm, site or collection admin rights #========================================================================== Function DS_GrantPVSAuthGroupAdminRights { <# .SYNOPSIS Grant an existing Provisioning Server authorization group farm, site or collection admin rights .DESCRIPTION Grant an existing Provisioning Server authorization group farm, site or collection admin rights .PARAMETER GroupName This parameter contains the name of the existing Provisioning Server authorization group that is to be granted farm, site or collection admin rights. If the parameters 'Sitename' and 'CollectionName' are left empty, the authorization group is granted farm admin rights. Please be aware that the notation "MyDomain\MyGroup" does not work! The string has be LDAP-like: MyDomain.com/MyOU/MyOU/MyGroup .PARAMETER SiteName This parameter is optional and contains the site name. If only the site name is specified (without the CollectionName parameter), the Provisioning Server authorization group is granted site admin rights. .PARAMETER CollectionName This parameter is optional and contains the name of the collection. You also have to specify the site name if your want to grant collection admin rights. .EXAMPLE DS_GrantPVSAuthGroupAdminRights -GroupName "company.com/AdminGroup/CTXFarmAdmins" Grants the authorization group 'company.com/AdminGroup/CTXFarmAdmins' farm admin rights .EXAMPLE DS_GrantPVSAuthGroupAdminRights -GroupName "company.com/AdminGroup/CTXSiteAdmins" -SiteName "MySite" Grants the authorization group 'company.com/AdminGroup/CTXSiteAdmins' site admin rights .EXAMPLE DS_GrantPVSAuthGroupAdminRights -GroupName "company.com/AdminGroup/CTXCollectionAdmins" -SiteName "MySite" -CollectionName "MyCollection" Grants the authorization group 'company.com/AdminGroup/CTXCollectionAdmins' collection admin rights #> [CmdletBinding()] Param( [Parameter(Mandatory=$true, Position = 0)][String]$GroupName, [Parameter(Mandatory=$false)][String]$SiteName, [Parameter(Mandatory=$false)][String]$CollectionName ) # Before attempting to grant admin rights, make sure that the authorization group exists try { Get-PvsAuthGroup -Name $GroupName | Out-Null } catch { DS_CreatePVSAuthGroup -GroupName $GroupName DS_WriteLog "-" "" $LogFile } # Grant admin rights to the authorization group try { if ( ([string]::IsNullOrEmpty($SiteName)) -And ([string]::IsNullOrEmpty($CollectionName)) ) { # Grant farm admin rights when both parameters 'SiteName' and 'CollectionName' are empty $result = "farm" DS_WriteLog "I" "Grant the authorization group '$GroupName' $result admin rights" $LogFile Grant-PvsAuthGroup -authGroupName $GroupName | Out-Null } Elseif ( !([string]::IsNullOrEmpty($CollectionName)) ) { # Grant collection admin rights when the parameter 'CollectionName' is NOT empty $result = "collection" DS_WriteLog "I" "Grant the authorization group '$GroupName' $result admin rights" $LogFile Grant-PvsAuthGroup -authGroupName $GroupName -SiteName $SiteName -CollectionName $CollectionName | Out-Null } Else { # Grant site admin rights in all other cases $result = "site" DS_WriteLog "I" "Grant the authorization group '$GroupName' $result admin rights" $LogFile Grant-PvsAuthGroup -authGroupName $GroupName -SiteName $SiteName | Out-Null } DS_WriteLog "S" "The authorization group '$GroupName' has been granted $result admin rights" $LogFile } catch { [string]$ErrorText = $Error[0] If ( $ErrorText.Contains("duplicate")) { DS_WriteLog "I" "The authorization group '$GroupName' already has been granted $result admin rights. Nothing to do." $LogFile } else { DS_WriteLog "E" "An error occurred trying to grant the authorization group '$GroupName' $result admin rights (error: $($Error[0]))" $LogFile Exit 1 } } } #========================================================================== ################ # Main section # ################ # Disable File Security $env:SEE_MASK_NOZONECHECKS = 1 # Custom variables [edit] $BaseLogDir = "C:\Logs" # [edit] add the location of your log directory here $PackageName = "Citrix Provisioning Server (configure)" # [edit] enter the display name of the software (e.g. 'Arcobat Reader' or 'Microsoft Office') # Global variables $ComputerName = $env:ComputerName $StartDir = $PSScriptRoot # the directory path of the script currently being executed if (!($Installationtype -eq "Uninstall")) { $Installationtype = "Install" } $LogDir = (Join-Path $BaseLogDir $PackageName).Replace(" ","_") $LogFileName = "$($Installationtype)_$($PackageName).log" $LogFile = Join-path $LogDir $LogFileName # Create the log directory if it does not exist if (!(Test-Path $LogDir)) { New-Item -Path $LogDir -ItemType directory | Out-Null } # Create new log file (overwrite existing one) New-Item $LogFile -ItemType "file" -force | Out-Null DS_WriteLog "I" "START SCRIPT - $PackageName" $LogFile DS_WriteLog "-" "" $LogFile # ----------------------------------- # CUSTOMIZE THE FOLLOWING VARIABLES TO YOUR REQUIREMENTS # ----------------------------------- $DatabaseServer = "MySQLServer.MyDomain.com" $DatabaseInstance = "" # Leave empty if your SQL server only has one default instance $DatabaseName = "MyPVSDB" $FarmName = "MyTestFarm" $SiteName = "MyTestSite" $DefaultCollectionName = "Default" $DefaultStoreName = "PVSStore" $DefaultStorePath = "$env:SystemDrive\PVSStore" $LicenseServer = "MyCTXLicenseServer.MyDomain.com" $LicenseServerPort = "27000" $StreamingIP = "" # If left empty, the script will use the IP address from the first online network adapter $FirstStreamingPort = "6910" $LastStreamingPort = "6968" $BootIP = "" # If left empty, the script will use the IP address from the first online network adapter $UserName = "MyDomain.com\MyUser" $Password = "MyPassword" $FarmAdminGroupName = "MyDomain.com/MyOU/MyOU/MyFarmAdmins" $SiteAdminGroupName = "MyDomain.com/MyOU/MyOU/MySiteAdmins" $CollectionAdminGroupName = "MyDomain.com/MyOU/MyOU/MyCollectionAdmins" $MaxPasswordAge = "10" $UNCStoreName = "MyUNCStore" $UNCStoreDescription = "Shared PVS store" $UNCStorePath = "\\MyServer\MyShare" # ----------------------------------- # Log variables DS_WriteLog "I" "Your custom variables:" $LogFile DS_WriteLog "I" "-Database server: $DatabaseServer" $LogFile DS_WriteLog "I" "-Database instance: $DatabaseInstance" $LogFile DS_WriteLog "I" "-Database name: $DatabaseName" $LogFile DS_WriteLog "I" "-Farm name: $FarmName" $LogFile DS_WriteLog "I" "-Site name: $SiteName" $LogFile DS_WriteLog "I" "-Default collection name: $DefaultCollectionName" $LogFile DS_WriteLog "I" "-Default store name: $DefaultStoreName" $LogFile DS_WriteLog "I" "-Default store path: $DefaultStorePath" $LogFile DS_WriteLog "I" "-License server: $LicenseServer" $LogFile DS_WriteLog "I" "-License server port: $LicenseServerPort" $LogFile DS_WriteLog "I" "-Streaming IP address: $StreamingIP" $LogFile DS_WriteLog "I" "-First streaming port: $FirstStreamingPort" $LogFile DS_WriteLog "I" "-Last streaming port: $LastStreamingPort" $LogFile DS_WriteLog "I" "-Boot IP address: $BootIP" $LogFile DS_WriteLog "I" "-User name: $UserName" $LogFile DS_WriteLog "I" "-Password: ******" $LogFile DS_WriteLog "I" "-Farm admin group: $FarmAdminGroupName" $LogFile DS_WriteLog "I" "-Site admin group: $SiteAdminGroupName" $LogFile DS_WriteLog "I" "-Collection admin group: $CollectionAdminGroupName" $LogFile DS_WriteLog "I" "-Max password age: $MaxPasswordAge" $LogFile DS_WriteLog "I" "-UNC store name: $UNCStoreName" $LogFile DS_WriteLog "I" "-UNC store description: $UNCStoreDescription" $LogFile DS_WriteLog "I" "-UNC store path: $UNCStorePath" $LogFile DS_WriteLog "-" "" $LogFile # --------------------------------------------------------------------------------------------------------------------------- ################################################# # CONFIGURE THE LOCAL FIREWALL # ################################################# # Note 1: The local firewall is not configured during the installation of Provisioning Server # Note 2: in case you use a Microsoft Group Policy object to configure the firewall, you can delete the following lines of code DS_WriteLog "I" "Create the firewall rules" $LogFile DS_WriteLog "-" "=========================" $LogFile # Create the inbound rule for the TCP ports DS_CreateFirewallRule -Name "Citrix PVS (Inbound,TCP)" -Description "Inbound rules for the TCP protocol for Citrix Provisioning Server ports" -Ports "389,1433,54321-54323" -Protocol "TCP" -Direction "Inbound" -Action "Allow" DS_WriteLog "-" "" $LogFile # Create the inbound rule for the UDP ports DS_CreateFirewallRule -Name "Citrix PVS (Inbound,UDP)" -Description "Inbound rules for the UDP protocol for Citrix Provisioning Server ports" -Ports "67,69,2071,6910-6930,6969,4011,6890-6909" -Protocol "UDP" -Direction "Inbound" -Action "Allow" DS_WriteLog "-" "" $LogFile # Create the outbound rule for the TCP ports DS_CreateFirewallRule -Name "Citrix PVS (Outbound,TCP)" -Description "Outbound rules for the TCP protocol for Citrix Provisioning Server ports" -Ports "389,1433,54321-54323" -Protocol "TCP" -Direction "Outbound" -Action "Allow" DS_WriteLog "-" "" $LogFile # Create the outbound rule for the UDP ports DS_CreateFirewallRule -Name "Citrix PVS (Outbound,UDP)" -Description "Outbound rules for the UDP protocol for Citrix Provisioning Server ports" -Ports "67,69,2071,6910-6930,6969,4011,6890-6909" -Protocol "UDP" -Direction "Outbound" -Action "Allow" DS_WriteLog "-" "" $LogFile ################################################# # CREATE OR JOIN THE PROVISIONING SERVER FARM # ################################################# DS_WriteLog "I" "Create or join the provisioning server farm" $LogFile DS_WriteLog "-" "===========================================" $LogFile # A Provisioning Server farm can only be created using the ConfigWizard.exe and an accompanying configuration file (*.ans). # The same goes for joining a Provisioning Server farm. # The ConfigWizard.exe is located here: "%programfiles%\Citrix\Provisioning Services\ConfigWizard.exe" # The ANS-file can be created in any editor such as Notepad and has to be saved as Unicode. # The possible parameters that can be used in the ANS-file can be found by executing the following command: # # "%programfiles%\Citrix\Provisioning Services\ConfigWizard.exe" /C # # This command generates the following output file: C:\ProgramData\Citrix\Provisioning Services\ConfigWizard.out # This output file can be opened in any editor (such as Notepad). The contents of this file is a complete list of # all possible ConfigWizard parameters. # # If you run the ConfigWizard.exe with the /S parameter, all steps in the wizard are recorded to an ANS file in the directory # C:\ProgramData\Citrix\Provisioning Services. # # The native command to execute the ConfigWitward with the ANS file is: # # "%programfiles%\Citrix\Provisioning Services\ConfigWizard.exe" /a:C:\ConfigWizard.ans /o:C:\ConfigWizard.log # Get the IPv4 address of the main network card DS_WriteLog "I" "Get the IPv4 address of the main network card" $LogFile try { $AvailableNICs = gwmi Win32_NetworkAdapter -Filter "NetEnabled='True'" switch ($AvailableNICs.Count) { {$_ -eq 0 } { DS_WriteLog "E" "No enabled network card could be found!" $LogFile DS_WriteLog "E" "Please make sure at least one network card exists and is connected to the network before running this script again." $LogFile Exit 1 } {$_ -gt 1 } { DS_WriteLog "E" "More than one enabled network card was found! This script cannot determine which network card to use." $LogFile DS_WriteLog "E" "Please enter the preferred IP address in the variable '$StreamingIP' and '$BootIP' and run this script again." $LogFile Exit 1 } default { DS_WriteLog "I" "One enabled network card was found. Retrieve the IP address." $LogFile ForEach ($Adapter in $AvailableNICs) { $IPv4Address = $(gwmi Win32_NetworkAdapterConfiguration -Filter "Index = '$($Adapter.Index)'").IPAddress } DS_WriteLog "I" "The IPv4 address of the main network card is $IPv4Address" $LogFile } } } catch { DS_WriteLog "E" "An error occurred trying to retrieve the IPv4 address (error: $($Error[0]))" $LogFile Exit 1 } DS_WriteLog "-" "" $LogFile # Define the variables for the ANS file for CREATING a NEW farm # # Add your values here: # ||||||||||||||||||||||||| # vvvvvvvvvvvvvvvvvvvvvvvvv $Text += "FarmConfiguration=" + "1" + "`r`n" # 0 = farm already configures, 1= create farm, 2 = join farm $Text += "BootstrapFile=" + "C:\ProgramData\Citrix\Provisioning Services\Tftpboot\ARDBP32.BIN" + "`r`n" # Set the boot strap file for the PVS TFTP service. Leave out this parameter if you do not want to use the PVS TFTP service $Text += "DatabaseServer=" + $DatabaseServer + "`r`n" # The name of the database (SQL) server if ( !([string]::IsNullOrEmpty($DatabaseInstance)) ) { $Text += "DatabaseInstance=" + $DatabaseInstance + "`r`n" # The name of the database instance. Leave out this parameter if there is only one (default) instance on your SQL server } $Text += "DatabaseNew=" + $DatabaseName + "`r`n" # The name of the database $Text += "FarmNew=" + $FarmName + "`r`n" # The name of the Provisioning Server farm $Text += "SiteNew=" + $SiteName + "`r`n" # The name of the default site $Text += "CollectionNew=" + $DefaultCollectionName + "`r`n" # The name of the default collection $Text += "Store=" + $DefaultStoreName + "`r`n" # The name of the default store $Text += "DefaultPath=" + $DefaultStorePath + "`r`n" # The path to the default store (this directory is created below to avoid errors) $Text += "PasswordManagementInterval=" + $MaxPasswordAge + "`r`n" # Automate computer password updates (number of days between password updates). Leave out this parameter if you do not want PVS to manage the password updates $Text += "LicenseServer=" + $LicenseServer + "`r`n" # The name of the Citrix license server $Text += "LicenseServerPort=" + $LicenseServerPort + "`r`n" # The port of the Citrix license server used for the initial connection (27000 by default) if ( [string]::IsNullOrEmpty($StreamingIP) ) { $Text += "LS1=" + "$($IPv4Address),0.0.0.0,0.0.0.0,$FirstStreamingPort" + "`r`n" # The IPv4 address of the local server to be added to the stream servers boot list } else { $Text += "LS1=" + "$($StreamingIP),0.0.0.0,0.0.0.0,$FirstStreamingPort" + "`r`n" # The IPv4 address of the local server to be added to the stream servers boot list } if ( [string]::IsNullOrEmpty($BootIP) ) { $Text += "StreamNetworkAdapterIP=" + $IPv4Address + "`r`n" # Set the network adapter IP for the stream servers (comma delimited IP address list). The first card is used if you leave out this parameter } else { $Text += "StreamNetworkAdapterIP=" + $BootIP + "`r`n" # Set the network adapter IP for the stream servers (comma delimited IP address list). The first card is used if you leave out this parameter } $Text += "UserName=" + $UserName + "`r`n" # The name of a user with SQL sysadmin rights $Text += "UserPass=" + $Password + "`r`n" # The password of the user with SQL sysadmin rights. Either use UserPass (plain text) or UserName2 (encrypted) for the password. # Create the Config Wizard ANS file for CREATING a NEW farm $ConfWizardANSFileCreateFarm = "$env:Temp\ConfigWizardCreateFarm.ans" DS_WriteLog "I" "Create the configuration file '$ConfWizardANSFileCreateFarm'" $LogFile try { Set-Content $ConfWizardANSFileCreateFarm -value ($Text) -Encoding Unicode DS_WriteLog "S" "The configuration file '$ConfWizardANSFileCreateFarm' was created successfully" $LogFile } catch { DS_WriteLog "E" "An error occurred trying to create the configuration file '$ConfWizardANSFileCreateFarm' (error: $($Error[0]))" $LogFile Exit 1 } # Reset/empty the variable $Text Clear-Variable Text # Define the variables for the ANS file for JOINING an EXISTING farm # # Add your values here: # ||||||||||||||||||||||||| # vvvvvvvvvvvvvvvvvvvvvvvvv $Text += "FarmConfiguration=" + "2" + "`r`n" # 0 = farm already configures, 1= create farm, 2 = join farm $Text += "DatabaseServer=" + $DatabaseServer + "`r`n" # The name of the database (SQL) server if ( !([string]::IsNullOrEmpty($DatabaseInstance)) ) { $Text += "DatabaseInstance=" + $DatabaseInstance + "`r`n" # The name of the database instance. Leave out this parameter if there is only one (default) instance on your SQL server } $Text += "FarmExisting=" + $FarmName + "`r`n" # The name of the Provisioning Server farm $Text += "ExistingSite=" + $SiteName + "`r`n" # The name of the default site $Text += "ExistingStore=" + $DefaultStoreName + "`r`n" # The name of the default store if ( [string]::IsNullOrEmpty($StreamingIP) ) { $Text += "LS1=" + "$($IPv4Address),0.0.0.0,0.0.0.0,$FirstStreamingPort" + "`r`n" # The IPv4 address of the local server to be added to the stream servers boot list } else { $Text += "LS1=" + "$($StreamingIP),0.0.0.0,0.0.0.0,$FirstStreamingPort" + "`r`n" # The IPv4 address of the local server to be added to the stream servers boot list } if ( [string]::IsNullOrEmpty($BootIP) ) { $Text += "StreamNetworkAdapterIP=" + $IPv4Address + "`r`n" # Set the network adapter IP for the stream servers (comma delimited IP address list). The first card is used if you leave out this parameter } else { $Text += "StreamNetworkAdapterIP=" + $BootIP + "`r`n" # Set the network adapter IP for the stream servers (comma delimited IP address list). The first card is used if you leave out this parameter } $Text += "PasswordManagementInterval=" + $MaxPasswordAge + "`r`n" # Automate computer password updates (number of days between password updates). Leave out this parameter if you do not want PVS to manage the password updates $Text += "UserName=" + $UserName + "`r`n" # The name of a user with SQL sysadmin rights $Text += "UserPass=" + $Password + "`r`n" # The password of the user with SQL sysadmin rights. Either use UserPass (plain text) or UserName2 (encrypted) for the password. # Create the Config Wizard ANS file for JOINING an EXISTING farm $ConfWizardANSFileJoinFarm = "$env:Temp\ConfigWizardJoinFarm.ans" DS_WriteLog "I" "Create the configuration file '$ConfWizardANSFileJoinFarm'" $LogFile try { Set-Content $ConfWizardANSFileJoinFarm -value ($Text) -Encoding Unicode DS_WriteLog "S" "The configuration file '$ConfWizardANSFileJoinFarm' was created successfully" $LogFile } catch { DS_WriteLog "E" "An error occurred trying to create the configuration file '$ConfWizardANSFileJoinFarm' (error: $($Error[0]))" $LogFile Exit 1 } DS_WriteLog "-" "" $LogFile # Before executing the ConfigWizard.exe, create the directory for the default PVS store (the config wizard ends in an error if the path does not exist) DS_WriteLog "I" "Create the directory for the default PVS store (otherwise the config wizard ends in an error)" $LogFile DS_CreateDirectory -Directory $DefaultStorePath DS_WriteLog "-" "" $LogFile # Delete the ConfigWizard log file (if exist) $ConfigWizardLogFile = "$LogDir\ConfigWizard.log" DS_WriteLog "I" "Delete the ConfigWizard log file '$ConfigWizardLogFile'" $LogFile DS_DeleteFile -File $ConfigWizardLogFile DS_WriteLog "-" "" $LogFile # Execute the ConfigWizard and either join or create the Provisioning Server farm $ConfigWizardEXE = "$env:ProgramFiles\Citrix\Provisioning Services\ConfigWizard.exe" DS_WriteLog "I" "Create a new farm (execute the ConfigWizard)" $LogFile if ( Test-Path $ConfigWizardEXE ) { # Create the farm $params = "/a:$ConfWizardANSFileCreateFarm /o:$ConfigWizardLogFile" DS_WriteLog "I" "Command: $ConfigWizardEXE $params -WindowStyle Hidden -Wait" $LogFile start-process $ConfigWizardEXE $params -WindowStyle Hidden -Wait # There is no need for a try / catch statement since the ConfigWizard always exists with code 0 # The ConfigWizard only provides the exit code 0. We have to read the log file to check the result. [string]$GetText = Get-Content $ConfigWizardLogFile switch -wildcard ($GetText) { "*Invalid Database Name*" { DS_WriteLog "I" "The Provisioning Server farm $($FarmName.ToUpper()) already exists!" $LogFile DS_WriteLog "I" "Join this server to the existing Provisioning Server farm $($FarmName.ToUpper())" $LogFile # Delete the ConfigWizard log file (if exist) $ConfigWizardLogFile = "$LogDir\ConfigWizard.log" DS_WriteLog "I" "Delete the ConfigWizard log file '$ConfigWizardLogFile'" $LogFile DS_DeleteFile -File $ConfigWizardLogFile # Join the server to the farm $params = "/a:$ConfWizardANSFileJoinFarm /o:$ConfigWizardLogFile" DS_WriteLog "I" "Command: $ConfigWizardEXE $params -WindowStyle Hidden -Wait" $LogFile start-process $ConfigWizardEXE $params -WindowStyle Hidden -Wait # There is no need for a try / catch statement since the ConfigWizard always exists with code 0 # The ConfigWizard only provides the exit code 0. We have to read the log file to check the result. [string]$GetText = Get-Content $ConfigWizardLogFile if ( $GetText.Contains("Configuration complete") ) { DS_WriteLog "S" "The server was successfully joined to the Provisioning Server farm $($FarmName.ToUpper())!" $LogFile } else { DS_WriteLog "E" "An error occurred trying to join the server to the Provisioning Server farm $($FarmName.ToUpper())!" $LogFile Exit 1 } } "*Configuration complete*" { DS_WriteLog "S" "The Provisioning Server farm $($FarmName.ToUpper()) was created successfully!" $LogFile } "*Fatal error*" { DS_WriteLog "E" "A fatal error occurred trying to create the Provisioning Server farm $($FarmName.ToUpper())!" $LogFile } } DS_WriteLog "I" "For more information see the log file $ConfigWizardLogFile" $LogFile } else { DS_WriteLog "E" "The file $ConfigWizardEXE does not exist!" $LogFile } DS_WriteLog "-" "" $LogFile # Delete the ConfigWizard configuration file (since it contains the password of the Active Directory service account in plain text) DS_WriteLog "I" "Delete the ConfigWizard configuration file '$ConfWizardANSFileCreateFarm'" $LogFile DS_DeleteFile -File $ConfWizardANSFileCreateFarm DS_WriteLog "I" "Delete the ConfigWizard configuration file '$ConfWizardANSFileJoinFarm'" $LogFile DS_DeleteFile -File $ConfWizardANSFileJoinFarm DS_WriteLog "-" "" $LogFile ############################################################# # CONFIGURE THE PROVISIONING SERVER FARM AND THE LOCAL HOST # ############################################################# DS_WriteLog "I" "Configure the Provisioning Server farm and the local host" $LogFile DS_WriteLog "I" "=========================================================" $LogFile # Load the Citrix snap-ins # ======================== DS_WriteLog "I" "Load the Citrix snap-ins" $LogFile try { asnp citrix* DS_WriteLog "S" "The Citrix snap-ins were loaded successfully" $LogFile } catch { DS_WriteLog "E" "An error occurred trying to load the Citrix snap-ins (error: $($Error[0]))" $LogFile Exit 1 } DS_WriteLog "-" "" $LogFile # Create three new authorization groups # ===================================== DS_CreatePVSAuthGroup -GroupName $FarmAdminGroupName # Farm admin group DS_CreatePVSAuthGroup -GroupName $SiteAdminGroupName # Site admin group DS_CreatePVSAuthGroup -GroupName $CollectionAdminGroupName # Collection admin group DS_WriteLog "-" "" $LogFile # Grant the authorization groups the appropriate admin rights # =========================================================== DS_GrantPVSAuthGroupAdminRights -GroupName $FarmAdminGroupName # Grant farm admin rights DS_GrantPVSAuthGroupAdminRights -GroupName $SiteAdminGroupName -SiteName $SiteName # Grant site admin rights DS_GrantPVSAuthGroupAdminRights -GroupName $CollectionAdminGroupName -SiteName $SiteName -CollectionName $DefaultCollectionName # Grant collection admin rights DS_WriteLog "-" "" $LogFile # Configure the Provisioning Server farm # ====================================== DS_WriteLog "I" "Configure the Provisioning Server farm" $LogFile DS_WriteLog "I" "-Enable auditing" $LogFile DS_WriteLog "I" "-Enable offline database support" $LogFile DS_WriteLog "I" "-Register license server" $LogFile DS_WriteLog "I" "-Register license server port" $LogFile try { Set-PvsFarm -AuditingEnabled -OfflineDatabaseSupportEnabled -LicenseServer $LicenseServer -LicenseServerPort $LicenseServerPort DS_WriteLog "S" "The Provisioning Server farm settings have been successfully configured" $LogFile } catch { DS_WriteLog "E" "An error occurred trying to configure the Provisioning Server farm settings (error: $($Error[0]))" $LogFile Exit 1 } DS_WriteLog "-" "" $LogFile # Enable the Customer Experience Improvements Program (CEIP) # ====================================================== DS_WriteLog "I" "Enable the Customer Experience Improvements Program (CEIP)" $LogFile try { Set-PvsCeipData -enabled 1 DS_WriteLog "S" "CEIP has been successfully enabled" $LogFile } catch { DS_WriteLog "E" "An error occurred trying to enable CEIP (error: $($Error[0]))" $LogFile Exit 1 } DS_WriteLog "-" "" $LogFile # Enable verbose mode in the bootstrap configuration # ================================================== DS_WriteLog "I" "Enable verbose mode in the bootstrap configuration" $LogFile try { Set-PvsServerBootstrap -Name "ARDBP32.bin" -ServerName $env:ComputerName -VerboseMode DS_WriteLog "S" "Verbose mode has been enabled" $LogFile } catch { DS_WriteLog "E" "An error occurred trying to enable verbose mode (error: $($Error[0]))" $LogFile #Exit 1 } DS_WriteLog "-" "" $LogFile # Configure the local host # ======================== DS_WriteLog "I" "Configure the local host" $LogFile $NumberOfCores = (gwmi win32_ComputerSystem).numberoflogicalprocessors # this is the total number of cores including hyperthreading if ( $NumberOfCores -lt 8 ) { $NumberOfCores = 8 } # set the threads per port to the default value of 8 in case the number of logical cores is less than 8 DS_WriteLog "I" "-Set first streaming port" $LogFile DS_WriteLog "I" "-Set last streaming port" $LogFile DS_WriteLog "I" "-Set the threads per port equal to the number of vCPUs/virtual cores" $LogFile DS_WriteLog "I" "-Set max password age to" $LogFile DS_WriteLog "I" "-Enable max password age" $LogFile DS_WriteLog "I" "-Enable write log to Windows event log" $LogFile try { Set-PvsServer -ServerName $env:ComputerName -FirstPort $FirstStreamingPort -LastPort $LastStreamingPort -ThreadsPerPort $NumberOfCores -AdMaxPasswordAge $MaxPasswordAge -AdMaxPasswordAgeEnabled -EventLoggingEnabled DS_WriteLog "S" "The PVS settings on the local host were configured successfully" $LogFile } catch { DS_WriteLog "E" "An error occurred trying to configure the PVS settings on the local host (error: $($Error[0]))" $LogFile Exit 1 } DS_WriteLog "-" "" $LogFile # Create a new farm-wide PVS store (UNC) # Note: the PVS store can be created even if the directory or UNC path does not exist # =================================================================================== DS_WriteLog "I" "Create the PVS store $UNCStoreName" $LogFile try { Get-PvsStore -Name $UNCStoreName | Out-Null DS_WriteLog "I" "The PVS store $UNCStoreName already exists. Nothing to do." $LogFile } catch { try { New-PvsStore -Name $UNCStoreName -Path $UNCStorePath -Description $UNCStoreDescription | Out-Null DS_WriteLog "S" "The PVS store '$UNCStoreName' was created successfully" $LogFile } catch { DS_WriteLog "E" "An error occurred trying to create the PVS store '$UNCStoreName' (error: $($Error[0]))" $LogFile Exit 1 } } DS_WriteLog "-" "" $LogFile # Add the local server to a PVS store # =================================== DS_WriteLog "I" "Add the local server to the PVS store '$UNCStoreName'" $LogFile try { Set-PvsServerStore -ServerName $ComputerName -StoreName $UNCStoreName | Out-Null DS_WriteLog "S" "The local server has been successfully added to the PVS store '$UNCStoreName'" $LogFile } catch { [string]$ErrorText = $Error[0] If ( $ErrorText.Contains("No object was added")) { DS_WriteLog "I" "The server has already been added to the PVS store '$UNCStoreName'. Nothing to do." $LogFile } else { DS_WriteLog "E" "An error occurred trying to add the local host to the PVS store '$UNCStoreName' (error: $($Error[0]))" $LogFile Exit 1 } } DS_WriteLog "-" "" $LogFile # Disable BIOS Boot Menu # Reference: http://www.carlstalhood.com/provisioning-services-server-install/#bootmenu # ====================== DS_SetRegistryValue -RegKeyPath "hklm:\Software\Citrix\ProvisioningServices\StreamProcess" -RegValueName "SkipBootMenu" -RegValue "1" -Type "DWORD" # Fix error: No servers available for disk When Booting from vDisk # Reference: https://support.citrix.com/article/CTX200233 # ====================== DS_SetRegistryValue -RegKeyPath "hklm:\Software\Citrix\ProvisioningServices\StreamProcess" -RegValueName "SkipRIMSForPrivate" -RegValue "1" -Type "DWORD" # Enable File Security Remove-Item env:\SEE_MASK_NOZONECHECKS DS_WriteLog "-" "" $LogFile DS_WriteLog "I" "End of script" $LogFile |
Execute the script as follows, for example:
powershell.exe -file C:\Temp\Citrix\ProvisioningServer\Configure_CitrixProvisioningServer.ps1
In case you get a security warning, set the execution policy to allow the script to run:
powershell.exe -executionpolicy bypass -file C:\Temp\Citrix\ProvisioningServer\Configure_CitrixProvisioningServer.ps1
Log files are created in the directory C:\Logs\Citrix_Provisioning_Server_(configure), but you can change this to any directory you want (see lines 501 and 502).
This concludes this article on the Citrix Provisioning Server unattended installation. You can customize the scripts in this article in any way you see fit.
I strongly recommend to read Carl Stalhood’s very detailed installation procedure for Provisioning Server 7.16: https://www.carlstalhood.com/provisioning-services-server-install/.
If you want to go one step further and create an SCCM package, please follow the step-by-step explanation in the article Deep dive creating SCCM packages for Citrix.
If you have any questions or recommendations please leave a comment below. Happy scripting!
Dennis Span works as a Lead Account Technology Strategist at Cloud Software Group in Vienna, Austria. He holds multiple Citrix certifications (CCE-V). Dennis has been a Citrix Technology Advocate (CTA) since 2017 (+ one year as Citrix Technology Professional, CTP). Besides his interest in virtualization technologies and blogging, he loves spending time with his family as well as snowboarding, playing basketball and rowing. He is fluent in Dutch, English, German and Slovak and speaks some Spanish.

Pingback: Detailed Change Log – Carl Stalhood
Pingback: EUC Weekly Digest – May 20, 2017 – Carl Stalhood
Pingback: Provisioning Services 7.13 – Server Install – Carl Stalhood
I read this piece of writing fully on the topic of the resemblance of latest and preceding technologies, it’s awesome article.
Thanks a lot Julian!
Pingback: Citrix Provisioning Services Installation_7.15 LTSR – Digital Cloud Zone
really nice piece of work, combining that alltogether with what is available in EUC and github, will make a really nice piece of tool once combined into modules. having this glued together with DSC and there is a masterpiece ready 😉
Sounds great Piotr! Once you are finished with your master piece and if you are allowed to share it, please do! Powodzenia!
btw. configWizard.exe may fail in so many occasions, when the prerequisities are not met, that it might be even pointless to enunmerate the conditions here.
just be sure that prereqs are in place.
* in my circumstances, based on the testing which were done, it is not assigning the db_reader, db_writer permissions on the sql side of things, so this is one of the aspects you have to take care by yourself.
* I’m also curious what is the way it is querying for LS1,LS2,LS3 values – I guess the querry goes to the database, and then show in the gui during the JoinFarm execution.
regards from PL
Pingback: Scripting the complete list of Citrix components with PowerShell - Dennis Span
Pingback: Citrix App Layering Agent unattended installation - Dennis Span
Hi Dennis,
Nice script!
Do you think your script needs much customization for 7.16?
Hi Jonas,
Thanks! All scripts also work for Provisioning Server 7.16. I have just successfully tested all scripts with the 7.16 sources (without making any changes to the scripts) and I have updated the article to 7.16 as well.
it also works with 18XX.
Thanks a lot for the feedback Piotr! That is great to hear. I have to update this article to the latest version but I did not have time yet. 😉
Absolutely great article, very well explained! Thanks a lot. Scripting these kinds of software can make life easier 🙂
Thank you for your kind words Jean-Marc! I am happy you like the article.
Great article, have you encountered any issues with 7.18 on windows server 2016 connecting to the ESX Hosting?
I can not even connect with the local IE to the FQDN of the ESX management server, I have imported the certificate to trusted people.
Hi Richie,
First of all thanks! Secondly, no, I did not test XenDesktop 7.18 on VMWare ESX yet. Perhaps you can be more specific about your issue. You say you cannot even connect to the ESX management Server (we are talking about vCenter, right?) from your local IE. Are you sure XenDesktop is the issue here? Just asking.
Dennis, I found your excellent site of information whilst searching an issue I am facing today with new Windows Server 2016 builds, using the Citrix XenApp and Provioning Services 7.18 installations. I do not necessarily think the unkown underlying issue is directly realted to the Citrix installations. Both XenApp and PVS fail on their Hosting connections with the Citrix consoles, please be aware that the SQL databases they are connecting to are the same as before the upgrade. As a simple troubleshooting step, I tried from the new Windows Server 2016 CDC or PVS VM to connect natively via the OS and IE to the vSphere Client via the https://FQDN and I get an IE errorPage Cannot be displayed… turn on TLS…. I have imported the FQDN certificate to the Trusted Publishers store. I thinik there is something with the Windows Server 2016 Build and maybe its Firewall that is stopping the Citrix Hosting from working. Any ideas most welcomed… Richie
Hi Richie, since I do not know your environment, it is not possible for me to provide you with a definite answer. The main issue seems to be that you cannot reach your vCenter Server (and I do assume you are talking about vCenter and not the actual vSphere client) independent from Citrix XenApp/XenDesktop. You mentioned you may have an issue with your (local Windows?) firewall. Can you turn it off and test once again? Also, even if the local machine does not trust the certificate of the VMWare vCenter Server, you still should be able to reach the vCenter website. The reason for the “Page cannot be displayed” notification may be your proxy settings. Do you have any proxy settings configured on the Delivery Controller or PVS server? You definitely first have to solve the issue of not being able to reach your VMWare vCenter Server from a local browser.
I traced it down to the new 2016 build having a number of weak ciphers suites removed, and the one ESXi 6.0 is using is one of them……
I traced the issue back to the new Server 2016 Build having a number of Weak SSL Cipher Suites removed via GPO. The ESXi is using one of them, now I need to get the vSphere guys to change from the weak suite….
Thanks for the feedback Richie. Keep me posted!
dbowner for configuration…
* once the SOAP account runs under the AD user account, and you set the dbowner permissions on the SQL side of things, you can not add/import existing vdisks into the PVS server.
* this is solved once the db_datareder and db_datawriter permissions are set for the PVS database against that service user.
That is correct. I always make sure that the service account that I use for the SOAP and streaming service is a member of the PVS farm administrators group. This way you do not have to worry about permission issues.
please be aware or at least test what you have in front of you as kind of documentation when you run configwizard.exe /c with what you get with configwizard.exe /s – as you might end up surprised like I did for the IPServiceType parameters….
I was able to get the Install and Farm Create/Join scripts to work with 2112.
In the Install Citrix Provisioning Server script, I had to update the arguments to suppress reboots.
Here are the changes:
Line 216> $Arguments = “/s /v””/qn /l $LogDir\Install_PVS_Console.log”””
CHANGED TO
$Arguments = “/s /v””REBOOT=ReallySuppress /qn /l $LogDir\Install_PVS_Console.log”””
Line 228> $Arguments = “/s /v””/qn /l $LogDir\Install_PVS_Server.log”””
CHANGED TO
$Arguments = “/s /v””REBOOT=ReallySuppress /qn /l $LogDir\Install_PVS_Server.log”””
Thanks a lot for this James!