
The installation and configuration of all Citrix products can be automated. This article covers the Citrix License Server unattended installation with PowerShell and SCCM.
| Change Log 23.05.2017: updated to License Server version (11.14.0.1 Build 20104). 31.08.2017: updated to License Server version (11.14.0.1 Build 21103), XD 7.15. 15.01.2018: updated to License Server version (11.14.0.1 Build 22103), XD 7.16. 09.05.2018: new section added: Troubleshooting and Support |
| Table of Contents |
Before continuing with this article please be aware of the following:
- The version of Citrix License Server in this article is 11.14.0.1 build 22103 (released on the 28th of November 2017).
- The software can be downloaded here:
https://www.citrix.com/downloads/licensing/ - The installation and configuration scripts are designed for the following operating systems:
- Microsoft Windows Server 2008 R2 SP1
- Microsoft Windows Server 2012 R2
- Microsoft Windows Server 2016
- The installation and configuration script have been tested on the following operating systems:
- Microsoft Windows Server 2008 R2 SP1
- Microsoft Windows Server 2016
- The assumption is that you execute the example script in this article on a server which has been pre-installed with one of the aforementioned operating systems including all latest hotfixes.
This article contains two separate scripts; one for the installation of the Windows Roles and Features (optional) and one for the installation and configuration of Citrix License Server.
Part 1: Install Windows Roles and Features (optional)
Before we install the Citrix License Server software, I recommend to install some commonly used roles and features. This step is not absolutely necessary, but I recommend to do it anyway.
In this example we will install the following features:
- .Net Framework 3.5.1 (for W2K8R2)
- .Net Framework 4.5.x (for W2K12 and W2K16 only)
- Desktop experience (for W2K8R2 and W2K12 only)
- Group Policy Management Console
- Remote Server Administration Tools (AD DS Snap-Ins)
- Remote Desktop License Server
- Remote Desktop Licensing Tools
- Telnet Client
- Windows Process Activation Service
As you can see, the Remote Desktop License Server role is added to the Citrix License Server. You can remove this role if you do not need it. As a matter of fact, you can remove any role or feature you do not require.
Please be aware that the Remote Desktop License Server and the Remote Desktop Licensing Tools are two different things.
In PowerShell, roles and features are installed using the Add-WindowsFeature (Windows Server 2008 R2) or Install-WindowsFeature command (Windows Server 2012 and higher). For example:
Windows Server 2008 (R2):
|
1 |
Add-WindowsFeature NET-Framework-Core,Desktop-Experience,GPMC,RSAT-ADDS-Tools,RDS-Licensing,RSAT-RDS-Licensing,WAS,Telnet-Client |
Windows Server 2012 (R2):
|
1 |
Install-WindowsFeature NET-Framework-45-Core,Desktop-Experience,GPMC,RSAT-ADDS-Tools,RDS-Licensing,RDS-Licensing-UI,WAS,Telnet-Client |
Windows Server 2016:
|
1 |
Install-WindowsFeature NET-Framework-45-Core,GPMC,RSAT-ADDS-Tools,RDS-Licensing,RDS-Licensing-UI,WAS,Telnet-Client |
The names of the individual roles and features differ between the various operating systems:
- .Net Framework:
- Windows Server 2008 R2 only offers version 3.5.1 (Add-WindowsFeature command NET-Framework-Core)
- Windows Server 2012 (R2) offers both the versions 3.5.1 and 4.5.x (Install-WindowsFeature command NET-Framework-Core and NET-Framework-45-Core), but I only install the 4.5.x version.
- Windows Server 2016 only offers version 4.5.x (Install-WindowsFeature command NET-Framework-45-Core)
- Desktop-Experience:
This feature no longer exists as a separate item in Windows Server 2016. Let me clarify; when you use the full version of Windows Server 2016 (not the core/nano version), desktop experience is included out-of-the-box. - Remote Desktop Licensing Tools:
In Windows Server 2008 (R2), this abbreviation of this feature is called RSAT-RDS-Licensing. In Windows Server 2012 and higher, this feature is called RDS-Licensing-UI.
To establish the version of the running operating system, I use the following PowerShell command:
|
1 |
[string]$WindowsVersion = ( Get-WmiObject -class Win32_OperatingSystem ).Version |
In case you use my installation template, this is what the complete script, including logging, looks like:
|
1 2 3 4 5 6 7 8 9 10 11 12 13 14 15 16 17 18 19 20 21 22 23 24 25 26 27 28 29 30 31 32 33 34 35 36 37 38 39 40 41 42 43 44 45 46 47 48 49 50 51 52 53 54 55 56 57 58 59 60 61 62 63 64 65 66 67 68 69 70 71 72 73 74 75 76 77 78 79 80 81 82 83 84 85 86 87 88 89 90 91 92 93 94 95 96 97 98 99 100 101 102 103 104 105 106 107 108 109 110 111 112 113 114 115 116 117 118 119 120 121 122 123 124 125 126 127 128 129 130 131 132 133 134 135 136 137 138 139 140 141 142 143 144 145 146 147 148 149 150 151 152 153 154 155 156 157 158 159 160 161 162 163 164 165 166 167 168 169 170 171 172 173 174 175 176 177 178 179 180 181 182 183 184 185 186 187 188 189 190 191 192 193 194 195 196 197 198 199 200 201 202 203 204 205 206 207 208 209 210 211 212 213 214 215 216 217 218 219 220 221 222 223 224 225 226 227 228 229 230 231 232 233 234 235 236 237 238 239 240 241 242 243 244 245 246 247 248 249 |
#========================================================================== # # Installation of Microsoft Roles and Features for Citrix License Server # # AUTHOR: Dennis Span (https://dennisspan.com) # DATE : 16.03.2017 # # COMMENT: # This script installs the following roles: # -.Net Framework 3.5 (W2K8R2 only)" # -.Net Framework 4.6 (W2K12 + W2K16)" # -Desktop experience (W2K8R2 + W2K12)" # -Group Policy Management Console" # -Remote Server Administration Tools (AD DS Snap-Ins)" # -Remote Desktop License Server" # -Remote Desktop Licensing Tools" # -Telnet Client" # -Windows Process Activation Service" # # This script has been prepared for Windows Server 2008 R2, 2012 R2 and 2016. # #========================================================================== # Get the script parameters if there are any param ( # The only parameter which is really required is 'Uninstall' # If no parameters are present or if the parameter is not # 'uninstall', an installation process is triggered [string]$Installationtype ) # define Error handling # note: do not change these values $global:ErrorActionPreference = "Stop" if($verbose){ $global:VerbosePreference = "Continue" } # FUNCTION DS_WriteLog #========================================================================== Function DS_WriteLog { <# .SYNOPSIS Write text to this script's log file .DESCRIPTION Write text to this script's log file .PARAMETER InformationType This parameter contains the information type prefix. Possible prefixes and information types are: I = Information S = Success W = Warning E = Error - = No status .PARAMETER Text This parameter contains the text (the line) you want to write to the log file. If text in the parameter is omitted, an empty line is written. .PARAMETER LogFile This parameter contains the full path, the file name and file extension to the log file (e.g. C:\Logs\MyApps\MylogFile.log) .EXAMPLE DS_WriteLog -InformationType "I" -Text "Copy files to C:\Temp" -LogFile "C:\Logs\MylogFile.log" Writes a line containing information to the log file .Example DS_WriteLog -InformationType "E" -Text "An error occurred trying to copy files to C:\Temp (error: $($Error[0]))" -LogFile "C:\Logs\MylogFile.log" Writes a line containing error information to the log file .Example DS_WriteLog -InformationType "-" -Text "" -LogFile "C:\Logs\MylogFile.log" Writes an empty line to the log file #> [CmdletBinding()] Param( [Parameter(Mandatory=$true, Position = 0)][String]$InformationType, [Parameter(Mandatory=$true, Position = 1)][AllowEmptyString()][String]$Text, [Parameter(Mandatory=$true, Position = 2)][AllowEmptyString()][String]$LogFile ) $DateTime = (Get-Date -format dd-MM-yyyy) + " " + (Get-Date -format HH:mm:ss) if ( $Text -eq "" ) { Add-Content $LogFile -value ("") # Write an empty line } Else { Add-Content $LogFile -value ($DateTime + " " + $InformationType + " - " + $Text) } } #========================================================================== ################ # Main section # ################ # Disable File Security $env:SEE_MASK_NOZONECHECKS = 1 # Custom variables [edit] $BaseLogDir = "C:\Logs" # [edit] add the location of your log directory here $PackageName = "Citrix License Server Roles" # [edit] enter the display name of the software (e.g. 'Arcobat Reader' or 'Microsoft Office') # Global variables $StartDir = $PSScriptRoot # the directory path of the script currently being executed if (!($Installationtype -eq "Uninstall")) { $Installationtype = "Install" } $LogDir = (Join-Path $BaseLogDir $PackageName).Replace(" ","_") $LogFileName = "$($Installationtype)_$($PackageName).log" $LogFile = Join-path $LogDir $LogFileName # Create the log directory if it does not exist if (!(Test-Path $LogDir)) { New-Item -Path $LogDir -ItemType directory | Out-Null } # Create new log file (overwrite existing one) New-Item $LogFile -ItemType "file" -force | Out-Null DS_WriteLog "I" "START SCRIPT - $Installationtype $PackageName" $LogFile DS_WriteLog "-" "" $LogFile ################################################# # INSTALL MICROSOFT ROLES AND FEATURES # ################################################# DS_WriteLog "I" "Add Windows roles and features:" $LogFile DS_WriteLog "I" "-.Net Framework 3.5 (W2K8R2 only)" $LogFile DS_WriteLog "I" "-.Net Framework 4.6 (W2K12 + W2K16)" $LogFile DS_WriteLog "I" "-Desktop experience (W2K8R2 + W2K12)" $LogFile DS_WriteLog "I" "-Group Policy Management Console" $LogFile DS_WriteLog "I" "-Remote Server Administration Tools (AD DS Snap-Ins)" $LogFile DS_WriteLog "I" "-Remote Desktop License Server" $LogFile DS_WriteLog "I" "-Remote Desktop Licensing Tools" $LogFile DS_WriteLog "I" "-Telnet Client" $LogFile DS_WriteLog "I" "-Windows Process Activation Service" $LogFile DS_WriteLog "-" "" $LogFile DS_WriteLog "I" "Retrieve the OS version and name" $LogFile # Check the windows version # URL: https://en.wikipedia.org/wiki/List_of_Microsoft_Windows_versions # -Windows Server 2016 -> NT 10.0 # -Windows Server 2012 R2 -> NT 6.3 # -Windows Server 2012 -> NT 6.2 # -Windows Server 2008 R2 -> NT 6.1 # -Windows Server 2008 -> NT 6.0 [string]$WindowsVersion = ( Get-WmiObject -class Win32_OperatingSystem ).Version switch -wildcard ($WindowsVersion) { "*10*" { $OSVER = "W2K16" $OSName = "Windows Server 2016" $LogFile2 = Join-Path $LogDir "Install_RolesAndFeatures.log" DS_WriteLog "I" "The current operating system is $($OSNAME) ($($OSVER))" $LogFile DS_WriteLog "-" "" $LogFile DS_WriteLog "I" "Roles and Features installation log file: $LogFile2" $LogFile DS_WriteLog "I" "Start the installation ..." $LogFile # Install Windows Features try { Install-WindowsFeature NET-Framework-45-Core,GPMC,RSAT-ADDS-Tools,RDS-Licensing,RDS-Licensing-UI,WAS,Telnet-Client -logpath $LogFile2 DS_WriteLog "S" "The windows features were installed successfully!" $LogFile } catch { DS_WriteLog "E" "An error occurred while installing the windows features (error: $($error[0]))" $LogFile Exit 1 } } "*6.3*" { $OSVER = "W2K12R2" $OSName = "Windows Server 2012 R2" $LogFile2 = Join-Path $LogDir "Install_RolesAndFeatures.log" DS_WriteLog "I" "The current operating system is $($OSNAME) ($($OSVER))" $LogFile DS_WriteLog "-" "" $LogFile DS_WriteLog "I" "Roles and Features installation log file: $LogFile2" $LogFile DS_WriteLog "I" "Start the installation ..." $LogFile # Install Windows Features try { Install-WindowsFeature NET-Framework-45-Core,Desktop-Experience,GPMC,RSAT-ADDS-Tools,RDS-Licensing,RDS-Licensing-UI,WAS,Telnet-Client -logpath $LogFile2 DS_WriteLog "S" "The windows features were installed successfully!" $LogFile } catch { DS_WriteLog "E" "An error occurred while installing the windows features (error: $($error[0]))" $LogFile Exit 1 } } "*6.2*" { $OSVER = "W2K12" $OSName = "Windows Server 2012" $LogFile2 = Join-Path $LogDir "Install_RolesAndFeatures.log" DS_WriteLog "I" "The current operating system is $($OSNAME) ($($OSVER))" $LogFile DS_WriteLog "-" "" $LogFile DS_WriteLog "I" "Roles and Features installation log file: $LogFile2" $LogFile DS_WriteLog "I" "Start the installation ..." $LogFile # Install Windows Features try { Install-WindowsFeature NET-Framework-45-Core,Desktop-Experience,GPMC,RSAT-ADDS-Tools,RDS-Licensing,RDS-Licensing-UI,WAS,Telnet-Client -logpath $LogFile2 DS_WriteLog "S" "The windows features were installed successfully!" $LogFile } catch { DS_WriteLog "E" "An error occurred while installing the windows features (error: $($error[0]))" $LogFile Exit 1 } } "*6.1*" { $OSVER = "W2K8R2" $OSName = "Windows Server 2008 R2" $LogFile2 = Join-Path $LogDir "Install_RolesAndFeatures.log" DS_WriteLog "I" "The current operating system is $($OSNAME) ($($OSVER))" $LogFile DS_WriteLog "-" "" $LogFile DS_WriteLog "I" "Roles and Features installation log file: $LogFile2" $LogFile DS_WriteLog "I" "Start the installation ..." $LogFile # Install Windows Features try { Add-WindowsFeature NET-Framework-Core,Desktop-Experience,GPMC,RSAT-ADDS-Tools,RDS-Licensing,RSAT-RDS-Licensing,WAS,Telnet-Client -logpath $LogFile2 DS_WriteLog "S" "The windows features were installed successfully!" $LogFile } catch { DS_WriteLog "E" "An error occurred while installing the windows features (error: $($error[0]))" $LogFile Exit 1 } } "*6.0*" { $OSVER = "W2K8" $OSName = "Windows Server 2008" $LogFile2 = Join-Path $LogDir "Install_RolesAndFeatures.log" DS_WriteLog "I" "The current operating system is $($OSNAME) ($($OSVER))" $LogFile DS_WriteLog "-" "" $LogFile DS_WriteLog "I" "Roles and Features installation log file: $LogFile2" $LogFile DS_WriteLog "I" "Start the installation ..." $LogFile # Install Windows Features try { Add-WindowsFeature NET-Framework-Core,Desktop-Experience,GPMC,RSAT-ADDS-Tools,RDS-Licensing,RSAT-RDS-Licensing,WAS,Telnet-Client -logpath $LogFile2 DS_WriteLog "S" "The windows features were installed successfully!" $LogFile } catch { DS_WriteLog "E" "An error occurred while installing the windows features (error: $($error[0]))" $LogFile Exit 1 } } default { $OSName = ( Get-WmiObject -class Win32_OperatingSystem ).Caption DS_WriteLog "E" "The current operating system $($OSName) is unsupported" $LogFile DS_WriteLog "I" "This script will now be terminated" $LogFile DS_WriteLog "-" "" $LogFile Exit 1 } } # Enable File Security Remove-Item env:\SEE_MASK_NOZONECHECKS DS_WriteLog "-" "" $LogFile DS_WriteLog "I" "End of script" $LogFile |
Execute the script as follows:
powershell.exe -executionpolicy bypass -file %Directory%\Install_Citrix_LicenseServer_Roles.ps1
Log files are created in the directory C:\Logs\Citrix_License_Server_Roles, but you can change this to any directory you want (see lines 63 and 64).
| Note: The installation of the roles and features requires a reboot. The reboot is NOT part of the example script. You can either add it to the script yourself, or if you use a deployment tool such as Microsoft SCCM, you can add a reboot task in the task sequence. |
If you want to go one step further and create an SCCM package as well, please follow the step-by-step explanation in the article Deep dive creating SCCM packages for Citrix.
Part 2: Install and configure Citrix License Server:
This second script focuses on the installation and configuration of the Citrix License Server. So how do you start?
- Create an installation directory on the local computer or on a file share (UNC path). For example: C:\Temp\Citrix\LicenseServer.
- Create a subdirectory called Files and add the following source files:
- Citrix License Server installation files (download here):
- CitrixLicensing.exe
- CTX_Licensing.msi
- PowerShell snap-ins for the Citrix License Server:
Run the installation file LicensingAdmin_PowerShellSnapin_x64.msi. This file contains the PowerShell snap-ins for the Citrix License Server. This file is included in the XenDesktop 7.x ISO file. The ISO file for the version XenDesktop 7.16 can be downloaded here. Extract the file; the MSI file is located in the directory x64\Licensing. - Citrix license file(s):
Add one or more Citrix license files. The PowerShell script below will copy all files ending with the LIC extension to the subdirectory Licensing\MyFiles of the installation directory (which by default is C:\Program Files (x86)\Citrix).
- Citrix License Server installation files (download here):

- Copy the PowerShell script at the end of this article to a new PS1 file and add this file to the root of your installation directory (not in the subdirectory Files).

- Execute the script:
powershell.exe -executionpolicy bypass -file C:\Temp\Citrix\LicenseServer\Install_CitrixLicenseServer.ps1
The script consists of four parts. The last paragraph of this article contains the complete script:
- Install Citrix License Server
- Install Citrix Licensing PowerShell Snapin
- Copy Citrix license files
- Configure Citrix License Server
- Complete script
The Citrix License Server can be installed as a stand-alone package or from the XenDesktop 7.x ISO file. I choose the stand-alone version. It can be download here: https://www.citrix.com/downloads/licensing/.
The installation can be triggered by either the CitrixLicensing.exe or the CTX_Licensing.msi. I use the CitrixLicensing.exe. For a complete overview of all available installation parameters for both the CitrixLicensing.exe and the CTX_Licensing.msi, see the following Citrix article:
https://docs.citrix.com/en-us/licensing/11-14/getting-started.html#install-components.
In the installation script I added the parameter to configure the four main ports:
- $LSPORT = “27000” # LSPORT is the port number used for the License Server. Optional parameter. The default is 27000.
- $VDPORT = “7279” # VDPORT is the port number used for the vendor daemon. Optional parameter. The default is 7279.
- $MCPORT = “8082” # MCPORT is the port number used for the console. Optional parameter. The default is 8082.
- $WSLPORT = “8083” # WSLPORT is the port number used for the Web Services for Licensing. Optional parameter. The default is 8083.
You can customize this anyway you see fit (lines 349 to 352 in the complete installation script).
The built-in firewall is configured automatically.
The installation command line is as follows:
|
1 |
CitrixLicensing.exe /quiet WSLPORT=8083 LSPORT=27000 VDPORT=7279 MCPORT=8082 /l C:\Logs\Citrix_License_Server\Install_CitrixLicenseServer_EXE.log |
The lines 337 to 367 in the complete installation script below cover the installation of the Citrix License Server.
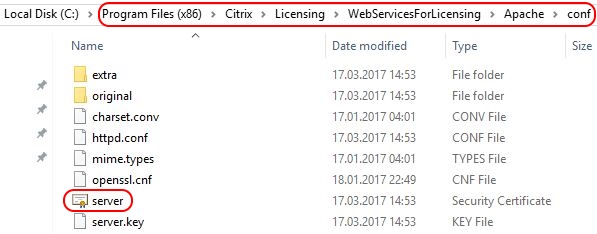
| Note: During installation, a self-signed certificate is generated that is used by the Apache web server to enable a connection through SSL. This self-signed certificate is located in the following directory: C:\Program Files (x86)\Citrix\Licensing\WebServicesForLicensing\Apache\conf Follow the procedure in the following Citrix article to replace the self-signed certificate with your own certificate: https://docs.citrix.com/en-us/licensing/11-14/getting-started.html#lic-mgmt-service.
|
Install Citrix Licensing PowerShell Snapin
When using the stand-alone license server software, the Windows PowerShell snap-in Citrix.Licensing.Admin.V1 is not part of the downloaded files. You can install this snap-in separately by executing the file LicensingAdmin_PowerShellSnapin_x64.msi. This MSI file is included in the XenDesktop ISO file in the subdirectory “x64\Licensing” (you first have to extract the ISO file). The ISO file for the version XenDesktop 7.16 can be downloaded here.
As with most Citrix products, before you can use the various PowerShell functions, you first have to load the Citrix snap-in(s). Enter the following command in the PowerShell console:
asnp citrix*
Please note that the complete installation script below already includes this command.
To see all available cmdlets within the Citrix.Licensing.Admin.V1 snap-in, enter the following PowerShell command:
|
1 2 3 |
asnp citrix* get-command -all -commandtype cmdlet | where-object {$_.modulename -like "*citrix*"} |
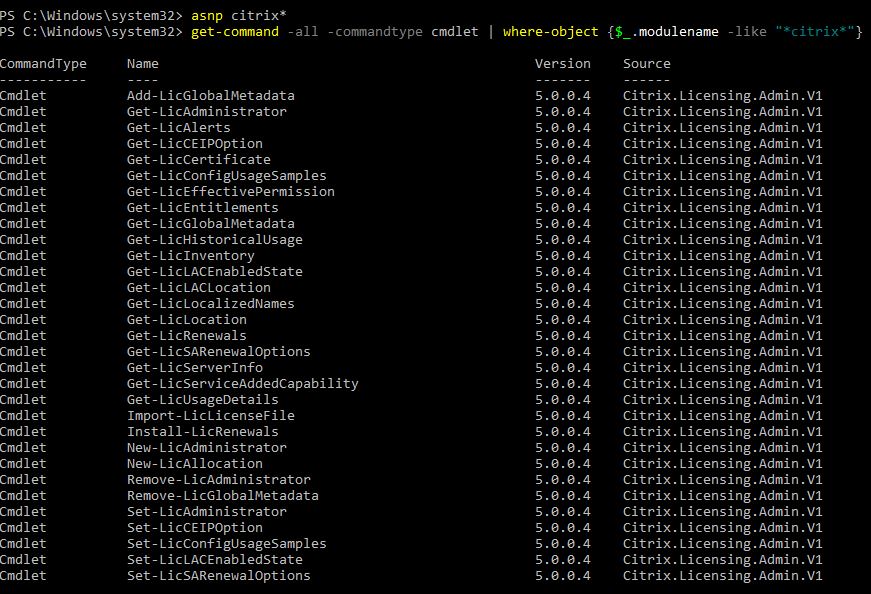
The lines 373 to 387 in the complete installation script below cover the installation of the Citrix Licensing PowerShell Snapin.
This part of the script copies your Citrix license files, all files ending with the LIC extension, to the subdirectory Licensing\MyFiles of the installation directory (which by default is C:\Program Files (x86)\Citrix).
In the script I use the same directory as the Citrix License Server installation files, but you can use any source directory you want including UNC paths.
Before I copy the files, I stop the three Citrix License Server services which are started automatically (using the function DS_StopService):
- Citrix Licensing
- CitrixWebServicesforLicensing
- CtxLSPortSvc
After the files are copied, I again start these services (using the function DS_StartService).
| Note: The functions DS_StopService and DS_StartService also checks for depend services. In case the service contains a depend service, this depend service is stopped or started first before the main service is stopped or started. |
The lines 393 to 436 in the complete installation script below cover the copy action of the Citrix license files.
Configure Citrix License Server
The last part of the script focuses on the customization of the license server. The one thing I customize is disabling the Citrix Customer Experience Improvement Program (CEIP).
For some reason, Citrix no longer allows the administrator to disable CEIP during installation. The only two possible values during installation are:
- Diagnostic – Call Home
- Anonymous – CEIP
Anonymous (CEIP) is the default value. For example:
CitrixLicensing.exe /quiet /l C:\Logs\install.log INSTALLDIR=installdirectory WSLPORT=port_number LSPORT=port_number VDPORT=port_number MCPORT=port_number CEIPOPTIN=Diagnostics
The value None is no longer available during installation and can only be configured afterwards using a PowerShell command.
Use the following command to see the current CEIP configuration:
|
1 2 3 |
asnp citrix* Get-LicCEIPOption -AdminAddress "https://localhost:8083" -CertHash $(Get-LicCertificate -AdminAddress "https://localhost:8083").CertHash |
When configuring CEIP using PowerShell, the following three options are available:
- None
- Anonymous
- Diagnostic
To disable CEIP, run the following PowerShell command using the None option:
|
1 2 3 |
asnp citrix* Set-LicCEIPOption -AdminAddress "https://localhost:8083" -CEIPOption "None" -CertHash $(Get-LicCertificate -AdminAddress "https://localhost:8083").CertHash |
If you want to run this command from a remote server, you have to replace localhost for your server name + fully qualified domain name (e.g. myserver.mycompany.com).
In the complete installation script I disable CEIP by setting it to None (see line 460).
Please note that I am not stating that CEIP should be disabled! I am only showing you how to do it in case you want to.
Refer to the Citrix documentation for more information. I recommend to read the section Use the Windows command line to install licensing in the article Get started, install, and configure the License Server.
The lines 442 to 465 in the complete installation script below cover the configuration of the Citrix License Server.
In case you use my installation template, this is what the complete script, including logging and a stop-start functions for (depend) services, looks like:
|
1 2 3 4 5 6 7 8 9 10 11 12 13 14 15 16 17 18 19 20 21 22 23 24 25 26 27 28 29 30 31 32 33 34 35 36 37 38 39 40 41 42 43 44 45 46 47 48 49 50 51 52 53 54 55 56 57 58 59 60 61 62 63 64 65 66 67 68 69 70 71 72 73 74 75 76 77 78 79 80 81 82 83 84 85 86 87 88 89 90 91 92 93 94 95 96 97 98 99 100 101 102 103 104 105 106 107 108 109 110 111 112 113 114 115 116 117 118 119 120 121 122 123 124 125 126 127 128 129 130 131 132 133 134 135 136 137 138 139 140 141 142 143 144 145 146 147 148 149 150 151 152 153 154 155 156 157 158 159 160 161 162 163 164 165 166 167 168 169 170 171 172 173 174 175 176 177 178 179 180 181 182 183 184 185 186 187 188 189 190 191 192 193 194 195 196 197 198 199 200 201 202 203 204 205 206 207 208 209 210 211 212 213 214 215 216 217 218 219 220 221 222 223 224 225 226 227 228 229 230 231 232 233 234 235 236 237 238 239 240 241 242 243 244 245 246 247 248 249 250 251 252 253 254 255 256 257 258 259 260 261 262 263 264 265 266 267 268 269 270 271 272 273 274 275 276 277 278 279 280 281 282 283 284 285 286 287 288 289 290 291 292 293 294 295 296 297 298 299 300 301 302 303 304 305 306 307 308 309 310 311 312 313 314 315 316 317 318 319 320 321 322 323 324 325 326 327 328 329 330 331 332 333 334 335 336 337 338 339 340 341 342 343 344 345 346 347 348 349 350 351 352 353 354 355 356 357 358 359 360 361 362 363 364 365 366 367 368 369 370 371 372 373 374 375 376 377 378 379 380 381 382 383 384 385 386 387 388 389 390 391 392 393 394 395 396 397 398 399 400 401 402 403 404 405 406 407 408 409 410 411 412 413 414 415 416 417 418 419 420 421 422 423 424 425 426 427 428 429 430 431 432 433 434 435 436 437 438 439 440 441 442 443 444 445 446 447 448 449 450 451 452 453 454 455 456 457 458 459 |
#========================================================================== # # Installation and configuration of Citrix License Server # # AUTHOR: Dennis Span (https://dennisspan.com) # DATE : 16.03.2017 # # COMMENT: # This script has been prepared for Windows Server 2008 R2, 2012 R2 and 2016. # #========================================================================== # Get the script parameters if there are any param ( # The only parameter which is really required is 'Uninstall' # If no parameters are present or if the parameter is not # 'uninstall', an installation process is triggered [string]$Installationtype ) # define Error handling # note: do not change these values $global:ErrorActionPreference = "Stop" if($verbose){ $global:VerbosePreference = "Continue" } # FUNCTION DS_WriteLog #========================================================================== Function DS_WriteLog { <# .SYNOPSIS Write text to this script's log file .DESCRIPTION Write text to this script's log file .PARAMETER InformationType This parameter contains the information type prefix. Possible prefixes and information types are: I = Information S = Success W = Warning E = Error - = No status .PARAMETER Text This parameter contains the text (the line) you want to write to the log file. If text in the parameter is omitted, an empty line is written. .PARAMETER LogFile This parameter contains the full path, the file name and file extension to the log file (e.g. C:\Logs\MyApps\MylogFile.log) .EXAMPLE DS_WriteLog -InformationType "I" -Text "Copy files to C:\Temp" -LogFile "C:\Logs\MylogFile.log" Writes a line containing information to the log file .Example DS_WriteLog -InformationType "E" -Text "An error occurred trying to copy files to C:\Temp (error: $($Error[0]))" -LogFile "C:\Logs\MylogFile.log" Writes a line containing error information to the log file .Example DS_WriteLog -InformationType "-" -Text "" -LogFile "C:\Logs\MylogFile.log" Writes an empty line to the log file #> [CmdletBinding()] Param( [Parameter(Mandatory=$true, Position = 0)][ValidateSet("I","S","W","E","-",IgnoreCase = $True)][String]$InformationType, [Parameter(Mandatory=$true, Position = 1)][AllowEmptyString()][String]$Text, [Parameter(Mandatory=$true, Position = 2)][AllowEmptyString()][String]$LogFile ) $DateTime = (Get-Date -format dd-MM-yyyy) + " " + (Get-Date -format HH:mm:ss) if ( $Text -eq "" ) { Add-Content $LogFile -value ("") # Write an empty line } Else { Add-Content $LogFile -value ($DateTime + " " + $InformationType.ToUpper() + " - " + $Text) } } #========================================================================== # FUNCTION DS_StopService #========================================================================== Function DS_StopService { <# .SYNOPSIS Stop a service (including depend services) .DESCRIPTION Stop a service (including depend services) .PARAMETER ServiceName This parameter contains the name of the service (not the display name!) to stop, for example 'Spooler' or 'TermService'. Depend services are stopped automatically as well. Depend services do not need to be specified separately. The function will retrieve them automatically. .EXAMPLE DS_StopService -ServiceName "Spooler" Stops the service 'Spooler' (display name: 'Print Spooler') #> [CmdletBinding()] Param( [Parameter(Mandatory=$true, Position = 0)][String]$ServiceName ) DS_WriteLog "I" "Stop service '$ServiceName' ..." $LogFile # Check if the service exists If ( Get-Service $ServiceName -erroraction silentlycontinue) { # Stop the main service If ( ((Get-Service $ServiceName -ErrorAction SilentlyContinue).Status) -eq "Running" ) { # Check for depend services and stop them first DS_WriteLog "I" "Check for depend services for service '$ServiceName' and stop them" $LogFile $DependServices = ( ( Get-Service -Name $ServiceName -ErrorAction SilentlyContinue ).DependentServices ).name If ( $DependServices.Count -gt 0 ) { foreach ( $Service in $DependServices ) { DS_WriteLog "I" "Depend service found: $Service" $LogFile DS_StopService -ServiceName $Service } } else { DS_WriteLog "I" "No depend service found" $LogFile } # Stop the (depend) service try { Stop-Service $ServiceName | out-Null } catch { DS_WriteLog "E" "An error occurred trying to stop the service $ServiceName (error: $($Error[0]))" $LogFile Exit 1 } # Check if the service stopped successfully If (((Get-Service $ServiceName -ErrorAction SilentlyContinue).Status) -eq "Stopped" ) { DS_WriteLog "I" "The service $ServiceName was stopped successfully" $LogFile } else { DS_WriteLog "E" "An error occurred trying to stop the service $ServiceName (error: $($Error[0]))" $LogFile Exit 1 } } else { DS_WriteLog "I" "The service '$ServiceName' is not running" $LogFile } } else { DS_WriteLog "E" "The service '$ServiceName' does not exist" $LogFile Exit 1 } } #========================================================================== # FUNCTION DS_StartService #========================================================================== Function DS_StartService { <# .SYNOPSIS Starts a service (including depend services) .DESCRIPTION Starts a service (including depend services) .PARAMETER ServiceName This parameter contains the name of the service (not the display name!) to startp, for example 'Spooler' or 'TermService'. Depend services are started automatically as well. Depend services do not need to be specified separately. The function will retrieve them automatically. .EXAMPLE DS_StartService -ServiceName "Spooler" Starts the service 'Spooler' (display name: 'Print Spooler') #> [CmdletBinding()] Param( [Parameter(Mandatory=$true, Position = 0)][String]$ServiceName ) DS_WriteLog "I" "Start service $ServiceName ..." $LogFile # Check if the service exists If ( Get-Service $ServiceName -erroraction silentlycontinue) { # Start the main service If (((Get-Service $ServiceName -ErrorAction SilentlyContinue).Status) -eq "Running" ) { DS_WriteLog "I" "The service $ServiceName is already running" $LogFile } else { # Check for depend services and start them first DS_WriteLog "I" "Check for depend services for service $ServiceName and start them" $LogFile $DependServices = ( ( Get-Service -Name $ServiceName -ErrorAction SilentlyContinue ).DependentServices ).name If ( $DependServices.Count -gt 0 ) { foreach ( $Service in $DependServices ) { DS_WriteLog "I" "Depend service found: $Service" $LogFile StartService($Service) } } else { DS_WriteLog "I" "No depend service found" $LogFile } # Start the (depend) service try { Start-Service $ServiceName | out-Null } catch { DS_WriteLog "E" "An error occurred trying to start the service $ServiceName (error: $($Error[0]))" $LogFile Exit 1 } # Check if the service started successfully If (((Get-Service $ServiceName -ErrorAction SilentlyContinue).Status) -eq "Running" ) { DS_WriteLog "I" "The service $ServiceName was started successfully" $LogFile } else { DS_WriteLog "E" "An error occurred trying to start the service $ServiceName (error: $($Error[0]))" $LogFile Exit 1 } } } else { DS_WriteLog "E" "The service $ServiceName does not exist" $LogFile Exit 1 } } #========================================================================== # FUNCTION DS_InstallOrUninstallSoftware #========================================================================== Function DS_InstallOrUninstallSoftware { <# .SYNOPSIS Install or uninstall software (MSI or SETUP.exe) .DESCRIPTION Install or uninstall software (MSI or SETUP.exe) .PARAMETER File This parameter contains the file name including the path and file extension, for example C:\Temp\MyApp\Files\MyApp.msi or C:\Temp\MyApp\Files\MyApp.exe. .PARAMETER Installationtype This parameter contains the installation type, which is either 'Install' or 'Uninstall'. .PARAMETER Arguments This parameter contains the command line arguments. The arguments list can remain empty. In case of an MSI, the following parameters are automatically included in the function and do not have to be specified in the 'Arguments' parameter: /i (or /x) /qn /norestart /l*v "c:\Logs\MyLogFile.log" .EXAMPLE DS_InstallOrUninstallSoftware -File "C:\Temp\MyApp\Files\MyApp.msi" -InstallationType "Install" -Arguments "" Installs the MSI package 'MyApp.msi' with no arguments (the function already includes the following default arguments: /i /qn /norestart /l*v $LogFile) .Example DS_InstallOrUninstallSoftware -File "C:\Temp\MyApp\Files\MyApp.msi" -InstallationType "Uninstall" -Arguments "" Uninstalls the MSI package 'MyApp.msi' (the function already includes the following default arguments: /x /qn /norestart /l*v $LogFile) .Example DS_InstallOrUninstallSoftware -File "C:\Temp\MyApp\Files\MyApp.exe" -InstallationType "Install" -Arguments "/silent /logfile:C:\Logs\MyApp\log.log" Installs the SETUP file 'MyApp.exe' #> [CmdletBinding()] Param( [Parameter(Mandatory=$true, Position = 0)][String]$File, [Parameter(Mandatory=$true, Position = 1)][AllowEmptyString()][String]$Installationtype, [Parameter(Mandatory=$true, Position = 2)][AllowEmptyString()][String]$Arguments ) $FileName = ($File.Split("\"))[-1] $FileExt = $FileName.SubString(($FileName.Length)-3,3) # Prepare variables if ( !( $FileExt -eq "MSI") ) { $FileExt = "SETUP" } if ( $Installationtype -eq "Uninstall" ) { $Result1 = "uninstalled" $Result2 = "uninstallation" } else { $Result1 = "installed" $Result2 = "installation" } $LogFileAPP = Join-path $LogDir ( "$($Installationtype)_$($FileName.Substring(0,($FileName.Length)-4))_$($FileExt).log" ) # Logging DS_WriteLog "I" "File name: $FileName" $LogFile DS_WriteLog "I" "File full path: $File" $LogFile if ([string]::IsNullOrEmpty($Arguments)) { # check if custom arguments were defined DS_WriteLog "I" "File arguments: <no arguments defined>" $LogFile } Else { DS_WriteLog "I" "File arguments: $Arguments" $LogFile } # Install the MSI or SETUP.exe DS_WriteLog "-" "" $LogFile DS_WriteLog "I" "Start the $Result2" $LogFile if ( $FileExt -eq "MSI" ) { if ( $Installationtype -eq "Uninstall" ) { $FixedArguments = "/x ""$File"" /qn /norestart /l*v ""$LogFileAPP""" } else { $FixedArguments = "/i ""$File"" /qn /norestart /l*v ""$LogFileAPP""" } if ([string]::IsNullOrEmpty($Arguments)) { # check if custom arguments were defined $arguments = $FixedArguments DS_WriteLog "I" "Command line: Start-Process -FilePath 'msiexec.exe' -ArgumentList $arguments -Wait -PassThru" $LogFile $process = Start-Process -FilePath 'msiexec.exe' -ArgumentList $arguments -Wait -PassThru } Else { $arguments = $FixedArguments + " " + $arguments DS_WriteLog "I" "Command line: Start-Process -FilePath 'msiexec.exe' -ArgumentList $arguments -Wait -PassThru" $LogFile $process = Start-Process -FilePath 'msiexec.exe' -ArgumentList $arguments -Wait -PassThru } } Else { if ([string]::IsNullOrEmpty($Arguments)) { # check if custom arguments were defined DS_WriteLog "I" "Command line: Start-Process -FilePath ""$File"" -Wait -PassThru" $LogFile $process = Start-Process -FilePath "$File" -Wait -PassThru } Else { DS_WriteLog "I" "Command line: Start-Process -FilePath ""$File"" -ArgumentList $arguments -Wait -PassThru" $LogFile $process = Start-Process -FilePath "$File" -ArgumentList $arguments -Wait -PassThru } } # Check the result (the exit code) of the installation switch ($Process.ExitCode) { 0 { DS_WriteLog "S" "The software was $Result1 successfully (exit code: 0)" $LogFile } 3 { DS_WriteLog "S" "The software was $Result1 successfully (exit code: 3)" $LogFile } # Some Citrix products exit with 3 instead of 0 1603 { DS_WriteLog "E" "A fatal error occurred (exit code: 1603). Some applications throw this error when the software is already (correctly) installed! Please check." $LogFile } 1605 { DS_WriteLog "I" "The software is not currently installed on this machine (exit code: 1605)" $LogFile } 3010 { DS_WriteLog "W" "A reboot is required (exit code: 3010)!" $LogFile } default { [string]$ExitCode = $Process.ExitCode DS_WriteLog "E" "The $Result2 ended in an error (exit code: $ExitCode)!" $LogFile Exit 1 } } } #========================================================================== ################ # Main section # ################ # Disable File Security $env:SEE_MASK_NOZONECHECKS = 1 # Custom variables [edit] $BaseLogDir = "C:\Logs" # [edit] add the location of your log directory here $PackageName = "Citrix License Server" # [edit] enter the display name of the software (e.g. 'Arcobat Reader' or 'Microsoft Office') # Global variables $StartDir = $PSScriptRoot # the directory path of the script currently being executed if (!($Installationtype -eq "Uninstall")) { $Installationtype = "Install" } $LogDir = (Join-Path $BaseLogDir $PackageName).Replace(" ","_") $LogFileName = "$($Installationtype)_$($PackageName).log" $LogFile = Join-path $LogDir $LogFileName # Create the log directory if it does not exist if (!(Test-Path $LogDir)) { New-Item -Path $LogDir -ItemType directory | Out-Null } # Create new log file (overwrite existing one) New-Item $LogFile -ItemType "file" -force | Out-Null DS_WriteLog "I" "START SCRIPT - $Installationtype $PackageName" $LogFile DS_WriteLog "-" "" $LogFile ################################################# # 1. INSTALL CITRIX LICENSE SERVER # ################################################# DS_WriteLog "I" "1. Install the Citrix License Server" $LogFile DS_WriteLog "-" "-----------------------------------------------------" $LogFile # Define installation variables for Citrix license server $LSPORT = "27000" # LSPORT is the port number used for the License Server. Optional parameter. The default is 27000. $VDPORT = "7279" # VDPORT is the port number used for the vendor daemon. Optional parameter. The default is 7279. $MCPORT = "8082" # MCPORT is the port number used for the console. Optional parameter. The default is 8082. $WSLPORT = "8083" # WSLPORT is the port number used for the Web Services for Licensing. Optional parameter. The default is 8083. $LogFile2 = Join-Path $LogDir "Install_CitrixLicenseServer_EXE.log" # Logging DS_WriteLog "I" "Define installation variables:" $LogFile DS_WriteLog "I" "-License server port (LSPORT) = $LSPORT" $LogFile DS_WriteLog "I" "-Vendor daemon port (VDPORT) = $VDPORT" $LogFile DS_WriteLog "I" "-Management console port (MCPORT) = $MCPORT" $LogFile DS_WriteLog "I" "-Web services port (WSLPORT) = $WSLPORT" $LogFile # Note: the built-in firewall is configured automatically (https://docs.citrix.com/en-us/licensing/11-14/getting-started.html#par_richtext_8) # Install software $File = Join-Path $StartDir "Files\CitrixLicensing.exe" $Arguments = "/quiet WSLPORT=$($WSLPORT) LSPORT=$($LSPORT) VDPORT=$($VDPORT) MCPORT=$($MCPORT) /l ""$LogFile2""" DS_InstallOrUninstallSoftware -File $File -InstallationType "Install" -Arguments $Arguments DS_WriteLog "-" "" $LogFile ################################################# # 2. INSTALL CITRIX LICENSING POWERSHELL SNAPIN # ################################################# DS_WriteLog "I" "2. Install the Citrix Licensing PowerShell Snapin" $LogFile DS_WriteLog "-" "-----------------------------------------------------" $LogFile # Install software $File = Join-Path $StartDir "Files\LicensingAdmin_PowerShellSnapin_x64.msi" $Arguments = "" DS_InstallOrUninstallSoftware -File $File -InstallationType "Install" -Arguments $Arguments DS_WriteLog "-" "" $LogFile ################################################# # 3. COPY CITRIX LICENSE FILES # ################################################# DS_WriteLog "I" "3. Import Citrix license files (*.lic)" $LogFile DS_WriteLog "-" "-----------------------------------------------------" $LogFile # Stop services DS_StopService "Citrix Licensing" DS_WriteLog "-" "" $LogFile DS_StopService "CitrixWebServicesforLicensing" DS_WriteLog "-" "" $LogFile DS_StopService "CtxLSPortSvc" DS_WriteLog "-" "" $LogFile Sleep 10 $LicenseFilesSourceDir = Join-Path $StartDir "Files" # Add you license file(s), *.lic, to the subfolder "Files" in the installation directory $LicenseFilesTargetDir = Join-Path ${env:ProgramFiles(x86)} "Citrix\Licensing\MyFiles" DS_WriteLog "I" "License files source directory is: $LicenseFilesSourceDir" $LogFile DS_WriteLog "I" "License files target directory is: $LicenseFilesTargetDir" $LogFile DS_WriteLog "-" "" $LogFile DS_WriteLog "I" "Copy license file(s) ..." $LogFile if (Test-Path "$($LicenseFilesSourceDir)\*.lic" ) { try { Copy-Item "$($LicenseFilesSourceDir)\*.lic" -Destination $LicenseFilesTargetDir -Force DS_WriteLog "S" "Successfully copied all '*.lic' files from $LicenseFilesSourceDir to $LicenseFilesTargetDir" $LogFile } catch { DS_WriteLog "E" "An error occurred trying to copy '*.lic' files from $LicenseFilesSourceDir to $LicenseFilesTargetDir" $LogFile Exit 1 } } else { DS_WriteLog "I" "No '*.lic' files were found in directory $LicenseFilesSourceDir" $LogFile } DS_WriteLog "-" "" $LogFile Sleep 10 # Start services DS_StartService "CtxLSPortSvc" DS_WriteLog "-" "" $LogFile DS_StartService "CitrixWebServicesforLicensing" DS_WriteLog "-" "" $LogFile DS_StartService "Citrix Licensing" DS_WriteLog "-" "" $LogFile ################################################# # 4. CONFIGURE CITRIX LICENSE SERVER # ################################################# DS_WriteLog "I" "4. Customize the license server" $LogFile DS_WriteLog "-" "---------------------------------" $LogFile # Load the Citrix snap-ins DS_WriteLog "I" "Load the Citrix snap-ins ..." $LogFile try { asnp citrix.* DS_WriteLog "S" "The Citrix snap-ins were loaded successfully" $LogFile } catch { DS_WriteLog "E" "An error occurred trying to load the Citrix snap-ins (error: $($Error[0]))" $LogFile Exit 1 } DS_WriteLog "-" "" $LogFile # Disable CEIP (is enabled by default from version 11.14.0.1 build 19005 and newer) DS_WriteLog "I" "Disable the Customer Experience Improvement Program (CEIP) ..." $LogFile try { Set-LicCEIPOption -AdminAddress "https://localhost:8083" -CEIPOption "None" -CertHash $(Get-LicCertificate -AdminAddress "https://localhost:8083").CertHash DS_WriteLog "S" "CEIP was disabled successfully" $LogFile } catch { DS_WriteLog "E" "An error occurred trying to disable CEIP (error code: $($Error[0]))" $LogFile Exit 1 } # Enable File Security Remove-Item env:\SEE_MASK_NOZONECHECKS DS_WriteLog "-" "" $LogFile DS_WriteLog "I" "End of script" $LogFile |
Execute the script as follows:
powershell.exe -executionpolicy bypass -file C:\Temp\Citrix\LicenseServer\Install_CitrixLicenseServer.ps1
Log files are created in the directory C:\Logs\Citrix_License_Server, but you can change this to any directory you want (see lines 313 and 314).
If you want to go one step further and create an SCCM package as well, please follow the step-by-step explanation in the article Deep dive creating SCCM packages for Citrix.
You can customize the above script in any way you see fit. If you have any questions or recommendations please leave a comment below. Happy scripting!
Troubleshooting and Support
Error after opening Citrix Licensing Manager
In case you receive an error after opening the Citrix Licensing Manager (https://licenseserver.mydomain:8083/), this is most likely related to your regional settings.

Go to Control Panel \ Region. On the first tab Formats change the regional settings to English (United States). Please be aware that this setting is a (current) user setting and not a machine setting.

To solve this issue for all administrators you could configure this setting in a Group Policy Preference.
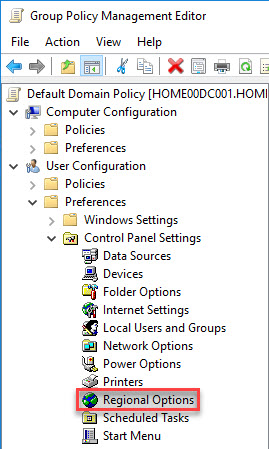
This preference item should be included in a Group Policy that is only applied to the license server. This means that the license server should be placed in its own (sub)OU.
Dennis Span works as a Lead Account Technology Strategist at Cloud Software Group in Vienna, Austria. He holds multiple Citrix certifications (CCE-V). Dennis has been a Citrix Technology Advocate (CTA) since 2017 (+ one year as Citrix Technology Professional, CTP). Besides his interest in virtualization technologies and blogging, he loves spending time with his family as well as snowboarding, playing basketball and rowing. He is fluent in Dutch, English, German and Slovak and speaks some Spanish.

Pingback: EUC Weekly Digest – March 25, 2017 – Carl Stalhood
Hi Dennis.
Many thanks for this. I tried the script today for the first time and it worked perfectly. Just a couple of points. The instructions seem to suggest that the PS snapin needs to be run manually before the install script but I subsequently found that this is not the case so perhaps that step can be removed. Also, does this handle upgrades from previous versions or is it just fresh? I suspect the latter but thought I’d ask.
Great work and thanks for sharing.
Martyn
Hi Martyn,
Thanks a lot for your feedback. I appreciate it a lot! I am sorry for confusing you. I have just updated the corresponding section in the article. I hope the description is clearer now.
And regarding your other question, yes, you are right, the script is intended for new installations. It may work for an upgrade as well, but I never tested this.
Thanks once again!
Bye,
Dennis
Hi Dennis,
This is a fantastic article and thanks for sharing.
We have a Windows 2008 R2 Standard virtual machine hosted on VMware ESX running License Server 11.9 (As we use XenDesktop 5.6).
We are in the process of moving to XenDesktop 7.6 LTSR and we require the License Server to be at 11.14.0.1 Build 20104.
Can the license server be upgraded easily without causing any necessary outages? – We have the fall back of 720 hours (30days grace period), but just interested if it can be upgraded and how it works. i.e. during the upgrade does it remove the bindings to IIS7 and replace them with some connectivity/bindings to Apache TomCat architecture.
Best Regards
Hi Mark,
First of all, thanks for your kind remarks!
The upgrade process of a Citrix license server is fairly easy; it only involves a number of steps (see also the following Citrix article: https://support.citrix.com/article/CTX133277). As you yourself mentioned already, the default grace period is 30 days, which should be more than sufficient for you to upgrade your server. The upgrade should not have any impact on your users, especially if you do it later in the day/evening. Regarding IIS bindings, which ones are you referring to? The license server does not use IIS; it uses Apache TomCat only.
One other thing; I have not tested my PowerShell-based installation routine for upgrades; only for new installations.
Bye,
Dennis
Pingback: Scripting the complete list of Citrix components with PowerShell - Dennis Span